• Please be sure to read the rules and adhere to them. Some banned members have complained that they are not spammers. But they spammed us. Some even tried to redirect our members to other forums. Duh. Be smart. Read the rules and adhere to them and we will all get along just fine. Cheers. :beer: Link to the rules: https://www.forumsforums.com/threads/forum-rules-info.2974/

Astro van cat conversion

Snowy Rivers

Well-known member
Busy day today....but productive too.....

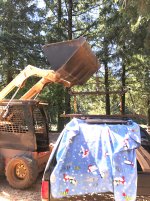
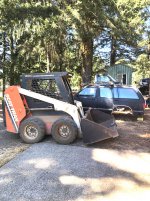
The Kids came up and grabbed the faithful little Scat Trak and loaded the Dirt bike rack on the Big Dog..

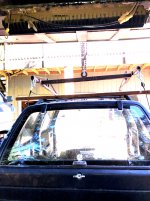
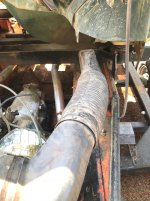
I was busy putting the finishing touches on the Body lifting rig so the Family model can be lifted into place on the cat....

The lift rig is the same unit I used to get the standard cab up into place on the cat.

Added a truss over the lengthwise tubes to handle the extra weight of the family model.

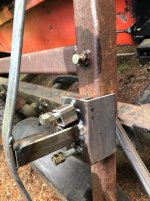
The center beam can be slid back and forth a lot to get the balance point spot on....Once in place the set screw is tightened.
The truss king pin has two threaded rods to allow the center beam to pass under the truss and then spacers are slipped under the threaded rods and the rods snugged up.....Sort of a McGyver....(Rube Goldberg) But it should work fine.....

Not real sure that the truss was totally necessary ....But I really do not want to have the lift go south just as the body is going up onto the CAT CHASSIS....That would SUCK....

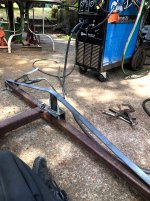
The rig is really basic and not pretty....Added materials from what was in the short stock rack and a couple pieces of 3/16 x 1 inch flat bar new materials....

Just want it simple and strong....we will need it to place the body as well as remove it for some service work in the future....

If all goes well....May go for a test lift tomorrow and get a feel for things.....
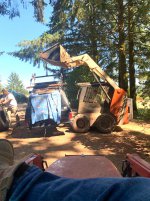
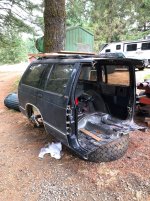
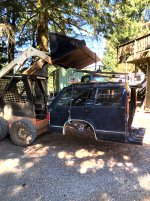
I need to carry the family model out of it's current location and turn it around.....
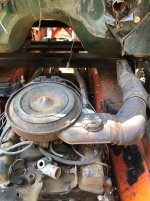
Need to remove the single cab and get it out of the way....

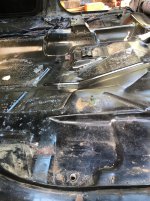
Then the family model can be placed on the cat chassis. For the time being on wood blocks until the radiator location and height can be sorted out.

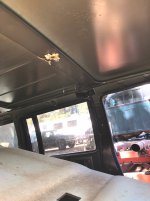
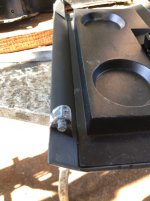
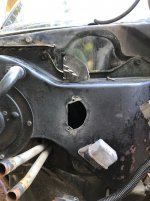
Going to modify the A pillar body mount to gain elevation and then fabricate the other mounts to fit exactly where they need to be......The A pillar mount was a bit involved with other parts....NOT GOING TO HACK IT UP....

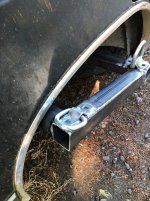
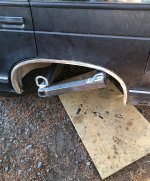
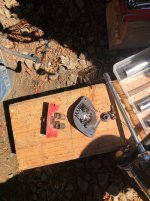
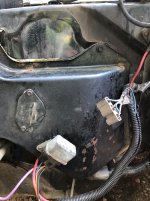
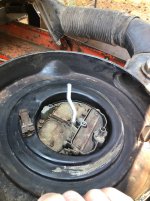
I came across some 17 gallon fuel tanks today that come with the filler neck/cap...The fuel outlet and vent fittings....
These bad boys will fit perfectly in the rear wheel house area....Will need a little bit of fabrication to add mounting brackets to the cat chassis.
The tanks come with the 0-90 ohm gauge sending unit (Standard for the GM dash gauges of this time frame)

Pretty much a plug and play...

That's about it for today....
 

Attachments

  • IMG_5364.jpg
    IMG_5364.jpg
    385 KB · Views: 68
  • IMG_5365.jpg
    IMG_5365.jpg
    322.3 KB · Views: 71
  • IMG_5358.jpg
    IMG_5358.jpg
    482.7 KB · Views: 69
  • IMG_5362.jpg
    IMG_5362.jpg
    499.9 KB · Views: 69
  • IMG_5360.jpg
    IMG_5360.jpg
    526.1 KB · Views: 71

Snowy Rivers

Well-known member
Decided to prepare the Family model to remove the seats...(WEIGHT THING FOR THE LIFT)
Grabbed the shop vac and really sucked the beast out.

Carpet is not stellar.....But I think that removing it and doing a good shampoo will give it a renewed lease on life..

No tears or any serious damage....just normal wear.....

No sense in tossing it out....After a good cleaning and letting the summer sun dry it good....It should do fine for this duty assignment....
Some nice rubber mats in each area....Good to go.....
 

Snowy Rivers

Well-known member
Back at it.
Ordered up new outer door rubber seals....31 years on the originals....They are shot
Got after getting the seats out and all the trim panels off so the new door seals can be installed when they get here next week.

Unlike all the newer rigs that have all the plastic interior trim SNAP into little holdown clips....These older rigs used phillips screws to mount all the trim pieces.....

The lower kick panels and sill plates especially can be a real PITA to get the screws out due to the fact that they penetrate the floor...

Some skunk piss helps a lot.....

Most of the interior trim is in great shape....A few screw holes have had the screws over tightened and the plastic areas damaged a bit.....Not a big deal....

Went after the rear full fold down seat.....This beast was like arguing with a pissed off Octopus.... :evil:

I finally wrapped it up with a ratchet strap and snugged it up.... Then got it out of rig.

Front seats were pretty easy.....Overall the seats are quite usable.....A bit of repair on the drivers seat cushion and a pair of Camo covers.....Good to go......

The head liner is sweet....I originally figured that it would be junk like most 30 pus YO GM rigs are with big baggy puckers hanging down.....
Good to go.

Tomorrow the plan is to get a small carpet/furniture shampoo machine and give the carpet a good DOUCHE.....
A good cleaning of the carpet will do wonders to stop the bad odors that always seem to creep in during the long wet winters

Got the front passenger area of the carpet blocked up so it can dry out.....Once it is dry (Not long in this heat) Will fix the hole the other folks hacked in the lower cowl for power cables to feed their boom box speakers....

Gonna leave the seats out until I can try a lift and see how that goes....

A few picks.....The piccys make the carpet look better than it actually is.......Rubber mats in the foot areas will definitely help a lot....
The giant azz hole in the floor left from the T case shifter has got to get a cover on it.

I am thinking that a piece of 1/8" aluminum sheet and a bit of massaging with a soft hammer around The O2 Bottle on the torch set should make a nice cover.
I can get under the rig easily to mark the holes in the cover.

This cover/opening may be a welcome thing to allow access to connect the shifter cable to the tranny.....?????? We shall see....

The center console was a real POS.....The Winters sidewinder shifter is going to occupy that spot....

The windshield took a hit from a rock at some point.....Cracked across the entire glass....
While the body is on the ground would be a great time to get a fresh glass installed....
Get that done before we do the Rattle can camo paint job....

The roof is pretty nasty....A bit of surface rust and some peeling.....The orbital sander will handle it....Shoot it with Phosphoric acid to kill the rust.....Prime and then Neon Green and flat black camo......Gonna be FUGLY :lmao:

All for now.......
 

Attachments

  • IMG_5375.jpg
    IMG_5375.jpg
    392.6 KB · Views: 65
  • IMG_5374.jpg
    IMG_5374.jpg
    429.4 KB · Views: 57
  • IMG_5373.jpg
    IMG_5373.jpg
    467.4 KB · Views: 62
  • IMG_5372.jpg
    IMG_5372.jpg
    444.3 KB · Views: 63

Snowy Rivers

Well-known member
Weather is hot now.....Pad under the carpeting is WET
No wonder....Previous owners had punched a hole through the lower edge of the cowl at the floor to run a heavy power wire inside to feed their big stereo box....No grommet and lots of room to leak water from right behind the RF tire.....Another big azz gash at the inner edge of the heater box.....Clean this up and fill the holes with silicone......They do not hurt anything....

The glove box door hinges (Little pivot bosses) were in the glove box....Some idiot likely tried to pry the glove box door off.....Broke the bosses off....

JB Weld and a little massaging.....Good as new....A used door the right color was $70....No way....
This dash is the dark blue and tough to find here.....

Yanked off the AC box and replaced it with the non AC metal unit.....The Resistors are different....Had to mod the hole in the can to get that handled....The fan motors are smalled on the NON AC box.....Not sure if the resistor set up from the AC model will work with the non AC....Both 12 volt motors.....Guys use these on V8 swaps.....WE will deal with any issues....

I need to lengthen the wire harness to reach the resistor pack.....

Just about have the front end cleaned up....A good washing and it will be ready for CAT DUTY.
The rear window/Hatch came with the 2x2 stick to hold it up....Arrrrrgh

Replaced the gas cylinders....That's done

The Rubber door seals will be here tomorrow....So they can go in and then the interior trim can go back on.

Letting the carpet and pad dry good in this heat...Then plug up the holes in the floor....

I really do not want to button this thing up WET....If it needs another week to dry....so be it.

There are two holes drilled in the firewall on the drivers side that I need to deal with too....Same sort of hash.....

Easy to use a grommet and some silicone....Nope...They just let it leak.....

I do not know if the windshield was leaking....But will replace that before rain flies......

Trying to get these little things done before the S Wagon body gets lifted onto the 2100 chassis...

The elevation will take a bit to get spot on......Gonna need to get the radiator location scoped out and the mounting done.....This will dictate where the body has to sit....

Just a few details......

I have been looking at the Exhaust pipes....Thinking seriously about running them up the rear sides and then doing Bullhorn tips 4" or 5"....I want the noise UP and away from the chassis......

Some pics
 

Attachments

  • IMG_5380.jpg
    IMG_5380.jpg
    407.6 KB · Views: 59
  • IMG_5377.jpg
    IMG_5377.jpg
    222 KB · Views: 58
  • IMG_5378.jpg
    IMG_5378.jpg
    225.4 KB · Views: 51
  • IMG_5379.jpg
    IMG_5379.jpg
    235.1 KB · Views: 56
  • IMG_5381.jpg
    IMG_5381.jpg
    379.5 KB · Views: 56
  • IMG_5382.jpg
    IMG_5382.jpg
    386.9 KB · Views: 53
  • IMG_5384.jpg
    IMG_5384.jpg
    294.5 KB · Views: 52
  • IMG_5385.jpg
    IMG_5385.jpg
    301.4 KB · Views: 60
  • IMG_5387.jpg
    IMG_5387.jpg
    349.5 KB · Views: 55
  • IMG_5388.jpg
    IMG_5388.jpg
    440.2 KB · Views: 54
  • IMG_5389.jpg
    IMG_5389.jpg
    457.8 KB · Views: 50
  • IMG_5393.jpg
    IMG_5393.jpg
    309.9 KB · Views: 54
  • IMG_5383.jpg
    IMG_5383.jpg
    297.4 KB · Views: 52

Snowy Rivers

Well-known member
AS is usual when you play mix and match with factory parts and asking things to go where few have gone before..

The heater motor on the heat only box is smaller (Body is smaller, windings are smaller and the blower wheel are smaller)
The electrical system is somewhat different too....Different resistor and different wiring.

I wanted to keep the electrical system as it was.....

The motor mounting flange is the same...just clocked differently...(About 180 degrees clockwise)
The blower wheel on the AC unit is an inch deeper and will not allow the motor to fit....

PLAN

Remove the blower wheel from the original AC blower motor......Install the blower wheel from the heat only motor (I ordered a new wheel as the one that came with the heat only box was a bit sad)
Shaft size is the same.....Good deal...

Now we still need a 1/2" spacer between the motor flange and the heater box.

How to accomplish this ?????
Machining an aluminum ring/adapter would work......but getting a piece of alloy pipe was gonna be a pain....

Simple solution popped up.

Self adhesive dense foam weather strip....3/4" wide x 1/2" thick....Apply the rubber strip (Really firm black stuff) to the flange on the motor.....Drill the holes needed through the rubber to make assembly easier.

Modified fan motor assembly now slips into the heater box and fastens in just fine...The blower wheel spins freely and is located in the inlet venturi that is part of the cowl air management/water separator system

Plug in all the wires as original.....The firewall side of the heater system is complete....(Almost....I want to repaint the heater box and seal it to the firewall with non hardening caulk )

The heat control cable in the cab is stuck......Will replace it a bit later as that is in dash work and does not involve the heater itself....I want to get the dash apart and make sure the radio/stereo wiring is not an issue...Shorted or hacked up so it will cause issues......A nice sound system in the cat would be nice....Long way off right now though...

Another little hurdle on this mountain has been dealt with......

The door rubbers came yesterday.....The carpet AND PAD are drying out nicely and will be ready to lay back down after the new rubbers are installed SOON :thumbup:
Get the interior trim back in place and then we will be getting very close to a TEST LIFT of the body.....
Once the test is complete and if this goes well....S wagon will get moved so the single cab can be removed from the cat chassis......

Then the fun begins.....I am anxious to see the S-Wagon on top of the 2100.......Should be quite a nice view from the height it will end up sitting.........Gonna need a stair case to get in me thinks.....

Likely something similar to what I had originally planned.......A "Running board" type step to be able to get up off the tracks and into cab.....

A open grate type step such as what is used on big rigs to climb up over the large fuel tanks.
Something that will not pack with snow and be an easy access...

I am still toying with the idea of a "Rear Veranda" to allow easy access to the rear hatch/gate......STEP off the track and up onto the veranda.......Time will tell....
 
  • Like
Reactions: PJL

Snowy Rivers

Well-known member
As is usual with this project.....A modification is being made...

I could not find the heavy foam I wanted to use as a spacer on the fan motor...

Decided o look at getting a water jet cut aluminum ring made.....Local outfit wanted an arm and a leg.

Water jet cutting is $$$$$$$$$$$...Mostly the setup fee for the first part....One off stuff gets spendy.....

Digging around looking for another item and ran across some HDPE.....But it was not quite big enough..

Called a local plastics outfit...$20 for a12" X 12" piece x 1/2" thick..... :clap:

Grabbed that piece...

Will lay it out and jig saw it a tad large and then grab it in the lathe and finish it up.

This will make a really nice permanent spacer/adapter for the fan motor.

Got a call a bit ago...The new fan cage is in....Just need to get into town and grab it....

I wanted Black HDPE...They only had white....such is life....

Problem solved......

This should make a very nice heater setup.....All factory...Well sort of....MORE FRANKEN PARTS....
 

Snowy Rivers

Well-known member
Well now....Does anyone hear CHANGE ORDER.

I had sent out a couple emails inquiring about getting the needed spacer ring for the fan water jet cut..

One fella called me with a quote....TO MUCH $$$$$$$$$

This morning I get a text message from the other guy....."Your aluminum ring is ready for pickup" Whaaaaaaaaaaaaaaat ?????

I asked for a quote.....

I called him back and asked about the ring..

He was apologetic for not sending a price first......But $40 is not bad and the part is nice..

Usually one off water jet cut parts can be spendy

When I had the snowflake wheel centers done...The setup for the first one was $80 and then $30 for each item after that...


This was a surprise and it is nice having an outfit close by that does this....

Part is perfect....I just need to index the ring to the motor...drill the screw holes and we are off to the rodeo.

I got the RH SIDE door seals installed and all the interior trim back on that side.

Tore the LH front door seal back off again....Propped the carpet up to dry in this toasty weather.....

Likely tomorrow the LH side new parts will go on.......Then the interior will be looking very good.....


Still need to Gooooop the hacked holes in the firewall to prevent water intrusion....
Next I want to get the pressure washer on the underside of the body and clean it well....Get the loose dirt off....
Then we are gonna be about ready for a FIRST LIFT....
 

Attachments

  • Fanspacer2.jpg
    Fanspacer2.jpg
    259.9 KB · Views: 49
  • Fanspacer1.jpg
    Fanspacer1.jpg
    291.6 KB · Views: 44
Last edited:

Snowy Rivers

Well-known member
The little Alloy ring was a real pleasure to work with...

Got the Original "Bolt pattern" (Screws) transferred to the ring ...as well as holes for the locating bumps on the heater box..

Drilled those holes through the ring and countersunk the outward face......

10-32 Flat head screws and nylock nuts to mount the ring to the heater box....

The original AC type blower has the same bolt pattern....at least for the screws, but is clocked differently

Clocked the motor so the cooling hose is lined up with the little fitting on the heater box and made a reference mark..

Took the ring back off the box and then aligned the motor and the ring so they are concentric....Marked and drilled the mounting holes.....The original screws get a great bite in the 1/2" depth of the ring.......

The assembly mounted up well and looks fine......

Will have the assembly back off later to paint the box and to add some final cosmetic touches to things......

Nothing fancy.....Just want to anchor the wiring to the firewall a bit better and I want to add a bracket someplace in the area right at the tunnel mouth to mount a Bus bar to connect the engine wiring.....Be nice to be able to unhook all the engine wires quickly in the event of needed repairs and a body removal is needed......

Far easier to work on this stuff now while I can sit on a chair in front of the area and work on it...

The LH side carpet area under the drivers feet is all dry now with two days of 90+F and a breeze blowing.....The carpet can get laid back down and the Door rubber seal and interior trim can go back in....

Weather folks keep taking about a bit of rain coming up....I want to patch the ugly holes the other folks cut in the firewall before this area gets wet and allows water into the cabin.....

Great fun....Well..sort of....
We are getting very very close to having a Cat Cab that is ready to go to work....

Some interior things will need to wait until the body is mounted to be really sure of the location......Big one is the transmission shifter.

Was too bad that the factory shifter will not work.....Exhaust head pipe is just in the wrong place and with the confines of the chassis tub......No way to move things....

I want the shifter located so it is comfortable and handy to operate easily and quickly......Gonna take some time in the front seat mocking things up (And making SNOW CAT NOISES) :lmao:

One other thing that needs attention ASAP is the original steering wheel hub assembly......This SOB has sheet metal flanges that are sharp and have managed to draw blood a few times already....

The Steering valve assembly I did prior (Currently mounted in the single cab) needs to be mounted on the tilt column head.


The steering controls will make getting access to the ignition key really tough......I had built in a place for a remote mounted ignition switch into the drivers steering controls....Piccy

The CURRENT key lock cylinder is messed up anyway......Very easy to unplug the two gang plugs on the sliding column switch and plug in the various wires needed to extend the wiring out to the new location and install a good Heavy duty switch....
The locking steering column is of no use anyway.....So having the key located in such a NASTY place is a waste of time.....

The air valves are proportional .....Set the main line pressure to the valves at 65 psi (Max pressure to the air chambers running the master cylinders that control the OC12 steering cylinders)

Bringing the valve handles all the way to the soft round pad will be the normal steering position.....All or none....But lower pressure applications can be used with both handles for braking..

A note

Rear outboard disc brake assemblies are partially completed and on the shelf......

Will mount the brake assemblies on an adapter bolted to the track drive sprockets......Having the original brake master cylinder and pedal assembly available will be a nice safety feature.

The Dual master cylinder from the S Wagon can easily be used as a single cylinder application by bench bleeding the forward section (Rear wheels) to remove all air and then plugging the outlet port......The rear portion of the cylinder (Disc brake side) will then function to control the disc brakes mounted on the track drive.....

Pretty simple solution to get Hydraulic braking that is independent of the rear differential......

Even in the event of an engine stoppage....The brakes will still work....

And the saga continues....
 

Attachments

  • Blower adapter complete2.jpg
    Blower adapter complete2.jpg
    358 KB · Views: 61
  • Driver controls1.JPG
    Driver controls1.JPG
    720.6 KB · Views: 57
  • Driver controls2.JPG
    Driver controls2.JPG
    484.2 KB · Views: 55
  • Blower adapter complete1.jpg
    Blower adapter complete1.jpg
    306.1 KB · Views: 55

Snowy Rivers

Well-known member
The little things that crop up on any older Resto mod can be challenging ....especially when it comes to parts replacement.....

The beauty of the popular GM S series....These are still highly sought after by many folks.....Probably not to use as a snow cat cab.....but none the less as a driver.

A current little challenge.....Yesterday while getting the LH side door seals back on and the plastic trim and sill plates back in......I notice that the door jam switch (Dome lights) looked really nasty and did not move.....Rusty and just used up.

A quick phone call to the local Autozone store and we will have new switches today.....

These little beasts can be a real pain to remove if not attacked properly...

Grab the center plunger that contacts the door with a small needle nose vise grip (LIGHTLY) to keep it from turning .....Then loosen the hex portion that threads into the door jam.......Not holding the center part of the switch will result in the wires being twisted into a knot and torn up.

These switches have two prongs for the slide on connectors......This is a ground circuit and interconnects with all the dome lights to allow lighting any time any door is opened.....THE LAMPS are live all the time and the switch simply provides the ground source.

Being able to get the replacement parts is a real blessing.....

So many parts on the older snow cats are simply non existent and when they fail.....McGyver has to take over to get function back....

The stuff like the door seals was an easy item to source.....I picked up one pack of two seals off ebay and the second set from JEGS online store.

JEGS is one of those great outfits that will send your parts....PLUS cool stickers to pimp their store and plenty of advertising and catalogs to cruise through.....WELL.....The parts are good.....I am not into the sticker thing ya know...

Looking through the original 2100 factory parts/service manual......Very little if anything other than standard parts like Bolts/nuts, bearings and seals are available at this late date.

Everything else is a SEARCH OUT something that will work.....

When starting this Restomod I have kept complete track of all the components going into the build.
Documenting the what, where, when and why..

The chassis parts including wheel bearings....The engine, complete from the ground up, what it is and what parts were used.... The tranny....Tires and wheels....The body.....

Any time a part may be needed in the future.....Just check the book and see what we did originally......
Being able to get a new heater core if we need one....An easy trip to the fav Parts house.....Bingo....good to go.

Things like the Bastard wheels....All documented, supply sourced and the special tools to build more all available.....

The front suspension system ....Another Bastard assembly....Uses standard accessory air bags....The urethane bushings are readily available from one of several suppliers......The upper and lower bump stops.....JEEP WRANGLER PART.
The spindles and the arms are original parts taken off the old axle....

The OC12.....All new bearings and seals (Standard off the shelf items) The thrust washers....Used parts from a GM TH 400 and from the Ford A4LD to replace the failure prone items used originally....

Yeah......It is a Frankencat....But we can replace any part and know what was done during the Restomod....

Having standard power train parts makes life sweet.....
A 400 Small block Chevy with a TH 350 gear box
Heads are 1998 Vortec 350 stuff
All the front end stuff on the engine (Serp drive off the Vortec 350) Alternator, starter and other nick nacks are all Vortec stuff.

The rear outboard disc brakes.....Mid 1990's Front disc brakes off an S10 Blazer.....Using modified after market caliper brackets, Stock rotors and stock calipers.....All readily available stuff from the parts house.

The tracks.
Stock 43" steel "J"grousers (2) 12" wide belts per side to allow the tracks to be narrowed up to 43" OAW
The Track hinges.....Stock type heavy steel (Not sure who made these....Hans hall type)

Tranny
Standard short shaft TH350....

Drive shaft

Two piece shaft from early 1990's S10 Extreme
This shaft has a single Cardan joint at the tranny output and the connects via a slip joint to the main shaft.
The main shaft is a "Double Double" (Two double cardan joints) with the female slip yoke connecting to the short shaft and a flat flange on the rear double cardan joint that connects to the OC12

The Input at the OC12 is a modified flat flange type that came (NOS) FROM A 1953 GMC M211 6X6 Military truck
This flange had the same spline size and count as the pinion shaft on the OC12......An adapter flange was made to get the S10 flange to play nice with the Military part.

These truck saw service from Korea up through Vietnam and later....Many of these rigs are still used as Brush Rigs on small fire Dept's and many were sold off and found there way into the private sector....

They had an extreme reduction box attached to the 4 speed hydromatic trans...

Again....good solid parts that are available....

The Double Double shaft with the two CV type joints allows quite a bit of error in shaft angle and therefore will keep the "Bad Vibes" in check

The only thing about these joints is THEY MUST BE GREASED OFTEN (Oil change time is a good rule) Not greasing them regularly allows the centering ball and seat to wear out quickly and then the assembly will drive you crazy with bad vibes....

GM dropped the Double Double due to Cost and the maintenance issues....People will not take care of things...A single cardan joint will last a fairly long time with the factory sealed joints.

I chose the Double Double for one reason.....TO MAKE INSTALLING THE BEAST EASY AND NOT HAVING TO WORRY A LOT ABOUT SHAFT ANGLES......Any reasonable angle on each of the two shafts and life will be good....

Again...Stock parts...readily available.....Standard U joints and centering ball kits......

The one thing that is different about this setup.....The drive shaft does NOT articulate during operation as it did in the original application......As long as the joints have a bit of angle to them.....They will play nice...

Just a chronology of parts and why they were chosen......

Did I make any mistakes that have been redesigned and or changed...HELL YEAH....That is all part of any design work....
Better to do it before the thing is finished......And the Saga continues
 

Snowy Rivers

Well-known member
Nothing fantastic going on today....Cleaning up the cat and getting ready to start the body swap job.

All the parts off the S-Wagon have been piled on and around the cat...BIG MESS Ya know.

Picked up 4 self retracting ratchet straps for the lift .....These are nice.....No extra tail hanging down and getting tangled up on stuff.

Four 6 foot 500 lb rated (1500 lb yield) straps that will pull out easily and then tighten up as needed......

Still a tiny bit of work to be totally ready to go for the test lift.....But getting closer....

If the lift goes well I will take the S-Wagon to the other side of the area and sit it back on it's tire.....Then the single cab can come off.....


Looking at the exhaust system that I had left heading out the back of the cat......With the "Family model" things are such that a nice 90 degree pipe welded to the existing rear pipes can be run out each side and then connected to a tall 4" stack with the Bullhorn tips up top.....I want the exhaust and noise up and away from the cat.....I do not want fumes getting into the cab and really want the bark and rumble from that 400 inch engine away from the creature comforts...

Granted....I want to hear the Mouse that roars.....just not to the point that it is annoying...

The piccy shows the 4" pipe slipped over the 2-1/2" pipe.....Adapter rings pilot the 4"
These are not welded yet.....Easy job to remove these and change the routing to any overhead position....

A bracket that bolts to the outer portion of the tub rail and extends up the side of the body (An inch or two away from the body) will work sweet to mount the 4" stacks on rubber type hangers.......


The rear urethane mounts can come around to the sides and hold the outer ends of the short rear 2-1/2" pipes.

The system has the ball and socket type connections to allow ease of assembly/disassembly.

So far the switch to the FAMILY MODEL is not going to entail a lot of work...

Actually there are many benefits.....not including the passenger room.....
 

Attachments

  • Tailpipe6.jpg
    Tailpipe6.jpg
    275.7 KB · Views: 48
  • TAILPIPE1.jpg
    TAILPIPE1.jpg
    366.3 KB · Views: 50

Snowy Rivers

Well-known member
Still getting ready for lifting the S-WAGON.
The subject of "Compatibility" of the S10 Body to work with the snow cat came up a while back......This morning I was able to confirm that indeed....THIS PLAN WILL WORK..

Definitely CAT SEATS :lmao:

Li'll Oscar was enjoying sleeping on the bucket seat..

We almost got slammed with a T storm last night....But it skirted around us.....I do not want these seats getting all soaking wet.
Gonna clean off the cat hair, fir needles and crap that has piled up on them over the last few days and get things in the back of the Suburban for safe storage.
 

Attachments

  • IMG_5417.jpg
    IMG_5417.jpg
    426.7 KB · Views: 49
  • IMG_5416.jpg
    IMG_5416.jpg
    301.1 KB · Views: 46
  • IMG_5415.jpg
    IMG_5415.jpg
    399.5 KB · Views: 48

Snowy Rivers

Well-known member
Trying to get some assistance to handle the lift on the S-Wagon.....
Decided to get after some loose ends.

The air filter assembly that came on the S-Wagon with the TBI looked interesting.....Decided to see if it would fit the Quadrajet...

IT DOES :thumbup: The only issue was we needed a center stud with a 3/8" offset to work....The cutout on the inside of the lower portion fits the QJ perfectly.

I flipped the flex hose over so it faces rearward...

The flex hose has a nice flange on it that can connect to a "HOT AIR BOX"

Using the VORTEC heads on the 406 SBC will be sweet.....ACCEPT ....The Vortec does not have manifold heat like the old carburetor manifolds did.....Cold air will cause the QJ to ice up.....

Adding a fair sized air box (Fasten it to the front cab mount beam) and run a "Stove" from the head pipe to supply hot air.

A vacuum operated flap to open the flow of hot air to the air box to supply carb heat......

In conditions with cold and moist air... the Vortec with a 4 barrel needs warm air or it is gonna run like Chit....

The filter fits great.

Decided to bolt up the inner front fender to check fit on the air supply tube.....Some mods to the inner fender will get things happy...

Also the very front of the inner fender bolts to the core support and after looking this over....Looks like the elevation of the cab will be fine as is.....

The radiator will be below the area that the tilt front end needs to mount to.....Sweeeeeeeeeeeet

This will make mounting "The family model" very easy....I had thought there was going to be issues.....

Looking at the front of the "Mock up engine" (305) and checking out things as far as the fan, shroud, clutch fan and such...
Things look good.
The S-Wagon has a 5 blade clutch fan....SERP DRIVE (Reverse rotation) water pump....

The water pump is also early enough that it uses the built in bypass hole that goes into the block (The 400 block is the same)
Vortecs bypass the coolant via an external hose during warm up....This issue must be addressed when swapping Vortec heads onto a Gen 1 SBC Drilling the RH head for the bypass hole....Done deal.

Using a new water pump like the one that came on the 1991 S10 V6 (Same pump was used on the 1991 350 V8)

So cooling will be a none issue.....

This thing is going to be real MUT......Mix and match....

There are a few different aluminum Vortec style intake manifolds that accept the spread bore Q JET...

With the S-Wagon still sitting on the ground.....Was a good time to get some of these things worked out.....

I am happy that we are not going to have to lift the cab any higher......

A few pix
 

Attachments

  • IMG_5426.jpg
    IMG_5426.jpg
    375.5 KB · Views: 50
  • IMG_5425.jpg
    IMG_5425.jpg
    302.6 KB · Views: 50
  • IMG_5424.jpg
    IMG_5424.jpg
    374.5 KB · Views: 47
  • IMG_5422.jpg
    IMG_5422.jpg
    402.8 KB · Views: 50
  • IMG_5421.jpg
    IMG_5421.jpg
    436.8 KB · Views: 47
Last edited:
  • Like
Reactions: PJL

Snowy Rivers

Well-known member
Looking over the air cleaner and mulling over the idea of an air box......

Decided to see what is available from small aircraft......OMG.....$$$$$$$$$$$$$$$$$$$$$$$$$$$$$$$$$$$$$$$$$$$$$$$$$$$$$$$$$$$$$$$$$$$$$$$$$$$$$$$$$$....

Sat this morning and designed a custom box to do the job.

Will see about getting some sheet metal sheared and the box can be fabricated easily.....
4" inlet and outlet
A flap on the inside to select cold or heated air.

Has to be large enough holes to allow the full air flow of the 4 barrel carb......

Just a great time to figure this out......
 

Snowy Rivers

Well-known member
Waiting for the kids to get here and lend a hand for the lift.

I got the Skid steer and did a trial rig on the lifting bar

Looks good.....Just need a second body to keep the S-Wagon from swaying around and hitting the Scat AND DENTING THE BODY.....(n) While it gets moved to behind the cat for the next few days......

I will get pics during the lift and post later.......(With any luck)
 

Attachments

  • IMG_5432.jpg
    IMG_5432.jpg
    456.7 KB · Views: 48
  • 68219395186__6435BDA5-4760-47FC-821D-CD21416CD835.jpg
    68219395186__6435BDA5-4760-47FC-821D-CD21416CD835.jpg
    505.9 KB · Views: 51
  • IMG_5429.jpg
    IMG_5429.jpg
    545.8 KB · Views: 46
  • IMG_5434.JPG
    IMG_5434.JPG
    479.6 KB · Views: 51
  • IMG_5435.jpg
    IMG_5435.jpg
    645.4 KB · Views: 50
  • IMG_5437.jpg
    IMG_5437.jpg
    579 KB · Views: 53

Snowy Rivers

Well-known member
Well now....
Yesterday afternoon was interesting to say the least.
Son in law and I rigged the S_Wagon up and went for a lift.....
We had to change the pick point and get the center of the lift back a bit before we could get the beast to leave the dirt...
Still a tad off center even with the rig in the air.

We did not have the extended lifting device on the Scat during this pick.....(Metal frame that give 2 feet more out in front of the Skid steer)

The lift went fairly smooth....WITH ONE CAVEAT......Damned S-Wagon is too heavy for the Scat to lift even without the extra extension........The picture shows the rear tires almost off the ground.....
During the move (We did two lifts...one to set the rig out away from the cat and then a second to re-rig to get the Scat Trak lifting from the passenger side) During both lifts the rear tires were bouncing on and off the dirt.....BAD JU JU....

In order to get the Body on the cat we need the extension and be able to lift to the maximum and get in over the frame of the cat......

This brings things to a turning point.....Safety is paramount......Doing Hinky Chit is common place.....But lifting this much over capacity of the machine is not going to happen on my watch......Not going to hang folks on the back to help balance it......

I slept on the events of yesterday...........Jury is still out......

At this time I can't justify extra equipment to pick the S-Wagon as it is.....The body will be on and off several times during the remainder of the build.......
We have to use the equipment we own.......

Options
Use the single cab and the pickup bed.....(Not my first choice)
Cut the S-Wagon off at the front edge of the B pillar and close off the open cabin then mount the rear section as a separate item on the 2100 frame...( This option was thrashed about yesterday a bit and would have certain advantage....

So far the mods made to the S-Wagon (Heater box) will go right on the single cab.......
Other than this I have not put any serious $$$ in the Wagon
Try and source a second single cab (Not seriously looking at this one)

A plus.
We have the front fenders...inner and outer plus the hood from the S-Wagon....These will all fit the single cab
The pickup box is in good shape....

I really wanted the extra passenger area....

Time to look things over....Measure and see what can be done...

A custom "Start from scratch cab" is too costly with steel prices where they are.....

I knew from the gitgo that the 4 door rig was going to be heavier.....But had not figured this much too heavy.....

Anyway.....This project has taken odd twists and turns along it's journey....So this little bump in the road is yet another hurdle to be jumped.......
 

Attachments

  • IMG_5581.jpeg
    IMG_5581.jpeg
    467.5 KB · Views: 45

m1west

Well-known member
GOLD Site Supporter
Well now....
Yesterday afternoon was interesting to say the least.
Son in law and I rigged the S_Wagon up and went for a lift.....
We had to change the pick point and get the center of the lift back a bit before we could get the beast to leave the dirt...
Still a tad off center even with the rig in the air.

We did not have the extended lifting device on the Scat during this pick.....(Metal frame that give 2 feet more out in front of the Skid steer)

The lift went fairly smooth....WITH ONE CAVEAT......Damned S-Wagon is too heavy for the Scat to lift even without the extra extension........The picture shows the rear tires almost off the ground.....
During the move (We did two lifts...one to set the rig out away from the cat and then a second to re-rig to get the Scat Trak lifting from the passenger side) During both lifts the rear tires were bouncing on and off the dirt.....BAD JU JU....

In order to get the Body on the cat we need the extension and be able to lift to the maximum and get in over the frame of the cat......

This brings things to a turning point.....Safety is paramount......Doing Hinky Chit is common place.....But lifting this much over capacity of the machine is not going to happen on my watch......Not going to hang folks on the back to help balance it......

I slept on the events of yesterday...........Jury is still out......

At this time I can't justify extra equipment to pick the S-Wagon as it is.....The body will be on and off several times during the remainder of the build.......
We have to use the equipment we own.......

Options
Use the single cab and the pickup bed.....(Not my first choice)
Cut the S-Wagon off at the front edge of the B pillar and close off the open cabin then mount the rear section as a separate item on the 2100 frame...( This option was thrashed about yesterday a bit and would have certain advantage....

So far the mods made to the S-Wagon (Heater box) will go right on the single cab.......
Other than this I have not put any serious $$$ in the Wagon
Try and source a second single cab (Not seriously looking at this one)

A plus.
We have the front fenders...inner and outer plus the hood from the S-Wagon....These will all fit the single cab
The pickup box is in good shape....

I really wanted the extra passenger area....

Time to look things over....Measure and see what can be done...

A custom "Start from scratch cab" is too costly with steel prices where they are.....

I knew from the gitgo that the 4 door rig was going to be heavier.....But had not figured this much too heavy.....

Anyway.....This project has taken odd twists and turns along it's journey....So this little bump in the road is yet another hurdle to be jumped.......
Is there anything close like a tree or two you can span with something to lift it, then push the cat under it and let it down.
 

Snowy Rivers

Well-known member
That would be sweet....and I would do it in a heart beat.....

Sadly all the trees are big and tall and no limbs of any usable size.

Sadly the backyard crane company is dead in the water.....

This setup will need to be on and off a few times during the build to allow things to be fitted correctly.

I went out this morning....took a deep breath...crawled into the S-Wagon and took a good look at things......

Ah hell....Grabbed the tools and started gutting the beast....Tossing all the screws and such in small containers.....

All the inner trim is off in a pile.
Headliner is laying on the floor ready to head up to the spare bedroom for safe keeping until this debacle is sorted out.

Just before I quite for dinner THE DATA IS IN....The choice has been made....GONNA CUT THIS CRITTER IN HALF JUST AHEAD OF THE B PILLAR......

Got a couple pics.....The roof has a great stiffener across the top at the B pillar.....The pillars are stout and there is lots of places to anchor square tube and build a bulkhead......
I have some stuff that I am committed to tomorrow....but the next Cat day is gonna be getting the parts all boxed up and things secured so they don't get lost during the changes.
Then cometh the SAWZZALL...... :thumbup:

Gonna layout the roof to get a nice straight line across the top just ahead of the upper stiffener......The exact location will come at the last minute after all the parts are out of the rig and I can eyeball it carefully.....

I am really hoping that this cab section can be mounted higher than the forward single cab ....Giving the folks in the back a nice view out over the cab.....

Will need to see what is available in the way of flat windshield glass that can be set into the new bulkhead with the grommet type mounting.....

I would love to be able to have wipers on that glass.....

The amount of weight that will go away with the entire front coming off should be at least half.....

We will end up with the same seating arrangement as the S10 Blazer and with the two cabs be able to handle each one separately......

The trick will be to get the front of the Blazer cabin to look decent ....There are a lot of compound shapes in that area....

But I fabricated mill machinery for a lot of years.....A torch, welder and a big hammer.....IT WILL ALL FIT.....

I am still thinking of using 3/4 plywood over steel tubing for the bulkhead......We shall see.....

I have never cut a rig in half before......Sort of like what they do when the stretch a big cadd'y and make a limo....WELL......sort of....

The Single cab on the cat has a sliding rear window....May be able to do something so the rear passengers can talk to those up front.......Things are in flux....but I like what I see so far.....I am much more upbeat than I was last night.....Yesterday was a real downer.......
More when I have it.......

Ahhhh
The front cab has crank windows....The electric rears may get changed......I have never had a crank window fail to go up when needed

These can be swapped easily.......

All in good time.....May just wire power to the rear door windows.....
 

Attachments

  • IMG_5441.jpg
    IMG_5441.jpg
    255.7 KB · Views: 43
  • IMG_5439.jpg
    IMG_5439.jpg
    237.2 KB · Views: 44

Snowy Rivers

Well-known member
GETTING SOME IDEAS TOGETHER.....For creating the panel to close the front of the S-Wagons back half.

Some years ago I grabbed a couple of sheets of HDO plywood panels...These are a polymer/resin coated plywood used in making concrete forms.....

This stuff is tougher than hell....Paintable too......
Much more durable than regular plywood....

With a bit of creative fabrication the front panel can be made from HDO and attached to the body......


DEPENDING on IF we can mount the rear cabin above the front cab and allow a view.....A pair of flat windshields set into the front panel might be sweet.....

A lot of maybe's here at this juncture.....But certainly worth keeping in mind and getting the pertinent information gathered up to allow the frame for the area to be built accordingly.....

I think that before we get crazy on things we need to see just how high our rig can lift the rear cabin......
Once that is a Known quantity......Then we can get a clearer picture of where any proposed windows can go...
 

m1west

Well-known member
GOLD Site Supporter
You could put a choker higher up around 2 trees that are 10 feet or so apart with a ladder. then use 2 chain falls or comealongs lift it and push the cat under. If you cut it in half, I don't think you will like the outcome. There are a lot of backyard ways to rig it rather than cutting it.
 

Snowy Rivers

Well-known member
Unfortunately trees are just not available where we can rig anything and be able to move the cat to.

The property here is not that flat...Only by the house and yard area....Get to the trees and the ground is seriously slanted.....

The cut and fabricate thing is really not that big of a hurdle....

Half my life spent in the fabrication BIZZ has some ingredients available to me that really helps my view point......

Getting the cab/s to a point that each end can be handled separately and with one person and the equipment we have is whats needed.

I do not want to end up with something that requires a crew and a lot of rigging to deal with it..
As mentioned....The cab/s will be on and off several times during the process of fitting out....

If I need into the beast I want to be able to unplug a few wires, remove a limited number of bolts and grab things with the Skid steer and lift it off and sit it on a big tire out of my way.......
Took me two weeks to get help just to do the test lift the other day......Gotta be a one person show on this deal......

Granted.....A crane, scaffolding, or improvised of such would be nice....In a shop with an overhead lift...even better.
Sadly the Scat Trak is our go to rig to lift stuff........

Yeah....this is not what I had hoped for...simply because of the extra work....But there are some nice perks that present themselves with a modular cab.........
 

Snowy Rivers

Well-known member
Spent time carefully scoping out the process of cutting the S Wagon in half.

NOT ONLY is this feasible.....Pretty much a walk in the park.....

The front door latch pins holes can be reinforced and a single bolt D ring added to be a permanent lift point....Both sides.
The rear lift points are also going to be permanent.......

Exactly where ....not sure yet....May have something to do with the rear cab mounts ?????

Needs to be a simple set up that will not interfere with mounting and or removing the cabin...and be permanent...

When I need to lift....I do not want to have to go looking for them.....

Single bolt D ring....May end up using the tube that we used on the recent lift.....No need to waste it....We will see....

The inner bucket seat bolt brackets are spot welded to the floor....These can come out easy by drilling out the welds and then adding these to the single cab that is on the cat now....

Just good use of materials....

Next work is to get the body level both ways so the floor can be laid out for cutting.......


Things will move quick once the cuts are made......

I am pretty sure that the outer edge of the cabin where the new front goes in can be massaged to look very nice....Function and weather tight are the first priority though.......Function and durability yeah
 

Attachments

  • IMG_5461.jpg
    IMG_5461.jpg
    371.1 KB · Views: 45
  • IMG_5453.jpg
    IMG_5453.jpg
    358.8 KB · Views: 44
  • IMG_5457.jpg
    IMG_5457.jpg
    529.2 KB · Views: 46
  • IMG_5459.jpg
    IMG_5459.jpg
    437.3 KB · Views: 48
  • IMG_5446.jpg
    IMG_5446.jpg
    300 KB · Views: 40

Snowy Rivers

Well-known member
A great working day this morning....Cool and cloudy...

Time to make things happen.....
Got the Cabin all marked for the rough cuts......Went at it like we were killing snakes....

Took about 30 minutes to get "Separation"

Dragged the forward section off and out of my way....I need to get the heater box off of it and get it on the Original cab.

I cut LONG on the rear section to give materials to be able to trim up exactly where it needs to be.......

The rear doors fit sweet....The rear structure is very sound.
Doing a bit opf snooping to see if a damaged single cab with a good rear panel can be scared up
Use the rear cab panel with the window as the forward bulkhead.

Just have to see what shakes out.....

Several options


I cut the carpet long so it will go back into the rear seat area and fit in well....

Tomorrow I want to finish up the lifting rig and get things ready to lift the "1/2-10" Or should be call it the "Half S..."

Overall I am very pleased with how this part went and once the rig is closer to the slab and tools we can get it leveled up and get going on it.

I would like to get this thing closed up before summer is over and the rains hit.......

A good look at the roof after the head liner was removed got me a great look at the Rivnuts that hold the roof rack on....

The rack is a bit nasty.....Very seriously thinking about removing it totally.

I need to use the orbital sander on the roof and treat the rusty spots.....Thinking about doing a "ROLL ON BEDLINER" UP TOP
With the rack out of the way....It will be much easier to work on the area...

This will make a good rugged surface.....
All for now
 

Attachments

  • IMG_5475.jpg
    IMG_5475.jpg
    475.8 KB · Views: 53
  • IMG_5474.jpg
    IMG_5474.jpg
    534.2 KB · Views: 51
  • IMG_5472.jpg
    IMG_5472.jpg
    465.1 KB · Views: 49

Snowy Rivers

Well-known member
Well....Here it is....The BIG CUT + 24hrs.....

I am still pleased with the decision to make the cab "Modular"

Yesterday got a bit sideways around here later in the day so not much more got done on the project.......

After SLEEPING on the design parameters for the front bulkhead ...The sides and the floor area are going to be very easy to do....The area right at the roof line is a bit of a grey area as yet.....but a couple ideas have surfaced.

I want the bulkhead (If we go with either plywood or HDO ) to be removable easily IF it should need to be replaced.....

Getting a good weather tight seal being the goal.....The sides and the riser along the floor are a simple seal strip ......The top is likely going to take a deep flange drip rail and a foam seal at the top at the roof line.

The B pillar has a PAD of some sorts between the arch at the top and the roof sheet metal.....
A formed Aluminum angle POP RIVETED to the sheet metal roof that sticks down over the front bulkhead with a foam seal in there should be enough to keep things weather tight......

I think this thing will evolve as it goes along and come together nicely....

FrankenParts are always an interesting challenge....When trying to make these odd ducks work....

The plan now is to finish up the lift rigging and get this bad boy such that it can be lifted on an even keel without issue.

Yesterday ..The last little parts I ordered for lifting DID NOT all show up....Still have two links coming....Today I HOPE

A bit of welding on the rear lift bracket is today's little ditty.....
I need to clean out all the remaining plastic trim parts and the many little containers of screws and such.....These parts will not be going back in this season....
We got a bit of a squirt of light rain last night....Just enough to dampen the ground.....So I need to get these areas picked up and secure.......

The chunk of carpet that came out behind the front seats back to where the cargo area piece starts is dirty as sin....Get that bad boy out on the slab and power wash it......

Cutting the carpet pad is just nasty.....That stuff tears and rips....ARRRRRRGH !!!!!!

Before winter shut down a good washout of the interior is in order....After removing all the interior trim panels IT IS DUSTY FILTHY IN THERE......

Maybe a batch of Mr Clean and a rag to make things better and remove the stuff that makes the bad smells ......

I will get more pics and whatever as it happens..

All for now
 

Snowy Rivers

Well-known member
Lift rigging complete now....All the final tid bits to be able to SECURELY hook up the cabin to the skid steer is here....
These lift point should give us the ability to lift things evenly......

Next plan is to move the Rear half back up along side the Cat and then get to work on constructing the front bulkhead......

With a bit of luck the "Rear cab" just might get finished by the time rain flies.......
This entire change in plans was certainly not anything that I wanted to see....But Chit happens....

With the rear side windows being electric and also electric door locks too......Looking over the wiring diagrams last night
(Wire harness cut ahead of the body cut to give us something to work with..

Going to wire the windows and door locks such the the windows can be operated from the rear.....Door locks will be lock/unlock capable from the front cab.......Doors lock from the rear manually only (That was factory)

Really nice to have factory wiring manual.....
 

Attachments

  • IMG_5480.jpg
    IMG_5480.jpg
    541.6 KB · Views: 43
  • IMG_5479.jpg
    IMG_5479.jpg
    378.4 KB · Views: 43
  • IMG_5478.jpg
    IMG_5478.jpg
    1.1 MB · Views: 44

Snowy Rivers

Well-known member
A great morning is has been.

Grabbed the Scat Trak and hooked up the Spreader bar lift rig.

Hooked up the S-Wagon and did a quick test pick.....Needed to adjust the slider adjustment Waaaaaaaaaaaay back to the rear...
Took 3-4 fine adjustments to get it level.....Sweeeeeeeeeeeeet.

I did a low level lift and romped the scat a bit to see how well it was going to handle the load.... :thumbup:

Raised the bucket all the way to the stops and .....Definitely OK

The rig swiveled around with the tail gate facing the Scat.....Then it became clear.....We will likely not need to worry about using the extension to set the cabin on the cat.....

The rear section can go on over the back end of the cat with ease.....

Some piccy's of the lifts.....

Sorting out the wiring more.....Ordered up a nice plastic enclosure to place the switches to run the rear electric windows and the electric door locks.

Scarfed the switches out of the front part of the cab......Switches are all usable.....
The plan is to wire things up so the front cab plugs into the rear section using a 9 pin heavy trailer plug and probably a 6 or 7 pin plug

Rear lights on the cab...Stop, turn, tail and backup.
The Window controls and door locks.

The cabin is pretty well leveled up now and readily accessible with the welder and other tools.....

Next comes the layout and framing of the front bulkhead......

Will be figuring out the materials needed to get the framing done .....

The cabin top and floor need to get a FINAL CUT....Once things get closer.....

At any rate ...... There will need to be an extension piece added to the rear of the cat chassis to allow a place for the rear cab mounts to fasten......
Another little item to think about.....A rear heater.....Probably see what is available as an add on unit.....


Overall...A great day with good progress......

Still not sure about raising the cab high enough for rear passengers to see over the front cab....I had the cabin as high as I could go......That was looking pretty sketchy......I think the the rear cabin needs to be just high enough that the rear mounts on the front cab can be accessed......NO MORE. about a foot....give or take....
 

Attachments

  • IMG_5491.jpg
    IMG_5491.jpg
    498.3 KB · Views: 54
  • IMG_5489.jpg
    IMG_5489.jpg
    746.4 KB · Views: 53
  • IMG_5487.jpg
    IMG_5487.jpg
    484 KB · Views: 55
  • IMG_5484.jpg
    IMG_5484.jpg
    617.3 KB · Views: 50
  • IMG_5483.jpg
    IMG_5483.jpg
    495.1 KB · Views: 52
  • IMG_5482.jpg
    IMG_5482.jpg
    689.8 KB · Views: 51

Snowy Rivers

Well-known member
Not a great deal going on...
Doing a lot of disassembly on the remaining front section of the S- wagon.
Getting the switches for the electric windows, the door locks and the attendant wiring and relays.

All this stuff will be needed to connect the windows and door locks on the rear cabin......

Grabbed a break and dragged out the carpet from the rear seat area and laid it out on the patio and soaked it up well ....added some good soap and scrubbed the hell out of it.....Flushed out a ton of nasty dirt...

Hung that bad boy out to drip dry in the sun.....All put away now...Actually looks pretty good......

Back to the Remains of the front half....Yarded out the tilt column (That should sell quick)

Figured I might as well strip all the goodies off the old carcass before it goes to the bone heap...

Also got all the wiring, relay and switches to run the electric mirrors.....
These items will be a real plus with a set of big AZZ tow type mirrors ..
The stock mirrors on the front cab are a joke......

I want to be able to see the tracks all the way back and a good deal to the sides....

Still need to remove the front inner seat brackets from the floor (Spot welded in) The two inner rear ones came out easy.....
These will make getting the bucket seats in the front cab a breeze....

So.....The rear cabin area will get the original carpet back in place and some rubber mats over it to help manage slush and stuff.
The front cab is going to get a full rubber mat....The carpet is trashed anyway.....

Keep ya updated as things go along
 
  • Like
Reactions: PJL

Snowy Rivers

Well-known member
Pretty mundane stuff at the moment.....
With the final goodies stripped off of the S-Wagon front section it was time to police up the area and turn the attention to the after section and HOW THE !@#$ ARE WE GONNA BUILD THE FRONT BULKHEAD

Spent a couple hours with a tape measure, a pencil and a doodle pad looking over the remains of the "Front door" pinch weld area..

Got a plan now.

Need to make a pattern for the "Pinch weld extender" This is 4" flat bar x 1/8" thick.....The front edge has to be straight up and down and then it must follow the curves of the pinch weld.....

This is not a hard process, but a pattern made from an easy to cut material is the BUZZ WORD HERE....

The pinch weld area has a lazy S curve in it as well as a slight taper and the needed material is narrower at the bottom (3" wide) and wider at the top (4" wide)

Once the pattern is made then the steel flat can be cut to match and with any luck things will all come together well.....

Things get interesting once this part is in place......The bulkhead cross tubes are a walk in the park.

Fun part is to get a nice clean looking "Finish cover strip" that will follow the shape of the front of the door and taper in and blend with the new bulkhead.......This will cover the door hinges and the B pillar ....

The Cover is just aesthetics, buttttttttttttttttttt.....Might as well make it look good besides being functional.....

The cover material will be either HDPE or UHMW Poly.....This stuff handles weather really well .

1/4" thick will suffice......
Getting the cover on the area will be the tricky part.....At present the plan is to weld pieces of 3/16" flat bar to the pinch weld extender and angle them back and out towards the edge of the door...

The Poly bends and forms easily ....so it will just be a matter getting the angle of the dangle right and then welding the parts on.....

At this juncture the plan is to make a pattern (From the same material as used on the pinch weld pattern) and possibly bolt the little steel flat pieces to the pattern and use the assembly to align things so the fit is proper to weld things.

The entire plan is starting to come into focus a lot clearer now.....

Still hoping that the fall weather will give me enough time to get the bulkhead done.......

Then there is the body mounts to get this entire package onto the 2100 chassis.....

Looking this over briefly suggests all is pretty basic stuff

The front body mount for the aft section will be very nearly like the rear one on the cab in place now....The difference will be the elevation.....The aft cabin MUST be slightly higher to allow access to the rear body mount on the front cab......(Be able to remove the front cab to service things if need be)

The next mount is where the lifting rig is bolted on at present......Then the rear most mounts are going to take some creativity .....There will need to be an extension to the 2100 frame....the exact arrangement is still a bit fuzzy....

The middle mount (Current lift rig location) Must be such the the lift rig can be slid in and out for removal of the cabin....The brackets to the frame may be similar to the others (Long square tube) The tubes will also be a perfect place to mount steps for ingress and egress of the cab/s

Then there is the Veranda across the back of the cat to allow access to the tail gate/hatch area.

Everything effects something else down the line....Change orders have been the norm on this build....I do not see this being much different from here on out.

Air tanks for the air system must go in under the cab/s......I have the tanks and they have brackets on them....We will make whatever is needed to work with the tanks.......

The engine exhaust system is in the center of the chassis...The large 4" tubes out the back will need to be longer to get the pipes out the back of the cat.....Possibly Chrome tips.......The only issue is with the rise of the exhaust from the belly of the cat up and out over the rear axle.

Speaking of the REAR AXLE .....Access is needed to do band adjustments and or ???? in there too.....

The higher mounting of the rear cab MAY be sufficient to cover this.......

The Fuel tanks......

The fuel tanks are going to mount inside the wheel house openings WHY....Because this spot is on both sides of the cat and it is a great little cupboard to stuff something into... And will be easily accessed to fuel up....

Plumbing for the fuel system.....Electrical wiring for the fuel gauges

Yes....This stuff needs to be sorted out....Once the rear cab is mounted we will be able to see wassssssup in the way of places to put stuff......

Just a lot of goodies to try and get situated....

The radiator mounting location is looking pretty good to allow the original core support to fit well and not cause issues.....
The original radiator cover/cat nose piece was MIA so a suitable replacement will need to be fabricated to allow the S-Wagon core support to mount on top....(Tilt front end is still on track)

Transmission cooler....Oil to air type.....Somewhere in the frontal air flow that will not be plugged up with snow.....
Oil cooler lines....Yeah
Transmission shifter and cable assembly
]
All the engine wiring....
And the list goes on.......

Every move leads down a path of possible interference with something else.....

More time studying stuff than actually beating on iron or turning wrenches.......
Engineer/imagineer
Welder
Fabricator
Machinist
Plumber
Mechanic
Electrician
Engine builder
Tranny builder

A whole handful of hats have been needed along the way on this beast.......

Fun stuff.....
 

m1west

Well-known member
GOLD Site Supporter
Pretty mundane stuff at the moment.....
With the final goodies stripped off of the S-Wagon front section it was time to police up the area and turn the attention to the after section and HOW THE !@#$ ARE WE GONNA BUILD THE FRONT BULKHEAD

Spent a couple hours with a tape measure, a pencil and a doodle pad looking over the remains of the "Front door" pinch weld area..

Got a plan now.

Need to make a pattern for the "Pinch weld extender" This is 4" flat bar x 1/8" thick.....The front edge has to be straight up and down and then it must follow the curves of the pinch weld.....

This is not a hard process, but a pattern made from an easy to cut material is the BUZZ WORD HERE....

The pinch weld area has a lazy S curve in it as well as a slight taper and the needed material is narrower at the bottom (3" wide) and wider at the top (4" wide)

Once the pattern is made then the steel flat can be cut to match and with any luck things will all come together well.....

Things get interesting once this part is in place......The bulkhead cross tubes are a walk in the park.

Fun part is to get a nice clean looking "Finish cover strip" that will follow the shape of the front of the door and taper in and blend with the new bulkhead.......This will cover the door hinges and the B pillar ....

The Cover is just aesthetics, buttttttttttttttttttt.....Might as well make it look good besides being functional.....

The cover material will be either HDPE or UHMW Poly.....This stuff handles weather really well .

1/4" thick will suffice......
Getting the cover on the area will be the tricky part.....At present the plan is to weld pieces of 3/16" flat bar to the pinch weld extender and angle them back and out towards the edge of the door...

The Poly bends and forms easily ....so it will just be a matter getting the angle of the dangle right and then welding the parts on.....

At this juncture the plan is to make a pattern (From the same material as used on the pinch weld pattern) and possibly bolt the little steel flat pieces to the pattern and use the assembly to align things so the fit is proper to weld things.

The entire plan is starting to come into focus a lot clearer now.....

Still hoping that the fall weather will give me enough time to get the bulkhead done.......

Then there is the body mounts to get this entire package onto the 2100 chassis.....

Looking this over briefly suggests all is pretty basic stuff

The front body mount for the aft section will be very nearly like the rear one on the cab in place now....The difference will be the elevation.....The aft cabin MUST be slightly higher to allow access to the rear body mount on the front cab......(Be able to remove the front cab to service things if need be)

The next mount is where the lifting rig is bolted on at present......Then the rear most mounts are going to take some creativity .....There will need to be an extension to the 2100 frame....the exact arrangement is still a bit fuzzy....

The middle mount (Current lift rig location) Must be such the the lift rig can be slid in and out for removal of the cabin....The brackets to the frame may be similar to the others (Long square tube) The tubes will also be a perfect place to mount steps for ingress and egress of the cab/s

Then there is the Veranda across the back of the cat to allow access to the tail gate/hatch area.

Everything effects something else down the line....Change orders have been the norm on this build....I do not see this being much different from here on out.

Air tanks for the air system must go in under the cab/s......I have the tanks and they have brackets on them....We will make whatever is needed to work with the tanks.......

The engine exhaust system is in the center of the chassis...The large 4" tubes out the back will need to be longer to get the pipes out the back of the cat.....Possibly Chrome tips.......The only issue is with the rise of the exhaust from the belly of the cat up and out over the rear axle.

Speaking of the REAR AXLE .....Access is needed to do band adjustments and or ???? in there too.....

The higher mounting of the rear cab MAY be sufficient to cover this.......

The Fuel tanks......

The fuel tanks are going to mount inside the wheel house openings WHY....Because this spot is on both sides of the cat and it is a great little cupboard to stuff something into... And will be easily accessed to fuel up....

Plumbing for the fuel system.....Electrical wiring for the fuel gauges

Yes....This stuff needs to be sorted out....Once the rear cab is mounted we will be able to see wassssssup in the way of places to put stuff......

Just a lot of goodies to try and get situated....

The radiator mounting location is looking pretty good to allow the original core support to fit well and not cause issues.....
The original radiator cover/cat nose piece was MIA so a suitable replacement will need to be fabricated to allow the S-Wagon core support to mount on top....(Tilt front end is still on track)

Transmission cooler....Oil to air type.....Somewhere in the frontal air flow that will not be plugged up with snow.....
Oil cooler lines....Yeah
Transmission shifter and cable assembly
]
All the engine wiring....
And the list goes on.......

Every move leads down a path of possible interference with something else.....

More time studying stuff than actually beating on iron or turning wrenches.......
Engineer/imagineer
Welder
Fabricator
Machinist
Plumber
Mechanic
Electrician
Engine builder
Tranny builder

A whole handful of hats have been needed along the way on this beast.......

Fun stuff.....
if you had spent the amount of time building a tube frame aluminum skin cab, that would look similar to the OEM as you have put into the blazer body, it would likely be done already. Your project not mine just my $.02 :cool:
 

Snowy Rivers

Well-known member
The COST $$$$$$$$$$$$$$$$$$$$$$$$

Yes...A custom cab can always be better....
The Blazer is Free so far...Sold a bunch of stuff off of it yesterday and today....The standard cab paid for itself within a week.....

Time is the big issue now.......
Once the new front bulkhead is completed we are getting close.

That one piece of tubing to build the lift bar was $70 plus travel $$ to go get it....

Materials are off in the ozones expensive now.......

I paid $700 for the Blazer and so far after selling the Chassis, the tilt steering column and the front doors I have returned $1200 to the coffers.....And I have a cool little cabin for my cat......There is a grand method to the madness....

Just a bit more fooling with things and we will have a pretty nicely pimped out rear cabin.....

Has a nice head liner, door panels, bench seat, carpeted floor, power windows, power locks.....

How can you beat it.....????

Pretty much all GM TOO....GM power, GM cabs, GM drive shaft......

And parts are available easily.

The OC-12 diffy is the odd duck....

My feeling is...It is not the destination....It is the journey....


The front cab is mostly ready to go.....Just need to swap in the bucket seats from the S-Wagon.....
Dash is a regular gauge type.....
The air steering controls are all in and mounted to the column......
The wiring all interfaces with the rear cabin as far as lights....

I am ahead of the game $$$$ wise....Sure there will be other costs and such.....The engine had a cash outlay.....

The cabs are pretty much a freebe at this point......and the creature comforts are decent too......

Ah well....We all have our own ways of going about things.....

I am a big fan of re-purposing stuff.....especially when I can high grade things and then offload the unwanted goodies to pay for my stuff.......
 
Last edited:

m1west

Well-known member
GOLD Site Supporter
The COST $$$$$$$$$$$$$$$$$$$$$$$$

Yes...A custom cab can always be better....
The Blazer is Free so far...Sold a bunch of stuff off of it yesterday and today....The standard cab paid for itself within a week.....

Time is the big issue now.......
Once the new front bulkhead is completed we are getting close.

That one piece of tubing to build the lift bar was $70 plus travel $$ to go get it....

Materials are off in the ozones expensive now.......

I paid $700 for the Blazer and so far after selling the Chassis, the tilt steering column and the front doors I have returned $1200 to the coffers.....And I have a cool little cabin for my cat......There is a grand method to the madness....

Just a bit more fooling with things and we will have a pretty nicely pimped out rear cabin.....

Has a nice head liner, door panels, bench seat, carpeted floor, power windows, power locks.....

How can you beat it.....????

Pretty much all GM TOO....GM power, GM cabs, GM drive shaft......

And parts are available easily.

The OC-12 diffy is the odd duck....

My feeling is...It is not the destination....It is the journey....


The front cab is mostly ready to go.....Just need to swap in the bucket seats from the S-Wagon.....
Dash is a regular gauge type.....
The air steering controls are all in and mounted to the column......
The wiring all interfaces with the rear cabin as far as lights....

I am ahead of the game $$$$ wise....Sure there will be other costs and such.....The engine had a cash outlay.....

The cabs are pretty much a freebe at this point......and the creature comforts are decent too......

Ah well....We all have our own ways of going about things.....

I am a big fan of re-purposing stuff.....especially when I can high grade things and then offload the unwanted goodies to pay for my stuff.......
Just giving you a little ribbing, waiting for the result. Do you think you will get it on before the snow flies? got 2-3 months before that happens.
 
Top