• Please be sure to read the rules and adhere to them. Some banned members have complained that they are not spammers. But they spammed us. Some even tried to redirect our members to other forums. Duh. Be smart. Read the rules and adhere to them and we will all get along just fine. Cheers. :beer: Link to the rules: https://www.forumsforums.com/threads/forum-rules-info.2974/

Astro van cat conversion

Blackfoot Tucker

Well-known member
GOLD Site Supporter
I've very glad the medical issues that caused you to list your Astro Van project for sale may be behind you, and you can hopefully get back to the project. That is truly encouraging news.

I think maybe it's a little poetic justice that the greedy vultures that wanted to pick up an incredibly well done project for pennies on the dollar missed out on the opportunity. Could have bought it at a more than reasonable price, but no... they wanted it for almost nothing.

Genuinely happy for you SR....
 

Snowy Rivers

Well-known member
M1
YES....Nasty stuff....
Even now some of my fav snacks taste like crap.

My Daughter had it last summer late and still has some things that taste funny.
She lost a bunch of hair too.
The respiratory part was not that bad....more like an annoying cold....Then things got hinky....

My daughters mother in l;aw had it a year ago at this time.
She was what they thought OVER IT
She had a massive stroke and eventually died.

I would love to send this crap back to whence it came from along with something very nasty....

AND....I am sick and tired of the damned face diapers.....We will be losing them in a couple weeks....

Blackfoot
For sure.....for sure.
If I can enjoy driving it just once....I will be really happy. :thumbup:
 

Snowy Rivers

Well-known member
Thanks Kicker
Between the time on the clock and this damned Rona....Definitely kicked my Azz.

I am hanging in there....
Still have days that suck....

Yeah....I think on a long haul...somebody gonna notice all the extra cat parts hanging off in the weeds :lmao:

I had originally thought of shortening up axles and narrowing the frame......But decided to just narrow the tracks up from 57" wide to 43".....

This allows using the standard 43" grousers....just not staggering them.....

Best haul plan would be to drop the tracks....roll them up and sit them on the trailer up front.

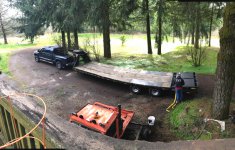
Our goose neck trailer is 102" wide...the cat is 96" at the outside of the guide tires.....

The only issue would be getting the tracks on and off the trailer......At present we don't have a winch on the trailer.

A hoist would help too.

We are a long way from needing to worry about such things...

But the Big Tex trailer is certainly up to the task.
We have had some huge loads on that trailer in past years ...for sure.

The cat does not weigh much...maybe 7000-8000 pounds, just takes up a lot of space is all....
 

Attachments

  • IMG_2315.JPG
    IMG_2315.JPG
    237 KB · Views: 69

KickerM

Active member
Site Supporter
GOLD Site Supporter
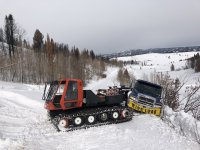
They make nice trailers! We have a 2008 28’ + 5’ x 102” Hillsboro and it has been great! might of accidentally hauled a 48,000# load on it once…got the scale ticket to prove my stupidity but the trailers got a lot of miles on it and its still going strong! Surprisingly enough getting a wide load permit is easy in most states and can be done online; putting tracks on and off is not…. and a bonus if the tracks are on the cat and you just happen to slide of the side of a mountain, you can drive the cat off the trailer and pull you up said Mountain; I may have personal experience on this…..
 

Attachments

  • 0840D2D8-269B-4E24-9CE3-893C64FE210F.jpeg
    0840D2D8-269B-4E24-9CE3-893C64FE210F.jpeg
    2 MB · Views: 84

PJL

Well-known member
Yeah, been there done that too. You're not stuck if you can extract yourself with the equipment on hand.
 

Snowy Rivers

Well-known member
I will pass on the "Slide off the road thing"

When we got the Big Tex we needed to haul an M211 army 6x6 truck.

Nobody had a trailer to rent that was big enough....

Found the one we have up in Washington....so we bought it.....

It gets used for hay and other hauls around here too....

The 25/5 with the full width ramps is sweet.
We can run just about anything on the trailer....From the Mahindra 22 horse 4x4 up to a full sized 4x4 or the 6x6 truck..

The full width ramps are sweet.
The only other trailer for sale at that time was a LOOOOOOOOOOOOOOOONG ONE....35 Foot IIRC
 
Last edited:

Snowy Rivers

Well-known member
Been thinking more about the cat engine.
Block is nearly ready to go.....
I installed the brass soft plugs in the block some time ago, as well as the oil gallery plugs (1/4" pipe threaded plugs) all the way...even the front behind the cam sprocket which normally use 1/2" cup plugs THAT HAVE BEEN KNOWN TO POP OUT.

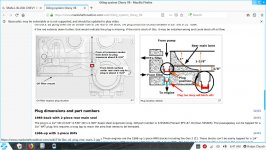
I had not replaced the one internal cup plug in the main oil gallery off the pump that feeds to the filter and then the oiling system.

This plug is not always known by a lot of folks.....As such it could be forgotten if it has been removed for cleaning.

Normally on these engine I don't touch it (Is driven out withe a rod down the oil sender hole on top) But this nasty dirty old GRUNGY 400 block was so dirty I wanted everything accessible while the block was in the tank getting cleaned.

The long sojourn between last fall and when things are likely to get moving again left this bad boy with that plug NOT INSTALLED...

Excitement to move ahead could gave saw this plug forgotten.....Bad deal.....Oil filter does not get oil flow and the pressure can be affected too.

Decided to head down to the shop and GITTERDONE.

Here is a cutaway piccy of the area that shows exactly where that little plug sits.

Been looking at camshaft specs and have become quite interested in the cam that is used on the Chevy crate 350/330 HO

That crate engine uses Vortec heads and the cam works fine on stock Vortec heads.

Should be a great choice for the application.......

I want a nice sounding engine that speaks with authority....but we do not need a wild azz cam that shakes the door handles off.

Also the stock Vortec heads will only handle .475" lift max in stock configuration.

The valve guides must be shortened and different springs used to go above the .475" spec...

The Vortec heads flow great with a cam in the stock range.

I need a flat tappet hydraulic cam for the 400.....No need to pop the coin for roller cam and lifters.......

The 350/330 HO cam has a lift of .435" intake and .460" exhaust with a duration of 212 and 222 degrees.
 

Attachments

  • REAR MAIN INTERNAL CUP PLUG.jpg
    REAR MAIN INTERNAL CUP PLUG.jpg
    295.9 KB · Views: 97
  • Like
Reactions: PJL

it's all about downhill

Nuts
GOLD Site Supporter
Wow was I behind. Haven't looked for a LOOONG time. Just to catch up I started back at page 41. With the fuel discussion, I was going to comment that Sportsman Air Park sells AV gas for a reasonable price, just drive on in and park by the fuel truck, they'll fill whatever you want. 100 octane and never goes bad (I have a 5 gal. can with about 1 gal in it, probably 35 years old...no light ends, but clear with no bad smell or sediments. ( I keep it just for fun now.)) I run AV in everything but road cars. Haven't drained fuel for off season (lawnmower, Chain saws, weed eaters, etc, etc. (There are a lot of etc's) no problems )

Then I saw that the CCP got you. So glad the mend has welcomed you back to life. Sometimes in life we are at a stage where we just say "Well this is the way it's going to be." That month after Mt. St. Hellens blew up and it rained ash. I cleaned out my gutters and was not interested in saving ANY of it. THen two years ago the entire valley was covered in smoke for Sept and Oct. I had to wear a mask in my semi-truck on I-5. But when I look back it reminds me of the Bible verse "It came to pass..." It came, then it passed, now it's OK.

Then the third thing I saw was your shell grinder. Several years ago Columbia Empire had a hammer mill to grind them to spread back in the orchard. It wore the screens out fast (I'm thinking better than walnut shells for US cleaning) PM me if you want my contact up there. The other option is - there was one variety of pellet stove that had an auger strong enough to break the shells when they tried to bind it up. Maybe a little of your overkill engineering could produce the same result and save the time of grinding.
 

Snowy Rivers

Well-known member
Hi there Down Hill...

Yeah .I have grabbed AV gas at the air park in Newberg before.
I get my fuel at the Card lock just across Hwy 219 ...They offer the non alky premium...I try to use that in my Seasonal tools.

The Gen set, weed whackers and other stuff.

The shells are certainly popular with the landscapers .....Does not break down as quick as bark dust does.

We are running Whitfield stoves (1990'S VINTAGE) These have good heavy augers and handle the shells fine.

WE used to get shells from a processor real close to us....they changed management and only sell to outfits that can take semi truck quantity now.....

All the processors have pretty much changed over to equipment that leaves the shells as 1/2 shell configuration.....Tough to use..

I built a machine we call "Munchy" that smashes the stuff into stuff about the size of the average persons little finger nail.....or a little bigger.....
Works fabulous.....
We run the stuff through munchy and then barrel it up to keep it dry until needed.

So nice to have machine tools to make stuff....Snow cat parts, nut shell grinders, dirt bike parts for the grand kids.....Always something to make or fix.

As far as that damned Rona stuff,,,,,,I am still battling some lingering symptoms that come and go......The worst of the thing was little worse than a nasty cold.....The stuff seemed to get better, then the taste/smell went away....then gut issues, and these have been on and off for over a month.......Arrrrrrrgh.

Have a good day, then feel like crap for several days.....

Makes wanting to get to work on the cat much harder.....

Been going over my list of NEEDED parts for the new engine.

I have never built an engine 1 piece at a time before....always have had a complete unit to start with.

This build has been a piece at a time.
I bought a bare 400 Chevy small block.
Then scared up a nice stock crank
Found a complete 1998 VORTEC 350 from a pickup....Saved the heads and the serpentine front drive equipment off that unit.
Found a complete set of stock 400 con rods..
Bought new .030 OS pistons and rings.
Bought a new 168 tooth flex plate
Found a good set of flex plate to crank bolts
New timing cover and pan bolts
Using the valve covers off the Vortec 350
All the accessories off the vortec are usable
A new 6 quart gated oil pan.
Vibration dampener for the 400 crank came with the crank
Front serpentine crank pulley from the Vortec fits the 400 dampener.....
Bought new exhaust manifolds
The rockers off the Vortec are all good.
Head bolts are good....These are not TTY bolts....Std grade 8
****************************************
Still need several small items.
Push rods (Standard length)
Fuel pump rod
Fuel pump mounting plate and hardware
Fuel pump
Vortec intake manifold to work with a 4 barrel carb.
Large cap HEI distributor
Plug wires
Spark plugs that fit the Vortec heads (These are different than older plugs...long reach type)
Timing chain/sprockets
I keep finding little tid bits to add to the list as we go along.......

So many little bits and pieces that are usually on a complete engine that are simply cleaned up and reused that need to be scared up on this rodeo..

I have narrowed the cam shaft choice down to a couple possibilities.....Still thinking about this .....Stock NON MODIFIED Vortec heads are good for a max of .476" lift This fact limits cam choices a lot.

My heads are in good shape....I do not want to spend $$$$$$$$$$$$$$ to cut the valve guides down and change the springs...Yada yada yada .....The engine is not going to be a screamer....4500 RPM MAX ....Stock Vortec parts can easily deal with the job at hand here.......

I still need to set up the Vortec heads and locate and drill the "Steam holes" between the cylinders (Peculiar to the 400 small block that has siamese cylinders)

Ah yess.....fun stuff.......

Between getting the engine together and stripping the 91 S10 Blazer body off the frame and fitting it up on the cat.
Lots of work to do.


We have pretty much all the hard parts to build the tracks.

The one original track that I got last summer (still all together) has gen 2 tire guides and the parts look good.
This track has the heavy duty lacers (Hinges) and the track has had a section replaced and a second set of hinges added.

The plan is to narrow thew tracks up to 44" wide and this will allow using the standard 2100 grousers (Some bolt holes will need to be redrilled) using two 12" belts....The hinges from the 4 belt tracks can be modified to give us enough heavy hinges for both tracks........

I do have a complete set of new Flexco 550 hinges.....But the heavy duty parts that are on the used track are much beefier....

Track drive sprockets are usable to get us to a test drive....but will eventually need to be recovered with new urethane...


Lots of work to do......
 

Snowy Rivers

Well-known member
It's been a soggy spring around here.....6" of snow on April 11th and rain..rain...rain.

We are at almost 4" of rain for May now.....COLD AND WET.
Not much going on with the cat...at least outside....

We were at a garage sale Friday and I scored a set of electric (Heated) side view mirrors off a 2004 Dodge 2500 4x4
Near new....$10 for the pair

These will be sweet on the cat ...mounted on the side upright for the overhead light bar/strobes

One thing I am looking for is a pair of the steering control valves for the 2100
My parts/service manual lists them but so far I have not come across any of these bad boys....

I had thought about using the master cylinder setup as used on the Spryte.....The bigger tracks and the heavier chassis really needs the full hydraulic setup to keep the bands in good order....(Bands on or off...not slipping)

Any info on a set of these controls would be sweet.....

YESSSSS
I have decided to head way from the air controls and go back to hydraulics.

The power steering pump on the engine can handle the job quite nicely.....

I decided to use the Steering wheel and related equipment to activate the control valves....
A very simple design to mount a bracket to allow a minimal turn of the wheel to activate the steering valves.....

Again.....looking for a pair of these valves......Don't need the levers...


As far as braking goes.....Already have most of whats needed to mount a pair of outboard disc brakes on the track drive sprockets.....


The factory brake master booster can readily accept a single master cylinder to run the brakes.

The change orders that go with this thing never stop.....Keeps life interesting that way.

Actually....Using the factory steering valves just make life far easier....

The other option was two electric valves and the related plumbing......

The OEM set up allows easy adjustment of the pressure at the band apply servo's (400psi) and life will be good.....

Looking forward to getting back to work on the project.

First activity when the weather gets better will be to get the body off the S10 blazer and strip it down....Then sell the chassis.
As far as I know the Blazer body will mount right up to the new mounts I built for the standard pickup cab....


And so it goes....
 
  • Like
Reactions: PJL

Snowy Rivers

Well-known member
I did a buttload of calling around today and finally scored a set of the factory 2100 Steering actuators.

They are used....but we shall see what sort of shape they are in.
The units are off the cat and the fittings are open.....(NOT GOOD) But if the innards are not rusted they may well be easily repaired with a seal kit.....

MICO was cast into the master cylinders that came off the machine.....So I called Mico and rattled their cage....
The fella I spoke with was quite nice....But without a part number he was lost.....They do have new stuff.....But the new parts are designed to be used with other components.

So we shall see what shakes out with these used valves....

If they are usable/repairable then the plan should work sweet....

I will be able to use the stock slave cylinders on the OC12.....albeit probably not the ones that were on it....The ones that were on it were pretty skanky....


Has anyone here worked on the steering controls on a 2100 ??????

They look simple enough...
 

Snowy Rivers

Well-known member
Got the good news.

The steering actuators are on their way...be here Tuesday.
I do hope they are in good shape inside.

These were made by MICO.,....Sadly these are no longer made NEW
BUTTTTTTTTTT...The repair kits are available at $45 per kit...

First order of Bizzzz will be to disassemble them and hopefully find good clean usable bores.....If they are all rusty.....YUCK....

We shall see..
 

sno-drifter

Bronze Member
GOLD Site Supporter
Brake Systems Inc north of Sandy 2221 ne Hoyt 503-236-2116 has handled Mico for years and may still have NOS parts.
 

Snowy Rivers

Well-known member
Called up brake systems in Portland.....Excellent customer service....but no info at this late date...

I chanced a second call to Mico and got hold of an engineer.....who was very helpful.
This time I got a copy of a real Blue Print......

So......Fast reverse to a few days ago.
I received a pair of the actuators from a fella in Cali.
These look nice....So I took one apart and they were in good shape....Just need new seals....Sweeeeet.
Fast forward to yesterday
The part I have is a buttload different than the deign from Mico (Now ZF Mico)

I am looking at the print while I have the engineer on the phone.... Mico only made the parts that he sent me a print for.
A bunch of difference......
It would seem that the early 2100 had an actuator made by another outfit.....

Looking at the parts book I have it shows a "Pressure limiter" at the band operating cylinder.....
The Mico part has a pressure limiting valve inside the unit.....There were 3 different part numbers for these actuators
03-460-080 03-460-082 03-460-084 (Mico numbers) A seal kit # 02-400-040 is still available

The unit shown has all the components assembled from the bottom......
THE OLDER UNIT can be identified by a conical shaped spring under the rubber boot that is secured by a snap ring..
Also the older unit has a small sintered vent on one side near the bottom.......
The older units applied full line pressure to the rear pf the cat...then the pressure limiter (Likely adjustable) was used to set the pressure to 400 psi nominal....

The info I got yesterday mentioned that one of the part numbers was a 500 psi setting.... (Internal spring)

Also the older units deliver the oil to the diify out the bottom of the actuator...The newer version (Mico) delivers oil out the upper most port and the bottom port goes back to the tank....

My book definitely shows the bottom port being connected to the cylinder on the OC12..

I am still curious about when the changes were made and why......
Thiokol was good about using off the shelf parts.

The newer actuators (Mico) were made for Thiokol.......
I have never seen a Spryte or other smaller cat with Power assist steering.
These parts had to be solely for the 2100.....
The later cats like the 3700 were Hydrostatic drive.....

Anyone that can add anything to this info....Please feel free to jump in....

So....I am sending the old style units back to Cali.....

And the saga continues..
 

Attachments

  • Mico actuator 03-460-080 wide shot.jpg
    Mico actuator 03-460-080 wide shot.jpg
    183.3 KB · Views: 47

Snowy Rivers

Well-known member
The hydraulic actuators have run into a big snag.
Mico no longer has any parts or and data on the original application.

They do carry the O rings for the late style.

Finding any of these is likely a lost cause......
Decided to look at a 4/2 way cam/plunger actuated style valve.
Parker makes these.....many months out on a special order....$1000 each...plus shipping.

Screw this.
Decided to take another look at the idea of using air (My original plan)

I had purchased a pair of the Original type master cylinders that were/are used on the Spryte with the OC12
I dug those out and measured the stroke...About 1.5"
1 inch bore
There is no room in the drivers area of the S10 Blazer to mount them and be able to crawl into the seat.

Another idea came to mind....Remote mount the cylinders and use a pair of Type 9 air brake chambers to actuate the master cylinders.

Use the stock type cylinders on the OC12 and run regular brake line with flexible connections (Hose) at each end.

I already have the air pump and the air control valves.....

These parts are easy to get and available in many places locally.

I am not at all interested in the hard to get...long lead time stuff that cost 3 fortunes....

A basic air over oil system......
The cylinders for the OC12 are easy to get too....
The master cylinders are the same as the ones used on the early Ford Econoline vans
Any 1" bore master cylinder can be adapted....

This steering thing has been an area that I have visited many times in past months or so.....Gotta make it easy to get parts and fix if need be
 
  • Like
Reactions: PJL

Track Addict

Bronze Member
GOLD Site Supporter
Time to go back to Thiokol roots and build a custom cab utilizing the OEM functionality and base.

Seems like the best path to Sno!
 

Snowy Rivers

Well-known member
Well....not sure about too much any more.
Thiokol made a good machine for sure.

Sadly so much of the stuff that was used is simply not available at this late date.
The current plan with the S10 4 door will be fine.
Everything needed is there....Cab comforts, dash with instruments, power windows, HVAC system, all the wiring to run the engine, complete exterior lighting system. All turn key

The small stumbling block with the steering control is well on the way to being solved.

Watching the rain come down AGAIN
Spent time yesterday and this morning doing the math on the steering equipment.
Using the standard OC-12 steering cylinders is definitely on the table now and not likely to leave.....This will keep the OC-12 all stock (Other than the improvements I made to the thrust washers and such)
The air over oil design will work sweet to activate the master cylinders....
Stock steering wheel can activate a pair of air valves to control the master cylinders..... Neat and clean install.....
I do not want to end up with something that will be a parts orphan by using the old steering parts...

The master cylinder mounting bracket can be put wherever it will fit.....Likely under the hood above the engine....Keeping the air chambers warm and dry.

All the rest is a piece of cake......Simple inexpensive parts that are available at any Napa store (Almost)

The hydraulic control idea was not bad....Just the cost of one valve at $1000 and a 36 week lead time....Nope.
 

m1west

Well-known member
GOLD Site Supporter
Im with track addict, Your simplest and easiest path to success is build a tube and aluminum sheet cab similar to OEM and the steering as intended.
 

vintagebike

Well-known member
Looks to me like Snowy enjoys the “design and build” part as much or maybe a bit more than the “Use it” part. Henry Ford raced his first real “Ford” car in competition only one time.
 

Snowy Rivers

Well-known member
The design work is the most time consuming......Especially if you don't want to do it over a few times.

C'mon guys....I have the complete S10 4 door sitting close to the cat...Simply unbolt the body, sit it on where the single cab is now and hook up the wires to the engine....

Why do I want to start all over with fresh materials and have to build every system ????

Ah yess
The joy of projects....
 

m1west

Well-known member
GOLD Site Supporter
The design work is the most time consuming......Especially if you don't want to do it over a few times.

C'mon guys....I have the complete S10 4 door sitting close to the cat...Simply unbolt the body, sit it on where the single cab is now and hook up the wires to the engine....

Why do I want to start all over with fresh materials and have to build every system ????

Ah yess
The joy of projects....
That presents problems too, your going to spend just as much time mounting the cab, then the floor pans are going to stop you from accesses anything to do repairs or maintenance. Mig, saw, 1x1 tube some aluminum sheet and rivets and the cab could be built in a week or two with drop in floor panels. Hardest part will be windows. Just do it , you know it the best thing.
 

Snowy Rivers

Well-known member
I understand what you are saying.
The only needed access area is over the rear diffy.....Cut nice access hole in the floor and add clips to mount the piece back in.
The front end (Fenders and hood) Tilt forward
The engine has full access.
The S10 Blazer body will attach to the current mounts I made for the standard S10 pickup cab....Two more mounts to catch the rear and center mounts....

I own the body....Chassis is sold....Body cost me nothing at this point.

The only item that will be a problem is the tranny....What cat tranny is not a job coming out.

This one,.....Remove the body...Lift the tranny out of the tub.......

Fuel tanks are already here....They mount in the Rear wheel house openings....Each side....20 gallons each side.

Starting from scratch will add a lot of cost.
I have zero $$ in the Blazer at this point...

Everything is there.
I will need a bit of material to build the body mounts for the center and rear.....

Interior need a good cleaning.....But everything works..
Electric windows work, Dash gauges all work, exterior lighting works.......The engine is trash....But the fresh 400 small block is sitting in the shop.

My only issue was getting the steering wrangled out.
The hydraulics would be sweet....But not for the costs and the long lead times.
The entire plan has been to keep it simple...use as much off the shelf parts as possible THAT CAN BE replaced easily and at low cost.....

The air steering is all figured out now (Spent yesterday and this morning sorting out the parts and sourcing the stuff)
If I can't find the parts easily....Its not going in the mix.
The air components are all class 7 or 8 truck stuff.....The master cylinders for the steering are a common 1-1/2" single type cylinder.....These have a 5 cubic inch per stroke fluid delivery.

The OC-12 slaves are 2.98 Cubic inch cylinders.
Two type 12 air brake chambers can run the master cylinders and push the slaves through their complete 3/4" stroke without running out of travel.
The original master cylinders used on the Spryte and others were 1 inch bore....These are fine if the cylinders can be pumped (Manual lever)

I want the air chambers to be able to operate without wasting a lot of extra air....
Type 12 chambers are readily available for about $35 each..(A new diaphragm can be swapped in with a couple wrenches in a few minutes in the brush...Cheap too.

The entire steering cylinder package can be mounted in the rear cargo area.....Its warm, no freezing the air system.
Two tanks can mount there too.
Two micro switches mounted to the original steering shaft (Connected to the factory steering wheel ) to trigger the air valves to activate the master cylinders that control the steering slaves.

Short hose runs from the master cylinders to the OC-12 using through hull fittings.....

Very simple to put this together.....

The original Thiokol 2100 lashup was a mess....Expensive to duplicate....and nearly impossible to find some parts.

Everything that may need fixing on the S10 Blazer is easy to find and cheap....

More aluminum road wheels are in the offing.
3 coming my way....They all lost a bearing and need to have the bores cleaned up and sleeved.....
Good tires too....

This winter has seen a lot of hours spent sorting out the pile of little issues......Now that the steering has been solved....Good to go...As soon as the weather stops raining....
 

m1west

Well-known member
GOLD Site Supporter
I understand what you are saying.
The only needed access area is over the rear diffy.....Cut nice access hole in the floor and add clips to mount the piece back in.
The front end (Fenders and hood) Tilt forward
The engine has full access.
The S10 Blazer body will attach to the current mounts I made for the standard S10 pickup cab....Two more mounts to catch the rear and center mounts....

I own the body....Chassis is sold....Body cost me nothing at this point.

The only item that will be a problem is the tranny....What cat tranny is not a job coming out.

This one,.....Remove the body...Lift the tranny out of the tub.......

Fuel tanks are already here....They mount in the Rear wheel house openings....Each side....20 gallons each side.

Starting from scratch will add a lot of cost.
I have zero $$ in the Blazer at this point...

Everything is there.
I will need a bit of material to build the body mounts for the center and rear.....

Interior need a good cleaning.....But everything works..
Electric windows work, Dash gauges all work, exterior lighting works.......The engine is trash....But the fresh 400 small block is sitting in the shop.

My only issue was getting the steering wrangled out.
The hydraulics would be sweet....But not for the costs and the long lead times.
The entire plan has been to keep it simple...use as much off the shelf parts as possible THAT CAN BE replaced easily and at low cost.....

The air steering is all figured out now (Spent yesterday and this morning sorting out the parts and sourcing the stuff)
If I can't find the parts easily....Its not going in the mix.
The air components are all class 7 or 8 truck stuff.....The master cylinders for the steering are a common 1-1/2" single type cylinder.....These have a 5 cubic inch per stroke fluid delivery.

The OC-12 slaves are 2.98 Cubic inch cylinders.
Two type 12 air brake chambers can run the master cylinders and push the slaves through their complete 3/4" stroke without running out of travel.
The original master cylinders used on the Spryte and others were 1 inch bore....These are fine if the cylinders can be pumped (Manual lever)

I want the air chambers to be able to operate without wasting a lot of extra air....
Type 12 chambers are readily available for about $35 each..(A new diaphragm can be swapped in with a couple wrenches in a few minutes in the brush...Cheap too.

The entire steering cylinder package can be mounted in the rear cargo area.....Its warm, no freezing the air system.
Two tanks can mount there too.
Two micro switches mounted to the original steering shaft (Connected to the factory steering wheel ) to trigger the air valves to activate the master cylinders that control the steering slaves.

Short hose runs from the master cylinders to the OC-12 using through hull fittings.....

Very simple to put this together.....

The original Thiokol 2100 lashup was a mess....Expensive to duplicate....and nearly impossible to find some parts.

Everything that may need fixing on the S10 Blazer is easy to find and cheap....

More aluminum road wheels are in the offing.
3 coming my way....They all lost a bearing and need to have the bores cleaned up and sleeved.....
Good tires too....

This winter has seen a lot of hours spent sorting out the pile of little issues......Now that the steering has been solved....Good to go...As soon as the weather stops raining....
The factory steering is quite mechanical and can be very labor intensive if you have to make tight corners a lot. Somewhere on here I saw a conversion to power steering for the Thickols, I believe it was a conversation between Blackfoot and Mountain outdoors a few years ago.
 
Top