• Please be sure to read the rules and adhere to them. Some banned members have complained that they are not spammers. But they spammed us. Some even tried to redirect our members to other forums. Duh. Be smart. Read the rules and adhere to them and we will all get along just fine. Cheers. :beer: Link to the rules: https://www.forumsforums.com/threads/forum-rules-info.2974/

Astro van cat conversion

Snowy Rivers

Well-known member
I appreciate the poking....It keeps me motivated.....
As far as a time frame for any particular happening......No idea.....My goal is to try and get the rear cabin weather tight before the rains hit.

My health has not been that great of late....Nothing serious....Mostly just the ravages of 70 years on the clock and having had a handful of strokes and a bout with Kidney cancer......

No biggy ya know :lmao:
So just because I want to get something done does not mean it will happen.....

I try to set a goal of some certain thing that needs doing....Even if it is only figuring out wiring or sourcing some needed items.
I hate letting a day go by without doing something......but that happens more than I would like......

There is still a lot of work to do....

Finish the engine (Have most of the parts)
I need to rebuild the TH350 tranny.....These are simple to do.....been through many back in the day
Just one step at a time.

I want to get the body stuff done and pretty much complete so I can get them off the chassis and set aside.
Then go after the mechanical stuff.

The OC12 is complete (Center section) The axle tubes need to go on and the axle bearings replaced and the axles installed

I have left these off simply to save space in the shop......
Drive shaft parts are all here.....The long section is rebuilt (The long section has two double cardan joints with the bolt flange at the rear end)

The short front section needs to be cut to length and the center support bearing bracket put into the tub.........This is pretty easy stuff.....can wait until the body is back off and out of the way.....
The "Double Double" arrangement is a sweet way to negate the worries about driveshaft angles ....At least to a great degree...

The rear end has to go where it has to go and the engine and tranny has to set where it is.......
So having two CV joints on the main section will keep things happy......I do not know at this time exactly what the angles on the shafts are....but the are very shallow......The main thing is that there is not anything weird like a compound angle or ???? to fight with.....

The original setup from Thiokol was a simple shaft with two single cardan joints.......

Given the high speed that this shaft must spin even at the fairly slow pace the cat moves (Maybe 12-15 mph) I wanted to be sure that we don't get bad vibes.....

The shaft I am using came from an S10 EXTREME.....(Long bed extended cab)
These shafts were notorious for issues.....This said..The issue was that the centering ball in the joints need to be greased, and folks would not do it.

Once the ball wears out the shafts vibrate bad

The center ball takes a needle greaser to get lube into it.....Most lube shops and or home mechanics do not understand.....

The standard joints are non grease types ...so folks assume they do not need to do anything.....Hence the center ball gets left to dry out and go away.....

I replaced all the parts with serviceable stuff...Zirks on all points.

The Double Double adds a bit of weight.....But likely no more than the original shaft that was in the beast..
The factory shaft was 1410 joints on a big tube..

The super low gears in the cat really reduces the torque load on the shaft.....So I decided to use the S10 EXTREME unit
Also ...again, all easy to get parts.-

Trying really hard to keep with off the shelf and easy to find parts.......

The engine is nothing more than assembly work on the short block.....
The Vortec heads need to go to the milling machine and get the STEAM HOLES between the cylinders drilled through the fire deck and into the water jacket.
400 SBC have Siamese cylinders with no water between them....The areas at the top between the cylinders will form steam pockets if the holes are not drilled......Factor 400 heads have the holes.......Also the factory heads on the 400 were junk.....

The Vortec heads I scared up are in nice shape......Off of a 1998 3500 truck.....

Still need a carburetor type intake manifold for that fits the vortec heads.....Just have not popped the $$ for one yet is all.....

And then of course are the day to day things....Living.....That always seems to get in the way of CAT TIME... :lmao:
 
Last edited:

m1west

Well-known member
GOLD Site Supporter
Make a good punch list, put some time on it everyday and it will get done. I normally have 3-5 projects going all the time and still running a business. Hour here hour there and it seems to get done. Waiting on parts, work on the other project. This summer so far, I rebuilt the front porch, bbq enclosure, fence with gate ,chicken enclosure with coop, half acre of fencing with a fabricated gate, bought a pony, put a new roof on the cabin and worked almost everyday with a work trip to Washington state in the middle. All that got done before I started work in the morning, sunup to 7am. except the cabin roof, that was 4 -12 hour days. Next weekend, back to the cabin to finish the roof ridge cap and start the new flooring. Get after it!
 

Snowy Rivers

Well-known member
Today's " Punch list "
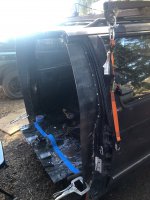
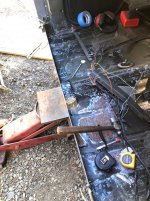
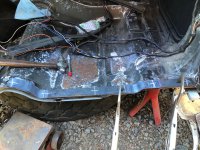
Got the pattern made to add the steel to the pinch weld area.....
Started off with blue masking tape and then transferred to the white board.....First pattern needed tweaking.....Made some adjustments and fine tuned the second one......GOOD TO GO.

Really great dealing with a body built by GM (Any major mfg) the pattern fits the opposite side perfectly as well.

As soon as possible I will get the steel piece and cut these bad boys out......

Going to line these all up and then stitch them into the pinch weld area....Paint the area and then seal the lap with seam sealer to keep it water tight.....
Once the pinch weld extenders are in....Then the floor gets cut nice and straight 3/4" back from the extenders....

A piece of sheet steel will weld to the floor sheet just below the lowest part of the flow pan and up at least 4" onto the extenders.....

A square tube goes across to fasting thre bulkhead sheet to.....

I am looking for a rear slider window that can be mounted in the bulkhead.....A bit lower than normal height.

The rear cabin needs to be about 18" higher than the front cab to allow access to the rear cab mounts on the front cab...

Also drilled out the front bucket seat spot welds....These will allow the bucket seats to go right into the front cab.

I need to stop off at Harbor Freight and pick up a few deep reach vise tongs.....My largest ones will not reach the pinch weld at the widest part.....

I want to be sure the extenders are clamped tight before welding....


Some pics

My biggest issue...I am good for a few hours in the morning....Then I'm all done.....The old bones are just used up.
Between the ravages of 5 or so strokes and a nasty bout with cancer......
The strokes really kick ones azz....Terrible fatigue.....
And with the fatigue comes a serious case of attitude....

But we keep trying...
 

Attachments

  • PINCH EXT7.jpg
    PINCH EXT7.jpg
    434.7 KB · Views: 64
  • PINCH EXT8.jpg
    PINCH EXT8.jpg
    797 KB · Views: 60
  • SEAT STUD BRACKETS.jpg
    SEAT STUD BRACKETS.jpg
    892.4 KB · Views: 63
  • PINCH EXT9.jpg
    PINCH EXT9.jpg
    561.8 KB · Views: 58
  • PINCH EXT10.jpg
    PINCH EXT10.jpg
    673.3 KB · Views: 63
  • PINCH EXT11.jpg
    PINCH EXT11.jpg
    1 MB · Views: 62
  • PINCH EXT1.jpg
    PINCH EXT1.jpg
    325.3 KB · Views: 61
  • PINCH EXT3.jpg
    PINCH EXT3.jpg
    342.4 KB · Views: 61
  • PINCH EXT4.jpg
    PINCH EXT4.jpg
    333.6 KB · Views: 64
  • PINCH EXT5.jpg
    PINCH EXT5.jpg
    536.5 KB · Views: 64
  • PINCH EXT6.jpg
    PINCH EXT6.jpg
    450.6 KB · Views: 61
  • PINCH EXT2.jpg
    PINCH EXT2.jpg
    356.8 KB · Views: 64

Snowy Rivers

Well-known member
Got to town today and stopped off at the steel yard.
I wanted a couple pieces of 1/8" x 6" x 43" flat stock to cut the pinch weld extenders from.

They only had full lengths of the 1/8" x 6" plus cuts $$$$$

So I walked out in the warehouse and sorted through the odd stock rack.

BINGO
Found two 5-7/8" x 10 gauge x 6' long

Far cheaper....
We will have some odd chunks left over....to stnd up in the corner....Likely find a use for them.

Tomorrows project is to get the needed parts cut using the new pattern.....Yessssssssssssssssssssssssss

And Harbor Freight had 3 of the long vise tongs on the shelf.....Grabbed them.
These were made in Tiawan....Far nicer than the others they have...

Also grabbed a couple packs of jig saw blades.....The odd shaped side has got to be cut....

I thought about using the Plasma cutter.....Sawing will likely assure zero warping
 

Attachments

  • PINCHWELD EXT12.jpg
    PINCHWELD EXT12.jpg
    292.4 KB · Views: 56

Snowy Rivers

Well-known member
Got after the 10 gauge steel before breakfast.
Cut the pieces to length....Then traced the pattern to the steel.

The Bosh jig saw did a fine job.....

Then came the fun part....A set of rolls would have made life easy....Had to do it by hand ....Clamped the piece to the cat frame and reefed on it a little at a time to get the bends started..

Then started clamping the part to the pinch weld with the vise tongs..

Still a really nasty beast....Very ornery critter...

Rolled out the "FIRE WAND" and heated the part dull red every 3 inches all the way down to let things relax.....

Still need to massage one spot on the bend area to get the steel to fit into the pinch weld nice and tight all the way down.

Went across town and grabbed a couple RV windows from a used/surplus outfit.

These are sliders....Will give some view to the folks in the back seat.

As soon as the new steel is in ....then we get to cut the floor to the final cut.....

Getting decent windows at affordable prices is a tough call.....New windows are $$$$$$$$$$$$$$$$$$$$$$$$$

These are scratch and dent stuff.....Something was blemished and they were removed from the RV and replaced.

Most of these windows will not be seen....especially the side that faces the forward cabin......

The windows are reversible ....I can mount them so the sliders align with the rear window in the front cab.....

One of those donuts that goes between canopy's and rear sliders will make it such that the rear crew can chat with the head end crew.......
 

Attachments

  • PINCH EXT 17.jpg
    PINCH EXT 17.jpg
    412.8 KB · Views: 57
  • PINCH EXT16.jpg
    PINCH EXT16.jpg
    386.2 KB · Views: 56
  • PINCH EXT15.jpg
    PINCH EXT15.jpg
    294.6 KB · Views: 55
  • PINCH EXT14.jpg
    PINCH EXT14.jpg
    302.4 KB · Views: 53
  • PINCH EXT13.jpg
    PINCH EXT13.jpg
    496.5 KB · Views: 56
Last edited:

Snowy Rivers

Well-known member
Mad a bit of good progress today.
Got the new steel piece finished uyp and fitted well.....Laid out the final location for the floor and the roof to be cut.

Notched out the floor and the roof....We can come back after the other side is done and get a good layout on the remaining floor panel and the roof.

This will allow good reference points to get a clean straight cut across both the roof and the floor....

The new piece welded in easily.....The 10 gauge holds the fire easily and allows a quick sneak onto the thin body metal...
 

Attachments

  • PINCH EXT20.jpg
    PINCH EXT20.jpg
    555.7 KB · Views: 59
  • PINCH EXT19.jpg
    PINCH EXT19.jpg
    338.6 KB · Views: 58
  • PINCH EXT18.jpg
    PINCH EXT18.jpg
    398.6 KB · Views: 55

m1west

Well-known member
GOLD Site Supporter
Mad a bit of good progress today.
Got the new steel piece finished uyp and fitted well.....Laid out the final location for the floor and the roof to be cut.

Notched out the floor and the roof....We can come back after the other side is done and get a good layout on the remaining floor panel and the roof.

This will allow good reference points to get a clean straight cut across both the roof and the floor....

The new piece welded in easily.....The 10 gauge holds the fire easily and allows a quick sneak onto the thin body metal...
Get after it snowy
 

Snowy Rivers

Well-known member
I am thinking that this plan is going to play out pretty much as I have envisioned it would....

Once the front bulkhead is done....Then we can rig it up and start in on the body mounts.

I have all the original metal body mount parts/bolts and scared up OEM rubber parts for the mounts.

The forward mounts are close to the B PILLAR....Then the next one is where the tube comes out of the wheel house ( Lift rig) and the last ones are just inside of the tail gate area....

Not sure we need all that many mounts....But it will not hurt anything.....

One piece at a time.......
Actually I will really be happy when this fabricating is done and I can get into building the engine.....Far more fun...
Even the automatic tranny is fun to rebuild......

The one job that is going to be bloody work....TRACKS.......big and heavy...
 
Last edited:

Snowy Rivers

Well-known member
Yeah.....

The tracks will need the outdoors to set up the assembly bench to drill the belts and add some holes to the grousers.
Need a metric buttload of bolts and nuts......

But the trade deal last summer (Started the year before) yielded two complete tracks (Grousers and tire guides)
One track had two complete sets of hinges.....These are the heavy ones......So we will have enough hinges to do both tracks using two 12" belts on both tracks.

Plenty of good tire guides.....Enough Gen 2 for almost all the grousers......I have a small number of the gen 3 tire guides.....Wish we had enough for all the spots.....

Beggars can't be choosy ......


Today saw the RH pinch weld extender cut, formed, fit up, located and welded into the chassis.

Tomorrows task will be to finish cutting the floor pan and the last little bit of the roof line....

This will put us in the sweet spot.

Next comes the sheet steel the fits the floor pan and comes up the pinch weld extender about 3 inches.....(Plywood bulkhead will lap over this metal at the bottom )
Starting to look good.....Warm and fuzzy thing ya know......

Getting this new steel in has not been all that bad of a job.....I had reservations at first as to how well it would go....

A set of rolls to form the bends would have been handy....BUT BRUTE FORCE WON THE BATTLE....
 

Attachments

  • PINCH EXT 22.jpg
    PINCH EXT 22.jpg
    356.9 KB · Views: 56
  • PINCH EXT 21.jpg
    PINCH EXT 21.jpg
    472.8 KB · Views: 57

Snowy Rivers

Well-known member
Made some good progress today.
Roof line and the floor are now all cut to finished dimensions ......

Pretty good sized chunk of floor came off....Ready for the scrap....

Straight edge across the cut in the floor.....Good enough for now....Once the lower upright is cut and ready to go in....Will likely need a tad bit of buffing off any high spots so the piece fits as tight as possible to the floor pans...

Decided against welding to the floor pans.....Will make up some angle clips and pop rivet them to the floor and weld them to the steel upright 6" flat....I had thought about bolting the brackets....Sadly there is a doubler piece in this area that prevents getting in to hold the nuts... 1/4" steel pop rivets will work fine....Since I have a big azz rivet tool with long handles....

Then we can hit the seams with seam sealer.....Nuff said.

One piece at a time....Starting to look like we know wassssup with this idea.....
 

Attachments

  • PINCH EXT31.jpg
    PINCH EXT31.jpg
    447.8 KB · Views: 55
  • PINCH EXT30.jpg
    PINCH EXT30.jpg
    473.2 KB · Views: 56
  • PINCH EXT29.jpg
    PINCH EXT29.jpg
    410.4 KB · Views: 56
  • PINCH EXT28.jpg
    PINCH EXT28.jpg
    381.4 KB · Views: 55
  • PINCH EXT27.jpg
    PINCH EXT27.jpg
    566.6 KB · Views: 56
  • PINCH EXT26.jpg
    PINCH EXT26.jpg
    535.6 KB · Views: 54
  • PINCH EXT25.jpg
    PINCH EXT25.jpg
    520.5 KB · Views: 59
  • PINCH EXT24.jpg
    PINCH EXT24.jpg
    325.5 KB · Views: 52
  • PINCH EXT23.jpg
    PINCH EXT23.jpg
    426.4 KB · Views: 54

Snowy Rivers

Well-known member
Yeah.....That's what I need....A REAL HONEST SCHEDULE :clap:

Today started off with a rip and a bang..../Until I figured out that the steel yard was closed for the holiday..

OK....WELL !@#$%^&*

Ah ...plan B

Took the two left over pieces from the materials used to make the pinch weld extenders.
Welded them together to make a piece long enough for the front piece....Yessss.. we had enough to keep busy today..

Got the lower part cut and fit....

A lot of hand work to get stuff in where it needs to go....

I need to get a piece of 1/8" x 1-1/2" flat bar to fit to the contour of the floor....

Then temporarily fasten it to the floor up snug against the 10 gauge piece....Then skip weld it to the 10 gauge.....

Will fasten the piece to the floor with sheet metal screws at first....Then after the part is ready for final install drill the holes out to 1/4" and pop rivet things in.....The ends are 1-1/2" x 3/16 angle...These bolt into the pinch weld extender.....I am done with fighting the painted and galvanized floor panels.....Galv is nasty to weld.....Not gonna do it....

A few pics
 

Attachments

  • PINCH EXT32.jpg
    PINCH EXT32.jpg
    421.6 KB · Views: 49
  • PINCH EXT33.jpg
    PINCH EXT33.jpg
    459.8 KB · Views: 58
  • PINCH EXT34.jpg
    PINCH EXT34.jpg
    470.1 KB · Views: 56
  • PINCH EXT36.jpg
    PINCH EXT36.jpg
    470.6 KB · Views: 51
  • PINCH EXT35.jpg
    PINCH EXT35.jpg
    449.9 KB · Views: 52

Snowy Rivers

Well-known member
Nope....Scrounged through my short stock rack.....Had plenty to keep going... :clap:
Today was a good day.....
Got the lower panels little brackets drilled and the pinch weld extender drilled as well....The lower panel fits in well.

Then off to the steel yard and got some flat stock to form to fit the floors humps bumps and such....

A bit of black smithing and we now have the flange to bolt the lower panel to the floor....

Tomorrow morning with any luck we can get the front panel back in and then get the lower flange in place and screwed to the floor and then welded to the panel......

Just tedious time consuming fitting.......

While figuring out a thing or two I grabbed a tape measure and checked out the opening for the plywood..

Not sure Why I assumed the bulkhead would take more than one sheet of plywood...

Good news....Total height of the opening is 47".......One sheet ....... Sweeeeeeeeeeeeeeeet


A few pics

The front panel now has its mounting ears drilled and welded on....
The formed flange is drilled.....

Once the lower panel is complete.....Things can move along a bit faster.....

I also got the material to do the top flange at the roof while at the steel yard.

They did not have any 4 x 4 x 1/8" angle.....But they did have a chunk of 12 gauge that was 9" wide and 5 feet long.

The $$$ were agreeable and they put a nice 90 degree bend in it.....So we now have the material to cap the roof/top corner.

Also got a 1" square tube for one of the cross tubes.....I need to figure out the elevation of the two windows before getting any more cross tubes......
 

Attachments

  • LOWER FRONT PANEL FLANGE4.jpg
    LOWER FRONT PANEL FLANGE4.jpg
    403.1 KB · Views: 57
  • LOWER FRONT PANEL FLANGE3.jpg
    LOWER FRONT PANEL FLANGE3.jpg
    516.2 KB · Views: 54
  • LOWER FRONT PANEL FLANGE2.jpg
    LOWER FRONT PANEL FLANGE2.jpg
    441.6 KB · Views: 57
  • LOWER FRONT PANEL FLANGE1.jpg
    LOWER FRONT PANEL FLANGE1.jpg
    334.6 KB · Views: 54

m1west

Well-known member
GOLD Site Supporter
You need to get that up there and mounted before the snow flies, Then you can build the motor and trans over the winter in the garage. If you get with it you can also work on the wiring and controls in the cab. Tic toc tic toc
 

Snowy Rivers

Well-known member
Yeah buddy

Sounds good
Today saw the lower panel welded to the black smithed pieces on the floor....
Made it over to Home depot and got a sheet of plywood....and some paint to cover the wood sheet.....
I grabbed a piece of the original interior trim from the S-Wagon and had the color matched....Will paint the inside of he plywood bulkhead so it matches the rest of the interior.....Just because....
We are under a severe fire watch around here....Had to help the daughter get the big horse trailer readied in case we get a fire and have to get the hell outta Dodge...

Between door handles full of Beeeees that are really pissy this time of year (A snort of Brake Kleen takes care of beeeees and wasps real quick) and a few other derailments the day just went away.....But work was done....

So the plan is looking good.....Lots of room in the aft seating area.....With the front seats all gone there is a ton of room....
I have actual pictures that we were doing stuff with the cat......

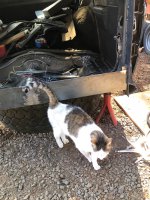
Oscar is always ready to help.....

I really need to get some hard numbers on where the front windows are going to sit so I can locate the lower cross tube.

I don't want to have to redo stuff.....
The rear cabin MUST MOUNT above the front cab high enough that I can get at the rear body mounts on the front cab.....

Also want the front windows on the rear cabin to line up well with the rear slider window on the front cab......

Just little crap that eats up time.......

But we should be able to get the cabin closed up before rain flies.......
 

Attachments

  • CAT WORK1.jpg
    CAT WORK1.jpg
    720.1 KB · Views: 58
  • CATWORK3.jpg
    CATWORK3.jpg
    832.9 KB · Views: 64
  • CATWORK2.jpg
    CATWORK2.jpg
    843 KB · Views: 58
  • BULKHEAD FRAMING6.jpg
    BULKHEAD FRAMING6.jpg
    547.3 KB · Views: 62
  • BULKHEAD FRAMING5.jpg
    BULKHEAD FRAMING5.jpg
    359.6 KB · Views: 60
  • BULKHEAD FRAMING4.jpg
    BULKHEAD FRAMING4.jpg
    642.3 KB · Views: 64
  • BULKHEAD FRAMING3.jpg
    BULKHEAD FRAMING3.jpg
    402.4 KB · Views: 67
  • BULKHEAD FRAMING2.jpg
    BULKHEAD FRAMING2.jpg
    546.7 KB · Views: 63
  • BULKHEAD FRAMING1.jpg
    BULKHEAD FRAMING1.jpg
    555.3 KB · Views: 63
Last edited:

Snowy Rivers

Well-known member
Yesterday was productive...Albeit interrupted with stuff we needed to get handled pending Red Flag fire warnings and possible power shut off due to high winds and such


Got the front bulkhead panel cut to size and fitted into the cabin.
Still quite a bit of little crap to deal with.....The roof cap seal plates and the side caps the cover the joint of the wood panel to the pinch weld extenders......

Not sure how much will get done today due to this weather BS......

Going to try and get the panel painted while it is still very dry......

Still need to add one more cross tube to the mid section of the opening.....and several angle clips to secure the panel so it follows the contour of the pinch weld extenders.

Just a note to the curious ....The vise grips are clamped to a pair of 1/4" bolts that thread into the lower plate..

These were added to allow the panel to sit on a location that was "Repeatable" and would hold the panel secure during the tracing of the inside of the cab against the wood panel and to allow the panel to slip in for mounting and not have to fight with clamps and other BS to irritate me...


After the panel was cut it took minimal sanding with the belt sander to "Tweak" things to fit well.

A little sanding at the roof crown was really all that was needed.....Basically only the RH side from center over to the edge had maybe 1/8" of an error......

Not going to cut the holes for the windows at this time....We can get that later ..I am thinking that after the cabin is on it's mount and located.....Then we can get a spot on location using the rear slider window access to mark the center of the front cabin rear window......THEN IT WILL END UP RIGHT......

The top corners of the roof will take some finesse to achieve a good weather tight seal.
Last night it became really clear that this area was going to need to be a little fabrication to cover the corner paired with the roof cap piece that runs across the entire crown.

Just a bit of a Richard.....not bad.....just take a bit of time to get it right....
Then the side pieces to cover the edges of the pinch weld extenders and onto the wood panel.......

If you don't see me pop in for a day or two.....POWER OUT.....May not happen.....BUTTTTTTTTTTTTTTTTT....
 

Attachments

  • BULKHEAD PANEL1.jpg
    BULKHEAD PANEL1.jpg
    349.8 KB · Views: 58
  • BULKHEAD PANEL2.jpg
    BULKHEAD PANEL2.jpg
    396.7 KB · Views: 55
  • BULKHEAD PANEL3.jpg
    BULKHEAD PANEL3.jpg
    349.6 KB · Views: 53
  • BULKHEAD PANEL4.jpg
    BULKHEAD PANEL4.jpg
    336.2 KB · Views: 53
  • BULKHEAD PANEL5.jpg
    BULKHEAD PANEL5.jpg
    505.3 KB · Views: 58

m1west

Well-known member
GOLD Site Supporter
Yesterday was productive...Albeit interrupted with stuff we needed to get handled pending Red Flag fire warnings and possible power shut off due to high winds and such


Got the front bulkhead panel cut to size and fitted into the cabin.
Still quite a bit of little crap to deal with.....The roof cap seal plates and the side caps the cover the joint of the wood panel to the pinch weld extenders......

Not sure how much will get done today due to this weather BS......

Going to try and get the panel painted while it is still very dry......

Still need to add one more cross tube to the mid section of the opening.....and several angle clips to secure the panel so it follows the contour of the pinch weld extenders.

Just a note to the curious ....The vise grips are clamped to a pair of 1/4" bolts that thread into the lower plate..

These were added to allow the panel to sit on a location that was "Repeatable" and would hold the panel secure during the tracing of the inside of the cab against the wood panel and to allow the panel to slip in for mounting and not have to fight with clamps and other BS to irritate me...


After the panel was cut it took minimal sanding with the belt sander to "Tweak" things to fit well.

A little sanding at the roof crown was really all that was needed.....Basically only the RH side from center over to the edge had maybe 1/8" of an error......

Not going to cut the holes for the windows at this time....We can get that later ..I am thinking that after the cabin is on it's mount and located.....Then we can get a spot on location using the rear slider window access to mark the center of the front cabin rear window......THEN IT WILL END UP RIGHT......

The top corners of the roof will take some finesse to achieve a good weather tight seal.
Last night it became really clear that this area was going to need to be a little fabrication to cover the corner paired with the roof cap piece that runs across the entire crown.

Just a bit of a Richard.....not bad.....just take a bit of time to get it right....
Then the side pieces to cover the edges of the pinch weld extenders and onto the wood panel.......

If you don't see me pop in for a day or two.....POWER OUT.....May not happen.....BUTTTTTTTTTTTTTTTTT....
Paint that plywood with penetrating epoxy, that way it wont delaminate and fall apart
 

Snowy Rivers

Well-known member
The fire weather is about over.....We did not get a power shut off as was possible per the power company...

Got some work done on the S-Wagon cabin today....

Pretty well have the cross tubes all welded in now.....
Got some different paint and painted the hell out of the bulkhead sheet......

Weather is not going to get real nasty for a while....Gotta get this bad boy sealed up....
 

m1west

Well-known member
GOLD Site Supporter
We got the PG&E warnings here as well.Didnt lose power either. Is the plywood just to hold everything together while mounting or is the 2 cabins going to be separate?
 

Snowy Rivers

Well-known member
Yeah....You folks have PG&E We have PGE (Portland General Electric)

They are following the fiasco of the mess down your way a while ago....They do not want to get sued.....
So they are just being safe.....
Pretty much getting things back on where it was shut off......
We were not in a designated PSPS area...But we got the notices and an email that we MIGHT get shut off if things got worse.
Winds never got over about 20 mph in gusts and generally 10-15 mph was about it......A few fires popped up even after the power was cut....so go figure....
Our area is all strung with "Tree wire" insulated where it is in forested places....It helps when limbs drop on it...Sort of

The cabins will be separate .....We can lift them as separate units and handle things with ease...
Today I ripped out the lower panel and cleaned stuff all up with prep solution.
Got the metal on the inner side painted and ready to add sealer and bolt back in....Gonna let the paint on the steel stuff dry until tomorrow before putting stuff back in.

Also tomorrow I want to seam seal the area where I added the extra material to the pinch weld.....Get that sealed then spray paint the area.

I do not want any bare steel left open from here on.

The plan is to get the wood panel in and sealed up as best I can and then cover with a tarp if need be until I can finish the roof cap area.....

I do not trust the weather from here on......It can change quick......NW Oregon has two seasons.....HOT AND DRY AND COLD AND WET.....We do not have a spring, summer, fall, winter as such.....When it changes....it changes.....

The last couple days have sucked....heavy smoke and just HOT....15% HUMIDITY......Much better today....Humidity at 63% as I write this....71F too.....

Yesterday at this time was 15% and 90F

I hate heat, super dry is not a fav....neither is super humid.....Oh well...never happy
 
Last edited:

Snowy Rivers

Well-known member
UPDATE...
Came in for a bit and heard a strange sound.....It started raining....Picked up .02" of rain in about 15 minutes.....
May get more over this evening....

A great ending to a long hot summer.....
 

Snowy Rivers

Well-known member
Trying to get this bulkhead wrapped up....
Spent 2 hours on the damned phone looking for some UHMW Angle to cap the edges and the roof line.
2-6 weeks out.....

NOT GONNA HAPPEN
Finally found an outfit up in Portland that carries the stuff...1/4" x 2"x 2" Sadly they only had the white stuff.....They thought they had black....1/2" only

So we got white.

Rained last night and wet things....A godsend....Really lowered the fire danger

Finally got back up here to the ranch and wanted to get the seam sealer on the pinch weld areas......Damned new tube was old me thinks....Broke the caulking gun trying to push the stuff out.......

Sooooooooo....Had to order some....Ordered up a can of brush on....This will make things easier to get the finish I want....

But we lost this afternoon......
But the 2 pieces of UHMW angle will really make things go easy and not add a bunch of extra weight....
The UHMW DOES NOT HOLD PAINT.....But I have spayed this stuff in the past.....Paint will stick for a while.....I WANTED BLACK.....AH WELL....

What I don't want is this thing open to the weather when it finally cuts loose
The last framing is in.....I need to caulk the lower area of the front floor and get the lower panel back in.....

Tomorrow should be a good day.....
 

Attachments

  • UHMW ANGLE.jpg
    UHMW ANGLE.jpg
    434.8 KB · Views: 53
  • fINAL FRAMING.jpg
    fINAL FRAMING.jpg
    385.7 KB · Views: 56

Snowy Rivers

Well-known member
The fresh can of Seam sealer showed up this morning.....
Got the lower panel all sealed into the body and then the pinch weld area seam sealed.....

Tomorrows task will be to get all the holes drilled in the steel tubes and other mounting points where the bulkhead panel bolts in.
Then start getting the panel drilled and snugged up into place......

The final fit with sealer will be in a few days....

Still fooling with the top corners and the trim pieces....

A few pics
 

Attachments

  • Sealing done3.jpg
    Sealing done3.jpg
    539.7 KB · Views: 55
  • Sealing done2.jpg
    Sealing done2.jpg
    409 KB · Views: 55
  • Sealing done1.jpg
    Sealing done1.jpg
    375.8 KB · Views: 56

Snowy Rivers

Well-known member
GITTENERDONE.....

The weather has been wonderful the past two days....

I got the bulhead all drilled and pretty well bolted in place today....
The bow in the panel made it tough to get the bolts of the correct size in and nuts on.

I had to use some all thread to pull the panel in (Vise grips on the nut at the bottom)
I got the materials today to fabricate the top corner caps.....

Hope to get this underway tomorrow.......

The panel pulled into place really nice.....There is about a 5/16" lip at the edge of the pinch weld extender......A great place to add a nice fillet of caulk.

Thinking about using either "Vulkem" or "Through the Roof"
The final design of the corner cap looks like a winner.....Will have a 1/4" closed cell foam pad that seals the cut ends of the top rail of the body.....

Should work well and compared to the original idea will be a lot lighter......

22 bolts holding the panel to the framing......

Thinking about some sort of a "Kick panel" from the lower cross tube to the floor.....
Maybe a piece of that light weight tread that is used over big rig fuel tanks....Maybe be nice to put the feet on..??????

The plywood panel will be good enough as far as insulating.....

Somehow we need a small heater in the rear cabin.....Coolant from the engine via a booster pump can supply the hot water..

Gonna have to think this one over a bit....A couple fans to keep the windows cleared....Yesssssssssssssssssss
 

Attachments

  • BULKEAD IN4.jpg
    BULKEAD IN4.jpg
    289.9 KB · Views: 54
  • BULKHEAD IN3.jpg
    BULKHEAD IN3.jpg
    508 KB · Views: 57
  • BULKHEAD IN2.jpg
    BULKHEAD IN2.jpg
    287.5 KB · Views: 55
  • BULKHEAD IN1.jpg
    BULKHEAD IN1.jpg
    448.7 KB · Views: 59

Snowy Rivers

Well-known member
I found a couple spots on the tube framing inside that I missed when I painted it.....

Decided to yank the panel back out one last time and get the paint on the tubes all spiffy..

All back together now and all the bolts in and snugged up.....

Started fabricating the top corner caps.....

LH one is done and ready to go on.....A few pics....I painted it just before dinner....so no pics with paint.....

This plan sort of supersedes the ones I had been thinking about....
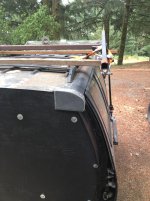
This design covers the entire corner well and SHOULD allow a good seal of the area to keep out the water.....

A cast aluminum part would be sweet....Fresh out....Oh well....

Tomorrow we should be able to get the other side built and ready to go.....

Just need to get the sealer and seal the bulkhead before it rains.....
One bolt through the front of the cover and two pop rivets up on top.....

Should be just fine......
 

Attachments

  • Corner cap5.jpg
    Corner cap5.jpg
    352.3 KB · Views: 58
  • Corner cap4.jpg
    Corner cap4.jpg
    192.1 KB · Views: 59
  • Corner cap3.jpg
    Corner cap3.jpg
    268.9 KB · Views: 55
  • Corner cap2.jpg
    Corner cap2.jpg
    329.5 KB · Views: 56
  • Corner cap1.jpg
    Corner cap1.jpg
    268.2 KB · Views: 54

Snowy Rivers

Well-known member
Took the better part of the morning to scare up the needed stuff to get things going.

Finally found the "Vulkem" Caulk in a dark color.....Most places only carry grey or white..

Found some dark bronze....Close enough....

The then 1/4" pop rivets....Nobody had them...Order in...Several days out ....ARRRRRGH

Then one bright young parts person...."Hey" Power window mounting kits.....He had a kit....Has enough of what I need to GITTERDONE.......

The two holes on top of the cab for securing the corner cap are blind......(Run inside the upper structure)

So finally got home with the goodies we need.

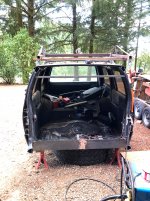
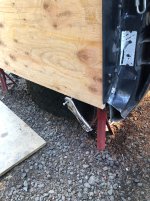
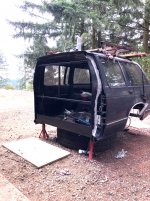
Got the entire bulkhead sealed....EXCEPT THE TOP CORNERS....

We have a little squirt of rain coming....Will cover the corners just in case.....

All for now....
Gotta feed the horses and then it's dinner time......
 

m1west

Well-known member
GOLD Site Supporter
Took the better part of the morning to scare up the needed stuff to get things going.

Finally found the "Vulkem" Caulk in a dark color.....Most places only carry grey or white..

Found some dark bronze....Close enough....

The then 1/4" pop rivets....Nobody had them...Order in...Several days out ....ARRRRRGH

Then one bright young parts person...."Hey" Power window mounting kits.....He had a kit....Has enough of what I need to GITTERDONE.......

The two holes on top of the cab for securing the corner cap are blind......(Run inside the upper structure)

So finally got home with the goodies we need.

Got the entire bulkhead sealed....EXCEPT THE TOP CORNERS....

We have a little squirt of rain coming....Will cover the corners just in case.....

All for now....
Gotta feed the horses and then it's dinner time......
Drifting a little, if you have horses. What do you think about pasturing a gelding horse thats bombproof with a stud pony thats a 5 on a 1-10 scale. There are no mares in sight but he does get excited from time to time.
 
Top