• Please be sure to read the rules and adhere to them. Some banned members have complained that they are not spammers. But they spammed us. Some even tried to redirect our members to other forums. Duh. Be smart. Read the rules and adhere to them and we will all get along just fine. Cheers. :beer: Link to the rules: https://www.forumsforums.com/threads/forum-rules-info.2974/

1972 Aktiv ST4 "Snow Trac"

Well I am STILL WAITING to hear about the sprockets so that is currently on hold. But I am hopeful. :pray: I am also still waiting for the shift pattern decals from my graphics guy.

I've also been thinking of another solution to the "shift pattern" problem and stumbled upon a company that makes custom shift knobs for cars. http://www.creative-car-concepts.com/ They make shift knobs in lots of colors, lots of designs, and they also are able to engrave a shift pattern into the knob. :cool2:

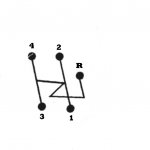
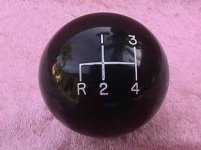
Below is a photo of one of their shift knobs, basic black, white letters in a standard VW shift pattern. I've also included a shift pattern for the Snow Trac. I've been trading some emails with the owner of the company, and he claims he can duplicate the shift pattern. Cost is a bit high at $48, but I think I might go for it.
 

Attachments

  • shift-pattern.jpg
    shift-pattern.jpg
    23.7 KB · Views: 478
  • 5solidblack4speedengraved.JPG
    5solidblack4speedengraved.JPG
    15.1 KB · Views: 484
Bob,

Not sure if it's worth considering/pursuing.

If you got a plain black knob, I would bet a local jeweler or trophy making place could engrave to your requirements.
 
I thought I would add some additional photos.

Picture #1 shows the POSSIBLE mounting locaiton of the Magellan Color Meridian GPS unit. The reason I say it is "possible" is because I have not secured the mounting base yet. The rake of the windshield may force me to keep the GPS screen in a positon that is too upright for easy reading so I need to try it with the GPS unit installed in the mounting base. The problem is the GPS is at home and the Snow Trac is at my warehouse, so I'll try it and hopefully it will fit?

Picture #2 shows the Fan mounted and some of the wiring. All the wiring is now in looms and some of it is fastened in place, some is still loose, but even in this condition it is much neater than it was with just some bare wires run.

Picture #3 shows the 12 volt outlet that was installed into the dash. A simple hole drilled and mounted flush and it looks like it came that way from the factory. The outlet will be used to power the GPS.
 

Attachments

  • 1gps.jpg
    1gps.jpg
    95.8 KB · Views: 465
  • 1fan-and-wires.jpg
    1fan-and-wires.jpg
    103.7 KB · Views: 458
  • 1dash-outlet.jpg
    1dash-outlet.jpg
    94.1 KB · Views: 470
Photo 1. Here is the battery switch mounted on the dash. I am not happy with this. I'm going to have to redo it but it may wait until spring before I do that? running the wires behind the dash proved more complicated than I thougth so for now the wires are surface mounted. Again, that will change when I get more time and the wires will end up behind the switch and under the dash.

Photo 2. This shows the new switches added to the left side of the dash. Obviously they still need to be labled but they control the new lights.

Photo 3. This shows the new batteries and the new heater. Plenty of work to do down here. I have to fabricate a new battery holder, you can see the cutout in the carpet where the original holder was located. Dual batteries made it impossible to keep the original holder.
 

Attachments

  • 1switch.jpg
    1switch.jpg
    81 KB · Views: 457
  • 1light-switches.jpg
    1light-switches.jpg
    85.1 KB · Views: 459
  • 1battery-heater.jpg
    1battery-heater.jpg
    117.3 KB · Views: 462
It is better to have the gps in the same hight as your eyes
 

Attachments

  • st4innan1.jpg
    st4innan1.jpg
    74.1 KB · Views: 452
  • st4innan2.jpg
    st4innan2.jpg
    80.4 KB · Views: 459
villi said:
It is better to have the gps in the same hight as your eyes
Villi, I do agree with you.

But I have this old GPS unit and it is still working great. The mounting bracket is ideal for the top of the dash. If I were to mount it higher, as you did, then I would have to fabricate some additional mount for the mount. Here are a couple better photos, it shows my GPS in the mouting bracket. It is an upright unit so it probably will be about 10" lower than is ideal, but still is not too bad?
 

Attachments

  • Photo_121406_002.jpg
    Photo_121406_002.jpg
    66.2 KB · Views: 442
  • Photo_121406_001.jpg
    Photo_121406_001.jpg
    84.7 KB · Views: 444
Bob

Check out the offerings by R-A-M mount. They have a GPS mount for most anything from cars to planes.

Second, scrap that damn green desk. It seems to be getting greener/bolder.
 
bczoom said:
Bob

Check out the offerings by R-A-M mount. They have a GPS mount for most anything from cars to planes.

Second, scrap that damn green desk. It seems to be getting greener/bolder.
Brian, that is the breakfast table the GPS is on, and it has a green tablecloth on it!

I just ordered one of these things. I looked at a few different models, one that I liked had a compass, but it was not illuminated for night use. I really wanted one that was lighted, this one has that feature. I'm not sure what use it will be for the flat farm fields I drive on, but I hope to trailer it to some more varied terrain.
 

Attachments

  • 87a0_1.JPG
    87a0_1.JPG
    19.1 KB · Views: 428
B_Skurka said:
Ok here is an opinion question for all of you.

Do I put the amber flashing strobe on the front or the back of the cabin :confused2:

I just got the strobe in the photo below (Photo #1). It is about 7" tall. I'm thinking of mounted it in front of the sunroof near the front of the cabin. It would make wiring very simple and seems like a pretty logical place to mount the strobe. Gordon Robertson's Snow Trac has his strobe mounted in the same place (Photo #2). On the other hand, Arlow mounted his on the rear (Photo #3) which is also where I saw mtntopper mount the lightbar on the cabin of his LMC 1500. If I carry anything on the roof, front mounting it will obscure the ability to see the stobe from behind. However I don't anticipate doing a lot of carrying on the roof, it is just something to consider.
Thoughts? Like I said, I'm leaning to mounting it on the front.

Bob, I mounted my strobe on the LH side above the drivers head as I said. I like it so much, I am going to balance the load and mount a matching strobe on the roof on the RH side also. At the price of the strobe, dual strobes are the way to make it look best in my opinion. Going to order another one on Monday. I will post pics when I get both installed.

As to the battery isolator switch it is now mounted in the small compartment under the passenger seat opposite the driver. It is hidden there and it also provides a degree of protection from unauthorized use. Unless you pay attention, you will not even know it is located under the lift up seat cushion in the small storage box just above the battery location.
 
Bill, I ended up mounting the strobe on the centerline, just a bit forward of the interior dome light. It is not the perfect location (because of the slight radius of the roof) but it is darn good.

As for the battery isolator switch, I like the location on the dash, but I did consider mouting it into the storage area under the passenger seat. I just figured I'd rather have it where I could get to it without having to move people, the seat or some gear that might be on top of it.

I also took my old Magellan Color Meridian GPS out with me yesterday when I went to help work on installing a hardwood floor at a friend's house. I wanted to see how it compared to a more modern unit (3 year old technology is pretty old compared to newer stuff). It was interesting that it to a lot longer to grasp its location at first start up (about 10 minutes) and when I turned it back on late in the afternoon while driving home a different route it took 2 or 3 minutes to fix my location (which was driving on a highway several miles away from where I had turned it off). Overall I was happy with it. Both GPS units showed me in the same spot, same elevation, etc. The Magellan's main fault is that the screen is not as bright and that makes it a bit harder to read in daylight settings. It has a brightness setting and can be dimmed down for night, but the photo showes it as bright as the display will go.
 

Attachments

  • 156520512133_3300.jpg
    156520512133_3300.jpg
    59 KB · Views: 422
B_Skurka said:
As for the battery isolator switch, I like the location on the dash, but I did consider mouting it into the storage area under the passenger seat. I just figured I'd rather have it where I could get to it without having to move people, the seat or some gear that might be on top of it.

Are you really going to be switching batteries that often? That is one big honkin' switch and it is a bit of an eye sore to be mounted on the dash like that.

I'd bury it away somewhere if it were me. Put it under the dash on the side wall or something.

It's fugly on the dash like that. Looks like something from a Little Tykes toy car! :whistle:
 
Bob
what is the big display in the dash ?

B_Skurka said:
Bill, I ended up mounting the strobe on the centerline, just a bit forward of the interior dome light. It is not the perfect location (because of the slight radius of the roof) but it is darn good.

As for the battery isolator switch, I like the location on the dash, but I did consider mouting it into the storage area under the passenger seat. I just figured I'd rather have it where I could get to it without having to move people, the seat or some gear that might be on top of it.

I also took my old Magellan Color Meridian GPS out with me yesterday when I went to help work on installing a hardwood floor at a friend's house. I wanted to see how it compared to a more modern unit (3 year old technology is pretty old compared to newer stuff). It was interesting that it to a lot longer to grasp its location at first start up (about 10 minutes) and when I turned it back on late in the afternoon while driving home a different route it took 2 or 3 minutes to fix my location (which was driving on a highway several miles away from where I had turned it off). Overall I was happy with it. Both GPS units showed me in the same spot, same elevation, etc. The Magellan's main fault is that the screen is not as bright and that makes it a bit harder to read in daylight settings. It has a brightness setting and can be dimmed down for night, but the photo showes it as bright as the display will go.
 
villi said:
Bob
what is the big display in the dash ?
Villi, in the center of my truck (VW Touareg) dash is a multi-function screen. The display shown is the GPS navigation screen, but it also controls the Radio, the 6 CD changer, and has a host of other funcitons. It can show elevation, location by lat/long position and even things like road temperature and it warns you if the road conditions could contain ice. There are optional adapters that can be added to display movies on the screen (but it is illegal to drive while a movie is playing!). The screen also interfaces with my Apple iPod (the small screen on the right side) so I can control the iPod through the truck stereo. It also interfaces with my cell phone so when I receive a call while driving the audio (from the radio, iPod or CDs) mute and the call plays through the speakers and my voice is picked up by a microphone for hands free talking.
 
Well just a little update.

The brakes have been reconnected so I can now stop :cool2: but the parking brake handle assembly completely fell apart and I had to order a new one. I found a complete handle assembly from a VW Bus on Ebay and am just waiting for it to arrive. The price was modest, about $40 with shipping.
This one is chrome plated so it will add some :bling: to the interior.

I'm still waiting for the shift pattern decals. The graphics guy did a lot of pre-Holiday partying and then took this week off for vacation so I'm sort of stuck waiting on him. For those of you guys who wanted the decals, sorry, but we are all going to have to wait!

The guy who was going to engrave a shift knob for me revised his price, to duplicate the pattern with the angled line, the price would skyrocket to $110 plus $8 shipping. :eek: No way. It would be nice to have, but not that nice. I'll just keep holding out for the graphics guy to make up the pattern so I can dash mount it. In the mean time I found a guy who makes shift and dash knobs for hot rods/street rods. He has some great shapes, and does custom colors, graphics, etc that he imbeds into the shift knob. I'm working with him to put the Snow-Trac "snowflake" logo into a shift knob. He said it would be about $35 to do that. But then he took this week off for vacation so I don't have a firm price from him for that. If it all works out, the graphic image in the photo below is what will be imbedded into the shift knob.

I got my "Clinometer" but have not mounted it yet. I've seen several different units that I liked, but very few of them were illuminated for night time use. This one is back lit and can be mounted on top or under a dash and at various angles. It is made by Rugged Ridge, part # 791005. Picture below.
 

Attachments

  • 157803979909_3300.jpg
    157803979909_3300.jpg
    94.5 KB · Views: 527
Hi Bob,

Looking at the picture of the battery selector, I was thinking you might be able to mount the switch behind the dash, depending on what's already back there, by using threaded standoffs and reversing the mounting bolts through the four mounting holes of the switch. The cutout in the dash would be a hole the diameter of the round part of the switch and four holes for the bolts. The large hole could even be lined with a vinyl edge.

Just a thought...
 
I have no issue with the battery selector being surface mounted, but I will be routing the battery cables under the dash to the back of the battery selector.

My big problem was the hole that I cut was not large enough to get the cables attached and I didn't have a bigger hole saw. I wanted to get it together before the snow. But we don't have any snow since this weather has been so warm all I get is rain. One of the first things I have planned for the spring is to cut a larger hole and reroute the wires. But the switch is actually in a convenient place, out of the way, and while it might be nicer to have a flush mount, I couldn't find one that was as heavy duty as this one.
 
I've been pretty lax on getting any update photos of my Snow Trac and its progress, and many of the photos have been pretty blurry lately because they were taken by my camera phone.

Below are a couple photos I took yesterday after doing some additional work.

Photo 1 shows my upgraded dash. I had a graphics guy make me some decals to designate the functions of the switches. You can't see it in the photo because it is 1/2 hidden, but the starter button is not labeled "starter" or "ignition" instead I had a little fun and labeled it "eject" :D 
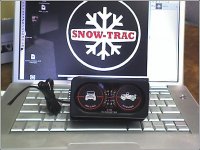
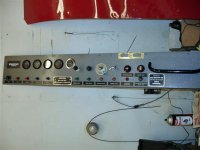
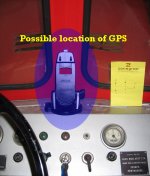
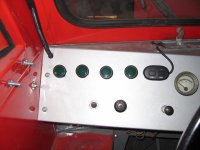
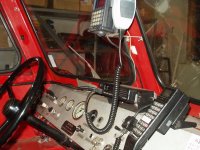
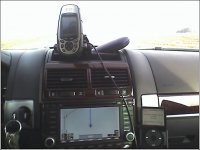
Having the labels really makes it easier to figure out what the different switches are for
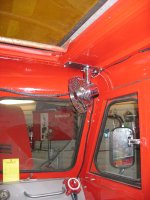
 :thumb:

You can also see the shift pattern decal located on the flat area of the transmission hump (some Snow Tracs had rounded transmission humps, some had flat) and since I sprayed mine with a waterproof 2-part epoxy "bedliner" like is used in pick up trucks that was a light gray color I had 2 problems to deal with when attaching the shift pattern decal. Problem number 1 is that the decal is white and the epoxy is light grey so there was not much contrast between the two. To make it easier to read I wanted it on a black background. Problem 2 is that the surface of the 2-part epoxy is bumpy and a decal would not easily stick to it. By attaching the decal to a piece of black plastic and then afixing the plastic plate to the transmission hump I solved both issues.

Photo 2 below shows an exterior photo. You can see the new mirrors, new PIAA lights, new side lights, and new amber strobe. :thumb:
 

Attachments

  • 1.jpg
    1.jpg
    107.4 KB · Views: 463
  • 2.jpg
    2.jpg
    115.8 KB · Views: 466
:a1: Very nice Bob :cool2: ,
I plan on going to a trophy shop and having all my labels made and engaved on Brushed aluminum metal plates so they can be removed if need be .
 
BigAl said:
I plan on going to a trophy shop and having all my labels made and engaved on Brushed aluminum metal plates so they can be removed if need be.
I thought about that too but (I hate to admit I'm getting old and my eyes are getting tired) I really wanted a very high contrast easy to read label. To my eyes, the engraved metal plates are difficult to read. Some trophy shops engrave plastic too, and for me that would be a better choice because the plastic is 2 layers, often white over black so the label would be white but the lettering would be black.

I just prefered the stick on individual lettering because it is easy (for me) to read.

If you have never used it, the letters are sandwiched between a peel off waxed paper layer and a clear plastic adhesive layer. You take the waxed paper side off and you are left with letters that are stuck on a clear plastic layer. You stick the clear plastic, with the letters attached, directly to your dash, rub it down so the letters stick to the dash, then peel off clear layer. Only the letters are left the dash and it gives a very clean O.E.M. look. Oh, and if I ever want to remove them, they can be peeled off, it takes some effort, but they will come back off if you need them removed.
 
Bob,

You make a good point on using the plastic name plates in a two color set up . I had thought, I would just have the trophy shop paint the engaved letters in black . Now I wonder if that is even possible ???
My original "Kristi Name plate and model/serial number are done in plastic ,now that I looked at it . It is on a black plastic with a white lettering and stands out quite well . I may need to rethink this .

I just went back to the start of this thread and read it all the way through . It is amazing how much knowledge you have picked up on the Snow Trac's since you started . I look at the manuals, how to repair section , and everything else you have done on FF and it is mind bloggleing:smileywac .
You have built a hell of a snow cat section my friend !:a1:
 
BigAl said:
You have built a hell of a snow cat section my friend !:a1:
Its amazing how much an ignorant man, with determination, can accomplish.

This started as a way for me to learn about the Snow Trac vehicles and create a little home on the interent where owners could talk about them. But it quickly became obvious that there was no good place for private snowcat owners to talk about them. I looked all over the internet for someplace like the tractor, welding and gun forums but I found nothing. With very special thanks to Doc, who asked me to be a moderator, we have a nice community for snowcats here. Doc gave me complete freedom to develop the Snowcat sub-Forum.

I'd still like to see some enhancements. Doc developed a new area where we can categorize pictures and files, but I've been lax in working on that. I'm wondering if we need to break the categories into more than the 3 that we have, but when I think about it, I'm not sure how I'd break them into 4 or 5? I like NOT having brand specific categories because there is so much common ground that we all seem to help each other, no matter what brand we own; I'm afraid that branded sub-forums might stifle that.

But the real thanks goes to all the guys (and gals) who contribute here. Go look at the thread with all the operators manuals in it. We could not amass that type of data without the help of a lot of very helpful members :thumb:

BigAl said:
You make a good point on using the plastic name plates in a two color set up
Well I noticed one thing when my eyes turned 40 years old. They started to need help!!! So for me the obvious choice is high contrast lettering on my dash. The 2 tone plastic plates would have been my 2nd choice, and they too look good. I'm not positive of it, but I think Gordon Robertson used them on his dash. You might want to check his photos: Gordon's Thread

EDIT BY BOB . . . I checked through some of the photos that Gordon and I have traded and found a photo of his dash. I don't think this photo is in Gordon's thread. So below is a photo that shows how Gordon labeled his dash. It looks like Gordon used black plastic engraved labels?
 

Attachments

  • 1.jpg
    1.jpg
    97.5 KB · Views: 421
Since we finally got a decent bit of snow I took the Snow Trac out at night to test out all the lighting upgrades that were done this summer.

Unfortunately I do not have a "before" photo using only the standard headlamps. So the first photo shows the new halogen upgrades that are MUCH brighter than the original lamps. The second photo shows both the Halogens + the roof mounted lights. Even with the roof mounted PIAA lights aimed too low, they still doubled the visible distance from the drivers seat. With proper adjustment, I expect that the roof mounted lights will come close to providing triple the forward visibility.

The photos are darker than the naked eye sees so the Halogens are really not too bad as they would be equivalent to typical automobile headlamps.
 

Attachments

  • 1.jpg
    1.jpg
    54 KB · Views: 413
  • 2.jpg
    2.jpg
    97 KB · Views: 407
Before and after with the side lights, and also a photo with the rear lights on.

There are 2 lights facing the rear. There is 1 side light facing away from each side.
 

Attachments

  • 3.jpg
    3.jpg
    33.4 KB · Views: 401
  • 4.jpg
    4.jpg
    119.1 KB · Views: 410
  • 5.jpg
    5.jpg
    45 KB · Views: 403
Cool lights Bob, I hope no one mistakes you for a UFO with all those lights you have!!!
 
Well the lights really work well and now I can not only see, but I can also be seen.

But I ran into another of my ghost problems last night. I was out running the Snow Trac, stopped to take a photo and the engine sputtered and died. Up until that point it was running great, it was warmed up and everything was working perfectly. I had stopped, probably for about a minute and it was idling when it just quit.

I went to restart it and even with both batteries selected the starter would barely roll the engine over. :drama:

Walked to the house (I was in the back yard and was returning from my ride) ate dinner, walked back out, and it started right up without any problems.:17875:

Any clue why this would happen? :confused2: Its been a long time since I played with VW engines and this incident just has be puzzled. What would cause this? Like I said, it was running perfectly, had been out for a couple mile run, everything was warm, everything was working properly.
 
From my chair way over here, it almost sounds like both batteries drained.

Do you have an ammeter &/or voltmeter in the ST4?
 
bczoom said:
From my chair way over here, it almost sounds like both batteries drained.
That is what it seemed like, but when I went back out it started right up without a hitch.

bczoom said:
Do you have an ammeter &/or voltmeter in the ST4?
I do. But it is the only gauge that doesn't work.
 
B_Skurka said:
That is what it seemed like, but when I went back out it started right up without a hitch.

I do. But it is the only gauge that doesn't work.

Maybe it is working, and you are just generating 0 amps?! :hide:
 
bczoom said:
From my chair way over here, it almost sounds like both batteries drained.

Do you have an ammeter &/or voltmeter in the ST4?

I would tend to agree with this... Even if the alternator is putting out full juice, the lights may bee more than it's capable of...

tell us again what the rated output of the alt is.. and did you calculate the amout of draw with all the lights on?
 
B_Skurka said:
That is what it seemed like, but when I went back out it started right up without a hitch.

I do. But it is the only gauge that doesn't work.

the batteries will come back to life to a certain extent if left to sit for a bit.
 
Top