Blackfoot Tucker
Well-known member
The wiring phase of the project is just about complete.
We installed the backup camera and its cable all the way up to under the dash panel. (The display will be mounted on the flat shelf behind the windshield and above the dash panel.) We needed a cable roughly 15’ long, but the camera and display system WBJ1 provided came with 20 meters of cable. Having an extra 45’ of cable coiled up under the dash seems so lame I think Scott will cut out what isn’t needed and splice the ends with soldered joints.
The cable ends are somewhat large, about 5/8”in diameter, while the cable itself is roughly 3/16”. Scott and I like to use rubber grommets wherever cable or wire pass through metal, be it a relatively thin sheet metal skin, or a frame member. But finding the grommet with the dimensions you need (especially locally) can be difficult. Twice we’ve run up against this and I end up driving to several businesses that I’m reasonably sure will have them…only to strike out. So I look online and find them without too much trouble. Yes, you are going to pay for shipping, and of course there’s a delay, but you avoid the wasted time and gas of driving all over town and coming up short. Right now we’re waiting for the grommets to finish wiring the backup lights….
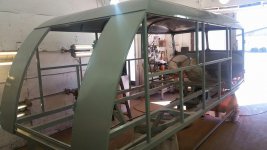
After running the backup light wires and the backup camera cable, both were covered with the nylon split loom I previously mentioned, and secured to the cab frame with stainless steel cushion clamps. We think that setup has a clean, professional look.
Here’s the backup camera mounted to the orange panel.

And the split loom installed and secured to the cab frame. Note the rear dome light is also installed.
I have no idea why, but Tucker installs the dome lights off the cab centerline to the left. When we removed the goofy bulkhead and installed our version of a center roll bar, we also relocated the dome light mounting plates to the cab centerline. Both dome lights will turn on when the driver’s door is opened, and they can be manually turned on with a switch on the gauge and switch panel. There are switches on the dome lights themselves to turn them off.

I must confess…we decided to abandon our plan of replacing all the nutserts in proper alignment to mount the gauge and switch panel. The biggest reason is the panel itself doesn’t have much of a margin outside the mounting holes, and the larger diameter nutserts would not be completely covered by the panel. The lesser of two evils was to carefully slot three of the mounting holes to allow the installation of the mounting bolts.
We also installed the gas tank and fuel quantity sender. When we originally removed the tank it had spacers to keep it off the steel plate underneath the tank and away from the cab sidewall. The existing spacers were cut from used track belting and we decided to replace them. We used 1/2” rubber horse stall mat for the cab side spacers and truck mudflap material for the vertical spacers. The tank is roughly four feet long and 18” high and does a good job of hiding some of the BSG paint.

While we were in installation mode we also installed the windshield wiper motor and its mechanical linkage, and the steering column and orbitrol were partially installed (need more fasteners to finish the job).
This is maybe a good time to relate part of our working relationship. After completing work and putting everything away one night, we were washing our hands before heading out to get a bite to eat. I remarked “We had a pretty productive night” meaning: we got a fair bit accomplished. Scott then says “Yes, it was productive. I got in some good licks” meaning: he measures productivity by the amount of harassment he dishes out!
Speaking of harassment… A few years ago Scott had an employee named Amanda who worked as a welder. While she worked for Scott she also was attending night school to become a nurse, and once she finished the book work left Scott’s employ to finish the practical requirements of the degree. Anyway, if you were working on something, and especially if whatever task you were trying to accomplish was being frustrating, Amanda would come by and say “Are ya done yet?” It was very obnoxious, and often the phrase would be repeated more than once for maximum effect. If the task took some time, the whole “Are ya done yet” experience could happen multiple times. Well, Amanda’s legacy lives on, and the phrase is fair game for either Scott or me to use at the most advantageous time to create the greatest annoyance to the other.
Next week the initial plan is to get the fuel lines (plural) installed. There is a combination pressure regulator and filter that has a return-to-tank line on it and that must be plumbed as well as the fuel supply line. Scott claims he’s done bending fuel line and he’ll watch me do it (and laugh). We’ll see… We need to paint four pieces of the aluminum floor panels and then maybe start installing the floor along with sound deadening material. Then probably interior upholstery…. (I’d also like to install the large Weatherguard box on the outside of the cab on the right as it will hide a bunch more of the BSG paint.)
There are a lot of tasks yet to accomplish….
We installed the backup camera and its cable all the way up to under the dash panel. (The display will be mounted on the flat shelf behind the windshield and above the dash panel.) We needed a cable roughly 15’ long, but the camera and display system WBJ1 provided came with 20 meters of cable. Having an extra 45’ of cable coiled up under the dash seems so lame I think Scott will cut out what isn’t needed and splice the ends with soldered joints.
The cable ends are somewhat large, about 5/8”in diameter, while the cable itself is roughly 3/16”. Scott and I like to use rubber grommets wherever cable or wire pass through metal, be it a relatively thin sheet metal skin, or a frame member. But finding the grommet with the dimensions you need (especially locally) can be difficult. Twice we’ve run up against this and I end up driving to several businesses that I’m reasonably sure will have them…only to strike out. So I look online and find them without too much trouble. Yes, you are going to pay for shipping, and of course there’s a delay, but you avoid the wasted time and gas of driving all over town and coming up short. Right now we’re waiting for the grommets to finish wiring the backup lights….
After running the backup light wires and the backup camera cable, both were covered with the nylon split loom I previously mentioned, and secured to the cab frame with stainless steel cushion clamps. We think that setup has a clean, professional look.
Here’s the backup camera mounted to the orange panel.
And the split loom installed and secured to the cab frame. Note the rear dome light is also installed.
I have no idea why, but Tucker installs the dome lights off the cab centerline to the left. When we removed the goofy bulkhead and installed our version of a center roll bar, we also relocated the dome light mounting plates to the cab centerline. Both dome lights will turn on when the driver’s door is opened, and they can be manually turned on with a switch on the gauge and switch panel. There are switches on the dome lights themselves to turn them off.
I must confess…we decided to abandon our plan of replacing all the nutserts in proper alignment to mount the gauge and switch panel. The biggest reason is the panel itself doesn’t have much of a margin outside the mounting holes, and the larger diameter nutserts would not be completely covered by the panel. The lesser of two evils was to carefully slot three of the mounting holes to allow the installation of the mounting bolts.
We also installed the gas tank and fuel quantity sender. When we originally removed the tank it had spacers to keep it off the steel plate underneath the tank and away from the cab sidewall. The existing spacers were cut from used track belting and we decided to replace them. We used 1/2” rubber horse stall mat for the cab side spacers and truck mudflap material for the vertical spacers. The tank is roughly four feet long and 18” high and does a good job of hiding some of the BSG paint.
While we were in installation mode we also installed the windshield wiper motor and its mechanical linkage, and the steering column and orbitrol were partially installed (need more fasteners to finish the job).
This is maybe a good time to relate part of our working relationship. After completing work and putting everything away one night, we were washing our hands before heading out to get a bite to eat. I remarked “We had a pretty productive night” meaning: we got a fair bit accomplished. Scott then says “Yes, it was productive. I got in some good licks” meaning: he measures productivity by the amount of harassment he dishes out!
Speaking of harassment… A few years ago Scott had an employee named Amanda who worked as a welder. While she worked for Scott she also was attending night school to become a nurse, and once she finished the book work left Scott’s employ to finish the practical requirements of the degree. Anyway, if you were working on something, and especially if whatever task you were trying to accomplish was being frustrating, Amanda would come by and say “Are ya done yet?” It was very obnoxious, and often the phrase would be repeated more than once for maximum effect. If the task took some time, the whole “Are ya done yet” experience could happen multiple times. Well, Amanda’s legacy lives on, and the phrase is fair game for either Scott or me to use at the most advantageous time to create the greatest annoyance to the other.
Next week the initial plan is to get the fuel lines (plural) installed. There is a combination pressure regulator and filter that has a return-to-tank line on it and that must be plumbed as well as the fuel supply line. Scott claims he’s done bending fuel line and he’ll watch me do it (and laugh). We’ll see… We need to paint four pieces of the aluminum floor panels and then maybe start installing the floor along with sound deadening material. Then probably interior upholstery…. (I’d also like to install the large Weatherguard box on the outside of the cab on the right as it will hide a bunch more of the BSG paint.)
There are a lot of tasks yet to accomplish….