HillBilt
Active member
Yes you do, I had already done the needed mods when I swapped to the Autolite carb. This is a direct replacement for one so just some minor adjustment needed.Did you need to modify anything at the throttle linkage?

Yes you do, I had already done the needed mods when I swapped to the Autolite carb. This is a direct replacement for one so just some minor adjustment needed.Did you need to modify anything at the throttle linkage?
A disease for which there is no cure
In the exhaust, drilled and welded in a threaded bung.Where did you place the oxy-sensor?
Did-ease, state of endless opportunities…
YES, APOLOGIES... curious where in the exhaust you plan to place O2 sensor - instructions state "if you have tube headers, mount the sensor approximately 1-10" after the collector. You must have at least 18" of exhaust pipe after the sensor." When I think of tube headers, I think after-market 'headers'... and not the typical OEM exhaust manifolds that weigh a ton.
Not sure if you have the OEM exhaust manifold (collector), but in my 77' the initial exhaust pipe is clamped by two bolts with flange - off of the OEM manifold - bends down, around, and out of the engine cover and stubs pointing up where the muffler is then attached just outside the cab for total of 26"...
I was planning to place my O2 sensor at 3" from the manifold pipe attachment flange (3/4" hole on top) leaving 23" to muffler attachment. ....curious where in the exhaust you have placed or plan to place your O2 sensor along that same stretch of exhaust pipe.
Not sure if measuring 18" down from muffler is a better spot, leaving O2 sensor at 8" from collector... or does it even matter?! I can call Holley # and ask their techs if this makes any difference too.
Thanks, it's not that I wouldn't mind making one for you, it's the price to ship it to you from where I'm at would be most likely the same cost for you to get a custom fuel cell made....Canuck shipping is outrageous, especially when boarders are involved.Hillbilt, I like your style! Would you be willing to make one of those pressure return aluminum plates to gas tank for me to buy? I’m waiting on my hi pressure fuel pump and was trying to figure out how I was going to install-what did you use as a seal / sealant, I’m a fan of your design but lacking in the scale of shop tools and a layman in snowcats!
Aye, ok got it!Thanks, it's not that I wouldn't mind making one for you, it's the price to ship it to you from where I'm at would be most likely the same cost for you to get a custom fuel cell made....Canuck shipping is outrageous, especially when boarders are involved.
You don't need any fancy tooling, a simple hole saw for the aluminum plate and drill your mounting holes, and some pipe fittings and your good to go. I used the lathe because I have it, didn't really need to. The sealant I used is called "Right Stuff" and is an awesome product. You could make a rubber gasket that sandwiched between the plate but Im lazy lol.
Also if I were to re-do it I would mount it on top of the tank, its where it should be mounted, not where I placed it. At the time I was worried it wouldn't clear the hood, but I had already removed it to get any measurements. Now after I have it back together I'm sure it would clear. It didn't leak at all last year so fingers crossed its good, but I will be monitoring it, if it's an issue Ill relocate it to the top.
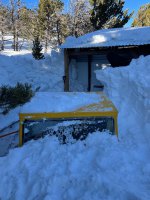
Love it ...Better than slip-sliding trying to get into the cab each time bust'n a shin!Got the little cat ready for the mountains, get some run time on the efi. Also mounted up another board rack and New Mexican seat cover for the back bench.
View attachment 143906
View attachment 143907
Thanks! and yes, this kit states the same, I don't think you need coolant to "flow" directly over it at all times, but I feel it refers to an area that coolant moves constantly. So for example, mounting it under the thermostat or above it where coolant sits rest are places to avoid, but I could be wrong. After running mine for a bit it seems to run great and matches temp readings to my gauge. This kit does have a option for oil pressure and numerous other gauge read outs, but you have to get another harness that plugs into this existing harness to add more gauges, I might add it later on as I plan to boost it with a small turbo eventually.Looking good! When I mounted my AFI Kit, I was told I couldn’t mount it in a “pocket” the sensor had to have water flow over it…so mine got more tricky, but I basically did the same thing! Does your display readout give u oil pressure? That’s the one thing I really wish mine did!View attachment 143932
Caribou-What EFI kit are you planning on using? They are all relatively the same but also very different. Some kits come with a high pressure "sump" that has the HP pump in it, others have a different style throttle body which would require a totally different throttle linkage setup, possibly an intake adapter and so on...KickerM - what are the brass fitting sizes for that piece you installed for the EFI coolant sensor? Do you have the source info / where you bought it? Any other gotchas to pre-consider and how you tackled em? Looking more for additional parts required as I'm in a snowcat down situation and fewer miles snowshoed to/from means I might get to use this again before spring...
Any personal experience with install / troubleshooting much appreciated!
- Throttle linkage (Any adjustments / Fabrication required? HillBilt provided some details on his as well, just curious!)
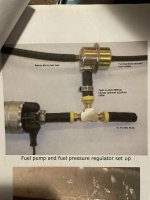
- High pressure fuel pump and fuel return to tank (What HPF pump did you use and how/where did you install return?)
- O2 Sensor on Exhaust (Got this from HillBilt)
- Coolant temp sensor (Brass fitting size details?)
- Wiring seems straight forward, yes, but ...?
Any recommendations on "electronic ignition upgrades" for 1985 or similar distributor version of the BR100 Bombi - Pertronix, MSD or? Photo with points removed... View attachment 145659
Come again?What is the difference with your Teflon and other polytetrafluoroethylene's?? HDPE is a material I use on a regular bases.
I used a Lokar Throttle CableKickerM - what are the brass fitting sizes for that piece you installed for the EFI coolant sensor? Do you have the source info / where you bought it? Any other gotchas to pre-consider and how you tackled em? Looking more for additional parts required as I'm in a snowcat down situation and fewer miles snowshoed to/from means I might get to use this again before spring...
- Throttle linkage
The AFI kit came with it, just use a pump that puts out at least 50psi, return line is T and controlled by Vaccum pressure
- High pressure fuel pump and fuel return to tank
AFI Kit came with it
- O2 Sensor on Exhaust (Got this from HillBilt)
Brass T: 1/2” MPT x 1/2” FPT x 1/2” FPT
- Coolant temp sensor
AFI Kit comes with great manual and great Tech Support from Norm at AFI!
- Wiring seems straight forward, yes, but ...?