• Please be sure to read the rules and adhere to them. Some banned members have complained that they are not spammers. But they spammed us. Some even tried to redirect our members to other forums. Duh. Be smart. Read the rules and adhere to them and we will all get along just fine. Cheers. :beer: Link to the rules: https://www.forumsforums.com/threads/forum-rules-info.2974/

SnowChicken Bombi Build

HillBilt

Active member
Hey @HillBilt hows that seat working out? I found almost the exact same seat, suburban 3rd row in great leather. Looks primo. Whatcha Think??Is it gone work? Modification I'm ok with. Throwing a hundred bucks out the window to keep up the Hilbilts only to find out that its a no go, eh? :poke:
? Yeah I think I'm going to use it, wife's orders:boobies: I honestly was going to leave it for next season project as the list is starting to add up but after she sat in it with the new seat it apparently made it to this years list:whip::mrgreen: Its totally better than stock. Only issues I see is it might be a bit more involved to have it tilt forward to access the battery and such. Also I will move the gas pedal forward a bit. Another thing is mine had the plow controls mounted basically between the original seats and I kinda wanted to keep them in there. So I'm just going to remove the levers for now and make something up later on.
 

HillBilt

Active member
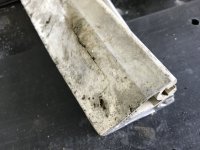
I got one track totally disassembled and ready for cleat weld repairs, all new fasteners and will flip the cleats around. I also will need to replace the inner track belting as it’s in rough shape.
3E367AB4-CF51-4929-AAE0-3F777CC093CB.jpeg

AFED4888-02CF-4C67-881B-7C99BA7D821E.jpeg

the outside belting is actually pretty decent and will reuse it for now
 

HillBilt

Active member
Ive slotted some time this week to put some work in on the Bombi, as I have been slack assin lately. See if I can get some shit done!:punk:
 

ezroller

Active member
GOLD Site Supporter
? Yeah I think I'm going to use it, wife's orders:boobies: I honestly was going to leave it for next season project as the list is starting to add up but after she sat in it with the new seat it apparently made it to this years list:whip::mrgreen: Its totally better than stock. Only issues I see is it might be a bit more involved to have it tilt forward to access the battery and such. Also I will move the gas pedal forward a bit. Another thing is mine had the plow controls mounted basically between the original seats and I kinda wanted to keep them in there. So I'm just going to remove the levers for now and make something up later on.
Alrighty!! Sounds good! I’m going for it to!
 

HillBilt

Active member
If the inside belting looks that rough, I’d consider the outside. Having done that work, and knowing the time it takes, might as well do both. Cost of new belt isn’t that bad (Boggie has the stuff pre-drilled).

Bob
Bob, I totally agree. But having said that I plan on replacing my tracks in the future, the cleats are rough and new ones aren’t in the budget this year. I’m going to try to salvage them and hopefully get a year or two, then replace both tracks entirely. I feel the outer belts are in good enough shape to last that time no problem. Here’s what I’m working with. All the cleats need welding, some better some worse. I’m also going to flip them on the tracks
3272D443-03F4-4B06-93CB-2F6060B287BE.jpeg


FEFF39F8-221E-4EDC-9DA2-EDA6DA9F090A.jpeg

And the outer belt
47D571EF-EEA7-44B7-92FA-E33FDF831E7A.jpeg
 

ezroller

Active member
GOLD Site Supporter
Those cleats are rough. One good thing I got was fairly nice tracks. I don't think mine got run on dirt or roads very often. Time to whip out the aluminum mig and teach your gal to weld.... :ROFLMAO:
 

HillBilt

Active member
Those cleats are rough. One good thing I got was fairly nice tracks. I don't think mine got run on dirt or roads very often. Time to whip out the aluminum mig and teach your gal to weld.... :ROFLMAO:
If anyone needs some aluminum practice it’s this guy, I don’t get a lot of aluminum work, but I’ll fire up the ole squirt gun and get some learning in? I’ve got a spool gun but my buddy just got a new push/pull so will probably give that a go
 

ezroller

Active member
GOLD Site Supporter
If anyone needs some aluminum practice it’s this guy, I don’t get a lot of aluminum work, but I’ll fire up the ole squirt gun and get some learning in? I’ve got a spool gun but my buddy just got a new push/pull so will probably give that a go
HAHAHAHAHAHAHAH
 

HillBilt

Active member
So figured I knock out the fuel return line issue. I’m planning on going EFI and it needs a fuel return line and the stock Bombi tank doesn’t have a provision for one. So I came up with this, a bit ghetto but should work fine.
Hole sawed out some 1/4” aluminum
AA253E6A-3B2E-4E22-9F8F-4C170CFF3E5E.jpeg

Then cleaned it up on the lathe
12D23B64-2895-4E28-93EF-9012DF0BC3BB.jpeg

Drilled a few holes and some pipe
8D693D8E-4BBD-4F58-9B8F-F153F0FA790E.jpeg

All you Bombi purests look away!! while I plow a 7/8” hole in this tank, sorry not sorry?
A0141BB3-2660-413C-A516-E515AA5E14C4.jpeg
 

Bobcatbob

Active member
GOLD Site Supporter
That is some awesome fabricobbling! Great idea for fuel return (like a common rail diesel). And those aluminum grousers....holy Mary mother of god! That’s some wear! I had 8 that needed replacing (all were the ones that had the ice breaking steel cleats on them, some kind of galvanitic corrosion). I bought 8 from Boggie, replaced as I went along (I can stick weld to get by, but TIG.....I leave that to the experts).
 

Attachments

  • 43960490-12B1-41CB-9DFD-ACA7BBD0E2B9.jpeg
    43960490-12B1-41CB-9DFD-ACA7BBD0E2B9.jpeg
    2.5 MB · Views: 119

ezroller

Active member
GOLD Site Supporter
YEAH! the good stuff!! Playing follow the leader here. I'm excited to see how this turns out.

@Bobcatbob Whoa thats crazy. Salt? I'm not a fan of the ice breakers. Those things ripped up my brand new trailer. I'll be removing those.
 

HillBilt

Active member
Pulled off the drive sprockets and man, Im glad I ordered new ones off the hop. These don't have many miles left on them. Also, maybe someone can enlighten me on the Hub Bearings. I see it has a grease fitting, but its also a Full Floater setup which is usually oil bath bearings, so are the hub bearings oil bath or grease packed?
 

HillBilt

Active member
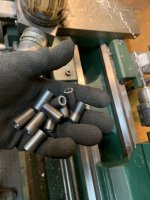
There are bushings inside the drive sprockets, mine are wasted so will spin out some new ones on the turny machine.

Bushings are 1/2" OD with an ID to accept a 5/16" Bolt and just over 1.00" in length
IMG_5657[1].JPG


Man these pics are freakin huge! my bad. Lets try something different...

IMG_5656[1].JPG
 

Bobcatbob

Active member
GOLD Site Supporter
YEAH! the good stuff!! Playing follow the leader here. I'm excited to see how this turns out.

@Bobcatbob Whoa thats crazy. Salt? I'm not a fan of the ice breakers. Those things ripped up my brand new trailer. I'll be removing those.
You’ll want to keep those cleats.....if your machine is driving sideways on a slope, the cleats keep you from sliding down. They also break surface ice. Add some plywood to your trailer (mine is a car trailer with a metal deck).....it’ll save the surface and provide some grip.

Bob
 

Bobcatbob

Active member
GOLD Site Supporter
Pulled off the drive sprockets and man, Im glad I ordered new ones off the hop. These don't have many miles left on them. Also, maybe someone can enlighten me on the Hub Bearings. I see it has a grease fitting, but its also a Full Floater setup which is usually oil bath bearings, so are the hub bearings oil bath or grease packed?
There’s an oil seal that keeps the grease in the bearing/race. If you put to much in (as I did with a pneumatic grease gun), it’ll push past the seal and get into the tube that the axle floats in. The seal also acts as a barrier for the differential fluid (if you happen to overfill past the side check plug) or splashes in there during operation. I would love a dipstick setup to check the differential fluid, but likely little need as long as there is no loss.

Bob
 
Last edited:

HillBilt

Active member
There’s an oil seal that keeps the grease in the bearing/race. If you put to much in (as I did with a pneumatic grease gun), it’ll push past the seal and get into the tube that the axle floats in. The seal also acts as a barrier for the differential fluid (if you happen to overfill past the side check plug) or splashes in there during operation. I would love a dipstick setup to check the differential fluid, but likely little need as long as there is no loss.

Bob
Right on, thanks for the clarification Bob, I had a feeling they were grease packed with the fitting there, just got confused when I pulled the hub apart and it was a full float design. Generally in the automotive scene full floats are lubricated by the differential oil.
 

ezroller

Active member
GOLD Site Supporter
That bushing is the exact same tube size as the door hinges. Hahahaha. I was just searching the web for that tube.


1/2 OD x .083 wall x .334 ID
1020 DOM A513 Round Steel Tube


2’ -10$ plus 15$ shipping ?
 

ezroller

Active member
GOLD Site Supporter
You’ll want to keep those cleats.....if your machine is driving sideways on a slope, the cleats keep you from sliding down. They also break surface ice. Add some plywood to your trailer (mine is a car trailer with a metal deck).....it’ll save the surface and provide some grip.

Bob
I think there are only like 4 on each side. Those little things do that much?
 

HillBilt

Active member
That bushing is the exact same tube size as the door hinges. Hahahaha. I was just searching the web for that tube.


1/2 OD x .083 wall x .334 ID
1020 DOM A513 Round Steel Tube


2’ -10$ plus 15$ shipping ?
Well that would’ve saved some time??

I had some 1/2” cold rolled and plowed some holes in it
F949A09A-77E3-4D25-AE4A-F06EC56E6EFF.jpeg
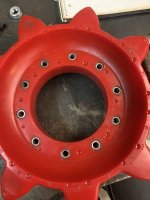
And inserted in the new sprockets?
C1EAFD2A-C1B9-4394-8C07-81339496539C.jpeg
 

Bobcatbob

Active member
GOLD Site Supporter
I think there are only like 4 on each side. Those little things do that much?
If my math was correct, there are approximately 16 cleats per each track (65 grousers I believe, a cleat for every 4th grouser). They have an alternating pattern every 4th grouser. If they’re missing, look for the grousers that have a through hole near where the boggies ride over. You’ll need a 1/4-20 bolt and lock nut to hold the cleats on. If missing, give Boggie at Mn outdoors a call .....he might have a few.

I have no experience driving the Bombi in snow yet (can’t wait though!)...but I read somewhere that the cleats are for ice breaking and helping on side slopes .
 

Attachments

  • C093FCC3-39A3-4AA9-A79D-53812EEFDF64.jpeg
    C093FCC3-39A3-4AA9-A79D-53812EEFDF64.jpeg
    1.7 MB · Views: 142
Last edited:

ezroller

Active member
GOLD Site Supporter
If my math was correct, there are approximately 16 cleats per each track (65 grousers I believe, a cleat for every 4th grouser). They have an alternating pattern every 4th grouser. If they’re missing, look for the grousers that have a through hole near where the boggies ride over. You’ll need a 1/4-20 bolt and lock nut to hold the cleats on. If missing, give Boggie at Mn outdoors a call .....he might have a few.

I have no experience driving the Bombi in snow yet (can’t wait though!)...but I read somewhere that the cleats are for ice breaking and helping on side slopes .
Yeah, I definitely don’t have anywhere near that many on my cat.... I’ll give her a run and see how she handles w/o them and report back
 

HillBilt

Active member
So, had some time off but been working away on this pile despite the lack of updates.
Few change of plans, my EFI kit keeps getting back ordered, now to Feb 2:mad: getting tired of waiting so I will run the carb for now as I really want to start using the machine and get a feel for it and seems to run really well as is.
Also I posted earlier that I was planning on swapping in a bench, I was undecided on it and now have decided to not use it, reason being as it moves the operator closer to the foot controls, without hacking them up and moving them further away its just not comfortable for me to run it, and Im not really into moving all the pedals. Will be running the factory seating for the time being.

Few items that did get completed:
New drive sprockets installed with all new hardware
IMG_5714[1].JPG

Ignition got an upgrade to pertronix/MSD parts
IMG_5701[1].JPG

Cleaned up all the lines and ran some new fuel lines and added the return. Full diff oil/filter change and installed the tank back in.
IMG_5713[2].JPG
 

HillBilt

Active member
I also have a dumb question, I cant find a coolant sensor anywhere on the engine :ROFLMAO: It looks like it should be on the bottom of the intake under the carb?? @Bobcatbob maybe you could enlighten me as to where it is or should be. I feel like it might have been removed as some of the coolant lines are somewhat hacked up and not original.
 

Bobcatbob

Active member
GOLD Site Supporter
I also have a dumb question, I cant find a coolant sensor anywhere on the engine :ROFLMAO: It looks like it should be on the bottom of the intake under the carb?? @Bobcatbob maybe you could enlighten me as to where it is or should be. I feel like it might have been removed as some of the coolant lines are somewhat hacked up and not original.
There’s two places you can install a coolant sending unit on the 1.6L: on the thermostat housing and the exhaust side of the engine. I’ve included a picture to highlight the locations. The only issue with the thermostat housing is it reads high (it‘s right next to the exhaust manifold). I’ve got a 180 degree thermostat and the gauge reads 235 before it opens up. I’ve checked it with an infrared thermometer (on opposite side of housing), it reads 180 degrees on the mark when it opens. So I’d go with the port on the side of the engine.

Bob
 

Attachments

  • C246E501-B1EC-451A-8BAA-FA27F2F5D104.jpeg
    C246E501-B1EC-451A-8BAA-FA27F2F5D104.jpeg
    710.4 KB · Views: 155

HillBilt

Active member
There’s two places you can install a coolant sending unit on the 1.6L: on the thermostat housing and the exhaust side of the engine. I’ve included a picture to highlight the locations. The only issue with the thermostat housing is it reads high (it‘s right next to the exhaust manifold). I’ve got a 180 degree thermostat and the gauge reads 235 before it opens up. I’ve checked it with an infrared thermometer (on opposite side of housing), it reads 180 degrees on the mark when it opens. So I’d go with the port on the side of the engine.

Bob
Thank you very much sir! mine is under the thermostat. I honestly didnt even look on that side of the motor as I wouldn't of expected it to be there. Also thanks for the tip on the temp variance (y)
 

ezroller

Active member
GOLD Site Supporter
Awh... No bencher? :cry: ahahahah. Sorry too here that Bud. maybe at 5'7" I can make it work. I'll find out soon. Almost ready to start putting it back together. I got the same problem as you. I wanna drive it this winter and its taking WAY longer to get this thing finished. I just keep replacing stuff.
 
Top