
-
Please be sure to read the rules and adhere to them. Some banned members have complained that they are not spammers. But they spammed us. Some even tried to redirect our members to other forums. Duh. Be smart. Read the rules and adhere to them and we will all get along just fine. Cheers. :beer: Link to the rules: https://www.forumsforums.com/threads/forum-rules-info.2974/
You are using an out of date browser. It may not display this or other websites correctly.
You should upgrade or use an alternative browser.
You should upgrade or use an alternative browser.
Round Door Kitten Restoration
- Thread starter RRose
- Start date
230 Pilot
Well-known member
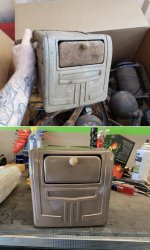
I don’t have a heater, must have been an option ?the heater is completely restored and re-wired
View attachment 135599
View attachment 135596
View attachment 135597
Track Addict
Bronze Member
Impressive progress. How much for the gauge restoration if you don't mind? 53 443 has the same one and needs love. Only difference is mine has a mechanical probe for temp and yours looks like a wired sender which might be a better upgrade during the process.
RRose
Active member
TA - he charges $150 if the gauge faces aren’t going to be replaced or $250 if you want new gauge faces. He can do white or black faces. Highly recommend him. Keven Patty - gaugeguy49@gmail.comImpressive progress. How much for the gauge restoration if you don't mind? 53 443 has the same one and needs love. Only difference is mine has a mechanical probe for temp and yours looks like a wired sender which might be a better upgrade during the process.
Track Addict
Bronze Member
I have a similar situation I am getting ready to embark on. Bottom of the door frames also.
You figure out the square stock for the frame? Tucker looks I have used thin walls.
You figure out the square stock for the frame? Tucker looks I have used thin walls.
hey kids, remember tucker did not treat the inside of the tubing, so, it is rusting rusting rusting from the inside out...and you will cut far more than you are planning to replace. you will be chasing your tail on this one, yes the wall thickness is very thin to start with and with a little rust action, it gets even thinner and thinner and thinner, you may want to seriously consider, replacing the entire frame rail with the rust issue.
fyi, fabric covered airplane frames are treated with linseed oil, they use it on the inside of the tubes, works well, one should consider treating the inside of the frame once done, otherwise, much sooner, than you think, you will have rust spots coming through your newly painted frame. Got to slow up the evil rust ...
pretty dang sure, tucker never thought for a moment, a single machine would still be around some 60 years later and or even thought to build it to last this long, it is a freak of nature, they just weren't meant to live this long...the joke is on us
Last edited:
I would like to second PP's suggestion on the tubing. On my Frandee I had a bunch of square tube that was rusted through, generally on the bottom of horizontal runs. Also, on vertical runs where water could enter, collect at the bottom, then freeze and expand the tube, generally cracking it at the edges. One solution to this was to drill drain holes at the low point of the vertical run, however this then opens up the inside of the tube to potentially more moisture, whether in liquid form or humidity in the air. On the Frandee I replaced the worst of the tube, then cut out and patched the bad bottoms of the square tube in isolated spots. This worked, but not the best, mechanically is strong enough but hard to get the aesthetics to original back, maybe a better metal worker could get it to look original. I would not scab anything on the outside, my 542 had that and it looked like sh$t and was a point to collect debris, whether gunk or snow. When I encountered the same corrosion on the 542 bed rails I just completely cut them out back to good sound steel then replaced with new tube, was much easier and turned out way better (you can use the original tubing as a template for hole pattern drilling, etc. When I cut out the original rails, some were heavily corroded on the top, not the bottom, where the wood decking contacted the tube. The wood held the moisture and propagated the corrosion. I also had two horizontal rails that were packed full of "mud", to this date I do not know how that material got inside and so packed in. But I also had some rails that had absolutely no rust at all on the inside, looked like the material had just come out of the steel mill, these rails had been sealed up tight and had no holes for fasteners or anything else. Additionally, from what I have seen on my cats is, the aluminum panels where fastened directly to the steel frame during original fabrication, then the entire unit was painted. As you know galvanic corrosion develops between the aluminum and steel, especially when moisture is present (sounds like snow or humidity in the air). My Frandee had extreme lose of aluminum from this corrosion, it was "rotten", I had to fabricate completely new aluminum panels for the entire unit. To prevent/minimize future galvanic corrosion I painted the steel frame with an epoxy primer then with urethane paint before attaching the aluminum panels. There is still some aluminum to steel direct contact in areas, especially the aluminum drive rivets, but the corrosion should be considerably less. For the 542 bed I am going to seal the wood so it does not collect and retain as much moisture, as well as paint the frame before attaching the wood. It is a lot of additional work, and may not be worth the extra cost or time to do this isolation between the materials for you, but it is something to consider. If you want to see what I did for the 542 Cab Forward frame tube replacement, there are pictures of the work on the forum for it's restoration. I also believe I posted the tube size and thickness that was original and that I used. This probably won't help much with the Kitten since the 542 used what I recall was 1-3/4 square tube. Good luck, and happy welding. One last thought, I went over the entire frame with a small hammer and tapped on the steel to determine what tube may need replaced since as PP describes the corrosion can start from the inside and may not be evident from the outside.
542 Frame Restoration:
 www.forumsforums.com
542 Frame Restoration:
542 Cab Forward Restoration
Then the bearings were drilled and tapped for the grease zerks, and a new bottom shield plate identical to the original one was attached.
RRose
Active member
That’s half the reason I took the body off the frame - so that I could get paint between the frame and the body to prevent the corrosion. You can definitely tell that it’s an issue. I will tap the whole lower section of the frame before I start cutting to see what all it needs - I’ve come to far to half-ass it nowI would like to second PP's suggestion on the tubing. On my Frandee I had a bunch of square tube that was rusted through, generally on the bottom of horizontal runs. Also, on vertical runs where water could enter, collect at the bottom, then freeze and expand the tube, generally cracking it at the edges. One solution to this was to drill drain holes at the low point of the vertical run, however this then opens up the inside of the tube to potentially more moisture, whether in liquid form or humidity in the air. On the Frandee I replaced the worst of the tube, then cut out and patched the bad bottoms of the square tube in isolated spots. This worked, but not the best, mechanically is strong enough but hard to get the aesthetics to original back, maybe a better metal worker could get it to look original. I would not scab anything on the outside, my 542 had that and it looked like sh$t and was a point to collect debris, whether gunk or snow. When I encountered the same corrosion on the 542 bed rails I just completely cut them out back to good sound steel then replaced with new tube, was much easier and turned out way better (you can use the original tubing as a template for hole pattern drilling, etc. When I cut out the original rails, some were heavily corroded on the top, not the bottom, where the wood decking contacted the tube. The wood held the moisture and propagated the corrosion. I also had two horizontal rails that were packed full of "mud", to this date I do not know how that material got inside and so packed in. But I also had some rails that had absolutely no rust at all on the inside, looked like the material had just come out of the steel mill, these rails had been sealed up tight and had no holes for fasteners or anything else. Additionally, from what I have seen on my cats is, the aluminum panels where fastened directly to the steel frame during original fabrication, then the entire unit was painted. As you know galvanic corrosion develops between the aluminum and steel, especially when moisture is present (sounds like snow or humidity in the air). My Frandee had extreme lose of aluminum from this corrosion, it was "rotten", I had to fabricate completely new aluminum panels for the entire unit. To prevent/minimize future galvanic corrosion I painted the steel frame with an epoxy primer then with urethane paint before attaching the aluminum panels. There is still some aluminum to steel direct contact in areas, especially the aluminum drive rivets, but the corrosion should be considerably less. For the 542 bed I am going to seal the wood so it does not collect and retain as much moisture, as well as paint the frame before attaching the wood. It is a lot of additional work, and may not be worth the extra cost or time to do this isolation between the materials for you, but it is something to consider. If you want to see what I did for the 542 Cab Forward frame tube replacement, there are pictures of the work on the forum for it's restoration. I also believe I posted the tube size and thickness that was original and that I used. This probably won't help much with the Kitten since the 542 used what I recall was 1-3/4 square tube. Good luck, and happy welding. One last thought, I went over the entire frame with a small hammer and tapped on the steel to determine what tube may need replaced since as PP describes the corrosion can start from the inside and may not be evident from the outside.
542 Frame Restoration:
542 Cab Forward Restoration
Then the bearings were drilled and tapped for the grease zerks, and a new bottom shield plate identical to the original one was attached.
thanks for the advice guys
RRose
Active member
Wow - good eye! It’s a custom painted 2014 that we used for the Canonball Baker 100th anniversary run from San Diego to New York.What year Tenere?
OK - - - that's beyond kick ass.
https://www.cycleworld.com/2014/07/...record-setting-cross-country-motorcycle-ride/
https://www.cycleworld.com/2014/07/...record-setting-cross-country-motorcycle-ride/
RRose
Active member
ya - thats it - the yellow one. Don Emde is my father in law. Best ride I’ve ever been on.OK - - - that's beyond kick ass.
https://www.cycleworld.com/2014/07/...record-setting-cross-country-motorcycle-ride/
RRose
Active member
I cut some inspection holes through the weakest spots on the frame. A TON of debris came out of the frame. I was originally thinking I was going to cut strips out of the bottom and weld in new flat stock. After further review, I’m going to replace an entire 2’ section on both sides.


RRose
Active member
Found something else kinda interesting a while ago when I pulled the fuel tank out. A 1.5” piece of wood was screwed in above the skid plate for the fuel tank to sit on so that it was level in the kitten. I dare say it looks like it has been in there the whole time. I think I’m going to add a cross member right there with a piece of angle iron top for the fuel tank to sit in - to strengthen the frame up.


Sounds like a good idea. I would also put some rubber between the tank and the frame to help prevent rubbing a hole in the tank.Found something else kinda interesting a while ago when I pulled the fuel tank out. A 1.5” piece of wood was screwed in above the skid plate for the fuel tank to sit on so that it was level in the kitten. I dare say it looks like it has been in there the whole time. I think I’m going to add a cross member right there with a piece of angle iron top for the fuel tank to sit in - to strengthen the frame up.
View attachment 135680
View attachment 135681
Geez, married into motorcycle royalty! So does that make you the Duke of San Juan? ;-)ya - thats it - the yellow one. Don Emde is my father in law. Best ride I’ve ever been on.