• Please be sure to read the rules and adhere to them. Some banned members have complained that they are not spammers. But they spammed us. Some even tried to redirect our members to other forums. Duh. Be smart. Read the rules and adhere to them and we will all get along just fine. Cheers. :beer: Link to the rules: https://www.forumsforums.com/threads/forum-rules-info.2974/

Astro van cat conversion

Snowy Rivers

Well-known member
Copy on the valve length, push rods, springs and such.

The Vortec heads were purpose designed to do what they do and do it well....Cam lift, duration and such is very mild and things really work fine given the emissions parameters for the rigs they ran in....1996 to 2000 GM Pickup L31 5.7 engines.

Then along comes some clown that wants to change the rules for Off highway use ....Then things go out the window.

Most hot rod folks want high RPM and big power with the Vortec heads....
In my case I want modest power at up to 4500 or so RPM

The stock Rocker arms are a 1.5:1 ratio......The other option is a 1.6:1 which is going the wrong way......

The heads have a fairly tall valve guide boss and the distance between the seal and the spring retainer is pretty limited...
Some sources say max lift at .420"....Others say .480" and so it goes on the internet sources....The only way to get good data is to measure things up and see....

The major performance outfits all offer Tools to cut the guide boss, open up the spring seat area, different springs, different retainers, and on it goes.

All good stuff for the performance seeker that wants to twist his little mouse motor high wide and handsome......

I don't need stiff valve springs that can handle 7000 RPM without floating......Stock spring rates will be fine for the application.....

Getting a bit more clearance between the retainers and the seals will get us in the ball park.....The machinist and I spoke of using a bit different set of springs he had that would work better and have a bit more room with zero worry about coil bind.

I do not want to spend $$$$$$ on screw in Rocker studs and such.....Simply do not need them for the spring pressure we are running and the low RPM

The Vortec 5.7 used hydraulic roller cam/lifters ....The push rods are shorter because of the longer lifters....
A set of standard production length push rods for the 400 SBC will get things where we need to be.....Going to use the stock valve guided rocker arms (These have a slot in the tip that sits over the end of the valve to keep the rocker centered)

Until I opened up that 5.7 Vortec I had never seen any of these rockers.....Guess I missed out on that staff meeting. :lmao:
IF...I had decided to go with a "Grocery getter" cam with lifts in the .400" range .....we would not be having this discussion, and I would have used the heads as is other than drilling the steam holes...

BUT OHHHH NOOOOO....I gotta have a bit of a Rumpy cam in my 406 inch Thunder Mouse........:thumbup:

So such is life........Plus I wanted to use the Late style serpentine belt drive system that came with the Vortec engine....
The serp drive needs heads with 3 bolt holes on the front of the RH head

The late serp drive system has the AC compressor on top on the drivers side.....This bad boy gets modified to handle the compressed air needs for the steering......Alternators available are stout and high amp units are pretty much stock....

Using the reverse rotation water pump style from the 1990 S10 (Same pump as used on the V8 of same year) this gives us a true GEN 1 cooling system flow through the bypass port......Which needs to be drilled in the RH head (Vortecs do not have this hole)

The 400 sbc has all the older GEN 1 cooling system passages......I just did not want to have to fool around with the mickey mouse fixes to keep from having weird heat spikes and air locks due to the Vortec head changes in coolant flow.

With the bypass hole drilled in the deck of the RH head and using the early serp drive water pump ...All these issues do not exist........

NOW
Truth be known.....I could have avoided all these issues and just installed a complete mid 90's TBI 350 with a carb type intake (These have heat passage) ...BUT OHHHH NO ....I gots to have the big inch small block.....Big bore, long stroke and all the goody yums......

Haaaaaaaaaaa.....JUST BECAUSE.....So along with "The I want" comes a host of things to deal with........


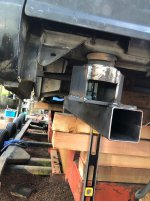
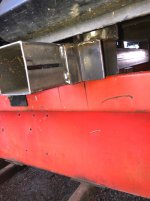
Back to Cat Central and the rear cabin mounting.

Slowly getting the LH mounting Bridge fabricated and in place.

I discovered yesterday late in the day that both the 2100 chassis and the S10 BODY can't be trusted to be exactly straight and the same from side to side......

Getting the Bridge assembly lined up and ready to start welding stuff in place and I find an error of about 1/2" ARRRRRRRGH.
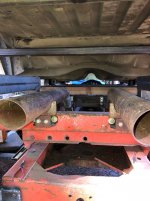
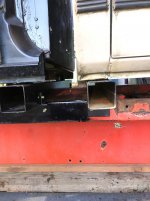
Turned out that part of it was due to what looks like a sloppy repair to the rear of the cat chassis.......I just could not figure it out....Then I walked back about 20 feet and looked down the top rail of the tub on the cat and spotted the issue.....

The last 6" of the tub rail tweaked inward and this accounted for the error in my dims on the new parts.....

The reference points I used on the S10 body are likely not good either due to production tolerances in the sheet metal....

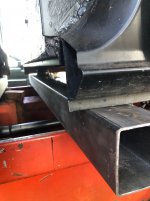
So I went back and referenced off the lower heavier part of the cat tub where the rear diffy mounts and found these to be pretty good....Then lined up the bridge tube with the lower part of the tub.....

Now the reference points are down in the 1/8" range as far as difference go......I can live with this......

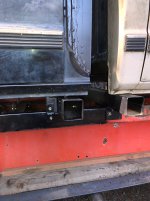
The one point on the sheet metal that seems off may be just normal production.....Or it may be from getting tweaked over the years from some damage or ???? Who knows......Anyway....The body mount is moving ahead and looks fine.....

Just a matter of "Fudging" a bit here and there to even out and lessen the error........

I really do not think that Thiokol was all that fussy about stuff.....GITTERDONE and out the door.....Then add 50 years of GAWD knows what has happened to it.....

All this stuff is aesthetics anyway and is just to make sure the cab sections are in line and will look decent when finished....

This stuff has no effect on the drive train or operation of the cat.....
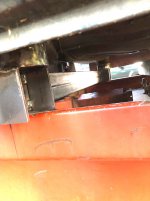
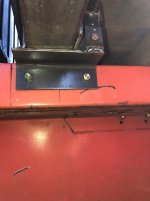
Got the beam front pedestal bolts in and the rear mount to the body is located and getting some weld on it......


I need to RE-Shuffle the blocks to allow getting the rear upright tube in and welded to the lower chassis.......

Trying hard to get all the points where the body sits on the new mountings contacting evenly.......The original mounting on the S10 had some shims between the mount points and the mounting biscuit hardware.....I can avoid this stuff simply by fabricating things in place and measuring as we go.... the factory error was 1/16" to 1/8" shims.......

I see no point in putting tweaks in things from the gitgo.......


Back at it today........
 

Attachments

  • LH BRIDGE BEAM1.jpg
    LH BRIDGE BEAM1.jpg
    280.6 KB · Views: 51

m1west

Well-known member
GOLD Site Supporter
springs and retainers won't give you more clearance, longer valves or machining the valve guide will.
 

Snowy Rivers

Well-known member
Correct....
The valve guide needs to be cut down some and machined for a more low profile seal.

The spring thing has more to do with the size of the wire and the pressure on the seat.....

There is a way to grind the underside of the retainers to gain a bit of extra room, but it is considered a bit sketchy and not on the list of "Good ways" to do the job

We are going to cut the guides down some and also open up the spring pocket so we can use a better set of springs.....
The springs on the Vortec are a bit sketchy....Very light single spring without a damper......

I do not need much...... .As long as we can run the .444" and .466" lift and have .060" of clearance between the retainers and the seals....Good to go....

The valves are plenty long in stock form......
Should work well.......The complete package should get this little mouse motor capable of 375 hp and 400 ft lb of torque

I think the HP is close.....Research on various builds of the 400 sbc with mild performance cams....9:1 compression and Vortec heads is in this arena......

The stock 400 heads were absolute crap as far as power......

The 400 is not a screamer for sure....But will happily handle 5000 RPM with the stock rotating assembly.

I stuck with the stock 400 Rods (5.565") and the stock 400 externally balanced crank. (3.750" stroke)....New flex plate
There are probably better ways to build a long stroke SBC ....But the factory parts are fine for the application.

Pistons are new 1443 Silvolite +.030"

These are a dished piston...With the vortec heads the compression ratio calculates out to about 9.3:1 Maybe a touch more......I am not worried about all the nit pick stuff to get the numbers down 6 places past the decimal point.....

It will be a bunch better than the way Ma General made it back in 1980......

The heads alone are light years better flow than the stock 882 castings..
A bit more Comp ratio and a much better cam.

I thought about several engine options for the Cat....The Chevy Small block is just so easy to get goody yum parts for....And it is a compact package........

The original Ford FE engine is huge, weighs a butt load and is a Turd in stock trim.....

I have had Fords with the FE engine.....Can be a power house.....But the little Mouse motor is so easy to build and cheap.....


I had given thought to a GM 6.2 Diesel.....Just too wide to be a good contender....HEAVY TOO

Several other options came to mind.....Most are just not nearly as easy as the SBC to get parts and adapt to the use...
Had the cat came to me with the Ford Engine and tranny as usable parts....That may have been a different story.

No engine and the C6 tranny was full of water.....Likely junk.....

Started with a clean slate.......And decided to be slightly different and go with the big bore Mouse Motor......

Got lucky and had a fella contact me on a WANT AD I placed for a 400 SBC.
Got a good block....Not much more.
Found a good crank at "Rebuilders supply"
The shop I use had a good set of Rods
New pistons
High capacity gated and baffled oil pan
Vortec heads
Cam choice is likely going to be an 1103 Summit
Stock GM L31 Serpentine drive system
Small GM starter
Exhaust manifolds from a 1995 Suburban 5.7 (Desired discharge area )
Carbureted intake with a 750 Quadrajet carb
Standard old school large cap HEI distributor.....

This should be a great little power plant

The TH 350 Tranny will back this power plant..

Just a good going over ....New seals, Clutches, better sprags, bushings if need be.....Fresh RV type converter
Going to go with a manual shift kit and basically make it a SELECT SHIFT.....No auto shift at all....
The TH350 is a great little box and should handle the gears fine.......


I am looking forward to the power train build......Far more fun than beating on the iron......
 

m1west

Well-known member
GOLD Site Supporter
I used bee hive springs on my roller cam magnum build, single spring with the same spring rate as a straight double spring, with a smaller retainer that helps with rocker clearance. The other thing I did was shim the non adjustable rocker pedestals to achieve zero lash. that way the lifters will lift the valves to full lift. No preload.
 

Snowy Rivers

Well-known member
Ahhhh yes....

I have seen this done before..
The Bee Hive springs and smaller retainer is one of the solutions on the vortec heads too..

I had thought about going Roller lifters.....The Cost over the flat tappet cam is more than I want to cough up.
The only draw back on the Flat tappet cams any more is the changes in the oils.
Most of the newer oils do not have ZDDP additive and this is tough on cams.

There are a few oils that have the ZDDP added for the "Classic cars and performance builds"

With the older GEN 1 SBC 400 I could add the after market roller lifters with the guide bar....

This engine will do fine with the Flat tappet cam/lifters......
We are not going to run big Herky pressure springs which place far more stress on the cam lobes...

I keep thinking about going roller....Since I have not purchased Cam/lifters or push rods as yet..
Then I look at the cost... Then ask...WHY...

The ZDDP amount was reduced some years ago when the Mfg's had to guarantee the Cat converters for 100,000 miles or ????
The ZDDP will poison the cat really quick and take it out.

The ZDDP additive is really only needed for the sliding type of actions found in a flat tappet cam.....So they went to Rollers to negate the worries of cam failures ......

When I start the assembly of the engine .....May change my mind.....WE shall see...
 

m1west

Well-known member
GOLD Site Supporter
Thats the reason built a magnum over just rebuilding the original LA 360. Flat cam wiped the motor out in a few miles. Started as a slight pop back in the carb. by the time I got it home, it wouldn't re start and the metal was throughout the motor. And yes I was using the additive.
 

Snowy Rivers

Well-known member
That can happen
I have only used the old school oils sold for vintage engines
The additive is good too

But it needs to be in the oil all the time

These kinds of stories make me think about a roller
 

m1west

Well-known member
GOLD Site Supporter
That can happen
I have only used the old school oils sold for vintage engines
The additive is good too

But it needs to be in the oil all the time

These kinds of stories make me think about a roller
aftermarket chevy stuff is pretty in expensive.
 

Snowy Rivers

Well-known member
Yes it is......(Relative term)

I am curious about the issue with the cam in your MOPAR
Was that cam failure short term right after a rebuild ? or after a lot of usage on the engine?

Most short term cam failures can be traced to the break in procedure and now with the oils used.

Using too stiff of a valve spring setup during the break in time.

I always use light (Stock type springs) for the break in of the cam.

Pre oil the engine with a primer to have nearly zero run time without oil pressure.
Get the engine started and keep the RPM up to about 1500 or so and varying the speed up and down to get lots of oil thrown on the cam for the first 30 minutes of it's life....NO IDLING for at least 30 minutes of run time.

After the break in.....Dump the oil and filter.....Refill with fresh oil and a new filter ....ZDDP additive....I prefer the performance oil that has the old school formulation .....JUST MY PERSONAL PREFERENCE .


Losing a cam on a fresh build is certainly disheartening to say the least.

Some cam failures happen due to lifter issues......I have heard and read that there are some trashy lifters that are sold under good names...but are made across the pond and the contact surface is not heat treated correctly and some actually have the wrong spherical grind on the face....

Flat tappet is actually misleading....The face that contacts the came is ground with a slight convex surface and the cam lobes have a .002" taper to promote lifter rotation.....
Still....even with a lot of care and proper break in ....a cam failure can happen......I started working in the auto industry back in 1970 and have personally only had 1 cam die on me during the break in.......I count my blessings on that.....

As you well know....cleaning up the mess is a pain........

I am not a real fan of the guide bar type roller lifters needed on the early Chevy small blocks.....The later stuff with the lifter guides in the valley are nice.......
 

Snowy Rivers

Well-known member
The new oil formulations were likely to blame......
50K on an engine is very low to lose a cam.
What oil were you using ?

I have beat my head against the wall on this oil thing.....There are a few good oils that are aimed at the performance engine market and contain high levels of Zinc and phosphorus.....

These oils are a tad more spendy than run of the mill stuff for the modern crew of engines with Roller cams....But the increased cost is minimal .....
 

m1west

Well-known member
GOLD Site Supporter
I was using Valvoline VR-1 high zink racing oil. I still use it in my hauler and my old ford tractor.
 

m1west

Well-known member
GOLD Site Supporter
I was on the way back from the cabin, I started hearing what I thought at first was a knock, so I pulled over and opened the hood. At idol everything was fine but as soon as throttle was applied it was a pop in the carb. I pulled that plug wire and went on, by the time I was almost home it was popping in another cylinder and the temp. was on the rise. I shut it off at home and it turned over slowly and wouldn't re start. Next day I pulled the valve covers and intake. There was a mound of metal flake in the valley and was progressing from lobe to lobe, I wouldn't have made it very much further. I pulled the pan, rod cap and a main cap. It was in everything grooving the crank and bearings. it was toast.
 

Snowy Rivers

Well-known member
Got some good work done today.
Finished up the LH Bridge beam and got the entire mass of blocking removed.....Rear cabin it sitting with its full weight on the cat.....

Decided to add a pair of gussets between the rear beam upright and the top rail of the tub to add a bit more stability given the tall nature of things......

A bit more work to do....Mostly I need to clean the new parts up and get some paint on them....Weather is still good....But that is sure to change soon...

Once the rear beams are painted it's off the the very front mounts (B pillar)
The exhaust rear pipes may get changed.....Still not quite sure if I want to do the veranda on the back.....
The exhaust is such that several options are available easily

This rig is definitely going to be a tall drink of water......
 

Attachments

  • Bridge beams2.jpg
    Bridge beams2.jpg
    483.1 KB · Views: 69
  • Bridge beams1.jpg
    Bridge beams1.jpg
    483.2 KB · Views: 71
  • Bridge beams3.jpg
    Bridge beams3.jpg
    419.4 KB · Views: 68
  • Bridge beams4.jpg
    Bridge beams4.jpg
    384.4 KB · Views: 62
  • Bridge beams5.jpg
    Bridge beams5.jpg
    403.3 KB · Views: 65
  • Bridge beams6.jpg
    Bridge beams6.jpg
    311.8 KB · Views: 65
  • Bridge beams7.jpg
    Bridge beams7.jpg
    257.6 KB · Views: 64
  • Bridge beams8.jpg
    Bridge beams8.jpg
    353 KB · Views: 70
  • Bridge beams9.jpg
    Bridge beams9.jpg
    383.6 KB · Views: 70
  • Bridge beams10.jpg
    Bridge beams10.jpg
    353.1 KB · Views: 73
  • Bridge beams11.jpg
    Bridge beams11.jpg
    319.7 KB · Views: 71

m1west

Well-known member
GOLD Site Supporter
Got some good work done today.
Finished up the LH Bridge beam and got the entire mass of blocking removed.....Rear cabin it sitting with its full weight on the cat.....

Decided to add a pair of gussets between the rear beam upright and the top rail of the tub to add a bit more stability given the tall nature of things......

A bit more work to do....Mostly I need to clean the new parts up and get some paint on them....Weather is still good....But that is sure to change soon...

Once the rear beams are painted it's off the the very front mounts (B pillar)
The exhaust rear pipes may get changed.....Still not quite sure if I want to do the veranda on the back.....
The exhaust is such that several options are available easily

This rig is definitely going to be a tall drink of water......
Yep , no side hilling for you.
 

Snowy Rivers

Well-known member
hAAAAAAAAAAAA.....I don't think this old 2100 is gonna have any issues with side hills.....

My only concern was having the rear supports at 20" long and the support anchored near the bottom of the frame...

The mid and front mounts are only a few inches above the cat frame .

If you look at the first pic TOP ROW LH SIDE.....You can see the rear support that sits at the lower edge of the lowest frame section.......

This entire mounting does give room under the body for extra stuff......Air tanks and goodies.....

As far as side hilling goes.....This cat should be fine....The road wheels are still at the factory 92" C/L With the tracks at 44" wide the overall width will be 11'- 4".....

I will not say that a good side hill won't tend to induce a little butt pucker.....But the mass of weight is low.

Main frame, axles, tires and wheels, tracks, engine and tranny are all extremely low.....The cabs are all that's up any distance.....

Could do some calc's and figure out the CG ....But the likelihood of issues are slim.....NOW I suppose one could arrange to get into trouble if they worked at it......

Some of the Tuckers are pretty tall, but they seem fine........Again.....Hanging it out waaaaaaaaaaay too far can get the pucker factor up greatly......

Today was tear down and paint day.....LH SIDE BEAM back off, cleaned and painted.....Reinstalled.....

Had to go get more paint.....Store was out of the color I wanted.....Finally got paint.....

Tomorrow we will rip off the RH side and get it painted and back on......Then up to the front of the S10 cabin and work on the mount....Middle mounts will be the last to go in.....Once the cabin is sitting on the front and rears the mid ship mounts will be easy to build to fit.......

Weather is staying nice.....Strange for this late though.......
 

m1west

Well-known member
GOLD Site Supporter
Had a Thiokol 603 pretty low and wide, still didn't like the side hill feeling, mainly because you can slide sideways down the mountain side. For whatever reason , I'm assuming its tied to traction and the differential. but it seems the low side track always spins first. Have seen Tuckers stuck in a ditch on one side, two tracks are a little better but it can happen to them too.
 

Snowy Rivers

Well-known member
Oh yes.....all the above.....
A cat with the Planetary drive is somewhat better than the open diffy drive of the Tucker.....But the only drive that will deliver full power equally to the tracks are the Hydrostatic systems........

Side hill situations of any serious amount certainly can cause the "Dreaded side slide" The grousers on my 2100 have "Slide stops" at the ends of every one.....But these are only an end cap on the grouser......Once MA GRAVITY finds your butt it may be very hard for those little end caps to hold onto enough to stop the slide.....

Fine loose powder snow.....All bets are off.....Try and swing the machine around and get it headed with the slide.....Once the slide is arrested ......Stop and clean out your shorts..... :lmao: .....

I looked at a 3700 Cat before I grabbed the 2100........The poor kitty had serious issues with the Hydraulic drive....$$$$$$$$$$$$$$$$$$$$$$$$$$$$$$$$$$$$$$$$$$$$$$$$$$$$$$$$$$$$$$$$$$$$ OMG.....I passed up that money pit

A hydro has some very nice perks.....Repair costs are not one of them....

Has anyone installed something like an "Air Locker" in the Diffy's on a Tucker ????

This would really go a long way to stopping losing power to one entire side.

The other way is of course a WINCH....
I have thought about a Winch for my 2100.....But that is certainly quite a ways down the trail..
 
Last edited:

Snowy Rivers

Well-known member
Both Bridge beams are all painted and back in the cat now....
Tired of using tree parts to jack the rear of the S10 cabin up in the back...Decided to build a dedicated jack....

I had an old 22.5 duplex Alcoa wheel off the transfer trailer from about 15 years ago....Blew a tire and trashed the wheel on the asphalt......

Finally found this wheel a new job.

Going to bolt in a chunk of channel...Weld on a piece of 3" x 5" box tube (Laying in the corner) And add in a piece of 1" threaded rod to a smaller channel to make a saddle.....

I need to do some drilling and a bit of machining to make the thing work...

This will be a dedicated jack for the rear of the cat cabin......Will not have to sort through the firewood to find suitable blocking....
When it comes time to remove/replace the rear cabin....LIFE WILL BE MUCH EASIER.....Safer too........

In most instances the cabin will be lifted up and off the mounts with the rear bridge beams in place....But should one or both need to be removed to access stuff without removing the cabin...The jack can fit under the back of the S10 Wagon body and over the bulkhead the rear mounts bolt to right in the center of the body....

Much nicer to deal with than piles of logs and 4 x 6 lumber....

Pics
 

Attachments

  • Rear body jack3.jpg
    Rear body jack3.jpg
    444.5 KB · Views: 57
  • Rear body jack2.jpg
    Rear body jack2.jpg
    523.5 KB · Views: 50
  • Rear body jack1.jpg
    Rear body jack1.jpg
    326.7 KB · Views: 54

Snowy Rivers

Well-known member
And onward we go.....Lots of EOTF today....(Engineering on the fly)
Went after the front mount beam on the S-Wagon cabin.

Everything has to be built in place to get things to fit right.....First stumbling block ....The front beam on the rear cabin is NOT PARALLEL to the rear one on the front cab....OFF BY OVER 1/2 INCH

Chased that CHIT for two hours before I found that the nut plate on the front mounts were full of hard dust and could not move as much as needed to allow the beams to sit square.....

Finally got things under 1/8".......Good enough.....

With the new mount pockets in place....Everything tacked up......NOW how do we get the sucker out of there to finish it up.....


Another Chinese puzzle.....It must be slide forward then the beam twisted to allow the mounts to face rearward.....Remove the rubber mounts....Slide the beam forward more until it can be lifted out from between the cabs.....

The mount pockets all welded in place and the side supports added....

Now.....Getting it back in took a little finesse......but it went in.......All lined up and the weight sitting on spacers above the beam to allow fabricating the attaching brackets that include an "Anti twist" part to keep the cantilevered mount from twisting the tube....

Tomorrows task.......


Chasing that 1/2" was annoying.......The entire setup on the front cab was measured off of accurate datum points taken off the 2100 tub/frame.

Possibly some GM manufacturing errors clashed with some of my slight errors and ended up making that big ugly 1/2" mess....

But with it finally pruned down to >1/8" .....We can live with it....


Hard to get pics in there....But got some to look at.....

May have to get a couple longer bolts for the two front mounts......

The mount center bolts are right over the side of the tub flange...Had to space things up some ...plus get the pocket so the lower part of the rubber mount and the big washer can be installed and tools in there to deal with it....
 

Attachments

  • S-WAGON FRONT MOUNT6.jpg
    S-WAGON FRONT MOUNT6.jpg
    178.2 KB · Views: 49
  • S-WAGON FRONT MOUNT1.jpg
    S-WAGON FRONT MOUNT1.jpg
    208.1 KB · Views: 48
  • S-WAGON FRONT MOUNT2.jpg
    S-WAGON FRONT MOUNT2.jpg
    509.8 KB · Views: 53
  • S-WAGON FRONT MOUNT3.jpg
    S-WAGON FRONT MOUNT3.jpg
    212.4 KB · Views: 50
  • S-WAGON FRONT MOUNT4.jpg
    S-WAGON FRONT MOUNT4.jpg
    208.3 KB · Views: 53
  • S-WAGON FRONT MOUNT7.jpg
    S-WAGON FRONT MOUNT7.jpg
    211.6 KB · Views: 46
  • S-WAGON FRONT MOUNT8.jpg
    S-WAGON FRONT MOUNT8.jpg
    233.1 KB · Views: 49
  • S-WAGON FRONT MOUNT9.jpg
    S-WAGON FRONT MOUNT9.jpg
    200.9 KB · Views: 51
  • S-WAGON FRONT MOUNT10.jpg
    S-WAGON FRONT MOUNT10.jpg
    273.8 KB · Views: 48
  • S-WAGON FRONT MOUNT5.jpg
    S-WAGON FRONT MOUNT5.jpg
    234.3 KB · Views: 48
Last edited:

Snowy Rivers

Well-known member
Wrapped up the fabrication on the front mount beam of the S-Wagon cabin

I can't weld any more parts to the beam and still get it in and out of the chassis....Decided to make a bolt on support for the ends of the front beam....

Later on ...once the cabins are back off for completion of the power train I may decide to weld the brackets to the beam ....Then this beam will bolt to the tub with two bolts per side as the others have.....

Until that time the extra goodies can't be on the beam and get it out of the cat due to available space....
The one bolt hole into the tube must get drilled after the beam is out to get painted....
Not enough room to get the drill in there...Just used a transfer punch and marked the location after I welded the tab in....

Tomorrow it's all apart with this beam and toss some paint at it.....Then back into the cat........
 

Attachments

  • S-WAGON FRONT MOUNT12.jpg
    S-WAGON FRONT MOUNT12.jpg
    182 KB · Views: 56
  • S-WAGON FRONT MOUNT11.jpg
    S-WAGON FRONT MOUNT11.jpg
    232.7 KB · Views: 50
  • S-WAGON FRONT MOUNT13.jpg
    S-WAGON FRONT MOUNT13.jpg
    195.1 KB · Views: 52
  • S-WAGON FRONT MOUNT14.jpg
    S-WAGON FRONT MOUNT14.jpg
    296.2 KB · Views: 54
  • S-WAGON FRONT MOUNT15.jpg
    S-WAGON FRONT MOUNT15.jpg
    320.1 KB · Views: 54
  • S-WAGON FRONT MOUNT16.jpg
    S-WAGON FRONT MOUNT16.jpg
    256.8 KB · Views: 59
  • S-WAGON FRONT MOUNT17.jpg
    S-WAGON FRONT MOUNT17.jpg
    269.3 KB · Views: 53

Snowy Rivers

Well-known member
Looking at the Weather forecast coming up later this week.

Our later than normal summer like weather is about to come to an abrupt ending....

Rain is in the forecast...BIG TIME (Subjective)
Going to try and wrap up things on the rear cabin.....
Very likely that working outside....at least to any extent is going to be over for the season.....real soon

Long range is showing possible first dusting of snow at the 4-5K ft level in the mountains around here........

Gonna clean up the last of the rear cabin mount work in the next couple days.....Then get all the parts, bits and pieces of the interior of the S-Wagon cleared out and stored for the winter.....

Once this stuff is handled.....Then its on to building the BADAZZ 406 incher to power this beast....

Much work can be done indoors .....

The block is all ready and on the stand wrapped in a plastic bag......

The crankshaft is still in need to a good cleaning as it has sat in a corner gathering dust since I got it from the rebuilder's supply outfit...

Pistons and rods are all assembled....Rings are on the shelf....as are bearings and several other parts.

The heads as mentioned a bit ago are in the shop......
Just have to see how things go......Maybe by spring we can have the new engine ready for a test running .....I have a chevy bell housing to use along with some other bits and pieces to construct a usable test stand on wheels......

Roll that bad boy outside and lite it off.....Break in the cam really good and check for any issues.....Change the oil and filter and have the rig ready to go into the cat.....


See what shakes out
 

Snowy Rivers

Well-known member
Front beam assembly out this morning.....Weather was very cloudy with a light mist....Not worth a damn for painting..

Did some other chores getting ready for the rains that are coming.

By 1pm the skies had cleared off and things warmed up a tad....Shot the paint on the parts......By tomorrow the paint will be dried well enough to be handled.....

Get that bad boy back under the cabin and lashed down.....

Wed/Thurs. we are doing nut shell runs to get our stocks built up for the start of the winter season..

We run ground up nut shells in the pellet stoves to heat the shack......The plants are operating now and it is far more pleasant to do this when the weather is decent rather than dodging rain squalls or snow....

And it was a great day all in all....
 

Snowy Rivers

Well-known member
Front mount beam all back in and secured....Had to add a shim between the mount unit and the body on both sides...

1/4" on the LH side and 1/8" on the RH side to get things where they needed to be....I found shims of about these dims in those spots when the S-Wagon body came off the frame.....

I must have done something right.....

Looking at the one piccy that shows the rear mount beam on the front cab and the front beam on the rear cabin.....I need to add a shim on the rear mounts of the front cabin to get it at the same elevation as the rear one.....

That can happen when the rig goes back together for the last time......

I am pleased at what has been accomplished this summer on the kitty cat.....

Weather is going to shut this off here really soon......
 

Attachments

  • Front mount complete3.jpg
    Front mount complete3.jpg
    271.8 KB · Views: 55
  • Front mount complete2.jpg
    Front mount complete2.jpg
    294.3 KB · Views: 62
  • Front mount complete1.jpg
    Front mount complete1.jpg
    298.9 KB · Views: 57

Snowy Rivers

Well-known member
Nothing on the cat YESTERDAY OR LIKELY TODAY EITHER.....
The lovely "Summer like" weather we have had through most of October has been a blessing as far as getting work done on the cat....

Yesterday was a grand day with warm temps and very little wind....A true Shirt Sleeve day....

We took advantage of this weather blessing and got after getting our supply of nut shells stocked up to full capacity...

We burn ground up hazelnut shells in our pellet stoves to heat the house...
The material is plentiful here as we are in the heart of Hazelnut country.

Loaded up the outfit yesterday and picked up our first load of shells about 10am and got into unloading by 11am

We finished emptying the "Can" (3 yard dumpster) by about 1pm.

Headed back down to the plant and reloaded the can......

Got home about 3pm and decided to park the rig and get the first load (Barreled up in 55 gallon drums) put in the barn and wait until this morning to tear into the second load......

This is not hard work....But us 70's OLD FOLKS don't move like we used to.......

Where we live the choices of heating options are limited.....
The house has an electric furnace (Poor choice of heat $$$$$$$$$$$$$$$$$$$$$$$$)
We use the AC and that is fine.
Other options are OIL.......WAAAAAAAAAAY TOO SPENDY.
Propane.....Still too costly and for either oil of propane we would need to replace equipment......

We have 3 pellet stoves located around the house that handle the heat duties.....A little one.....A medium sized one and a BIG ONE......

Changing from little to big or adding more than one burning to the mix allows dealing with pretty much all the seasons weather....

The fact that the shells are totally renewable and for the greenies "Carbon neutral".....I am not a fan of all the carbon noise..

So here are a few pics from yesterday......Barrels, The tractor, The Burb, Trailer and the can.....A loaded barrel.

Today will be a similar scene for a few hours and then break the outfit apart and put away all the tools until mid winter when we do this all again...

Just a rundown on all the hoses and gizmos....

We use the big shop vac to provide air transport.
The barrel is situated on a dolly with a cover on it with a vacuum port and an inlet port....

The inlet port goes to a long hose that transports the shells to the barrel......The vacuum removes excess dust and dirt from the air stream as an added benefit.....

Once the barrel is full the inlet plugs up and the vacuum screams .....Alert to shut down...barrel full...

Toss the lid on and secure the band clamp....Do it again.....A normal haul will usually fill 10 barrels.....

The sessions of yesterday and today will get us back to about 60 barrels total.......We try to run on the top 1/3 of the supply just in case of a severe weather event of anything that could prevent us from getting more supply at regular intervals...

Normally 10 is the magic number...When we have 10 empties we watch the weather and get into the plant for more dry shells

From mid October until late spring the plant will be running processing the crop .....They get a very few months to pull maintenance on the machinery and then do it all again.....

The past few years have seen BUMPER CROPS.....So we can usually expect to be able to get product all through the Fall to spring......

For those that are curious....The cost is 2 cents per pound.....$30 to fill the 3 yard can.....

Then once the barrels are full and stored.....We drag out "Munchy" and process the "Half shells" into stove ready materials...
With 4 barrels in the shop area ready to go.....Four 5 gallon buckets of material will keep our two most used stoves running per day during the cold weather.......

Having machine tools make so many things possible besides sow cats.... :thumbup:
The slow feeding of the material into Munchy was done just for the video.....This little beast can handle the stuff just about as fast as you can scoop it into the hopper .....I drops into a tub and from there gets dumped into a barrel.....All good...


We have heated this way since 1992.......Been a good run......The older we get the slower we are....but we are still at it...

Keeping the ranch house warm makes for happy thoughts about snow cats......

Some pics

Pretty much the same layout every time........
The Skid steer picks up the Can and sits it on the trailer
The little tractor transports the barrels to and from the barn
The slab make a nice working place
The shop vac does the "Sucky job" :lmao:
Barrel dolly makes handling the full barrels easy.
Takes only a short time and we get into a rhythm and in the groove.....
Takes about 4 minutes to fill each barrel .....
The removal/refitting of the clamp on tops......Some have a bolt through a clamp....Some have a lever lock clamp.....A few are plastic lids with lever lock clamps.....
The barrels were mostly free from a jelly plant close by...Beggars and the can't be choosy thing ya know...
Roll out the full barrel and set it on the far side of the slab.....Roll up an empty, get the lid off...toss on the "Barrel master" lid gizmo.....hook up the hoses and turn on the vacuum.......Access slide gate in bottom of the can allows an easy place to SUCK from.

The last barrel full is retrieved over the top of the can with the long extension wands .....Suck the can clean and good to put it away....

And that is how we do this......

The wait time while the barrel is filling allows time to think about snow cat things...:thumbup:

Still hoping to get a bit of cat things done before the weather goes totally sour.......
 

Attachments

  • RUN5.jpg
    RUN5.jpg
    820.1 KB · Views: 54
  • RUN4.jpg
    RUN4.jpg
    386.9 KB · Views: 56
  • RUN3.jpg
    RUN3.jpg
    533.9 KB · Views: 56
  • RUN2.jpg
    RUN2.jpg
    699.3 KB · Views: 59
  • RUN1.jpg
    RUN1.jpg
    619.4 KB · Views: 56
Last edited:

Snowy Rivers

Well-known member
Yes...Old bones get a workout.....But no ants, no other pests..

We are heating 2300 sq ft ranch style house....
Our two main stoves are diagonal from one another at opposite ends of the house....

Very open floor plan with no hallways .....Stand in the living room and throw a ball all the way to the family room.......

We figure about $150 to $200 to heat for the season.....THIS YEAR A BIT MORE DUE TO THE PRICE OF FUEL TO FEED THE GREEN MOOSE 454 POWERED

Still quite affordable......

All the nutty stuff is done for a while now.....Weather MAY allow a bit of work on the cat on Sunday.....

Most of what I have on the schedule is cleaning stuff up and getting things ready to winter over....
 
Last edited:

Snowy Rivers

Well-known member
well now

The outdoor work looks to be pretty well over for this season....
Got a call from the machine shop yesterday..

Good news (Not really unexpected) the Vortec heads are in great shape (No cracks and the decks are very good)
So we're moving ahead on those bad boys.

Still thrashing through the final stages of cleaning up my downstairs rental apartment.

This area of the house is right behind many of the pictures of the cat.....Was my parents digs during their last few years.

Last 8 years we have had a wonderful gal in here....

She and her mom bought a place together......

So we have a new gal coming on board soon...

Now I can gather my thoughts and get to work stuffing the Mighty Mouse together....
 
Last edited:
Top