Ha, yes, the pins are 20mm and the chassis tubing is 60x60mm - the whole snow-trac is a mix of metric and imperial threads/sizes just to keep us on our toes - you guys are the last hold out for inch measurements, when you succumb it will be so much easier for all of us!

-
Please be sure to read the rules and adhere to them. Some banned members have complained that they are not spammers. But they spammed us. Some even tried to redirect our members to other forums. Duh. Be smart. Read the rules and adhere to them and we will all get along just fine. Cheers. :beer: Link to the rules: https://www.forumsforums.com/threads/forum-rules-info.2974/
You are using an out of date browser. It may not display this or other websites correctly.
You should upgrade or use an alternative browser.
You should upgrade or use an alternative browser.
ST4 restoration of Frankie the Frankentrac
- Thread starter Jphoenix
- Start date
Jphoenix
Well-known member
Puckle, I spent 5 years in Brussels working for DHL managing their fleet of aircraft. I became fluent in metric - but the airplanes were all imperial and it had the effect of the technicians having to learn imperial while I learned metric, crazy old world we have here. I did have a very old Jag with some Whitworth, plus I have some screwdrivers that look like Phillips but aren't for the TR-6 I restored, I recall it was the screws on the Strombergs that needed that special non-Phillips Phillips head, can't recall the name of that type of screw?Ha, yes, the pins are 20mm and the chassis tubing is 60x60mm - the whole snow-trac is a mix of metric and imperial threads/sizes just to keep us on our toes - you guys are the last hold out for inch measurements, when you succumb it will be so much easier for all of us!
one I've run into a couple of times:I have some screwdrivers that look like Phillips but aren't for the TR-6 I restored, I recall it was the screws on the Strombergs that needed that special non-Phillips Phillips head, can't recall the name of that type of screw?
Frearson screw drive, also known as the Reed and Prince screw drive. sharp point, wider angle. one size fits all.
And from the Oregon area an article just appeared today:
 www.kgw.com
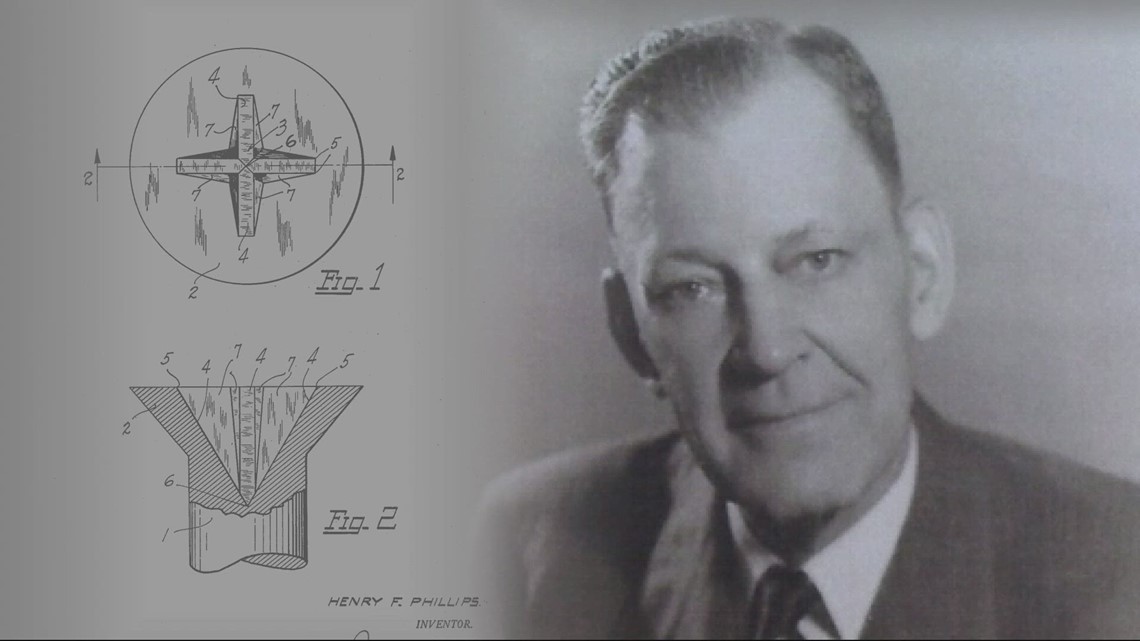
When a Portland businessman patented a new kind of screw, it changed how quickly cars could be made
Henry Phillips' new screw design was a top choice for car manufacturers because of its ability to keep the screwdriver tip from slipping out of the screw's head.
www.kgw.com
Sno-Surfer
Well-known member
I'm curious with this set up how you will attach the springs and bogies without giving it a lift kit feel with the extra tubing added? Otherwise this looks a heck of a lot better than the original set up. You're really going to town on it!Picked up the square channel I ordered as well as some 1/4” thick plate and 1.25” angle to replace the rusty angle that attach the sides of the body. Cut it all up and getting it squared for welding. Lots of sanding on the frame, lots more to go.
View attachment 171183
Jphoenix
Well-known member
I flipped the frame over and now I can weld the bottom of the new bogie support beam. I do plan to lift the machine - but only with an added 1/4" plate welded to the bottom of both bogie support beams because that long 3/8" plate that spans the width of the frame ends right where the bogies are attached - seems like a weak design, so I'm welding this plate onto the bottom of the bogie support beam to help carry the upward load into the long span wise beam. Also added the track support wheel frame hole backup plates to the aft side of the new beam.


Mig welding in mesh-topped sneakers = not smart. I though I could get away with it
Also going to add a couple of angles to the side corners of where the beam attaches to the frame - another stress point that needs some beef.
Next I'll flip it back right side up and weld on the new 1.25" angles that attach to the body sides with the 1/4-20 bolts.
Aklynxhunter
New member
Been enjoying watching your thread. Awesome work you been doing. We slide a piece of 2" tubing full length inside the original tubing to stiffen it up. My frame and suspension is about ready to get powdercoated. You are on a ready pace with yours. Look forward to seeing your progeess.I flipped the frame over and now I can weld the bottom of the new bogie support beam. I do plan to lift the machine - but only with an added 1/4" plate welded to the bottom of both bogie support beams because that long 3/8" plate that spans the width of the frame ends right where the bogies are attached - seems like a weak design, so I'm welding this plate onto the bottom of the bogie support beam to help carry the upward load into the long span wise beam. Also added the track support wheel frame hole backup plates to the aft side of the new beam.
View attachment 171254
View attachment 171255
View attachment 171256
Mig welding in mesh-topped sneakers = not smart. I though I could get away with it
Also going to add a couple of angles to the side corners of where the beam attaches to the frame - another stress point that needs some beef.
Next I'll flip it back right side up and weld on the new 1.25" angles that attach to the body sides with the 1/4-20 bolts.
It seems there were two versions of the mount. mine, like Jims is welded to a solid siderail. I've seen one where the tube was solid and the frame was welded. IDK if the change happened with the big wheel / 3 band or some other point.We slide a piece of 2" tubing full length inside the original tubing to stiffen it up.
Aklynxhunter
New member
Not sure. Im working on a 63 2 band.It seems there were two versions of the mount. mine, like Jims is welded to a solid siderail. I've seen one where the tube was solid and the frame was welded. IDK if the change happened with the big wheel / 3 band or some other point.
Attachments

Jphoenix
Well-known member
Looks different - if that is the bottom surface (frame upside down?) then I don't see the 3/8" thick steel strap welded to the bottom of my centrer channel. So, maybe your bogie support channel goes all the way through the frame? Seems like that's a better way of doing it - just welding the tube onto the side of the frame channel wasn't smart in my opinion, and that's probably why mine cracked where it did - big stress riser where the tube ends and the big thick strap ends there too, all the load going through one weld joint - that's why I added the 1/4" plate to the bottom of mine. I think yours is built differently.Not sure. Im working on a 63 2 band.
Aklynxhunter
New member
Thats correct. Its upside down.Looks different - if that is the bottom surface (frame upside down?) then I don't see the 3/8" thick steel strap welded to the bottom of my centrer channel. So, maybe your bogie support channel goes all the way through the frame? Seems like that's a better way of doing it - just welding the tube onto the side of the frame channel wasn't smart in my opinion, and that's probably why mine cracked where it did - big stress riser where the tube ends and the big thick strap ends there too, all the load going through one weld joint - that's why I added the 1/4" plate to the bottom of mine. I think yours is built differently.
Jphoenix
Well-known member
Big milestone today - got first coat of POR-15 on the frame top. First I had to finish welding and fitting the from axle housings to the new pivot bushings and decided not to replace the trans mount channel, just straighten it out. So, I hooked up the come-along and cleaned all the rust out of the rust pockets on the top channel, pulled the channel straight and welded up all the rust pockets with the mig machine. That had the effect of getting the channel red hot and when I released the come-along, the channel had taken a set right where it needed to be.


Then more sanding, wire-wheeling and then finally the paint goes on. I'll flip it tomorrow and put a first coat on the bottom. Two coats of POR is required, then reassembly is the reverse of the disassembly procedure.

Then more sanding, wire-wheeling and then finally the paint goes on. I'll flip it tomorrow and put a first coat on the bottom. Two coats of POR is required, then reassembly is the reverse of the disassembly procedure.
Snowy Rivers
Well-known member
Gittenerdone....Looks great...
georgeofdesert
Member
Also following with great interest. Someone in the past (PP?) mentioned sloshing linseed oil inside tubing to prevent rust. I did find water inside one of the tube sections of a chain tensioner.
Jphoenix
Well-known member
POR15 instructions recommend two coats, so I started with a gray coat, and finished with black. The contrast helped ensure that I wouldn't miss any spots. I learned that from reading Ed Hollingsworth's blog on his TR6 restoration when I was restoring my TR6. Here's a link to his site, his restoration work is amazing because he does absolutely everything himself and does things like fabricating a new wood steering wheel from scratch - it's a true rabbit hole you can get lost in for hours: For a little more, you can do it yourself.

When POR dries, it is thick (with 2 coats) and sets up very hard, so I have to chase all the internal and external threads and clean the hardened drips off mating surfaces, but it's really tough stuff. Cleaning and prep is also time-consuming with grinding and wire wheeling and sanding, then degreaser and metal prep, but it's worth the time and effort.
When POR dries, it is thick (with 2 coats) and sets up very hard, so I have to chase all the internal and external threads and clean the hardened drips off mating surfaces, but it's really tough stuff. Cleaning and prep is also time-consuming with grinding and wire wheeling and sanding, then degreaser and metal prep, but it's worth the time and effort.
")
Jphoenix
Well-known member
Thanks Tom, I’m enjoying the work, and the warm weather we’re having, paint dries faster!No one can say you're not moving right along with this project. WOW, fast and complete. Normally those two are exclusive of each other, but you doing it!
So if you have cheeseburger lights what do I have?
View attachment 171463
View attachment 171463
Attachments
So if you have cheeseburger lights what do I have?
View attachment 171463
We could name them donut lights??
")
Hella K23308