• Please be sure to read the rules and adhere to them. Some banned members have complained that they are not spammers. But they spammed us. Some even tried to redirect our members to other forums. Duh. Be smart. Read the rules and adhere to them and we will all get along just fine. Cheers. :beer: Link to the rules: https://www.forumsforums.com/threads/forum-rules-info.2974/

SNOW TRAC WHEELS - help me find parts

nikos

Active member
Great job! Once you get started it hard to stop!
As soon as I get my Tracy and varator done going to start on my engine

Hey Steve from Anchorage
How are you?
I know about your progress on " So What have you done with your Snow Trac today"

http://www.forumsforums.com/3_9/showthread.php?t=72203

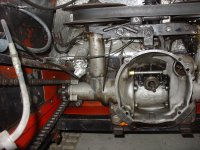
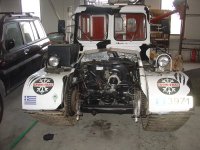
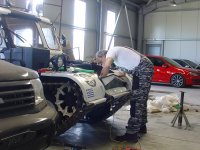
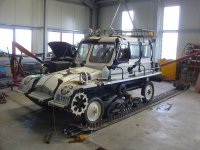
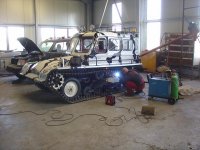
My progress has started on January 20th. November - December and twenty days of January, the ST4 was sitting, next to the shed with the tractors.
The Winter was Wet and Worm.
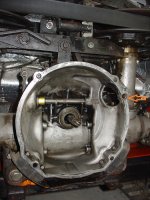
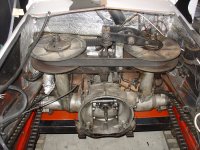
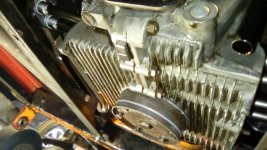
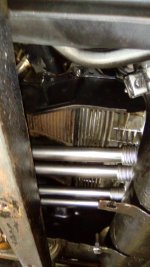
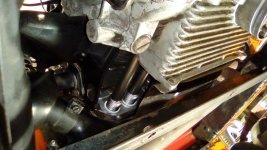
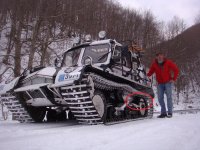
The repairs of the Seasons, The project "No More Oil Leaks" finished on May 2016. Sooner or Later, step by step, Everything has a beginning and an Ending.
Thanks to you guys, thanks to the amazing source of information, of the knowlege, the ideas, and the specific restorations - maintenance, in this FORUMS, everything is possible.

Nikos
 

nikos

Active member
The Black beauty.
 

Attachments

  • 1.JPG
    1.JPG
    247.7 KB · Views: 241
  • 2.JPG
    2.JPG
    219 KB · Views: 245
  • 3.JPG
    3.JPG
    226.1 KB · Views: 245
  • 4.JPG
    4.JPG
    219.5 KB · Views: 240
  • 5.JPG
    5.JPG
    233.4 KB · Views: 245
  • 6.JPG
    6.JPG
    243.9 KB · Views: 247

3512b

Junior Member
GOLD Site Supporter
I doing good now!
No hello rides in my future for now!
Thanks for the oi slump no platforms for a bit!

But Tracy going together today and I got a set of drive sprockets from Mike that was in my yard at one time when the Keini Kat was on its way south
At least a part of it got back to Alaska!

Looks like the chains were run loose pulled the Sprockets a bit
I working on getting some spares remade we see how much money it takes

Hers the pictures you mite have to flit em
 

Attachments

  • image.jpg
    image.jpg
    90.2 KB · Views: 235

nikos

Active member
I doing good now!
No hello rides in my future for now!
Thanks for the oi slump no platforms for a bit!

But Tracy going together today and I got a set of drive sprockets from Mike that was in my yard at one time when the Keini Kat was on its way south
At least a part of it got back to Alaska!

Looks like the chains were run loose pulled the Sprockets a bit
I working on getting some spares remade we see how much money it takes

Hers the pictures you mite have to flit em

Steve Thank you for the picture
 

Attachments

  • imagen5.jpg
    imagen5.jpg
    168.1 KB · Views: 274

nikos

Active member
In the meantime, next to shed, i was working on the ST4, cleaning the area close and inside the bell housing, and of course to take a look on the Starter (gear etc) when i pulled it out. Also a checking at the small bronze cylinder Bushing Kit on the bell housing.

Next The chain and the sprockets. Everything was ok
The only think i didn't, is to pull the variator discs, to check and to pull the bearings out. (Too busy maybe some other time)

Nikos
 

Attachments

  • 1.JPG
    1.JPG
    262.9 KB · Views: 246
  • 2.JPG
    2.JPG
    313.6 KB · Views: 253
  • 3.JPG
    3.JPG
    301.6 KB · Views: 249
  • 4.JPG
    4.JPG
    312.3 KB · Views: 254
  • 5.JPG
    5.JPG
    285.6 KB · Views: 246
  • 6.JPG
    6.JPG
    299.6 KB · Views: 248
  • 7.JPG
    7.JPG
    317.4 KB · Views: 254

nikos

Active member
Next to the shed.
Fitting the cables and the other parts.

Nikos
 

Attachments

  • DSC07165.JPG
    DSC07165.JPG
    251.9 KB · Views: 233
  • DSC07170.JPG
    DSC07170.JPG
    240.7 KB · Views: 240
  • DSC07171.JPG
    DSC07171.JPG
    232.7 KB · Views: 236
  • DSC07173.JPG
    DSC07173.JPG
    279.5 KB · Views: 237
  • DSC07179.JPG
    DSC07179.JPG
    255.5 KB · Views: 239
  • DSC07417.JPG
    DSC07417.JPG
    240.8 KB · Views: 233

nikos

Active member
How it looks
 

Attachments

  • IMG_20160425_151147.jpg
    IMG_20160425_151147.jpg
    258.9 KB · Views: 218
  • IMG_20160425_151201.jpg
    IMG_20160425_151201.jpg
    227.5 KB · Views: 227
  • IMG_20160425_151213.jpg
    IMG_20160425_151213.jpg
    254.4 KB · Views: 227

nikos

Active member
New rotor, new cable distributor, the Cup, and The Good Guys in the garage (Vangelis and Aris )

Nikos
 

Attachments

  • IMG_20160416_131947.jpg
    IMG_20160416_131947.jpg
    259.4 KB · Views: 227
  • IMG_20160418_165520.jpg
    IMG_20160418_165520.jpg
    207.2 KB · Views: 225
  • IMG_20160418_165443.jpg
    IMG_20160418_165443.jpg
    179.9 KB · Views: 230
  • IMG_20160418_165446.jpg
    IMG_20160418_165446.jpg
    176.9 KB · Views: 225
  • IMG_20160418_155812.jpg
    IMG_20160418_155812.jpg
    244.5 KB · Views: 229

nikos

Active member
Some new parts on the exhaust pipe
 

Attachments

  • IMG_20160425_150106.jpg
    IMG_20160425_150106.jpg
    167.1 KB · Views: 563
  • IMG_20160425_150142.jpg
    IMG_20160425_150142.jpg
    152.2 KB · Views: 568
  • IMG_20160425_151123.jpg
    IMG_20160425_151123.jpg
    225.6 KB · Views: 560
  • IMG_20160425_151139.jpg
    IMG_20160425_151139.jpg
    227.2 KB · Views: 560

nikos

Active member
From the stock
The new arrival. A pair of Trelleborg tyres 4.00 X 4
I need to order another one pair (next months)

Nikos
 

Attachments

  • IMG_20160523_165017.jpg
    IMG_20160523_165017.jpg
    187.4 KB · Views: 556
  • IMG_20160523_165127.jpg
    IMG_20160523_165127.jpg
    206.8 KB · Views: 553
  • DSC08162.JPG
    DSC08162.JPG
    268.9 KB · Views: 563
  • IMG_20160523_175502.jpg
    IMG_20160523_175502.jpg
    246.4 KB · Views: 555
  • DSC08259.JPG
    DSC08259.JPG
    244.7 KB · Views: 593

nikos

Active member
The New Tyres BKT 8181 4.50 - 16 4 Ply.
(Two months ago).
 

Attachments

  • ΒΚΤ 8181 5,5Χ16 (2).jpg
    ΒΚΤ 8181 5,5Χ16 (2).jpg
    225.6 KB · Views: 540
  • 3.JPG
    3.JPG
    299.2 KB · Views: 548
  • 4.JPG
    4.JPG
    278.7 KB · Views: 560
  • 6.JPG
    6.JPG
    263.4 KB · Views: 547

nikos

Active member
For the new tyres i need a Track Jack.:whistling::whistling:
A homemade Track Jack, something like these.

Nikos
 

Attachments

  • universal_track_jack_540.jpg
    universal_track_jack_540.jpg
    108.2 KB · Views: 524
  • TRACK JACK.jpg
    TRACK JACK.jpg
    25.1 KB · Views: 532
  • 106294_ts.jpg
    106294_ts.jpg
    56.3 KB · Views: 540

nikos

Active member
In the local Machinery Workshop (Two Weeks Ago)
A small sketch with the right measurements and dimensions,
and the homemade Track Jack is here.

Nikos
 

Attachments

  • GOPR6835.JPG
    GOPR6835.JPG
    480.6 KB · Views: 541
  • GOPR6836.JPG
    GOPR6836.JPG
    506.4 KB · Views: 548

nikos

Active member
How it looks
My Homemade Track Jack.

Nikos
 

Attachments

  • DSC08504.JPG
    DSC08504.JPG
    187.9 KB · Views: 530
  • DSC08505.JPG
    DSC08505.JPG
    213.9 KB · Views: 534
  • DSC08506.JPG
    DSC08506.JPG
    216 KB · Views: 534

nikos

Active member
Removing the rubber track to comming off.

At this Time i am working on the rubber track, ( Guides) left side, trying to find the damages, some of them are broken and they need to be fixed in a straight line ( Not to damage the new tyres).

Nikos
 

Attachments

  • DSC08597.JPG
    DSC08597.JPG
    265.3 KB · Views: 521
  • DSC08600.JPG
    DSC08600.JPG
    220.7 KB · Views: 514
  • DSC08604.JPG
    DSC08604.JPG
    265.3 KB · Views: 516
  • DSC08639.JPG
    DSC08639.JPG
    225.6 KB · Views: 511

nikos

Active member
The process on the rubber track.
In the circles the broken parts.

Nikos
 

Attachments

  • DSC08730.JPG
    DSC08730.JPG
    235.3 KB · Views: 497
  • DSC08729.JPG
    DSC08729.JPG
    255.3 KB · Views: 509

nikos

Active member
Working on the Guides. After a closer look i realize that:
Five or Six of them, had some old steel - weld residues, and its necessary to grinding the surfaces, because they can damage the new tyres
And also some of the guides (two or three), are broken.

The left side is ok.

Nikos
 

Attachments

  • DSC08822.JPG
    DSC08822.JPG
    157.2 KB · Views: 462
  • DSC08835.JPG
    DSC08835.JPG
    176.4 KB · Views: 460
  • DSC08823.JPG
    DSC08823.JPG
    201.9 KB · Views: 462
  • DSC08824.JPG
    DSC08824.JPG
    138.5 KB · Views: 455
  • DSC08838.JPG
    DSC08838.JPG
    162.4 KB · Views: 462
  • DSC08839.JPG
    DSC08839.JPG
    188.5 KB · Views: 458
  • DSC08856.JPG
    DSC08856.JPG
    250.1 KB · Views: 458
  • DSC08857.JPG
    DSC08857.JPG
    198.5 KB · Views: 457
  • DSC08859.JPG
    DSC08859.JPG
    220.3 KB · Views: 455

nikos

Active member
Using the the optical method of the perspective lines and the vanishing point to find the damaged guides.

Nikos
 

Attachments

  • DSC08843.JPG
    DSC08843.JPG
    169.7 KB · Views: 451
  • DSC08844.JPG
    DSC08844.JPG
    178.5 KB · Views: 453
  • DSC08845.JPG
    DSC08845.JPG
    198.2 KB · Views: 452
  • DSC08868.JPG
    DSC08868.JPG
    256.9 KB · Views: 460
  • DSC08873.JPG
    DSC08873.JPG
    272.5 KB · Views: 452
  • DSC08871.JPG
    DSC08871.JPG
    255.4 KB · Views: 452

Beartooth

New member
nikos what material was used for your track jack? looks like 1inch square with either 1/2 all thread or 3/4 all thread, how did it work? i was thinking of welding one nut hard and fast so that a ratchet or power could be used to tighten the all thread bolt.

doug
 

nikos

Active member
Hey Doug
Sorry for my late reply. Forgive me It's summertime but i know .......
the Winter is comming.:w00t2::w00t2::w00t2:

The material of my Homemade Track Jack

1) Two metal square bars A + C 4cm
2) Two Stainless Steel threaded bar nuts B1 + B2 2cm
3) Four Nuts 4cm

The one metal square bar A, and the two stainles steel threaded bar nuts B1 + B2 are attached together (Welding) in one piece.

The second metal square bar C is forced by the two NUTS in a paraller motion.
We have two forces. F1 +F2.
F1 against F2 and it works perfectly.:hammer::hammer:

Nikos
 

Attachments

  • DSC09072 - Αντίγραφο.JPG
    DSC09072 - Αντίγραφο.JPG
    183.3 KB · Views: 403
  • DSC09074.JPG
    DSC09074.JPG
    203.3 KB · Views: 400
  • DSC09075.JPG
    DSC09075.JPG
    189.4 KB · Views: 407
  • DSC09077.JPG
    DSC09077.JPG
    167.2 KB · Views: 410
  • DSC09080.JPG
    DSC09080.JPG
    193 KB · Views: 403
  • DSC09081.JPG
    DSC09081.JPG
    214.8 KB · Views: 402
  • DSC09082.JPG
    DSC09082.JPG
    246.7 KB · Views: 400
  • DSC09091.JPG
    DSC09091.JPG
    205 KB · Views: 407

undy

New member
Beartooth,
You may already know this, but Acme thread would be the ideal thread for this. I'm not sure where you are, but I get it cheap from Surplus Center in Nebraska.
As you suggested, I always weld one nut onto the threaded rod and it makes it easier to use.
 

nikos

Active member
Sorry i think we use four types of forces
The plan sketch shows the forces F1, F2,F3,F4.

F1 = Vertical Force
F2 = Ground Reaction Force
F3 = The effect of the F1 + F2
F4= The horizontal tensional Force

F1+F2+F3 are stable and they reacting from the horizontal motion of the tensional force F4.

F4 acting to F1+F2+F3

Nikos
 

Attachments

  • DSC09083.JPG
    DSC09083.JPG
    233.9 KB · Views: 400
  • DSC09082.JPG
    DSC09082.JPG
    246.7 KB · Views: 402
  • DSC09118.JPG
    DSC09118.JPG
    122.6 KB · Views: 403

boscardi

New member
Hello to all, I have the exact same vehicle here in La Thuile, Italy. I use it for advertisment for our bar on the slopes, named Lo Ratrak -look us up on facebook. Unfortunately I lost - or someone stole - a whole wheel during the summer rim included, so I need to replace it ASAP before the first snow. If any of you has one available, please let me know, I really need it, Thank You! PS: if available, I also need a variator belt because the one I have mounted is on its way out! Contact me directly if preferred, onlyski@lathuile.it
 

boscardi

New member
Hello, I would like to know if spare parts are still available for a snow trac t4 I believe, in particular I need wheels and a variator belt. Couild you let me know, thank you!
 

nikos

Active member
About the Mysterious Wrench D. :hammer::hammer:

A = Villi's Tool
B= Homemade Track Jack
C= Homemade Hand Crank
D= The "Unusual" Wrench

THANKS to NWERRING

Well i think it works fine on both of the variator Nuts -Screws. With this tool, its easy to count how many turns (in the same amount) you can make, on each Nuts- Screws.

(photos) How the Wrench, Fits on the Upper and the Lower Nut - Screw.

Nikos
 

Attachments

  • tools.JPG
    tools.JPG
    184.5 KB · Views: 328
  • 1.jpg
    1.jpg
    121.3 KB · Views: 331
  • 2.jpg
    2.jpg
    123.9 KB · Views: 330
  • 3.jpg
    3.jpg
    142.7 KB · Views: 329
  • 4.jpg
    4.jpg
    139 KB · Views: 341
  • 5.jpg
    5.jpg
    133.1 KB · Views: 331
  • 6.jpg
    6.jpg
    133 KB · Views: 333
  • 7.jpg
    7.jpg
    130.3 KB · Views: 323

nikos

Active member
The EXTRA ADD - SIDE EXTEND on the main exhaust pipe

When i had to replace the Trelleborg - Big Wheels with the new ones, i realized that the source of the old tires, the three of them were OEM, and the other one, as you know is coming from the BMW Spare tire ok.
The Fourth OEM tire, that it was missing, it was behind the exhaust pipe.
We made a discussion with the "Guys" in the garage, and the conclusion is that.

After a long period in a face close to the hot fumes, the forth trelleborg tire getting hard, losing the elastic characteristic and broke in many place, through the movements among the guides.

So with the new tires BKT, an extra add it was necessary, a side Extend on the main pipe Exhaust, in the way to the back.

Nikos
 

Attachments

  • DSC03769.JPG
    DSC03769.JPG
    62 KB · Views: 300
  • DSC03770.JPG
    DSC03770.JPG
    66.2 KB · Views: 292
  • DSC03979.JPG
    DSC03979.JPG
    61 KB · Views: 296
  • DSC09994.JPG
    DSC09994.JPG
    112.4 KB · Views: 295
  • 11.JPG
    11.JPG
    145.7 KB · Views: 303

SnowTrac Hunter

New member
hi Nikos i have st4/1575.had no look finding correct tires.but have fitted two tires at the back. off BMW space saver spare wheel.continental 115/90/16. these are only single ply.but run high psi.cheep at scrap yards maybe better hard foam filled.most of weight is on the front wheels.i fitted puncher proof mobility scooter tires also cheep second hand.ps Iam in England.

Do you have the model # for the rims? I am in bad need of a replacement. My drivers side wheel had a major meltdown.

Thanks,
Joe
 

nikos

Active member
Do you have the model # for the rims? I am in bad need of a replacement. My drivers side wheel had a major meltdown.

Thanks,
Joe

Dear Joe
I know how you feel about the broken rear rim in your ST4.
I am thinking that your problem, it will become (its possible) and my problem in the next years. So i must try to find something that is similar or equivalent with the original equipment manufacturers (oems) of this type of rims. As you Know I am not leaving in the North Countries with so many Snowtracs, and sometimes i am looking like a lonely Cow Boy in my Country. At this moment i didnt have any answer, not either some any extra sources. But i will find a solution for the rims ( soon ) from the agriculture manufacturers in my home town.

As for the BMW Tyre, the type is CONTINENTAL 116/ 90 R16.
The rim also in the photo it is only for the car. (You can see the difference)

Joe i hope that i help you.

Nikos
 

Attachments

  • DSC00081 - ?????????.JPG
    DSC00081 - ?????????.JPG
    101.5 KB · Views: 217
  • camera.sept11 895.jpg
    camera.sept11 895.jpg
    96.1 KB · Views: 217
  • 5.JPG
    5.JPG
    69.3 KB · Views: 215
Top