Bannedjoe
Well-known member
While working on the addition, and getting things ready to start building the interior, I became stymied on what I wanted to use for building materials.
The price of wood has gone insane, with a standard 2x4 (which is so far removed from 2 inches by 4 inches) topping out over $6 a piece, wood framing is almost not worth considering.
Not only is the price outrageous on this renewable resource, there's the waste factor.
Most folks figure in 10%.
In my case, I figure better than 25%. Not because of mistakes and odd cuts, but also do to the dry air causing wood that's supposed to be dry twisting and warping just days after getting it home.
I looked into the aluminum stud framing, and as quickly as it goes, the whole idea just doesn't lend much to creativity, and much like wood framing, pretty much leaves finishing down to drywall.
And I hate the fuck out of drywall.
The cutting, the taping, the mudding, the sanding, more mudding, more sanding la la la.... and you end up with walls that look like every other house, mobile home, and shopping center.
I want more than that. I know what I'm going to do now, but much more on that later in a new thread.
In the meantime, while thinking about all that, and not wanting to start on it until I was satisfied with a plan, I decided to focus my energies towards woodworking.
I plan to make all my cabinets, shelving, kitchen island etc myself.
I've built a few similar things in the past, but not with any real repeatability, and repeatability is key when designing and putting together something as involved as kitchen cabinets.
This meant, for me, it was time to go back to school.
Not school in the traditional sense as in going to a classroom, but school as in really studying hard, reading, learning and practicing at home, everyday, for 8 or 12 hours a day, which is exactly what I've been doing.
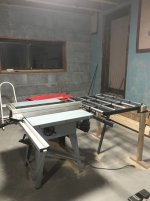
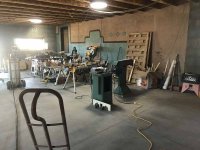
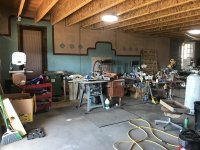
What started out as a way out of adjustment table saw in a corner, has slowly morphed into damn near a full blown woodshop, complete with table saw, drill press, miter saw, bandsaw, router table, jointer, shaper, and a really large belt sander, all with a homespun dust collection system based on a shopvac.
It's a busy place for me, with lots of things going on constantly, so it might appear a bit of a mess, but here's the setup for now.
So I spent the majority of this winter learning new things, as well as honing some skills I used long ago.
I built a number of projects over the course of the cold months. Every one of them involved learning new skills in working with wood, as well as how to set up machines down to fine tolerances, to again, be able to achieve repeatability.
Every project involved many hours of planning, setup, and practicing techniques before the final cuts and assembly took place.
All of these things I could probably do again in a fraction of the time they took, but I tried very hard to get the final results not only functional, but as professional and as perfect as I could, which took a whole hell of a lot of carefuling. (my new favoritist word)
I had never heard of a table saw sled before this winter, but after watching some videos and seeing the absolute need for one in cabinet making, I decided to build one, but not just some slaptogether something.
I was particularly drawn to one gentleman's work, and decided to buy his plans and build what he calls the ultimate sled.
The following pics are the result.
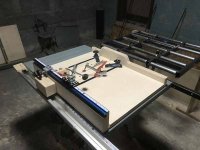
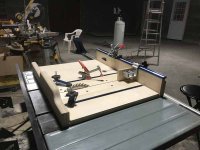
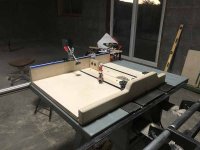
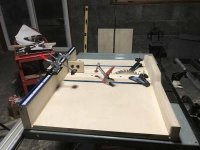
For those who don't know about sleds, this contraption will allow a person to make very fine, and accurate cuts on a tablesaw.
It also takes fingers out of the equation on risky cuts that we do, or are tempted to do on a tablesaw, knowing fully well we really shouldn't do this on a table saw, making them very safe and well controlled.
The wood used here was totally new to me. I've seen it before in some furniture and things, but have never seen it in any Hope depo, or hardware store.
It's called Baltic birch. It's very strong with many plys and probably a fair amount of glue.
I had to make a 300 mile round trip to Flagstaff to find a REAL lumber supply to acquire this stuff.
For some strange reason, we can't seem to cut up our own birch trees here, so we import this stuff from Russia and other countries.
But except for being a little harder on blades this stuff is rather exceptional to work with, it's very sturdy, and has almost zero voids. Also there nary a sign of a knot.
It takes screws well, glues well, finishes nicely, and takes shaping like a breeze, and besides that, I think it looks kinda cool.
I've learned a bit more than I previously knew about plywood.
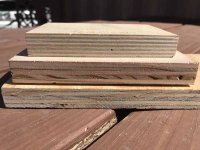
Just quickly, these are all considered 3/4 inch ply wood, though their actual thickness varies tremendously, and they size it in easy to understand fractions like 472 567ths, or something.
The top one is the Baltic.
The next down I wish I had never bought, but went ahead and built the cabinet under the router table with it.
Hosedepot just called it "Birch" plywood.
It's sturdy, to and extent, but has sort of a brittle character to it.
The outside has a very thin veneer of "Birch" so thin, it's not much thicker than paper, and it tears and chips off easily, and you can sand though it in a heartbeat.
I won't do that again!
The bottom is your basic building sort of plywood.
Continued....
The price of wood has gone insane, with a standard 2x4 (which is so far removed from 2 inches by 4 inches) topping out over $6 a piece, wood framing is almost not worth considering.
Not only is the price outrageous on this renewable resource, there's the waste factor.
Most folks figure in 10%.
In my case, I figure better than 25%. Not because of mistakes and odd cuts, but also do to the dry air causing wood that's supposed to be dry twisting and warping just days after getting it home.
I looked into the aluminum stud framing, and as quickly as it goes, the whole idea just doesn't lend much to creativity, and much like wood framing, pretty much leaves finishing down to drywall.
And I hate the fuck out of drywall.
The cutting, the taping, the mudding, the sanding, more mudding, more sanding la la la.... and you end up with walls that look like every other house, mobile home, and shopping center.
I want more than that. I know what I'm going to do now, but much more on that later in a new thread.
In the meantime, while thinking about all that, and not wanting to start on it until I was satisfied with a plan, I decided to focus my energies towards woodworking.
I plan to make all my cabinets, shelving, kitchen island etc myself.
I've built a few similar things in the past, but not with any real repeatability, and repeatability is key when designing and putting together something as involved as kitchen cabinets.
This meant, for me, it was time to go back to school.
Not school in the traditional sense as in going to a classroom, but school as in really studying hard, reading, learning and practicing at home, everyday, for 8 or 12 hours a day, which is exactly what I've been doing.
What started out as a way out of adjustment table saw in a corner, has slowly morphed into damn near a full blown woodshop, complete with table saw, drill press, miter saw, bandsaw, router table, jointer, shaper, and a really large belt sander, all with a homespun dust collection system based on a shopvac.
It's a busy place for me, with lots of things going on constantly, so it might appear a bit of a mess, but here's the setup for now.


So I spent the majority of this winter learning new things, as well as honing some skills I used long ago.
I built a number of projects over the course of the cold months. Every one of them involved learning new skills in working with wood, as well as how to set up machines down to fine tolerances, to again, be able to achieve repeatability.
Every project involved many hours of planning, setup, and practicing techniques before the final cuts and assembly took place.
All of these things I could probably do again in a fraction of the time they took, but I tried very hard to get the final results not only functional, but as professional and as perfect as I could, which took a whole hell of a lot of carefuling. (my new favoritist word)
I had never heard of a table saw sled before this winter, but after watching some videos and seeing the absolute need for one in cabinet making, I decided to build one, but not just some slaptogether something.
I was particularly drawn to one gentleman's work, and decided to buy his plans and build what he calls the ultimate sled.
The following pics are the result.


For those who don't know about sleds, this contraption will allow a person to make very fine, and accurate cuts on a tablesaw.
It also takes fingers out of the equation on risky cuts that we do, or are tempted to do on a tablesaw, knowing fully well we really shouldn't do this on a table saw, making them very safe and well controlled.
The wood used here was totally new to me. I've seen it before in some furniture and things, but have never seen it in any Hope depo, or hardware store.
It's called Baltic birch. It's very strong with many plys and probably a fair amount of glue.
I had to make a 300 mile round trip to Flagstaff to find a REAL lumber supply to acquire this stuff.
For some strange reason, we can't seem to cut up our own birch trees here, so we import this stuff from Russia and other countries.
But except for being a little harder on blades this stuff is rather exceptional to work with, it's very sturdy, and has almost zero voids. Also there nary a sign of a knot.
It takes screws well, glues well, finishes nicely, and takes shaping like a breeze, and besides that, I think it looks kinda cool.
I've learned a bit more than I previously knew about plywood.

Just quickly, these are all considered 3/4 inch ply wood, though their actual thickness varies tremendously, and they size it in easy to understand fractions like 472 567ths, or something.
The top one is the Baltic.
The next down I wish I had never bought, but went ahead and built the cabinet under the router table with it.
Hosedepot just called it "Birch" plywood.
It's sturdy, to and extent, but has sort of a brittle character to it.
The outside has a very thin veneer of "Birch" so thin, it's not much thicker than paper, and it tears and chips off easily, and you can sand though it in a heartbeat.
I won't do that again!
The bottom is your basic building sort of plywood.
Continued....
Last edited:

