• Please be sure to read the rules and adhere to them. Some banned members have complained that they are not spammers. But they spammed us. Some even tried to redirect our members to other forums. Duh. Be smart. Read the rules and adhere to them and we will all get along just fine. Cheers. :beer: Link to the rules: https://www.forumsforums.com/threads/forum-rules-info.2974/

Fifth wheel camper demo/conversion

NorthernRedneck

Well-known member
I have a problem. Too many toys and no way to tow them all in order to use them. I have a 2 place snowmobile trailer currently but 3 snowmobiles and 2 pull behind sleighs. So, one of the snowmobiles sits neglected. Same thing with the summer toys. I have a sxs, and 2 quads. The quads sit neglected as I can't haul them.

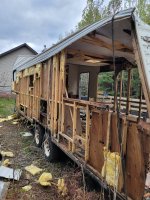
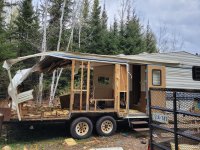
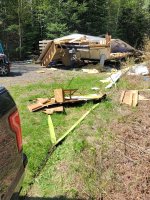
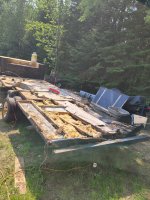
I knew of an old fifth wheel camper that I could get my hands on for a barter deal. I was the one who moved it 3 years ago for a buddy. He and his fiance had no plans for it as he had no fifth wheel hitch in his truck. They were in desperate need of a kitchen and dining room refresh before their wedding this summer. I sat at their kitchen table all winter staring at vomit peach walls while looking out at the old fifth wheel and pondering over a few drinks. I told them....you buy the paint and I'll paint your kitchen and dining room. In exchange I will take that old rotten fifth wheel off your hands. I have lots of time and am always looking for projects to keep me busy. So I decided to take on tearing down the old camper and turning it into a flat deck trailer. I have a fifth wheel hitch mounted in my truck. They tow much nicer than a ball hitch.

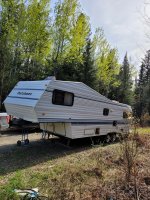
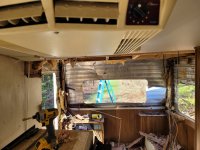
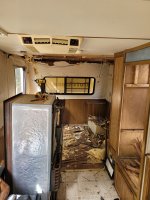
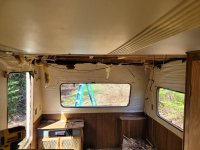
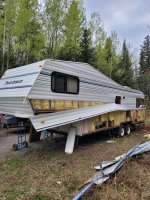
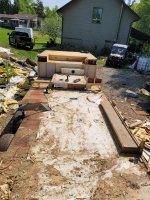
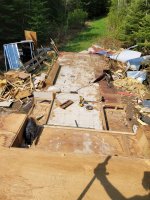
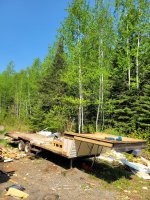
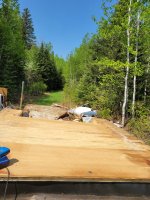
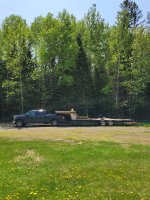
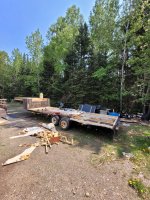
Sorry for the crappy picture but that's what I started with. A 1991 Dutchman 30ft. Walls rotten. Full of mouse poop. None of that matters. That I see is a 30ft solid square tube fifth wheel frame with 2 3500lb axles already mounted.

20250515_185028.jpg
 
  • Like
Reactions: Doc
I didn't take any pictures of the inside before I started. I started by removing some of the rear windows and interior dinette and sofa. The ac unit was held in with about 8 screws. I pushed it up from the inside and was able to drag it off the roof while standing on a ladder as I didn't trust the roof integrity.
 

Attachments

  • 20250521_173316.jpg
    20250521_173316.jpg
    3.5 MB · Views: 7
  • 20250521_102904.jpg
    20250521_102904.jpg
    1.8 MB · Views: 6
  • 20250521_111751.jpg
    20250521_111751.jpg
    1.6 MB · Views: 4
  • 20250521_115017.jpg
    20250521_115017.jpg
    1.6 MB · Views: 4
  • 20250521_150323.jpg
    20250521_150323.jpg
    2.3 MB · Views: 6
  • Like
Reactions: Doc
I started by removing the exterior metal siding which also involves taking out roughly 40 1/4 hex head screws and using a long pry bar to pop staples all along each strip.
 

Attachments

  • 20250522_100357.jpg
    20250522_100357.jpg
    3.2 MB · Views: 7
  • 20250522_105550.jpg
    20250522_105550.jpg
    2.3 MB · Views: 7
  • 20250522_115720.jpg
    20250522_115720.jpg
    2.8 MB · Views: 7
I find myself very interested in yoyr conversion project. I have a bumper pull Monarch we currently use for storage at Hippie Ridge. 1996 model year, it was our first camper on the Hippie Ridge ranchette. Sadly, we had a few years where we didn't go to the ranch, so it suffered neglect. It has seen better times.

Not sure how the storage is working out. Like yours it has critters invading the space. Roof is shot. TV antennae tower fell and ruined the bedroom. Water heater and pump still work so I could salvage them and some other items. Like the outdated but functional kitchen cabinets. Demo the building had have a 5000 lb payload flatbed.

I would use the backhoe to tear it apart. I've seen that done.

Keep us posted on your project. It is giving me ideas!
And Crumpy,,,,; some concerns.
 
I made some progress yesterday morning. First, I finished cutting all the walls with my chainsaw. The last cut was where i bent my bar20250526_114913.jpg

I have a heavy duty tow strap I tossed through the opening and hooked up to my truck. The roof is down.

20250526_115223.jpg
 

Attachments

  • 20250526_115244.jpg
    20250526_115244.jpg
    3.4 MB · Views: 2
Today's task? Get the roof out from between the trailers. Any way! 20250527_112713.jpg20250527_113724.jpg

I started cleaning up the flooring and removed the carpet from the upper deck so it won't retain water. The plywood is actually exterior grade. Only the back two sheets are soft from water damage. I'll replace those. Originally I was thinking 2x6 decking from the cheap surplus lumber yard and coating it with Thompsons water seal. Now, I'm thinking about just leaving it plywood and painting it with exterior paint. I'll finish up the sides with treated lumber. I'm also leaving the front storage compartment under the tongue and enclosing it fully for helmet storage, starts, blocking etc.

20250527_113837.jpg
 
Last edited:
I find myself very interested in yoyr conversion project. I have a bumper pull Monarch we currently use for storage at Hippie Ridge. 1996 model year, it was our first camper on the Hippie Ridge ranchette. Sadly, we had a few years where we didn't go to the ranch, so it suffered neglect. It has seen better times.

Not sure how the storage is working out. Like yours it has critters invading the space. Roof is shot. TV antennae tower fell and ruined the bedroom. Water heater and pump still work so I could salvage them and some other items. Like the outdated but functional kitchen cabinets. Demo the building had have a 5000 lb payload flatbed.

I would use the backhoe to tear it apart. I've seen that done.

Keep us posted on your project. It is giving me ideas!
And Crumpy,,,,; some concerns.

It's actually not too bad of a project. There's probably quicker and easier ways to demo a camper. It's my first time and I'm learning as I go along as well. I was originally going to strip it to bare frame and reinforce it with additional frame supports but as most of the plywood floor is solid and it doesn't need to haul a backhoe, only 4 snowmobiles in the winter and my sxs and quad in the summer, I'm going as cheap as possible. So far all it's cost me is time from the time I started painting their place to hauling the fifth wheel over here three weeks ago. I have the time and the tools. It's keeping me busy instead of just sitting in the house channel surfing. Lol

I was debating on a ramp lift gate for the back or just sticking with a set of folding ramps (which I already have) for the quads and sxs and a different folding ramp for the snowmobiles. I may go that route as the lift gate would require additional frame supports 🤔

Edit...pro tip....a skill saw works great at cutting a metal roof on an rv and through the corner wooden roof supports. 😉
 
Last edited:
Since I came home from camp early yesterday, I decided to head out to the fifth wheel and first, finish tearing up the roof into sections. Then I cleaned up any screws and scrap wood on the trailer deck and raked the whole area followed by sweeping with a magnet before backing in to hook up and haul it out. Before connecting, I adjusted the fifth wheel hitch lowering it to give me more clearance between the box rails and the tongue. I then hauled it out from behind the shop so I can work on cleaning up the carnage back there this week. This is the first time I see it connected to the truck with the hitch set at the right height. I can see it's going to need a 2" axle lift. My buddy offered to help beef up the back end to accommodate a lift ramp. I have to replace the back two sheets of plywood anyway so I will take him up on his offer since welding is not my strongest skillset.
 

Attachments

  • 20250601_132638.jpg
    20250601_132638.jpg
    3.1 MB · Views: 20
  • 20250601_112327.jpg
    20250601_112327.jpg
    2.7 MB · Views: 14
  • 20250601_114425.jpg
    20250601_114425.jpg
    2.7 MB · Views: 13
  • 20250601_114408.jpg
    20250601_114408.jpg
    3.8 MB · Views: 12
  • 20250601_112303.jpg
    20250601_112303.jpg
    3.2 MB · Views: 17
It's a lot of mindless work trying to figure out how best to take one of these things apart without totally destroying the parts that you want to save. For example....there was a raised section where the bathroom was. I first attempted the brutal method of using a 30lb sledge hammer. Didn't budge. Ok. Rethink things and pry away the paneling. It's full of 2" screws. Try to get the drill in there. Nope. K...plan c. Reciprocating saw and a 4ft pry bar. She'll come. After a few cuts, I used the bar to essentially lift up on it as there was no way get into the middle to finish cutting the supports. A couple of good lifts and it popped up. I actually didn't want to cut the plywood as I can salvage some of it for the sides around the tongue.

So far, I'm only down 3 drill bits and a chainsaw bar for this whole project. From the time I picked up the first roller of paint over at my friend's place to paint their dining room and kitchen in exchange for the trailer. I will have to buy some materials to finish it off and replace the back 8 ft of lower deck as it's not just a standard purpose built utility trailer. 20250601_153540.jpg20250602_135138.jpg

Tomorrow's task is cleaning up some of the garbage first as our landfill is open Tuesday then I will be crawling underneath the trailer with a grinder and cutting the support straps holding up both the black and grey tanks and removing those along with the plumbing below as well as the furnace ductwork. I also started removing the linoleum flooring which is a pain as it is glued in spots and stapled in others
 
At one time it was a nice camper. Unfortunately it sat neglected for years and the critters had made it their home. The water system was actually properly winterized the last time it was used. I didn't notice any signs of leaks in the water lines.
 
I'm cheap and frugal trying to repurpose everything I can. Lol. I just spent the past hour removing a bunch of staples to save a chunk of 3/4" exterior grade plywood from the landfill. It was originally the raised floor in the bathroom.


17489640133236818491195799058461.jpg

Then I looked over at my pile of scrap wood on the other side of the trailer and see 4 sheets of 1/2" plywood. I was going to buy some this week. They were the original sides to my flat deck trailer when I bought it used 6yrs ago. They'll work great to enclose the neck on the trailer.


20250603_111132.jpg
 
  • Like
Reactions: Doc
I started out the day by hauling the flat deck out from the rubbage pile behind the garage and making a dump run after doing the plywood staple removal. Then I dove into cutting up the plywood to finish up the exterior. That's enough for today.

I also got my trailer lights working. The harness was a spliced mess of wires.

20250603_123444.jpg20250603_153145.jpg
 
  • Like
Reactions: Doc
I had zero plans when I came out this morning around 9am. I tore apart the back end of the trailer to reveal the rot. Then made a list of wood and headed to the discount lumber store down the street for some lumber and 2 sheets of 3/4" plywood.
 

Attachments

  • 20250604_111404.jpg
    20250604_111404.jpg
    2.7 MB · Views: 5
  • 20250604_111411.jpg
    20250604_111411.jpg
    2.6 MB · Views: 4
  • 20250604_133522.jpg
    20250604_133522.jpg
    2.4 MB · Views: 3
  • 20250604_152541.jpg
    20250604_152541.jpg
    2.8 MB · Views: 4
  • 20250604_152633.jpg
    20250604_152633.jpg
    3 MB · Views: 6
  • Like
Reactions: Doc
The back end is now reframed. Ideally I would have liked to strip the whole thing down to bare frame and reinforce it but this will be plenty strong enough for the quads and snowmobiles
 
Interesting little bit of info I discovered in rebuilding the back end flooring structure. Would you believe that the whole back end of the camper shell was only attached to the frame with 6 carriage bolts. That....and gravity. Wow.

930b14ea-89de-4c99-87f7-dbca71e9a1b4.jpg
 
Going forward, if I ever strip another camper that's how I will do it. Wrap a chain around it to another vehicle and cut all the support bolts at the dump and drive away. Could be interesting 🤔. But it was interesting seeing how they are put together. Actually, if I had to do it over again, I would have started on the siding outside then remove the insulation. After removing the interior. I had started from the inside in the back. And ended up with a tangled mess halfway through. Then I smartened up and finished removing all the siding.
 
No problem. I'm learning lots as well. I still have work to do on it and will post as I go along. As this thing was old, the plastic inside was very brittle including all the plumbing fixtures. The bathtub and tub surround for example, were simple to take out as the plastic all snapped. I just cut the drain underneath from outside and tore it out.
 
Top