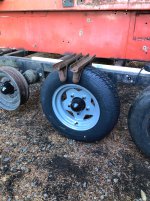
Most folks run filled tires in the front to take abuse the air for the rest, Tire foam is heavyGrabbed a couple cans of "Cowboy Chrome" paint this morning....Cleaned up the 4 Snowflake wheels that are all welded and gave them a shot of paint.
Spoke with a shop up in Portland earlier about filling the tires with Urethane tire fill....
We discussed what was needed...I grabbed the tubeless valve stems while were were in town....
Installed them with some soap after the paint dried.
Going to mount the tires and air them up...Once the cat is ready to go....then fill them up.
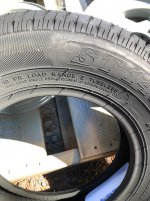
I ordered up a pair of 10 ply 145/r12 tires this morning too....These are very very close to the 5.30 x 12 bias ply....
We shall see how they work.
10 ply and when filled they should work fine......
I do not want to run any air filled tires...
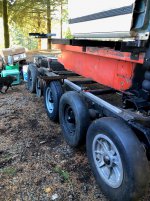
All spots except the front two on my cat were tubed and air filled.
Wheels beat all to hell after a tires lose air....Tire guides just eat them suckers.
So today has to be a good solid 9.....10 is an unobtainium spot.....at least here....
I think I may mix in a pair of the bias ply tires and see how they hold up.
10 ply seems to be tough to find....8 ply is the norm.
I am not getting suckered into spending huge $$$$$$ on Falline or Alpine guide.
That is what was on this machine.....They were torn up pretty good too.....
A couple that were not torn up were just checked badly from years in the elements...Not worth the trouble to try and salvage....just too rough....
I can't get any tire guys that know anything about why the "Snowcat Special" is soooooooooo good.
My local tire guy has been in bizz here locally forever and his father before him.
The old man is in his late 80's and we have discussed this topic.....He just smiles and rubs his fingers ....Gesturing $$$$$$ in somebodies pocket....
Solid urethane would be sweet.....$$$$$$$$$$$$$$$$$$$$$$$$$$......
This cat is gonna get whatever 10 ply tires I can scare up and then fill them....
Will see what shows up here in a few days......

-
Please be sure to read the rules and adhere to them. Some banned members have complained that they are not spammers. But they spammed us. Some even tried to redirect our members to other forums. Duh. Be smart. Read the rules and adhere to them and we will all get along just fine. Cheers. :beer: Link to the rules: https://www.forumsforums.com/threads/forum-rules-info.2974/
You are using an out of date browser. It may not display this or other websites correctly.
You should upgrade or use an alternative browser.
You should upgrade or use an alternative browser.
Astro van cat conversion
- Thread starter Snowy Rivers
- Start date
Snowy Rivers
Well-known member
Yessss...Damned things weigh a bloody ton....probably 40 pounds or more...
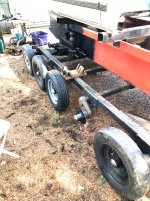
I stuck my two filled fronts back on to get the spindles protected and to get the machine back on all of its feet.
Also keep the alloy wheels from being in the way and or going MIA.
The heavy machines (2100, 3700) I am told are much better off with filled tires all the way....
I really do not want to deal with tire/wheel issues ......
Almost all of my air filled wheel/tires had the wheels beat up due to tire guides chopping off the valve stems (At least it looks that way)
All the ones beat up and flat were missing the stems on the tubes....Hard to say what went first....the stem or the wheel getting beat up....
Sure looks as though the stems got clipped, tire goes flat....then wheel gets trashed......
The extra weight should not be an issue on this machine......
The fella I got the tracks from runs a 3700 and mentioned running all of them filled.
Even if the tire is a RAG the fill will get it home generally I am told.
Back when I ran the Spryte for the snowmobile club it had filled tire at all 10 spots...../YES...HEAVY
georgeofdesert
Member
Sounds heavier and complicated-er.AHHHH YESS
OK
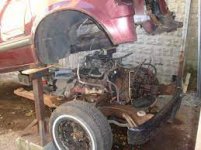
After the sub frame with the engine, tranny and sundry other parts are removed ....and the rear axle
The plan is to fabricate a simple tube frame that will attach to the original body mount locations (Rubber or urethane biscuits) up front and a similar arrangement in the rear using the original spring attachment point...
Then add a roller at four points around the body on the new frame assemblies.
A pair of channels attached to the cat tub will allow the body to roll fore and aft .....
All electrical can be run through a long multi wire cable to allow the body to move.
Things like fuel line and such can be set up with quick disconnects.
A simple explanation I guess.
But the entire body will stay totally intact just as it came from The General.
Some added things to handle the steering (Remove the steering wheel and add a bracket to mount the air controls for the steering)
Aside from anything in the way of LED light bars, horns.....or whatever else comes along.....The van will remain stock.
The plan also includes an access port in the floor aft of the drivers seat to allow accessing the fuel tank sender and the pickup tube.
The tank access is easy.....I have done this on Vans I have owned....(Makes a real nasty job a snap)
Also an access in the rear floor over the OC-12 to allow adjusting the bands.....
The rear area in the van is wide open under the floor when the spare tire is gone.....
A simple cut the floor carefully and add on a flange to allow easy remove and replace.
If the entire engine trans needs to come out....Yank the body off.
For the day to day stuff like checking the oil, accessing other engine parts (Plugs or ????) Just roll the body back about 3-4 feet and gitterdone.
As far as the actual attachment points.....Brackets that accept bolts or TO BE DETERMINED
This is the basics.....Simple and leaves the van nearly stock with very little mods to the interior.....PLUG AND PLAY....ALMOST
Snowy Rivers
Well-known member
Actually I calculated that about 2000lb can be stripped off the van.
The add back for mounting hardware will be minimal
One of our past members had a full sized van on a 3700 chassis. That thing was way cool
Not at all complicated....pretty simple to do as far as making it all work...
The add back for mounting hardware will be minimal
One of our past members had a full sized van on a 3700 chassis. That thing was way cool
Not at all complicated....pretty simple to do as far as making it all work...
georgeofdesert
Member
Seemed like alot to check the oil lol. Depending on your floor plan do you need the stock floor pan at all? Removable plywood or composite floorboards pinned in place?
Snowy Rivers
Well-known member
Actually....
The body on the van is a "Monocoque" or unit shell type construction.
The Astro has a subframe up front that contains the engine, trans, suspension and such.
The rear axle/springs anchor to the unibody .
Removing the floor would basically turn the body into a loose box.
Getting at such things as "Checking the oil" will be easy through a portal cut in the inner fender on the left side.
Tranny dipstick will be accessible similar on the RH side....Or the Dog house cover.
Serpentine belt up front will be an easy access through the front.
Modify the grille to allow the center section to come out quick.
Lift the short hood and the giant hole where the radiator and other cores had resided will be about the same size as the nose of the 2100.
The issue that was the main concern was getting at other components that might require service on the engine.
The access through the front grille area will be adequate for.....Serp belt, water pump, air pump (Converted AC unit) PS pump (Will be used to power the Hydrobooster for the outboard disc brakes on the rear axle)
Alternator.....
It all sounds like a daunting task....but when you get things in front of you and start measuring and getting a good look at stuff it becomes fairly easy.
The hardest part (Not really hard...just takes a bit of TLC ) will be dropping the sub frame and power pack out.
Just a case of stripping off all the parts that can be handled with the power pack still in the body
Radiator, fan, shroud, ect.....anything to lighten the beast up...
Disconnect the various wires and hoses..
Cut exhaust loose at the RH side near the front (Sawzall)
Block the sub frame on dunnage
Remove the front tires/wheels
Remove the bumper
Remove the 6 bolts that fasten the sub frame to the unibody assembly.
At this point the Skid steer can be used to grab the front of the body and lift it up high enough to allow the power pack to be removed out the front....
Be far easier if I had a big shop 4 point lift......But us poor folks have to rely on other means of gitterdone.
I was involved with a friend a few years ago doing a V8 swap into an Astro.
He had a small shop and a couple air jacks/lifts.
Really pretty easy...
All I want is to get the extra parts off the body
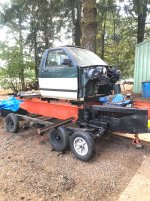
Here is a piccy of an Astro with the sub frame dropped out.
Not sure I like the supports on the body.....but this shows the entire lashup
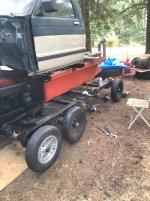
Once the sub frame is out the front of the body can sit on some timbers and the rear axle removed.
Get the new rear support mounted and a couple little "Goat wheels" can be temporarily mounted on the rear to allow the body to be pushed around by grabbing the front with the skid steer.
I am thinking that an attachment to anchor in the skid steer bucket will allow precise control when moving the body.
Position the body where the cat is now and jack it up.....Roll the cat under the body and go from there.
None of this will be any more difficult than it was tearing down the 2100.....removing the cab or setting the S10 cab.
Time and careful planning.....then let it rip.....
The body on the van is a "Monocoque" or unit shell type construction.
The Astro has a subframe up front that contains the engine, trans, suspension and such.
The rear axle/springs anchor to the unibody .
Removing the floor would basically turn the body into a loose box.
Getting at such things as "Checking the oil" will be easy through a portal cut in the inner fender on the left side.
Tranny dipstick will be accessible similar on the RH side....Or the Dog house cover.
Serpentine belt up front will be an easy access through the front.
Modify the grille to allow the center section to come out quick.
Lift the short hood and the giant hole where the radiator and other cores had resided will be about the same size as the nose of the 2100.
The issue that was the main concern was getting at other components that might require service on the engine.
The access through the front grille area will be adequate for.....Serp belt, water pump, air pump (Converted AC unit) PS pump (Will be used to power the Hydrobooster for the outboard disc brakes on the rear axle)
Alternator.....
It all sounds like a daunting task....but when you get things in front of you and start measuring and getting a good look at stuff it becomes fairly easy.
The hardest part (Not really hard...just takes a bit of TLC ) will be dropping the sub frame and power pack out.
Just a case of stripping off all the parts that can be handled with the power pack still in the body
Radiator, fan, shroud, ect.....anything to lighten the beast up...
Disconnect the various wires and hoses..
Cut exhaust loose at the RH side near the front (Sawzall)
Block the sub frame on dunnage
Remove the front tires/wheels
Remove the bumper
Remove the 6 bolts that fasten the sub frame to the unibody assembly.
At this point the Skid steer can be used to grab the front of the body and lift it up high enough to allow the power pack to be removed out the front....
Be far easier if I had a big shop 4 point lift......But us poor folks have to rely on other means of gitterdone.
I was involved with a friend a few years ago doing a V8 swap into an Astro.
He had a small shop and a couple air jacks/lifts.
Really pretty easy...
All I want is to get the extra parts off the body
Here is a piccy of an Astro with the sub frame dropped out.
Not sure I like the supports on the body.....but this shows the entire lashup
Once the sub frame is out the front of the body can sit on some timbers and the rear axle removed.
Get the new rear support mounted and a couple little "Goat wheels" can be temporarily mounted on the rear to allow the body to be pushed around by grabbing the front with the skid steer.
I am thinking that an attachment to anchor in the skid steer bucket will allow precise control when moving the body.
Position the body where the cat is now and jack it up.....Roll the cat under the body and go from there.
None of this will be any more difficult than it was tearing down the 2100.....removing the cab or setting the S10 cab.
Time and careful planning.....then let it rip.....
Attachments
Last edited:
Snowy Rivers
Well-known member
Just thinking....
No disrespect to our many Tucker folks.....But I would much rather get that Astro body stripped off its running gear than rebuild a few sets of steel tracks and pontoons.....Been there back years ago.....Rusty and quite a job....
No disrespect to our many Tucker folks.....But I would much rather get that Astro body stripped off its running gear than rebuild a few sets of steel tracks and pontoons.....Been there back years ago.....Rusty and quite a job....
Snowy Rivers
Well-known member
Spent some time this morning measuring the cab supports that are already on the cat for the S10 cab.....Got some preliminary measurements off of an Astro.
The current cab mounts can be used and with a slight modification and the addition of 2 more tubes across the tub there should be adequate support for the Astro body to sit right up quite nicely.....
Only getting a tape measure on the real deal after it is stripped out will the actual mods needed be clear....But it looks good...
Still fooling with wheel bearings......Got a shout from the fella with the large bearing alloy wheels this morning....Be next month and we will get together.
Supposed to get some pics sent to me so I can see just how much machine work will be needed to repair the wheels....
Snowy Rivers
Well-known member
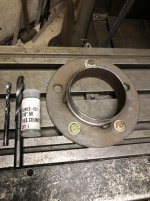
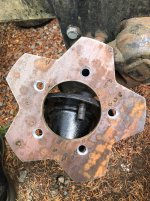
Wrapped up ALL the hubs/bearings today.
Now these were some nasty messy GRUNGY ASSEMBLIES.....Every one was full of rust.
There were ZERO bearings that were usable in the cat.
All Hubs refurbished or replaced.....
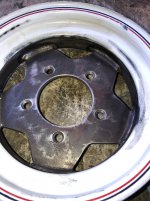
All spindles in good shape...some discoloration from a lot of time on the clock and the water infiltration over the last (nearly) 50 years
The tires are crap...as are the wheels....the steel wheels that are not dented up from tire guide crashes have had the lug stud coined area way over tightened so many times the holes are the size of quarters.
But the hubs are all good....new tires coming soon.
As soon as the tires get here we will mount them on the new Silver Snowflake wheels and get them on the cat.....
The 3/8" thick steel plate centers will not bend and distort like the sheet metal garbage did....
Thinking about getting after finishing up the OC-12 NOW.
Looking at the original steering cylinders and have some plans on an adapter that will sort of look like the original cylinder....but actually adapt the Type 20 brake chambers.....
I need to get the adapters to set the arms on the steering shafts at the same place that they would normally be with the cylinders in the off position.
The adapter will be a "PASSTHROUGH" LINK .
I have it sketched up and the plan looks good......
I still need to get the axle bearings on the axles and press on the retainers.
I have the seals, gaskets and such here on the shelf......
Back to the steering cylinders.
The top lid on the OC-12 is going to need a bit of modification to allow the Type 20 chambers to bolt on.
All stresses must stay in the top cover......The original cylinders were fed 400 PSI oil pressure....This translates to about 1500 + pounds of pressure on the actuator rod.....
The type 20 chamber (20 sq inches) requires 75 PSI air pressure to do the same job as the 400 psi oil on the 2-1/4" stock cylinder...
More great fun.......
At any rate....need to get the big gear box all finished up and then get it filled with oil before stuffing it back into the cat...
Just waiting for an Astro or Safari to come home.....
Grabbed up a grouser and got it situated on the number two tire....evened it up to get a good view of the width of the cat..... also wanted to see what the proximity of the bottom the belting and the backing plates will be in relation to the top of the rub rail on the inner suspension.....LOOKS GREAT.....ABOUT 5 INCHES clearance with the road wheels all the way down.....
IS THIS ALL GOING TO WORK????...I SURE HOPE SO ......
Starting to get itchy fingers to get at stuffing the 406 SBC together.....
Really doubt that 406 inches is necessary.....but it will be BADAZZ......For sure... VORTEC heads to top it off..
Got a fresh Quadrajet Carb TO GO UP TOP....SO THE LITTLE MOUSE CAN ROAR......
Fun FUN FUN.....
Now these were some nasty messy GRUNGY ASSEMBLIES.....Every one was full of rust.
There were ZERO bearings that were usable in the cat.
All Hubs refurbished or replaced.....
All spindles in good shape...some discoloration from a lot of time on the clock and the water infiltration over the last (nearly) 50 years
The tires are crap...as are the wheels....the steel wheels that are not dented up from tire guide crashes have had the lug stud coined area way over tightened so many times the holes are the size of quarters.
But the hubs are all good....new tires coming soon.
As soon as the tires get here we will mount them on the new Silver Snowflake wheels and get them on the cat.....
The 3/8" thick steel plate centers will not bend and distort like the sheet metal garbage did....
Thinking about getting after finishing up the OC-12 NOW.
Looking at the original steering cylinders and have some plans on an adapter that will sort of look like the original cylinder....but actually adapt the Type 20 brake chambers.....
I need to get the adapters to set the arms on the steering shafts at the same place that they would normally be with the cylinders in the off position.
The adapter will be a "PASSTHROUGH" LINK .
I have it sketched up and the plan looks good......
I still need to get the axle bearings on the axles and press on the retainers.
I have the seals, gaskets and such here on the shelf......
Back to the steering cylinders.
The top lid on the OC-12 is going to need a bit of modification to allow the Type 20 chambers to bolt on.
All stresses must stay in the top cover......The original cylinders were fed 400 PSI oil pressure....This translates to about 1500 + pounds of pressure on the actuator rod.....
The type 20 chamber (20 sq inches) requires 75 PSI air pressure to do the same job as the 400 psi oil on the 2-1/4" stock cylinder...
More great fun.......
At any rate....need to get the big gear box all finished up and then get it filled with oil before stuffing it back into the cat...
Just waiting for an Astro or Safari to come home.....
Grabbed up a grouser and got it situated on the number two tire....evened it up to get a good view of the width of the cat..... also wanted to see what the proximity of the bottom the belting and the backing plates will be in relation to the top of the rub rail on the inner suspension.....LOOKS GREAT.....ABOUT 5 INCHES clearance with the road wheels all the way down.....
IS THIS ALL GOING TO WORK????...I SURE HOPE SO ......
Starting to get itchy fingers to get at stuffing the 406 SBC together.....
Really doubt that 406 inches is necessary.....but it will be BADAZZ......For sure... VORTEC heads to top it off..
Got a fresh Quadrajet Carb TO GO UP TOP....SO THE LITTLE MOUSE CAN ROAR......
Fun FUN FUN.....
Attachments


Last edited:
Snowy Rivers
Well-known member
Well now.
We had a really good rain over the weekend....2 inches total Friday to Sunday
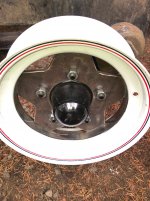
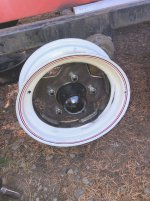
The new wheels were laying outside on the skid where I painted them.
Went to pack them inside this morning and half the paint was WASHED OFF.....This is rust prevention type paint.
Wheels were cleaned up well to remove all oils and such.
I grabbed a rag and some surface cleaner (PREP SOL) and that silver paint just runs off.....
Cleaned the 4 wheels up and repainted with a solid light gray.
The silver was rubbing off even after a week in the sun.....Bad choice..
I may need to sand blast the wheels to get the powder coat off.....at least on the outside face that shows.
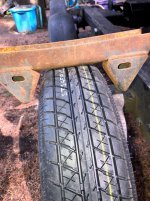
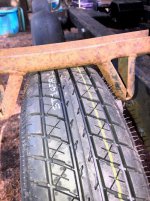
The FEDEX truck showed up and brought me my two new tires....
Great looking 10 ply tires.
Gonna head into town to see if the guys at cheeeeezoid used tire place will mount them....At least get one mounted and see wassssup.
I will post a piccy or two later.
Trying to find 12" 10 ply tires is a chore......at least at a price that is affordable....
After things are operational they can get foamed......for now ...air will do
We had a really good rain over the weekend....2 inches total Friday to Sunday
The new wheels were laying outside on the skid where I painted them.
Went to pack them inside this morning and half the paint was WASHED OFF.....This is rust prevention type paint.
Wheels were cleaned up well to remove all oils and such.
I grabbed a rag and some surface cleaner (PREP SOL) and that silver paint just runs off.....
Cleaned the 4 wheels up and repainted with a solid light gray.
The silver was rubbing off even after a week in the sun.....Bad choice..
I may need to sand blast the wheels to get the powder coat off.....at least on the outside face that shows.
The FEDEX truck showed up and brought me my two new tires....
Great looking 10 ply tires.
Gonna head into town to see if the guys at cheeeeezoid used tire place will mount them....At least get one mounted and see wassssup.
I will post a piccy or two later.
Trying to find 12" 10 ply tires is a chore......at least at a price that is affordable....
After things are operational they can get foamed......for now ...air will do
Last edited:
Snowy Rivers
Well-known member
Got one of the tires mounted....Shopped around a bit....Local shop will pop these little beasties on the wheels for $10 each.
Far easier than the tire spoons and a bunch of BLUE AIR
The new assemblies are a touch wider...but the tire guides fit with room to spare.
The alignment on the new tire/wheel is pretty well spot on.
In order to make the 3/8" plate wheel centers fit in the rims with enough material to weld on both inside and out I had to CHEAT a tiny bit...I fudged the offset about 1/4"
After getting the new tire/wheel on I checked things with a straight edge against the old originals and things are plenty good enough for the crowd I hang with....
The new wheels are 4" wide....The offset was adjusted to account for this....Accept the fudge factor.....
The 145/12 Radials are very close size wise....both in the section and the diameter.
Life will be good....
So far the tariff on getting these filled is $70 per tire....I am still shopping.
But the FRONTS are going to get filled...Come hell or high water....
Still working on the three damaged alloy large bearing wheels..
The tires are nearly new....lost a bearing and boogered up the wheels (Somebody did not service their bearings as they should have)
If I can repair one for the other fella....I get two for my troubles.
Stuff the alloys on the front....Life be good....
Attachments

Snowy Rivers
Well-known member
Grabbed the other new tire and had it mounted while we were in town...
Got it bolted on the cat.,...
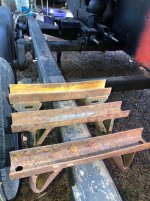
Decided to grab the 3 different types of tire guides used on the 2100.....at least these are the ones I know of.
I call them GEN1..GEN2 AND GEN3
The GEN 1 is the early type used on the 2100 and is the weakest design.
The outside upright spans less of the base and is prone to breaking the weld....
Gen2 is similar to the Gen1 except the outer part of the upright is wider and there is more contact with the base....The formed parts of the upright nearly touch in the inner part of the guide.
These guides also sit looser on the tires too compared to the GEN 1 ...Which have very little clearance on the radial tires.
The Gen2 guides have about 3/8" clearance on the tire on each side.
The Gen3 guides are the beefiest of the bunch with pretty much a total redesign....
The base is thicker material, deeper draw on the channel and the guide portions are welded parallel to the sides of the base.
A much better design....These were used on the 3700 and the 4200 machines...(Can retrofit to the 2100 cats)
The Gen3 guides are much heavier and will take a beating.....
I have about 20 of the Gen3 guides and a pretty good quantity of the Gen1 and Gen2 types..
It looks like the track I pulled apart recently had quite a few Gen2 guides....plus what I had that came with the cat originally and a few from a trade deal should net enough Gen2 guides to do one track.
The second track we recently acquired seems to have Gen2 guides.
Hopefully the tire guide issues will not require any more effort to complete the tracks.
The LH side now has a new tire and wheel on axle 3
After seeing these new tires I ordered up another pair.....
Still need to build at least 2 more wheels.....
Won't really know until we get eyes on the alloys that have been offered.
Some pics
Got it bolted on the cat.,...
Decided to grab the 3 different types of tire guides used on the 2100.....at least these are the ones I know of.
I call them GEN1..GEN2 AND GEN3
The GEN 1 is the early type used on the 2100 and is the weakest design.
The outside upright spans less of the base and is prone to breaking the weld....
Gen2 is similar to the Gen1 except the outer part of the upright is wider and there is more contact with the base....The formed parts of the upright nearly touch in the inner part of the guide.
These guides also sit looser on the tires too compared to the GEN 1 ...Which have very little clearance on the radial tires.
The Gen2 guides have about 3/8" clearance on the tire on each side.
The Gen3 guides are the beefiest of the bunch with pretty much a total redesign....
The base is thicker material, deeper draw on the channel and the guide portions are welded parallel to the sides of the base.
A much better design....These were used on the 3700 and the 4200 machines...(Can retrofit to the 2100 cats)
The Gen3 guides are much heavier and will take a beating.....
I have about 20 of the Gen3 guides and a pretty good quantity of the Gen1 and Gen2 types..
It looks like the track I pulled apart recently had quite a few Gen2 guides....plus what I had that came with the cat originally and a few from a trade deal should net enough Gen2 guides to do one track.
The second track we recently acquired seems to have Gen2 guides.
Hopefully the tire guide issues will not require any more effort to complete the tracks.
The LH side now has a new tire and wheel on axle 3
After seeing these new tires I ordered up another pair.....
Still need to build at least 2 more wheels.....
Won't really know until we get eyes on the alloys that have been offered.
Some pics
Attachments
-
 GUIDES ON RAIL 1 2 3.jpg566 KB · Views: 126
 -
 GUIDES END 1 2 3.jpg368.4 KB · Views: 123
 -
 GUIDES END 1 2.jpg619.4 KB · Views: 125
 -
 GUIDES 1 2 3.jpg408.7 KB · Views: 122
 -
 GUIDE GEN 1..2..3.jpg416.5 KB · Views: 120
 -
 GUIDE GEN3.jpg392 KB · Views: 125
 -
 GUIDE GEN2.jpg362.7 KB · Views: 129
 -
 GUIDE GEN1.jpg385.1 KB · Views: 135
Snowy Rivers
Well-known member
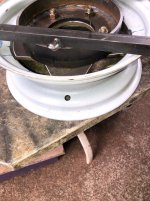
Between dodging rain showers and sun breaks I managed to get another one of the custom wheels built.
Got a bit of time that the wind was not blowing to weld the assembly up
I have one more rim that is ready to go...Just need to grab a snowflake blank... set up the fixtures in the mill and drill and countersink the lug stud holes....then trim the outer diameter to size and weld it in..
Sort of a PITA...BUTTTTTT..Given the fact that the 12" wheels with 5 on 5.5 bolt pattern are non existent any more....not too bad.
Snowy Rivers
Well-known member
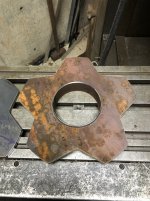
Got to work this morning and decided to finish the last two wheels I had knocked the centers out of.
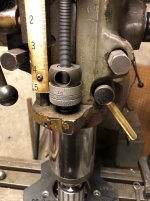
As I was getting ready to go at it I decided to do a complete start to finish write up on the making of these wheels
WARNING....WTMI.....
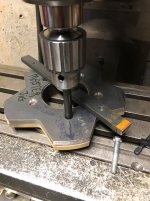
We will start off with getting the holding fixture on the mill
Then the water cut "Snowflake" blank comes out...
Then the master jig gets in the act....The new blank goes on the fixture first (The center pilots fit the jig snug)
The master goes on top of the blank and the pairs are evened up and the ties down bar is tightened up.
The 17/32" transfer punch is inserted into the chuck on the mill and the table adjusted to get the punch to just slip into the marked hole in the fixture (Arrow)
Table is locked to prevent any movement.
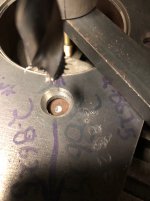
The 17/32 drill is dropped in the hole and the center is marked...
Then the pilot hole is drilled.
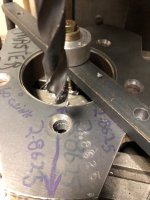
The 17/32" drill is put back into the chuck and the hole drilled.
Now the transfer punch (Used because it fits the hole snug) is placed through both plates.
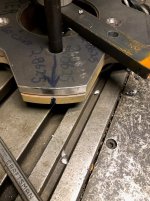
The plates are marked to keep them oriented through the process.
The tie down plate is loosened and the pair of plates are rotated to allow indexing the next hole.
NEXT POST
As I was getting ready to go at it I decided to do a complete start to finish write up on the making of these wheels
WARNING....WTMI.....
We will start off with getting the holding fixture on the mill
Then the water cut "Snowflake" blank comes out...
Then the master jig gets in the act....The new blank goes on the fixture first (The center pilots fit the jig snug)
The master goes on top of the blank and the pairs are evened up and the ties down bar is tightened up.
The 17/32" transfer punch is inserted into the chuck on the mill and the table adjusted to get the punch to just slip into the marked hole in the fixture (Arrow)
Table is locked to prevent any movement.
The 17/32 drill is dropped in the hole and the center is marked...
Then the pilot hole is drilled.
The 17/32" drill is put back into the chuck and the hole drilled.
Now the transfer punch (Used because it fits the hole snug) is placed through both plates.
The plates are marked to keep them oriented through the process.
The tie down plate is loosened and the pair of plates are rotated to allow indexing the next hole.
NEXT POST
Attachments
-
 IMG_4913.jpg353.1 KB · Views: 121
 -
 IMG_4915.jpg351.8 KB · Views: 128
 -
 IMG_4914.jpg317.8 KB · Views: 120
 -
 IMG_4916.jpg299.9 KB · Views: 123
 -
 IMG_4917.jpg313.5 KB · Views: 106
 -
 IMG_4918.jpg284.8 KB · Views: 105
 -
 IMG_4920.jpg180.7 KB · Views: 111
 -
 IMG_4921.jpg228.9 KB · Views: 119
 -
 IMG_4924.jpg341.7 KB · Views: 119
Thefatsquatch
Active member
Those Wheels look AWESOME! Especially with the tires mounted! It looks like it is all coming together.
Snowy Rivers
Well-known member
Process repeated until the new plate is finished. The punch stays in the original hole all the way so the holes DO NOT get out of sinc...
The finished plate is removed, a counter sink (82 degree std) is lightly touched to the holes to debur them.
Plate fit to the hub to check fitment.....
Now it's time to countersink the holes using a 60 degree countersink (Standard automotive lug nuts are 60 degree....regular Allen head bolts are 82 degree)
The new plate is placed on the bottom of the fixture and then the master is set on to...The assembly is aligned with the punch in the hole.
The countersink is placed in the chuck and lowered into the master jig and the stop on the spindle is set
The next step is to check the final fitment on thre hub with all 5 lug nuts.....
The snowflake now heads to the lathe to machine the OD so the wheel will just tap on...
Now the finished snowflake gets fastened to to positioning jig and then slipped in from the back of the wheel..
Spray the bare metal with the anti spatter.
Tack weld the inner sides in CROSS PATTERN...AND HOPEFULLY KEEP THINGS TRUE.,
NEXT POST
Attachments
-
 IMG_4926.jpg341.8 KB · Views: 124
 -
 IMG_4928.jpg464 KB · Views: 115
 -
 IMG_4929.jpg323.4 KB · Views: 121
 -
 IMG_4930.jpg303.2 KB · Views: 119
 -
 IMG_4931.jpg472 KB · Views: 115
 -
 IMG_4932.jpg261.6 KB · Views: 113
 -
 IMG_4934.jpg350.4 KB · Views: 123
 -
 IMG_4935.jpg435.9 KB · Views: 106
 -
 IMG_4936.jpg350.5 KB · Views: 116
 -
 IMG_4937.jpg414.2 KB · Views: 109
Snowy Rivers
Well-known member
Now we tack the front sides in a cross pattern
Try it on the cat to see if it runs true.....IT DOES
Weld this bad boy up using a cross pattern...front and rear
Retry on the hub with all 5 lug nuts tightened.
SWEEEEEET
It still runs true
Clean up with the wire wheel on the die grinder.
Nest it gets scuffed well with Scotch bright to prepare the original powder coat to accept paint...
Ready to go...
Attachments

Snowy Rivers
Well-known member
Squatch.
Thank you.
Yes...the plan is getting there.
More tires coming
I am going to run a few different sets of the 10 ply radials (Brands) and see wasssssup.
This wheel thing has been fun.....But what a hassle....But still far cheaper than the alloy wheel hub combos.
The 3/8" plate centers are not going to bend or warp......The sheet metal stockers were just a mess from over tightening....
Snowy Rivers
Well-known member
Whats gonna really tickle me silly is when DECENT Astro/Safari finds it's way home...
Still lots of stuff to do.
As soon as the weather closes in for the winter it will be time to get at the 406 Small block Chevy...
I want to get the engine completed and mounted in a test stand and run for an hour or so to break in the cam and check for any oil leaks or other issues.....
Then the tranny needs to come out of the cat and hit the bench.
I dug out my auto tranny tools.....all ready to go......
My plan is to freshen up the TH350 and set it up as a SELECT shift full manual control.....NO AUTO SHIFT AT ALL...
Going with a Winters sidewinder shifter...
Likely go with a "Reverse pattern ROCK GATE" ....At least that's on the table at present....
Being able to shift and hold each gear will keep the tranny from being a busy box and shifting right up fast.....
Hold third gear and get the boot into throttle and let the little mouse roar......
And so it goes.....
Snowy Rivers
Well-known member
Another Change order may well be in the works.
The idea of going back to the Astro van body....although very much on the table, the van creates a few unpleasant caveats.
Access to the engine is a big concern and creates issues in handling the body......
The S10 cab is already situated on the 2100 Chassis and the work done to get things ready to move forward.
Would be a shame to waste the time and $$$ already spent.
Now.....an idea that was suggested early on in this thread by others.
Use the back half of the Astro to provide the passenger compartment.
A wrecked Astro should be easy to scare up.
Cut the body at the forward edge of the "B" PILLAR (Rear edge of the front doors) (Sawzall job)
Scrap the entire front end of the body.
This would allow the easy access to the engine with a forward tilting hood.....
The rear portion of the Astro body is not all that heavy.
Getting rid of the sub frame, the entire driver compartment and leaving the hollow box.
Easy task to close in the cut off portion.....Add a slider widow and good to go.
The rear portion of the Astro will provide 2 folding bench seats, the side sliding door and the rear Dutch doors/hatch
The aft section will not be all that heavy.
Also the fuel tank is under the floor on the drivers side and can be used as is (Pretty much...just change to a pickup tube only instead of a high pressure pump)
At this time...this looks like it may be a great plan.....Getting an Astro with severe front damage should be a cheap proposition.....
Snowy Rivers
Well-known member
WELL
All the wonderful ideas will not play out.
With the S10 cab in the middle of the Cat....THERE IS SIMPLY NOT ENOUGH FRAME to set even the rear 2/3 of an Astro body on..
If the cab was forward over the engine...it would be perfect.
Another grand idea that will not work.
Since the S10 cab is fitted...Seems like the best plan is to move forward with the idea of using the pickup box and a canopy.....
Ahhhh well...As they say...The best laid plans of mice and men...often go astray....
I still think that you could easily build a cab that would fit it from square tube and then skin it. I believe it could be done with about 80 hours of labor, painted, glass in and ready to mount. You could do it in the shop over the winter and put it on in the spring. It could either tilt or just install removable floor panels for access to everything. If designed right, it would look like it came that way.
Snowy Rivers
Well-known member
M1
I agree..."In the shop" My shop is tiny and with the machine tools, shelves and such there is little room to do much.
Buuuuuuuuuttttttttttttt...
We went to the bone yard this morning and I got a tape measure on both generations of S10 Blazers and GMC Jimmy and the the Olds Bravada...2 & 4 door
These will bolt right onto the new mount I built for the S10 CAB....I will just need to add one maybe two more cross tubes and attach the Blazer.
My main attraction is "These are PLUG AND PLAY" Everything is there.
All the creature comforts.
Power windows (Maybe) all the instruments in the dash.
Seating for at least 4
A spot in the back to toss the extra chit.
Rear flip up hatch and fold open rear gate.
Simply sit it on top of the cat and plug in the wires.....
Everything is there and ready to go......
A small fab job to do the ant eater hood....Done deal.
The engine will have gobs of room to get to it.
These are light enough that I can lift them with the skid steer and lower right onto the cat.
J5 Bombardier
Well-known member
I built a cab for one of my Muskeg's using Freightliner doors, it's got all the creature comforts, probably better than the originals and it does blend with the rest of the vehicle .The downside is the weight and the crazy amount of time and steel put into it, and that's when steel was cheap .
J5 Bombardier
J5 Bombardier
Attachments
Snowy Rivers
Well-known member
Yesssss
Steel costs have gone off in the Ozones
Seemed like whenever I headed to the steel yard to get a few pieces to finish up the front axle project ....it was $$$$$$$$$$$$$$$$$$$$$$$$$$$$$$$$$$$$$$$$$$$.
I have built
Industrial type machinery "Operator cabs" back years ago.....Not a hard job at all,
Just have to have enough floor space to work and be able to handle the beast during the process.
I do not have anything indoors that can handle it...
Re-purposing a ready made cab/body can be done for very little $$$$$$$$
I did a cost/time analysis (Sort of) back at the start and I think M1 is pretty close on the time to build a cab.
Sadly I don't hunker down and thrash on things any more.....Age and health have taken a toll that really slows me down.
Another item here is.....I have already put a fair amount of time into mounting the S10 cab.....So switching (Mid course correction) to the S10 Blazer body will require little make the change..
The front body mounts will sit exactly where we have them now....
Just need to move (And slightly modify) the rear cab support tube ($$$$ already spent...)
Another perk.....I cut the wires that fed the rear of the truck (Lights and other stuff) as they were in the frame.
That all has to be put back or replaced.
The Blazer body is intact and ready to go...
All seating is in and ready to go.
Sort out the under hood wires for the needed functions and splice in added length to reach down into the cat belly..
All in and ready to go for the most part.....
Front lighting wiring....same story....all in and ready to splice to the needed lights on the front droop snout hood
Other than a little bit of mods to the steering wheel to fasten the air controls....Plus add the air lines.....Everything in the cab is in there and ready for prime time....
As far as cost for a used S10 Blazer goes ????
I am looking for a unit with a bad engine, bad tranny, bad rear axle .....Most folks this day and age are not going to take a 20-30 year old rig and dump thousands of $$$$$$$$ into an engine/tranny or ?????
I expect to scare one up cheap $$
Then remove the body and sell the rolling chassis for as much or more than I paid for the entire unit.....
The S10 pickup cost me $300
I have the cab and box
Sold the rolling chassis for $450
Yes there are those of us who salivate over scrap iron goodies......
The Average muggle will not fool with a 30 year old car....
I will admit...I should have done the S10 Blazer the first go round.....Oh well....The cab and box will go to a new home....$$$$$$$$$$$$$$$$$
It's not the destination....It's the journey .....
Met a lot of very interesting people along the way..
Snowy Rivers
Well-known member
Back when I hatched the idea of using the S10 CAB....I scored this book on ebay cheap...
Factory GM electrical manual for the entire S series......2 door..4 door....Pickup, Blazer the whole shebang...
This makes any Re-purposing wiring changes a snap.
All the wire colors, locations of relays, fuse, junctions, grounds....all of it.....
Factory GM electrical manual for the entire S series......2 door..4 door....Pickup, Blazer the whole shebang...
This makes any Re-purposing wiring changes a snap.
All the wire colors, locations of relays, fuse, junctions, grounds....all of it.....
Attachments


Snowy Rivers
Well-known member
Yesterday was a "Finish stuff up day" before it rains.
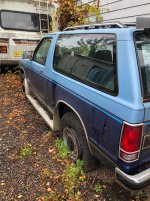
Went out to get some stuff and by a strange twist took a different road....spotted an S10 Blazer 2 door sitting along side a garage with grass growing up around it and a Rock stuck behind a rear wheel....
Stopped and nobody home...Left a note.
Guy called and left me a call back number.....We shall see...He seems interested in parting with the rig
License tags been expired since 1999.....
Rig likely has major mechanical issues to have been parked that long.....
I did not get too snoopy as nobody was home....took a quick peek at both sides and the interior.
Gotta be an 80's rig
I will call the guy this morning at a decent hour....See wasssup.
Finished up getting the last 2 fabricated wheels painted yesterday while it was dry......
Not much more to tell....Let ya know what shakes on the little Rig.
I am excited about the little 2 door....but at present....that's about it..,
Best part is that it's 3 miles from my house......The old Burb and a string should drag it home....Or stuff it on my trailer.
Attachments

Snowy Rivers
Well-known member
Spoke with the owners of the S10
They are quite willing to let the little Blazer go away.....
We are dealing with this....
Will know more later today......
They are quite willing to let the little Blazer go away.....
We are dealing with this....
Will know more later today......
Snowy Rivers
Well-known member
Looks like we have a done deal on the blazer cab....
Spent some time yesterday afternoon going over the little Blazer carcass.
Not bad.
20 years of sitting has not been kind....But a very good find that should make a sweet cab for the cat....
We need to get the tires back on the wheels and holding air so we can get the "Wretched little truck" on the trailer and 3 miles home.
Raining cats and dogs the past couple days.
L'll Blue gonna look sweet atop the 2100
Attachments

Snowy Rivers
Well-known member
Started making my shopping list for bits and pieces to restore the cab interior...
Floor covering.....Has blue carpet now....May replace it....possibly get the vinyl (Rubber) parts that replace the entire carpet set.
Floor sound pad (The old stuff is suffering from Mold Ala Carte.....)
Headliner has the all too common SAGGGGGGGGGGGGGGGGGGGGGGGGGGGS from the foam disintegrating and letting go.
Driver seat looks like a bomb crater.....
But mostly a good stripping out and a Royal Douching with stuff like Mr Clean or Pine Sol...should make the little girl spiffy.
Door panels as well as the other interior parts are good....just dirty.
Dash looks great.....
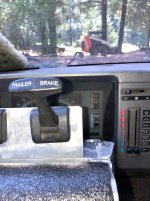
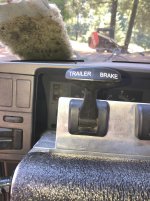
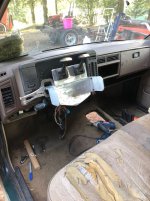
We will keep the steering wheel (Has tilt too) and mount the air controls for the steering similar to how I have it in the pickup cab...
A quick look at the wheel....pretty well looks like the air control setup will just bolt onto a small adapter bolted to the wheel where the puller bolts thread in....
Dash is nearly identical in the Blazer....
The Blazer column being complete and functional will allow the use of the original ignition switch and everything else...
A very quick bit of work to get the air valve setup mounted.
Run the nylon air lines down next to the hump..under the seat and then down the left side of the interior at the floor....
May be able to get those in after removing the interior panels to clean the beast and replace the carpet......
Since the Blazer is also a stick shift rig the column does not have any provisions to handle the Tubo 350 Trans.
Will stick with the same Winters Sidewinder shifter....mount it on a little platform on the hump to get it up to a handy spot.
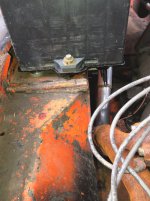
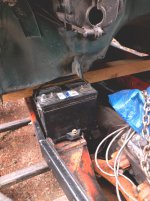
The cab being identical as far as the cowl area goes....The current location for the battery tray on the RH side about under the passengers feet will stay as it is....The spot was a perfect place....out of the way, but still accessible.
The tray was the LH tray from a Square body Suburban (New and had been hanging on a nail in the shop for years)
A small bit of mods...good to go.
This tray will handle a large Optima or other Heavy duty battery.
Other than a switch panel to handle the overhead lights and such.....the interior needs little more.
Being a non AC equipped rig the HVAC system is all manual push pull lever type.....no vacuum required.
The non AC also gets rid of the large evaporator cabinet in the engine bay too .....Quite handy to be shed of that thing.
If we don't find any issues with the heater core.....the dash should need nothing more.
Really nice to get a dash that has not been molested.....All the parts are as the came from MA General.
Wiring being a big part.
Once factory wiring has been thrashed.....ya never really know what has been damaged, shorted or otherwise FUBAR'D
Plan is and has been to tie into the factory light wires that feed all the forward lamps.....Reroute those to the overhead LED light bar/s and mount the signals up high too.
Stock stuff can stay as in out back.....Maybe some LED bulbs later....
The plan for the fuel tanks remains the same....A tank fitted into each rear wheel house.....Tanks are readily available with gauge senders that will work with the GM dash gauge.
The speedometer in the dash could possibly be utilized.....BUT WHY.....10 TO 15 MPH ...Waste to time to re calibrate that thing.
It's moving....that's all we need to know.... Look out the window....Yup it's moving..
The sound system is a genuine factory Cassette player......
Dash not chopped up.
Later a much more up to date sound system can be added.
Some place within reach of the driver....A top notch CB radio would be cool.....Maybe a 10 meter ham with the 11 meter CB band enabled....
I saw a Blazer yesterday that had the rear swing away spare tire carrier...One of those would be cool....Modify it to carry a couple of the Cat wheels/tires.....
With the back end being up quite high......Thinking about a Veranda around the back so the rear gate and hatch could be accessed easily.
Bring the veranda around so one could walk down the tracks on either side and step up onto the walkway.
Be cool....We shall see.
Floor covering.....Has blue carpet now....May replace it....possibly get the vinyl (Rubber) parts that replace the entire carpet set.
Floor sound pad (The old stuff is suffering from Mold Ala Carte.....)
Headliner has the all too common SAGGGGGGGGGGGGGGGGGGGGGGGGGGGS from the foam disintegrating and letting go.
Driver seat looks like a bomb crater.....
But mostly a good stripping out and a Royal Douching with stuff like Mr Clean or Pine Sol...should make the little girl spiffy.
Door panels as well as the other interior parts are good....just dirty.
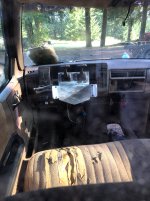
Dash looks great.....
We will keep the steering wheel (Has tilt too) and mount the air controls for the steering similar to how I have it in the pickup cab...
A quick look at the wheel....pretty well looks like the air control setup will just bolt onto a small adapter bolted to the wheel where the puller bolts thread in....
Dash is nearly identical in the Blazer....
The Blazer column being complete and functional will allow the use of the original ignition switch and everything else...
A very quick bit of work to get the air valve setup mounted.
Run the nylon air lines down next to the hump..under the seat and then down the left side of the interior at the floor....
May be able to get those in after removing the interior panels to clean the beast and replace the carpet......
Since the Blazer is also a stick shift rig the column does not have any provisions to handle the Tubo 350 Trans.
Will stick with the same Winters Sidewinder shifter....mount it on a little platform on the hump to get it up to a handy spot.
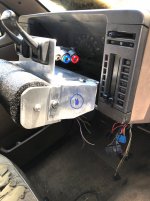
The cab being identical as far as the cowl area goes....The current location for the battery tray on the RH side about under the passengers feet will stay as it is....The spot was a perfect place....out of the way, but still accessible.
The tray was the LH tray from a Square body Suburban (New and had been hanging on a nail in the shop for years)
A small bit of mods...good to go.
This tray will handle a large Optima or other Heavy duty battery.
Other than a switch panel to handle the overhead lights and such.....the interior needs little more.
Being a non AC equipped rig the HVAC system is all manual push pull lever type.....no vacuum required.
The non AC also gets rid of the large evaporator cabinet in the engine bay too .....Quite handy to be shed of that thing.
If we don't find any issues with the heater core.....the dash should need nothing more.
Really nice to get a dash that has not been molested.....All the parts are as the came from MA General.
Wiring being a big part.
Once factory wiring has been thrashed.....ya never really know what has been damaged, shorted or otherwise FUBAR'D
Plan is and has been to tie into the factory light wires that feed all the forward lamps.....Reroute those to the overhead LED light bar/s and mount the signals up high too.
Stock stuff can stay as in out back.....Maybe some LED bulbs later....
The plan for the fuel tanks remains the same....A tank fitted into each rear wheel house.....Tanks are readily available with gauge senders that will work with the GM dash gauge.
The speedometer in the dash could possibly be utilized.....BUT WHY.....10 TO 15 MPH ...Waste to time to re calibrate that thing.
It's moving....that's all we need to know.... Look out the window....Yup it's moving..
The sound system is a genuine factory Cassette player......
Dash not chopped up.
Later a much more up to date sound system can be added.
Some place within reach of the driver....A top notch CB radio would be cool.....Maybe a 10 meter ham with the 11 meter CB band enabled....
I saw a Blazer yesterday that had the rear swing away spare tire carrier...One of those would be cool....Modify it to carry a couple of the Cat wheels/tires.....
With the back end being up quite high......Thinking about a Veranda around the back so the rear gate and hatch could be accessed easily.
Bring the veranda around so one could walk down the tracks on either side and step up onto the walkway.
Be cool....We shall see.
Attachments
-
 Column mod21.jpg341.8 KB · Views: 136
 -
 Column mod20.jpg323.7 KB · Views: 131
 -
 Column mod19.jpg279.6 KB · Views: 135
 -
 Column mod18.jpg352.1 KB · Views: 124
 -
 Column mod17.jpg243 KB · Views: 132
 -
 Column mod16.jpg349.9 KB · Views: 125
 -
 BATTERY TRAY3.jpg352.9 KB · Views: 128
 -
 BATTERY TRAY2.jpg281.9 KB · Views: 137
 -
 BATTERY TRAYT1.JPG315.5 KB · Views: 141