• Please be sure to read the rules and adhere to them. Some banned members have complained that they are not spammers. But they spammed us. Some even tried to redirect our members to other forums. Duh. Be smart. Read the rules and adhere to them and we will all get along just fine. Cheers. :beer: Link to the rules: https://www.forumsforums.com/threads/forum-rules-info.2974/

Another Muskeg

J5 Bombardier

Well-known member
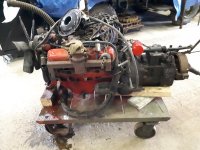
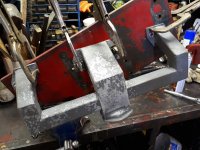
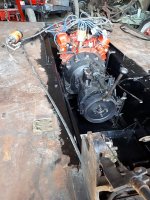
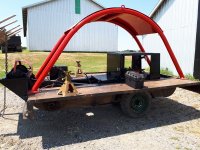
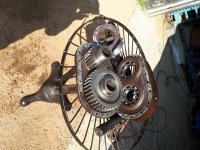
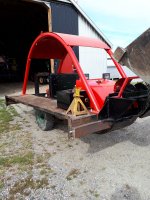
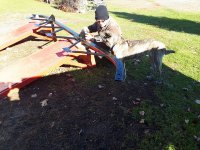
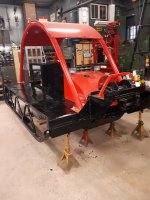
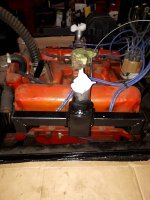
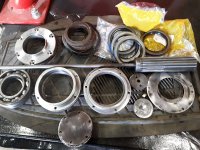
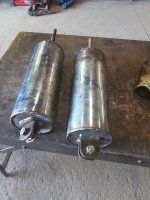
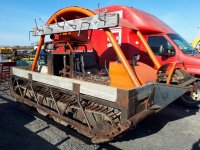
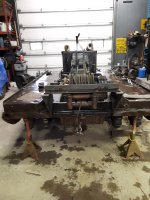
Picked up this Muskeg (MT73) , with a 318 dodge on Monday. Ex Hydro unit, brought it home in 2 trailers , tracks and roll bar on one and the rest on the second. Going to give it a once over front to back, and see if there are any surprises, first thing to go was the cable rack, the bolt pointing down is @#$%$# hard on the head ! Pics to follow.:hammer:
J5 Bombardier
 

Attachments

  • 002 - Copy.jpg
    002 - Copy.jpg
    144.6 KB · Views: 1,265

J5 Bombardier

Well-known member
Well this muskeg project , reminds me of my 1959 J5 Quick Restoration thread . Things seem to snowball, once you get started, so it looks like it will be a strip to the hull and go over everything. Good news on the 318 dodge , it came to life, but will need a fuel pump and carb rebuild, looks like it has about 400 hrs since a rebuild. Gotta love Hydro keeping a log book of repairs.
J5 Bombardier:hammer:
 

Attachments

  • fall 2017 #4 028 - Copy - Copy.jpg
    fall 2017 #4 028 - Copy - Copy.jpg
    217.7 KB · Views: 1,184

J5 Bombardier

Well-known member
From what the Bombardier museum said ,this muskeg was made in 1973 with a block heater and a winch for accessories. It is pto driven , the way it was installed would make me think an outside vender did it other than the factory. But a lot can happen in 44 years.
Anybody ever price the Harris silent bloc bushings on the bogey tandems, 8 required ? part # 114 0327 or pn#114 1477 00 .
Easier to remove these beams than the old style , but my bushings are done.
J5 Bombardier:hammer:
 

Attachments

  • fall 2017 #4 029 - Copy.jpg
    fall 2017 #4 029 - Copy.jpg
    299.9 KB · Views: 1,163

IMP

Member
Site Supporter
Looks like it's been gently treated in it's life. Nice straight tub with no major dings front. It's going to be a beautiful thing when restored!
 

J5 Bombardier

Well-known member
Thought I wood check the 318 over while I wait for milder weather before going back at the hull . Going to reweld the cracked manifolds, may have to square them on the mill after, they are pretty dainty, factory bombardier or somebody's handiwork, I don't know. Looks like a clutch , ring gear , starter pinion drive and reshim the PTO on the trans , will have to be put on the to do list.
J5 Bombardier
 

Attachments

  • Fall 2017 #5 014 - Copy.jpg
    Fall 2017 #5 014 - Copy.jpg
    111.7 KB · Views: 1,055
  • Fall 2017 #5 082 - Copy.jpg
    Fall 2017 #5 082 - Copy.jpg
    112.6 KB · Views: 1,057

Bobcatbob

Active member
GOLD Site Supporter
Looks like the start to a great adventure! Were you able to track down those bushings?
 

sno-drifter

Bronze Member
GOLD Site Supporter
I would start over and make my own headers. The flange is too thin especially if you have to mill it flat. Use 3/8 plate there. Those mitered 90's are flow killers. Get mandrel bent 180's and cut what curve you need from them. I would match the header plate and pipes to the exhaust ports. Maybe a bit of work but leaking exhaust is expensive too. Death is natures way of saying slow down. There is an asbestos substitute wrap which will keep the heat away from the engine and quite the noise that I would wrap the finished headers whether you roll your own or use what is there.
 

J5 Bombardier

Well-known member
Still more tear down, managed to tear down the 3 bolt prestolite starter drive on the 318 , needs a pinion gear and a set of brushes. I'm still toying with buying a 2 bolt gear reduction starter to try as I believe these mopars all used the same starter, this 3 hole cast bellhousing being the exception. Turned the flywheel and stripped the remaining tires off the beams, looks like 8 solids are good, maybe stretch it to 10 and the remaining I'll convert to air.
J5 Bombardier:whistling:
 

Attachments

  • fall#6 2017 006 - Copy.jpg
    fall#6 2017 006 - Copy.jpg
    201.5 KB · Views: 1,022

J5 Bombardier

Well-known member
Spring is here, started back on the muskeg, hope to have it mobile for this coming winter. Cleaned the hull tub, welded a cracked transmission mount , then some paint and put the 318 back into place. Next up will be plating the holes in the hull and front bumper . Wood splitting season has arrived, so the progress could be slow.
J5 Bombardier:hammer:
 

Attachments

  • phone 2018 spring 044.jpg
    phone 2018 spring 044.jpg
    232.2 KB · Views: 936
  • phone 2018 spring 046 - Copy.jpg
    phone 2018 spring 046 - Copy.jpg
    285.8 KB · Views: 942

J5 Bombardier

Well-known member
Still poking away at the muskeg, hull patches are 75% done , motor wiring fairly complete, winch and drive are done. New worm gear seals were installed in the Braden, and 1 u joint changed in the driveshaft. The large brass gear showed a lot of wear, with over 100 feet of cable on the drum the Hydro crew must have climbed many mountains, and dragged through many swamps . Put the feelers out for a small mast off a skidder , if one shows up it will save me building one. Next up, repair the rails and strip and reseal the planetaries , so I can put the diff cover on. :hammer: J5 Bombardier
 

Attachments

  • july  2018 101 - Copy.jpg
    july 2018 101 - Copy.jpg
    396.3 KB · Views: 861

J5 Bombardier

Well-known member
Cleaned up the final drives today and made the 6 gaskets. No surprises , all the ball bearings were good, removed all the old fill/drain plugs, already have the seals . So should be another piece of the puzzle to go back on .
J5 Bombardier:hammer:
 

Attachments

  • july #3  2018 003 - Copy.jpg
    july #3 2018 003 - Copy.jpg
    301.1 KB · Views: 815

J5 Bombardier

Well-known member
A little more progress on the Muskeg , installed the final drives, cleaned the Differential housing, repaired and installed the diff cover. Put the fuel tank in and mounted the cab .
I had no luck matching a splined hub (18 splines x 2" ) to repair my collection of broken muskeg axles, so going to work out some machine shop prices . That should delay my retirement !
J5 Bombardier :hammer:
 

Attachments

  • sept  2018 #2 053 - Copy - Copy.jpg
    sept 2018 #2 053 - Copy - Copy.jpg
    438.5 KB · Views: 756

J5 Bombardier

Well-known member
Been putting off repairing the side rails, left the worst one for the last, lots of patches , but finished it yesterday. Had some help near the end , yes you can teach an old dog new tricks !
J5 Bombardier:hammer:
 

Attachments

  • nov 2018 071 - Copy.jpg
    nov 2018 071 - Copy.jpg
    204.5 KB · Views: 663
  • nov 2018 074 - Copy.jpg
    nov 2018 074 - Copy.jpg
    306.8 KB · Views: 697

J5 Bombardier

Well-known member
Rails went back on today , they have been been off for a year, nice to see parts going on . Painted the hull top and bottom, going to work up top for now and leave the suspension later.
J5 Bombardier :hammer:
 

Attachments

  • nov 2018 014 - Copy.jpg
    nov 2018 014 - Copy.jpg
    371.8 KB · Views: 623

J5 Bombardier

Well-known member
Will be able to repair the cracked /worn splines in our muskeg axles now . The hubs arrived today, it will be nice to have some spares ready , just in case.
J5 Bombardier:hammer:
 

Attachments

  • DSCN4802 - Copy.jpg
    DSCN4802 - Copy.jpg
    110.1 KB · Views: 587
  • nov #2 2018 009 - Copy.jpg
    nov #2 2018 009 - Copy.jpg
    204.5 KB · Views: 576

J5 Bombardier

Well-known member
I have no idea on factory price, a used axle would probably go for a thousand canadian here. So I won't go that route, parts machines usually have well worn axle .All said and done if I have around $ 5-600 tied up in each one , may as well fix them myself. They are broached, never could match the spline with anything else out there.
J5 Bombardier
 

J5 Bombardier

Well-known member
Finished the exhaust manifolds and installed, busy making up axles for both style of muskegs. I will feel more comfortable having a couple spares around on standby, I'll post some pics when their finished.
J5 Bombardier:hammer:
 

Attachments

  • dec 2018 004 - Copy.jpg
    dec 2018 004 - Copy.jpg
    295.5 KB · Views: 753

J5 Bombardier

Well-known member
We have been working on the walking beams, the right side beams being true , as were the axles , only needing new bushings and pin for the adjuster. The left side was a different story ,a rear axle shaft was bent, had to make one up, along with bushings and pin . Couldn't believe both left side walking beam shafts (2 1/4") x 30" were bent, so did it fall off a float or mountain , who knows. So they were cut off and drilled through on the mill enough to torch them , then pressed out . I picked up 5 feet of shaft on the way home, (got to love those steel tariffs) and the project continues.
J5 Bombardier:hammer:
 

Attachments

  • feb 2019 045 - Copy.jpg
    feb 2019 045 - Copy.jpg
    223.4 KB · Views: 707
  • feb 2019 049 - Copy.jpg
    feb 2019 049 - Copy.jpg
    322.5 KB · Views: 720

J5 Bombardier

Well-known member
Had a little trouble pressing the old shaft out of the rear beam, ended up cutting and removing the sleeve in the beam. Still have to cut the new sleeve to size before welding it in .
The second pic shows two muskeg axles that have the new splines welded in, the taller one is for non planetary. The shorter one is an old non planetary that was damaged, cut down with a new spline installed and sleeved for the larger seals in the planetary drives.
J5 Bombardier :hammer:
 

Attachments

  • feb 2019 #2 022 - Copy.jpg
    feb 2019 #2 022 - Copy.jpg
    228 KB · Views: 647
  • feb 2019 #2 024 - Copy.jpg
    feb 2019 #2 024 - Copy.jpg
    240.3 KB · Views: 671

J5 Bombardier

Well-known member
Finished the two front walking beams today , added a link for some spring in a can to be mounted. New washers , a step up sleeve for the bushings and the bushings themselves were installed. A coat of paint and their ready for wheels.
J5 Bombardier :hammer:
 

Attachments

  • mar #1 2019 010 - Copy.jpg
    mar #1 2019 010 - Copy.jpg
    209.8 KB · Views: 632

J5 Bombardier

Well-known member
Cleaned up the parts for the sprockets install, made new outer supports ( shark Fins), just have to weld them up. Fitted the axle shaft to my new repaired axle, it was tight, needed some filing There is a slight difference on the root cut between non planetary and planetary axles and as I sent an old style axle for a sample when my new couplings were made, it was a surprise. Either way they are ready to install, one more item to take off the list.
J5 Bombardier:hammer:
 

Attachments

  • june 2019 051 - Copy.jpg
    june 2019 051 - Copy.jpg
    232.1 KB · Views: 657
  • june 2019 047 - Copy (2).jpg
    june 2019 047 - Copy (2).jpg
    200.6 KB · Views: 542
  • june 2019 049 - Copy.jpg
    june 2019 049 - Copy.jpg
    241.4 KB · Views: 597

J5 Bombardier

Well-known member
Finished installing the drive sprockets today, and filled the diff with TDH. Going to repair the 4 saddles on the hull for the walking beams next, then sort out the 16 wheels to install. Hard to think of this machine in snow as the temp is 87 degrees so far today.:hammer:
J5 Bombardier
 

Attachments

  • june#2 2019 021 - Copy.jpg
    june#2 2019 021 - Copy.jpg
    207.1 KB · Views: 508

J5 Bombardier

Well-known member
Sorted out the wheels , ended up with 8 solids, 4 foam filled, and 4 brand new air tires. Finished welding up the new " spring in a can ' , just have to compare max stroke on an original to make sure their long enough.
Started packing wheels, 2 down 14 to go !
J5 Bombardier
 

Attachments

  • july #5 2019 016 - Copy.jpg
    july #5 2019 016 - Copy.jpg
    213.9 KB · Views: 495
  • july #5 2019 018 - Copy.jpg
    july #5 2019 018 - Copy.jpg
    218.1 KB · Views: 469
Top