• Please be sure to read the rules and adhere to them. Some banned members have complained that they are not spammers. But they spammed us. Some even tried to redirect our members to other forums. Duh. Be smart. Read the rules and adhere to them and we will all get along just fine. Cheers. :beer: Link to the rules: https://www.forumsforums.com/threads/forum-rules-info.2974/

Thiokol Snowcat Project

Snowy Rivers

Well-known member
Pretty well have to use the planetary axle for steering.
Others have used a standard diffy ...and used the brakes to lock up one track or the other.

I thought about that but then thought better of it.

The OC-12 is nearly bullet proof.

If you get the diffy all the way down and go through it you should be fine,

Now you did have issues with some breakage on the R&P if I remember correctly ??????

The biggest part of the OC-12 is keeping them in good shape.....
Once thrust washers and things start wearing out and junk goes through the gear and bearings....it can and will get ugly.....


Water getting in....RUST ruins bearings then they grind themselves to bits and shed all sorts of metal scrap.

When you get ready to do the diffy...let me know, and we can come up and give you a hand.

I made several special tools to deal with the big box
 

Thefatsquatch

Active member
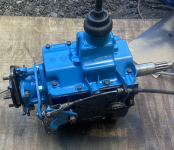
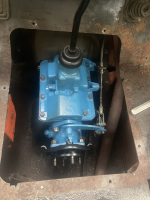
I should have asked if there was a trick to getting this tranny back in by myself, as there isn't room in the cab for even one extra person. I ended up strapping the back of it up to the hand-rail and starting a couple long bolts, then just wrestled with it while basically standing on my head for a few hours. But the freshly rebuild NP435 is in and bolted down! Tracking down brake shoes and springs for the emergency brake was less than fun, but a local Potter Webster supplier found what I needed! Now for the Overdrive contraption! New Axle should be on it's way Monday, so I have about a week to get this all bolted together enough to move it up by the shop. Then the real work starts on the final drive, and repairs to the tracks.
 

Attachments

  • t1.png
    t1.png
    864 KB · Views: 109
  • t1i.png
    t1i.png
    1.5 MB · Views: 111

Thefatsquatch

Active member
Well, While I had the tracks off, I figured I would correct the problem in the picture. This is the worse side, but neither one of them are straight. Upon inspection, it is not the axle spindles which are bent, but the suspension axles holding the arms. That gives the whole front end toe-out. The only option at this point was to buy new torsion axles. Unfortunately, they only come in half axles right now, from the production shortages everyone is having. The question I have is: Is it beneficial to toe-in the front wheels, to compensate for track tension? The 3500 point axles come with a bracket to provide about positive 1-2% camber, so I am thinking a similar amount of toe-in. I am going to have to build these into an axle, so I can arrange it however I need to.
 

Attachments

  • allignment issue.png
    allignment issue.png
    2.1 MB · Views: 119

Snowy Rivers

Well-known member
A small amount of toe in will not hurt.
The front axle gets beat hard from all the pull of the tracks.....This is the biggest reason the front torsion units go south....The others are just along for the ride and wear far less. (The front torsion rubber cords have failed and this allows the inner bar to crawl back....causing the "out of line)

I looked at using the half axles and going that route....but nobody local had any that I could go and get a hands on "Touchy Feely"
I was not keen on dropping the big coin$$$$$ to take a guess....Hence the reason I chose to build my own.

Camber is there to help keep the tires flat on the road once under load.....In this application the track is all over the place as it moves with the terrain and likely will make zero difference in actual operation.....Unless it was really off in the ozones ....

The Snow cat "Smoothies" (Tires) are dome shaped on the contact face......as opposed to the flat surface of the treaded tires.

The Toe is a good thing....A little bit.

One important thing is to have all 5 road wheels in a straight line....This will make things easier on the sidewall of the tires
Also make sure the tire guides are sitting centered in the sprockets and the tires are all lined up

Any misalignment will cause a bit more wear......Subjective....As the machine is turned the tracks move all over anyway.

Good luck on the axle project.

Keep us in the loop......
 
Last edited:

Thefatsquatch

Active member
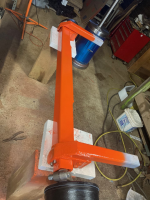
It's been a busy month, trying to get ready for the snow! The front axle is finally done. Since no one makes a suspension axle quite the right length, I ended up getting two half-axles, and fitting/welding them into a new 4" square tube. Hopefully that will do the trick. Took a bit of retro-fitting, but it doesn't drop below the level of the oil pan, and it is adjustable for tension. Since I was at it, I went with some trailer brake hubs I had laying around, so I have an emergency electric brake. Just a big red button on the dash to slow the front wheels. I realized with the issues last year that an axle breakage will shut down all my brakes. Center e-brake, steering brakes... everything. This won't be anything I will want to use often, and who knows if it will even work well, but at least it will be peace of mind. I found some of the st145r12 wheels and tires again. they are the only ones with the correct offset to use 10" drum hubs, but they are the ones I want anyway. Quite difficult to find when I need them. Those will be getting filled and installed with the new axle and brakes.
The other picture is the re-furbished intake and exhaust manifolds. The bolts holding them together broke, and had to be re-drilled and tapped, and I cleaned and polished the insides of both pieces a little heat-resistant paint and they should be good to go. The old-exhaust donut system is getting a modification on the pipe-end. I saw some old mustang down-pipes with a flange to hold the donut in place, so it can actually be compressed. That's next, along with running a new muffler and an expansion chamber. Then it's time to pull the rear-end and get the axle installed, along with checking for bearing damage. And it's half-way through November!
 

Attachments

  • new axle.png
    new axle.png
    1.8 MB · Views: 121
  • bent metal.png
    bent metal.png
    816.8 KB · Views: 128
  • refurbished manifolds.png
    refurbished manifolds.png
    895.9 KB · Views: 121

Thefatsquatch

Active member
Well, I hate to admit it, but I think I really screwed the pooch on this one. I made some assumptions that turned out to be very wrong. Since I am using the wide tracks, I had to put 1.5 inch wheel-spacers on all my axles except the front one. The front one I had found some metric wheels with a better center, so I didn't need them. When I built the new axle, I wanted to use the drum-brake hubs, and I was thinking the outer surface would be centered the same on the axle. It is not. : | So, I tried using the old hubs. The only diameter difference is the outer bearing, and I made a spacer for that. Unfortunately, the old hubs are actually a shorter spindle than the new ones. So now my axle is about 2 inches longer than I wanted. I needed it 1 inch longer than the old one, but 2 inches seems like it will cause a problem.
So. I installed the axle, and I think I will put the brake hubs on when I get home today.
Has anyone on here ever built a wheel? I think building a wheel with a unique offset is probably my best bet at aligning the tires all in a perfect row.
 

Attachments

  • completed axle.png
    completed axle.png
    1.9 MB · Views: 103

Snowy Rivers

Well-known member
Home depot has 12" wheels for under $20 each
Cut the welds and knock the centers out.
I designed new 3/8" plate centers ...but mine are for the 5 x 5-1/2" stock hubs

You can design anything you want though....

I set up a jig and fixture to set the center where I needed it to be and then welded them in...
 

Thefatsquatch

Active member
Thank You! I looked at punching the centers out, but the 10" drum brakes won't fit in the dished part of the rim. I would need to cut the lip off either side and put a shallower dish , (or no dish at all). The other option is get non-brake hubs and re-center the wheels, but I'm hoping to have that last line of defense if the back end goes.
 

Snowy Rivers

Well-known member
Best plan is to go to an outboard disc brake on the sprockets
I have my Rotors and calipers....

They are from an gen 1 s-10 blazer.
Aftermarket mounts are available.
I did the design work and lashed it all up.....Just need a pedestal standoff to bolt to the sprockets with the nuts that hold the sprockets on....

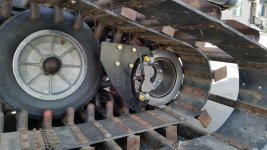
Here is a picture posted by Snowcatcrazy of his 2100 rear brakes.

I believe his are large GM PICKUP REAR DISCS.

Does not take a big rotor to stop this beast.

Check through my posts and look at the parts
 

Attachments

  • 71000-841f8c576b5e06d7a4a83262c9b63a9c.jpg
    71000-841f8c576b5e06d7a4a83262c9b63a9c.jpg
    13.7 KB · Views: 121

Snowy Rivers

Well-known member
The setup in the picture worked well the fella said.
My setup has a spindle that bolts to the sprocket and the rotor fastens to that.
A machined tube with bearings goes over the spindle assembly and the caliper mounts to that.
The tube has a reaction arm that keeps the caliper from rotating.
The reaction arm anchors to the frame to keep things from tweaking.....

Really simple....AND IT WILL ALLOW A SAFE SAFE STOP EVEN IF AN AXLE SNAPS OFF......

Best part is these can be hacked together using standard GM calipers and rotors.....
 

Thefatsquatch

Active member
Anyone have a diagram for mounting the blade on a 2100? Pictures? Thoughts?
We only got to take it out one time this year, but it was good. took it all the way up to the south climb parking lot on Mt Adams. The weather was crazy, with 60 mph or more wind gusts, and there were significant sidehills on the way up and down. A blade would have allowed me both a bit of security leveling out the 35 degree sidehills, and a way to dig out for the tents. Snowy was kind enough to give me a blade in exchange for some tire guides, but I still need to make the mounting brackets.
 

Rockodom

New member
I have a 245 page scan of the Thiokol 2100B illustrated factory manual - operation, service and parts for both the V8 and L6 engine. PM me if you want and can download a very large Google file. :thumbup:
I sure could use that manual i just aquired a 2100 front axle and track tensioners are are part with parts missing
Rocky
 

Rockodom

New member
I have a 245 page scan of the Thiokol 2100B illustrated factory manual - operation, service and parts for both the V8 and L6 engine. PM me if you want and can download a very large Google file. :thumbup:
yes i would like to get a copy i have a 1975 2100 with the diesel Rocky 208 539 1048
 
Top