• Please be sure to read the rules and adhere to them. Some banned members have complained that they are not spammers. But they spammed us. Some even tried to redirect our members to other forums. Duh. Be smart. Read the rules and adhere to them and we will all get along just fine. Cheers. :beer: Link to the rules: https://www.forumsforums.com/threads/forum-rules-info.2974/

"Snowzilla": A Comprehensive Tucker 1643 Project...

Blackfoot Tucker

Well-known member
GOLD Site Supporter
We finished up CHUGSzilla’s tracks last night. To be fair, they look a lot better with the backing plates all cleaned up and repainted. Was it worth it? My answer is yes, but considering the ugliness of the green paint, the phrase “lipstick on a pig” is a fair description. Ouch! Did I really say that (as opposed to just think it)?

While the backing plates were curing we started prepping the carriers for reassembly. "Way back when" we had removed all the spindles from the spindle tubes on the carriers, and now it’s time to clean everything up. A great many of the spindles were rusted/corroded in place and it took a lot of force to get them out. A LOT of force. Well, getting everything clean and smooth and sliding easily is time well spent, and we’ll coat the spindles liberally with anti-seize as part of the reassembly process.

The plan is to get the carriers all reassembled with the idler and damper wheels, then bring the machine in the shop and install the carriers and tracks. Starting to see the light at the end of the tunnel.

Pics of the tracks.

IMG_3106.jpeg


IMG_3107.jpeg
 

Cidertom

Chionophile
GOLD Site Supporter
Very nice. I went with "nyloc" nuts on my track build and regret it. I've had to retorque several that have loosened. I think the nuts you used are better.
 

Blackfoot Tucker

Well-known member
GOLD Site Supporter
What blackfoot used look like grade 8 nyloc flange nuts to me. What am I missing?
The nuts are Grade 8 flange Stover nuts. (Also called Grade G lock nuts. A Stover nut without the flange would be a Grade C).

Nylok nuts have a ring of nylon that deforms as the bolt threads it's way through the nut. A Stover nut has a deformed portion of the nut's threads that the bolt must also get through. It's a different means of preventing the nut from loosening.

In replacing the belting on the three Tuckers, we removed literally thousands of nuts. I'd say the majority were probably Nylok style nuts and some were loose. Honestly, I don't think one is significantly better than the other, though Nylok nuts have temperature limitations and supposedly the nylon degrades over time with salt or UV exposure. Nylok nuts tend to be taller vertically, which may require a longer bolt.

In many other locations on CHUGSzilla we used stainless steel bolts with stainless steel Nylok nuts. A significant drawback of using stainless fasteners is sometimes the threads gall, and now you have a mess on your hands. You can almost think of it like cold welding, and a galled fastener can be really difficult to take apart. Often we've had to cut the nut off....

My understanding is galling occurs when there is significant friction between the two surfaces; the threads on the bolt and nut. If you're threading a stainless nut onto a stainless bolt and you sense higher than expected friction; stop now and remove the nut. Continuing to tighten that nut could very likely result in a galled fastener, and you'll be frustrated with yourself for not heeding that warning (ask me how I know).
 

Cidertom

Chionophile
GOLD Site Supporter
In doing communications work I used a lot of Stainless steel fasteners. Some customers spec SS over hot dip galvanize. While there is a place for SS, most of the time Galv does just fine. I learned that lube is essential. Having a 1" diameter threaded rod weld itself to a nut at 400 ft in the air isn't fun. (BTDT)

a good blurb by fastenall about the issue: https://www.fastenal.com/fast/services-and-solutions/engineering/galling#
 

Blackfoot Tucker

Well-known member
GOLD Site Supporter
In doing communications work I used a lot of Stainless steel fasteners. Some customers spec SS over hot dip galvanize. While there is a place for SS, most of the time Galv does just fine. I learned that lube is essential. Having a 1" diameter threaded rod weld itself to a nut at 400 ft in the air isn't fun. (BTDT)

a good blurb by fastenall about the issue: https://www.fastenal.com/fast/services-and-solutions/engineering/galling#
CT,

That doesn't sound like much fun on the ground. At 400'... No Thank You! At that height, I want to be in an airplane.
 

alryA

Well-known member
The nuts are Grade 8 flange Stover nuts. (Also called Grade G lock nuts. A Stover nut without the flange would be a Grade C).

Nylok nuts have a ring of nylon that deforms as the bolt threads it's way through the nut. A Stover nut has a deformed portion of the nut's threads that the bolt must also get through. It's a different means of preventing the nut from loosening.

In replacing the belting on the three Tuckers, we removed literally thousands of nuts. I'd say the majority were probably Nylok style nuts and some were loose. Honestly, I don't think one is significantly better than the other, though Nylok nuts have temperature limitations and supposedly the nylon degrades over time with salt or UV exposure. Nylok nuts tend to be taller vertically, which may require a longer bolt.

In many other locations on CHUGSzilla we used stainless steel bolts with stainless steel Nylok nuts. A significant drawback of using stainless fasteners is sometimes the threads gall, and now you have a mess on your hands. You can almost think of it like cold welding, and a galled fastener can be really difficult to take apart. Often we've had to cut the nut off....

My understanding is galling occurs when there is significant friction between the two surfaces; the threads on the bolt and nut. If you're threading a stainless nut onto a stainless bolt and you sense higher than expected friction; stop now and remove the nut. Continuing to tighten that nut could very likely result in a galled fastener, and you'll be frustrated with yourself for not heeding that warning (ask me how I know).
I was being facetious. I worked as an assembler at Terex and very familiar with bolt grades.
 

Blackfoot Tucker

Well-known member
GOLD Site Supporter
Kind of surreal to see Snowzilla approaching completion!!
Yes indeed!

But once assembly is complete we'll need to test it to make sure it runs well, and works properly. Inevitably, we'll find some kinks that need to be worked out. It's just part of the process....

Testing is not running it around the gravel at Scott's shop. It's taking it out in the snow and putting it through its paces. Scott will of course want to go to Cedar Hollow, and I'll insist on Mirror Lake Highway. Cedar Hollow is fine, except the tress have grown in and it's impossible to take the trails without getting "Rocky Mountain pinstripes" in the paint from branches, etc.

Then again...they'd be an improvement to the hideous green paint!
 

Blackfoot Tucker

Well-known member
GOLD Site Supporter
Some progress Travler, but it seems slow....

Work continues on CHUGSzilla, albeit the summer heat slows progress a bit. On the one hand snowcat season seems a long way away… but the reality is... it’s really not all that far, and we need to make progress. We have a lot to do before the snow flies.

We finished reassembling the four carriers last night. CHUGSzilla got four brand-spanking new idler wheels from Tucker, Inc. They are installed in the forward position on each of the four carriers. The carriers themselves have been sitting outside and needed some paint touch up. We also had to clean up the spindle tubes to ensure the spindles would slide in easily, and that took some time to get all the spindle tubes prepped. The spindles get liberally slathered with anti-seize, then slid into position. New Grade 8 bolts secure the spindles in position and they too get some anti-seize prior to threading the Grade 8 Nylok nuts on to the bolts. The ring seals all got wire wheeled and all the parts slowly get assembled. Either the Tucker factory, or a previous owner, cut down most of the castellated nuts to a shorter length. But they did this on a band saw. That method works, but a band saw is a relatively crude and imprecise method of shortening the nuts, and it’s pretty easy for the cut to not be perpendicular to the threads. If that happens, as the nut is tightened to preload the bearing tension, it will put uneven pressure on the bearings…not a very good idea. Scott is using his lathe to reface the cut end of the nuts to a standard length and correct any misalignment. He said a bunch were well out of perpendicular… Unfortunately, I had to say “most” above because some castellated nuts were full length. I hate this, because it means the parts are not interchangeable. After reassembly one spindle required a longer nut, and I foresee someone being frustrated in the future.

Two of the ring seals were pitted on the surface, so we decided to replace those with new ring seals bought, of course from Tucker. You would think those seals would fit perfectly… as did we… but like us… you’d be wrong. The inside diameter of the ring seals was too small. The tapered roller bearings by their nature are machined to very close tolerances and yet they slid properly on the spindles. The new Tucker ring seals did not fit on those same spindles, and we had to use a cylindrical sanding wheel to ever-so-slightly increase the ID of the ring seal. Yup…Tucker strikes…AGAIN!

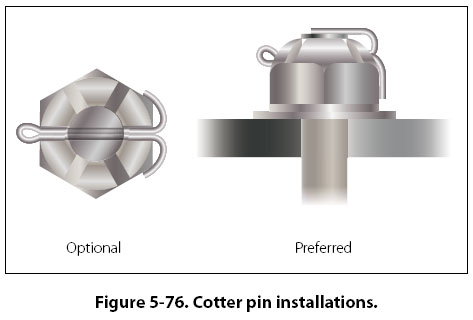
There are, of course multiple way of installing a simple cotter pin. We like to follow the aviation style shown in the drawing below as the preferred method. I think it looks more professional, but of course others may disagree. It definitely makes reusing a cotter pin more difficult, but cotter pins are supposed to be a one-use-only item.

fig5-76.jpg

I had set a goal of installing the tracks and carriers on CHUGSzilla by the end of July, but it’s looking like that won’t happen. It was going to be close, but July 24th is Pioneer Day in Utah, which is a state holiday. Scott didn’t want to work on snowcats that evening….

I was going to get in a Scott-oriented jab, but thought better of it before posting. You see, seven years ago Mrs Blackfoot and I had a plumbing emergency at our house and Scott came to our rescue over the Pioneer Day holiday. He has more than earned a pass on not working on snowcat stuff on Pioneer Day….
 

Travler

Active member
GOLD Site Supporter
BFT it takes time to get things done RIGTH as you know a little of my back ground i like the best

thanks for update
 

Blackfoot Tucker

Well-known member
GOLD Site Supporter
At long last CHUGSzilla is finally back on tracks. Honestly, it feels very satisfying to finally see it looking like a snowcat again after years of sitting on tires and wheels.

These two photos make it look like CHUGSzilla is all tracks, and it somewhat is. The 1600 series carriers of this vintage are not symmetrical. A 1500 carrier is 76” long and a 1600 series is 92” long. But that extra 16” is allocated with 3” on one end and 13” on the other. That means the overall length from the front of the front tracks to the rear of the rear tracks is 26” longer than a 1500 series machine.

IMG_3215.jpeg


IMG_3219.jpeg


Here’s a pic of Thundercat after we finished installing the tracks. It doesn’t look as much “all track” as CHUGSzilla because we stretched the rear frame 12”, moved the front axle assembly forward 2” and we built a new bed 18” longer than the original factory bed. But we do like the "all track" look on CHUGSzilla.

IMG_1379.jpeg


The track installation on CHUGSzilla has us perplexed. Let me explain….

Our plan when we started on the re-belting project was to put new belts on CHUGSzilla, and make new extra-long belts for Thundercat - as we’re considering a potential modification that would require longer belts. Thundercat’s belts were in reasonably good condition, so we thought why not cut those down in length and put them on the 1544, whose belts were in worse shape? So we stripped off all the grousers and hardware from Thundercat's belts and went to install the first one on a 1544 track and… trouble. The belt pitch (distance between grousers) was different. Huh?

Looking at the order sheets from Thundercat, CHUGSzilla, and the 1544, all had 6 1/16” grouser spacing. But actually measuring the spacing on a Thundercat belt showed someone had installed belts with 5 7/8” grouser spacing, The upshot was the 1544 got all new belts, too, but that also explained why Thundercat's belts were tighter than we wanted, despite being adjusted all the way loose. Mathematically, the 3/16” difference between the 5 7/8” spacing and the 6 1/16” it was supposed to have results in a 5 11/16” shorter belt. Interestingly, if you add a 32nd grouser to the track, the overall belt length is almost identical to 31 grousers at 6 1/16” (32 grousers at 5 7/8” = 188” overall length, 31 grousers at 6 1/16” = 187 15/16” overall length.)

So with all that explanation, we were surprised how tight the new belts are on CHUGSzilla. Hopefully, they’ll wear in a bit as they get used, and the belt tension will loosen slightly.

Of course Scott being Scott, when he backed CHUGSzilla out of the shop and went to park it, couldn’t just sedately drive it away. He asked if I wanted to ride with him, but I said I'd walk. He said “I’ll leave you in the dust”. And he put CHUGSzilla in gear and started to drive away. But he wanted the transmission to shift, so he punched it. If you'll excuse the term, he “lit up the tracks” as he accelerated away, giving an indication of just how much power is lurking in the L94 engine. Later, he confessed it was an "Oh sh*t moment" as he was almost instantly going faster than he wanted to be. I know there are forum members who like Diesel powered machines, but Scott and I, in addition to being certifiable knuckleheads, are also motorheads at heart, and we like what a strong gasoline fueled engine brings to the table…. Testing on snow will be fun!

We have some odds and ends to finish on the track installation, and then some other assembly details to finish up, but the end is definitely in sight!

I’ll also spill the beans slightly and mention the 1544 is about to re-enter the limelight for a nice upgrade. That will of course be discussed in the 1544 IRAN thread.
 

Blackfoot Tucker

Well-known member
GOLD Site Supporter
Work continues on CHUGSzilla, but I think the machine is out for revenge. Let me explain:

As we’re checking off items necessary for completion, CHUGSzilla seems to make everything as difficult as possible for us. You see, the machine is so mad at us for painting it that hideous green color that it wants to pay us back. Here’s but one example.

The new instrument panel has three LED indicator lights. There’s a red one that illuminates when the parking brake is set. There’s a yellow one that is the check engine light, and there’s a blue one that indicates when the headlight high beams are on. The intensity of the red one is fine, but the yellow one is a bit too bright, and the blue one is very obnoxiously bright. We decided to dim the yellow and blue LED lights by adding resistors to the wiring. So… off I go to a local electronics store that has all kinds of this stuff. I explain what we’re trying to do, and the fellow is very helpful. Resistors are cheap; like ten cents each, and the store has a two dollar minimum. I leave with several resistors between 1K and 10K ohms of resistance. We should be all set….

The setup is I sit in the driver’s seat to evaluate bulb brightness while Scott tries different resistors. The 1K resistor does virtually nothing. We try the 5K; not much better. The 10K…and the light is still way too bright. Then we start adding them in series. At 30K ohms of resistance... the light needs more resistance. CHUGSzilla says “Tough luck morons. You have to go get more resistors. Ha Ha...”. And I get to make another trip to the store to get a slew of bigger resistors. But while sitting in the seat I look at the six-way hydraulic valve and I see hydraulic fluid underneath “Oh Darn” (those are not my actual words). We now need to disconnect all the hydraulic lines and remove the valve, then replace the internal seals. Gee, that won’t be very messy….

Want to guess how much resistance we ended up settling on for the blue LED light? Yup, 120K ohms.

We did manage to install a grab bar of our own making for access to the rear cab. We made it longer than the ones Tucker used, and it’s a thicker diameter so it’s easier to grab on to.

We are making progress, it's just very slow. I need to somehow make it clear to CHUGSzilla that it needs to direct its anger and revenge to the person who chose that godawful color. That would of course be The Infamous WBJ1!

Pics. The new rear grab bar.

IMG_3257.jpeg


New door mirrors and arms.

IMG_3259.jpeg


Side shields installed.

IMG_3260.jpeg
 

Blackfoot Tucker

Well-known member
GOLD Site Supporter
We continue to wrap up some things on CHUGSzilla as we start the transition to the 1544’s planned upgrade(s).

We (really Scott) added the resistors to the indicator light wiring, and the light intensity is significantly improved. One more project detail complete. We installed the blade’s bolt-on frame and we’ve loaded the other blade components onto a trailer to go to the sandblaster. Then we’ll prime them and paint them black. NOT GREEN!

We also removed the leaking six-way valve for the blade. That has been disassembled, cleaned, new O-rings installed, and then reassembled and reinstalled. Thus far it looks like the leak has been fixed. When we removed the spools, as they’re called, two of the three were scored on the upper sealing surface. I called a hydraulic repair company in SLC for their advice. Of course they suggested replacing the valve with a new one, but I explained that wasn’t really an option. They said we could polish those surfaces on a lathe, but be very careful not to remove too much material. I was told .005 - .010 would be okay. I was able to remove probably 90% or so of the scoring by only removing .002. Hopefully the polishing will work well.

New hydraulic cylinders have been purchased for the blade’s angle and tilt functions. We want to install the blade and take measurements to determine the optimal lift cylinder dimensions. If you’re wondering why we don’t order a similar cylinder to Thundercat’s lift cylinder, the answer is the geometry of the blade lift function is different. CHUGSzilla has a front mounted Warn winch and that required a change to the design of the axle mounted frame. Then we’ll order that cylinder and we can complete the hydraulic system plumbing. The engines computer needs to go back to the folks that did the original re-programming. There are some changes that need to be made to match the computer with the installation.

We may add some interior grab handles to the doors. The new weatherstripping requires closing the doors with some force, and it would be better to have a grab handle than pulling on the latch handle.

Scott and I have been giving some thought as to what to do with the holes in the hood used to attach the factory installed “Tucker”, "Sno-Cat” and "Medford Oregon” emblems. I have a very good friend that’s super creative, and we’ll get him involved in the brainstorming as well…. (The Infamous WBJ1 will not be consulted as to his desires.)
 

Blackfoot Tucker

Well-known member
GOLD Site Supporter
CHUGSzilla is getting closer to the finish line. One of the biggest hurdles was getting the blade components sandblasted, then primed and painted. That’s all been done, and we installed the blade components on CHUGSzilla.

We used Axalta's CORLAR mastic epoxy primer, which is available in black. Here are a couple of parts after primer application.

IMG_3489.jpeg


For the topcoat we used Sherwin Williams Polane 8890 in a custom blended satin black sheen. After curing for several days we started installing the components. Here’s a front pic of the blade after installation.

IMG_3520.jpeg


We used Scott’s shop crane to move the parts around, and after a while you take that machine's capabilities for granted. It is so handy… We installed the two angle cylinders and the tilt cylinder, but not the lift cylinder. CHUGSzilla had been ordered from the factory with a front Warn winch, and we had to modify the mounting bracket as well as modify the design for the blade's bolt on frame. That changed the geometry slightly and Scott understandably wanted to get the blade installed before trying to determine the optimal cylinder configuration. In this pic you can see the angle and tilt cylinders all installed, while the lift cylinder is conspicuously absent. We used a ratchet strap to hold the blade up to move CHUGSzilla around until the lift cylinder has been installed and the hydraulic lines all plumbed.

IMG_3521.jpeg


We made some measurements and figured out what cylinder configuration would work best. The lift cylinder was ordered and it arrived. The next step will be installing it, and plumbing the hydraulic system forward of the quick disconnect fittings.

We've had a few snowstorms in Northern Utah, and while there's a couple of inches at my house we really want several feet of snow before we take CHUGSzilla out for its initial testing. There is no snow in the forecast, so my best guess is that will be after Thanksgiving.
 

YamaDooPolCat

Well-known member
SUPER Site Supporter
The angle rams on my Tucker have the fixed end on the fixed portion of the blade frame.
It was this way when I bought the Tucker.
Seems like there would be less movement of the hoses and shorter hoses as well if you switched the rams around.
No snow here yet. Some up high in the mountains.

IMG_5050.jpeg
 

Blackfoot Tucker

Well-known member
GOLD Site Supporter
The angle rams on my Tucker have the fixed end on the fixed portion of the blade frame.
It was this way when I bought the Tucker.
Seems like there would be less movement of the hoses and shorter hoses as well if you switched the rams around.
No snow here yet. Some up high in the mountains.

View attachment 170298
YDPC,

I was wondering if anyone would notice that.

Our customer, better known as The Infamous WBJ1 (don’t believe his self-proclaimed “Sweet WBJ1” line) is extremely cost conscious, and that means I try and get parts as inexpensively as possible; sometimes sacrificing desired features for cost savings. Hydraulic cylinders can be bought with the connection ports oriented differently in relation to the end fittings. My preference would have been for the ports on the angle cylinders to be vertical with the cylinders installed, but those were more money. (The Infamous WBJ1 does have a wedding at Sun Valley to pay for.) I got all three cylinders, including tax and shipping, for under $320. The recently purchased lift cylinder alone was $206, and I shopped that hard, too.

When we first mounted the angle cylinders, we installed them just as yours are mounted, but decided to flip the cylinders for more clearance between the yet-to-be-installed hydraulic hoses and the tracks. Looking at your setup, maybe we’ll re-visit the issue and see just what the actual clearance is.

Thanks for mentioning that.
 
Top