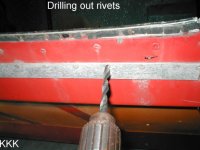
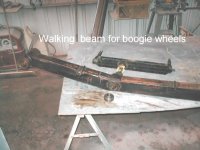
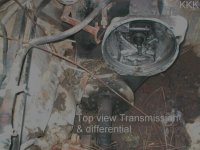
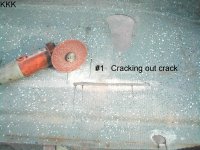
• Please be sure to read the rules and adhere to them. Some banned members have complained that they are not spammers. But they spammed us. Some even tried to redirect our members to other forums. Duh. Be smart. Read the rules and adhere to them and we will all get along just fine. Cheers. :beer: Link to the rules: https://www.forumsforums.com/threads/forum-rules-info.2974/

BigAls Kristi #113 KT3 thread

BigAl

Gone But Not Forgotten
The thread is temporarily down . I was cleaning up a double post and deleted a portion of the thread by by mistake . All text is saved as well as pictures . It will be back online soon . In the mean time any questions can be asked here about your Kristi or send me a PM and I will return your replies asap . Thanks Big Al
sorry for the inconvience :flowers:
 
AHH MAN! I was hoping to check on the progress of my Kristi! Guess I will just have to drive to your house.

LOL ! Yep I screwed it up . But the good news is I can build it back better than it was . Check back tomorrow . I think you will be happy with the new results . I am such a knucklehead !!!
 
Good day folks :tiphat:, Well I pushed the wrong button And lost some information on the Kristi KT3 rebuild I been doing for the last couple years . Sooooo ...we are going to rebuild it from day #1 with pictures and part #'s as we go .
It all started when I put a wanted ad in a local snowcat website . I noticed a old ad about a Kristi KT3 in Montana and called the number . They still had the KT3 avalible . A few emails and pictures later and the deal was stuck . Kristi KT3 #113 was now owned by me . Me and the wife outran a snowstorm to pick it up and turn back west before the storm hit . We got as far as Idaho ,when the storm hit and fought snow all the way back home .
The KT3 came with a trailer . Imagine my surprize when it turned out to be an orginial Kristi made trailer . Pretty rough and the lights were shot but it towed great! This is the only Kristi Made trailer I have seen other than in a demo movie on a KT3 . I think they are very rare .
 

Attachments

  • 756.jpg
    756.jpg
    61.5 KB · Views: 1,411
  • 757.jpg
    757.jpg
    66.3 KB · Views: 1,387
  • 755.jpg
    755.jpg
    63.5 KB · Views: 1,399
After getting home I started checking out the engine . It was frozen . This most likely was cause by water going down the exhaust and freezing up the Pistons .This is a bad design of Kristi's and will be changed as we rebuild this unit . No chance to save the motor so I started looking for a replacement .
Now Kristi Manufacturing never was one to have a great repair manual on the KT3 so I hope this will help in Rebuilding yours if you decide to.
The one most important tool you need is a digital camera that can record every part of you rebuild . I cannot stress this enough . Take pictures of every angle , every part , and everything that you can think of starting right now .
Since the only easy way to move a snowcat on hard ground is to remove the tracks , that is where to start . The tracks are connected by a "Flexco" fastener. If you can , roll the track connecter to the top front position and take out the 3/8" bolt that holds the faster together . Roll the track back off the rollers and then do the other side . Remember you will have no brakes to stop after doing this so its best to be performed on level ground . Roll up the tracks and store for later rebuild if needed . Take Pictures !!!
Now I hope you have a area picked out to do your restore because this will take a while . I used a rolling jack under the rear hitch to turn the snowcat and pushed it to the area I wanted to begin disassembly .
 

Attachments

  • 009.jpg
    009.jpg
    112.4 KB · Views: 1,407
  • 959.jpg
    959.jpg
    92.5 KB · Views: 1,408
  • New Style Track Cleats 002.jpg
    New Style Track Cleats 002.jpg
    130 KB · Views: 1,385
Ok ??? Where to start ! I decided I needed a total rebuild as there was so many things that needed attention and repair . I pulled/pushed the cat into my shop . The first thing I did was take a marking pencil and circle every hole in the body that would not be used . There were a lot of holes . The fiberglass was cracked around the openings where the axles and Clam shells exited the body . Take pictures!!
I then marked every piece of trim with the felt marker .
 
About this time I discovered that my KT3 had been rebuilt in the past . I assume this was in Washington during the time that Kristi was going under . The paint job is a dead giveaway as I have seen many with this same "stripe yellow" paint style after being rebuilt by the factory . Unfortunately Kristi did no more than they had to on the rebuilds so it is best to look over everything closely .
Nows the time to make a decision on how far your rebuilding your Kristi . I wanted a dependable unit and I wanted to know how every part worked ,so I decided it is going to bare frame . When I finish this unit will be better than new . Every weak point will be rebuild and reinforced as needed . I would find lots of areas that needed this as I went forward . I not knocking Kristi on the original design but now after much use the KT3 would show me her every weak spot .
So by now you have marked every hole and everything that you want reglassed and you took pictures .
Lets tear it down :
Start by removing the hood which is a pain in the ass as Kristi loved the rivet gun ! Get a 1/4 varible speed drill and put a 1/8 drill bit in it and start drilling out the centers of rivets that attach the hood . Remove the safety cable and the cable that raises the center hood vent . It should come off with a little cussing . You may end up taking a small punch and driving the rivet out with a hammer .Take you time . This is slow work ! I used a later picture of the hood but you get the idea .
 

Attachments

  • 970.jpg
    970.jpg
    72.7 KB · Views: 1,365
  • body work 002.jpg
    body work 002.jpg
    55.4 KB · Views: 1,363
Ok , Hood is off . Time to take off the doors . Crap ! More rivets ! Leave the plexi glass in and remove them in one piece . My Kristi has a front door on each side of the operators position . The Rare second door was added at the Washington Kristi rebuild and it was a crappy job . Still more rivets and a God awful sliding track that is supposed to hold the door up , but is for slamming down on you head when your half way out the front . Yes this will be changed to the new gas operated air piston type openers , so mark the old holes to be filled end . In fact mark all the rivet holes to be reglassed and we will redrill new holes and do it right when we reinstall the doors .
Now it time to decide if you are going to use the God awful electric wiring hardness or build a new one??? BUILD A NEW ONE !!! So start cutting wires loose on the lights and tail lights and leave enough wire to make clean soldered connections at a later date .
You have a roof rack too so make up your mine if you will reuse it or build a new one . The orginial is pretty small and funky so I plan to make a new one . Mark the mounting holes for reglass !
Now you see all those rivets in trim that seperates the two body parts ??? Start drilling . Then punch out the centers if need be .
Now if you don't own a 4" hand held grinder , stop and go buy one . Buy about 100 metal cutting blades too .
Harbor Freight has cheap ones that will work for this .
That little trim piece is bolted all the way around the body on the inside holding both halves of the body together . Take your grinder and cut off the nuts cause there is no other easy way to do this . You will find that most are frozen on and will not budge .
Up around the dash will be the toughest area . Some are accessed from the engine side of the cowling . Some you will need to stand on your head to reach and some you will pray that the SOB that installed them had a rotten retirement . Slow and steady and keep bumping the top half . It will take a few hours . There may be a little chaulking between the halfs ,but it will pop loose in time .
Leave the windows in place and just sit the whole top half outside on saw horses . It will take two or three people to lift it off safely .
Looks like a boat huh ???


Attachments

  • 971.jpg
    971.jpg
    102.5 KB · Views: 1,341
  • 992 - Copy.jpg
    992 - Copy.jpg
    88.2 KB · Views: 1,320
  • 972.jpg
    972.jpg
    69.2 KB · Views: 1,308
  • kt3 025.jpg
    kt3 025.jpg
    91.1 KB · Views: 1,332
Remove the seats and fuel tank that sits under the front seat . You might as well send that out to a radiator shop to be boiled out and a liner installed . It will more then likely be full of rust .
Ok , now you get to decide which comes out next ??? Engine or track assembly rails ??
Lets do the track rails . Remove the wheels and store the lug nuts They are held to the front clam shells by a nut and rear rotating spindle by E clips . You will need to build a puller for the front sprocket as it will be froze in place . Remove the packing nut and note the order of all shims or bushings , Take lots of pictures !!!
The back half of the track rail will come off easy but the front spockett is a pain to get off . I needed the homemade puller and a torch heating up the center flange to get it off . Keep tension on the puller and watch the heat that you do not melt the rubber on the spockett . Mine sounded like a 22 when it popped loose . Set them aside a don't forget to grab the square key that slides inside the spoket that goes in the keyway on the axle shaft .
Now I needed a 8 pound hammer and a piece of wood to beat the rail loose off the shaft . Keep switching ends until it slides easy . Get help to take it off as that mother is heavy !!
Now you have a set of two walking beams on that rail that are held in place by a big expensive bearing . Two per side . Then you have the independent bearing at each boggie wheel . Thats about $500 bucks if you need to change then all out . Most likely half the zert grease fittings have fallen out and you will need those too . Any parts house can supply them . Make sure those bearings are good . I got lucky on the KT3 as all mine were in excellent shape as were the bushings .If the bushings need be replaced ,these can be made at a machine shop or purchased at a auto store or McMaster - Carr . The main walking beam Bearing is hard to fine but McMaster -Carr has then . That is the only source I found . The wheel bearings can be ordered at a parts house .
If the rails need to come apart clean then well and look closely for cracks in the rear section . Mine were cracked and needed reweldings . Also the sliding track tensioner needing welding too . Grease can hide a lot of damage so spent the extra time to check them close .
Get to know the saleman at McMaster -Carr very well as you will be calling him often .

Once you have the track rails cleaned ,repaired and painted as needed ,set them aside till you need then for the reinstall . I have used a couple pictures off my KT7 restore as the rails are basically the same and give better detail .


Attachments

  • 1023.jpg
    1023.jpg
    102.9 KB · Views: 1,321
  • 958.jpg
    958.jpg
    92.4 KB · Views: 1,309
  • track 001.jpg
    track 001.jpg
    76.3 KB · Views: 1,267
  • track 004.jpg
    track 004.jpg
    90.2 KB · Views: 1,263
  • track 005.jpg
    track 005.jpg
    73.4 KB · Views: 1,266
  • track 006.jpg
    track 006.jpg
    77.5 KB · Views: 1,254
I am probably the only one that will ever even need this information , but I guess I should rebuild the thread . That and to bug the crap out of Snot Trac owners everywhere :w00t2::yum:

Yes PB the ending will change as I end up saving the asses of Snot Trac owners throughout the world .:moon:
 
I have not mentioned it earlier but you should have removed the battery by now .
I would suggest that the motor be the next order of business . Mine is shot . Very lousy exhaust system led to its demise . Rain water ran down the exhaust and froze up everything . We will change that on the rebuild.
The Motor sits sideways in the engine area and is a very tight fit !
 
Take pictures of everything you can !!!!!
To remove the Engine ,start by marking and removing the hydraulic hoses that run to the Hydraulic tank on top of the engine .Watch out for oil as it will go everywhere !! Remove the hydraulic tank .Remove any air vent tin that will be in the way .Remove the exhaust system or cut it out of the way if you plan to replace it as I do . Unhook the gas pedal linkage . I will be replacing my wiring harness with a updated new one with a fuse box . I suggest you do the same . Disconnect any sensor wires . Pull the starter . Fuel line needs to be removed . Place a engine hoist in place and put a little tension on the chain . Remove the 4 bolts that connect the motor to the Transmission . You will need to tip the motor at a pretty steep angle as it comes out to clear the side of the body and also clear the pilot shaft of the transmission .
If you motor is to be repaired or replaced now is a good time to start on that project and get it ready for when its needed . I will not be doing a section on motor rebuild as there are many fine books on the subject . Now is a good time to upgrade the motor . I am replacing mine with a 1682 CC engine . This will be a vast improvment over the 1300 that was in it .


Attachments

  • 985.jpg
    985.jpg
    83.9 KB · Views: 1,181
  • 986.jpg
    986.jpg
    110.7 KB · Views: 1,173
  • 956.jpg
    956.jpg
    91.3 KB · Views: 1,158
  • 957.jpg
    957.jpg
    80.5 KB · Views: 1,185
Time to remove the rear axle and front clam shells .
They are held in place by a series of shims and snap rings . Make damn sure you note the order those shims are in . TAKE PICTURES !!! Once you remove the rear snap rings the rear rotating axle linkage should slide off the axle shaft . The front snap rings fought me and I had a lot of trouble getting the front driver side calm shell to slide off . Nice and slow is the way to go . The whole clam shell assembly should slide out of the Differntial tube with ease .
You can also disconnect the 4 hydraulic rams for the lift system . Make sure you draw a diagram of the hose route and mark the hoses if you plan to reuse them . The bushing where the Ram rod is bolted to the roating alxe is probably oblonged and worn out . You can buy new bronze bushing through McMaster-Carr part # is 639K414 @ $3.80 each . Cut the new one in half and you can get 2 bushing out of each one . Note the order of the tensoin springs that hold the rams . This is the flex system on your KT3 and you want them to work correctly . My springs were broken in many places and came out in pieces . I purchased 1 new longer 36" spring from McMaster -Carr and cut the new ones to size using a vice and 4" grinder with a metal cutting blade . The part numer is : 9621K47

My last picture shows the calm shell still attached to the track rail . This was my first attempt at removing it . Much to heavy !!! Take off the Clam Shell first and it will be much easier to remove . lesson learned !!!


Attachments

  • 983.jpg
    983.jpg
    111.5 KB · Views: 1,164
  • 1112.jpg
    1112.jpg
    116.9 KB · Views: 1,134
  • 1094.jpg
    1094.jpg
    148.8 KB · Views: 1,141
  • 1064.jpg
    1064.jpg
    133.5 KB · Views: 1,155
  • 977.jpg
    977.jpg
    91.5 KB · Views: 1,158
  • 1107.jpg
    1107.jpg
    126.9 KB · Views: 1,144
Last edited:
Trans/diffential removal :
Ok now you need to remove the fire wall and get to the linkage and brackets on the bottom of the trans/differential unit . Remove and mark all brackets and locations .Probably need to remove the shifter rods to on top . Take pictures of everything you do . Tighten up on the engine hoist that you still have hooked up to the trans/differential unit . This baby is coming out in one piece . Unbolt the 2-½"x6" bolts that hold the mounting blocks in place and bag the springs and mark them . There are two bolts on each side . Unbolt the top support . The unit should now be free to remove .
 
Splitting the Transmission from the differential :
This is a basic straight forward procedure . The transmision is attached to the differential by a double roller chain system . You should be able to remove the top of the transmission cover to inspect your gears . The brake bands are located in the bottom of the Differential and can be changed without removing the differential from the unit .refer to your owners operation manual . I am not a expert on transmissions and unless you have a leaking seal,worn out gears, gear popping out or no brakes ,I would suggest , that if your sure its ok ...to leave the transmission hooked to the differential . Anything else and I would get a manual on a Clark S70FS differential and go from there . They were used in the old Oliver OC3 and OC4 tractors . If your chain is overly loose that is a very simple fix and does not require separating the pieces . The Kristi operation and maintenance manual explains it in detail .


Attachments

  • 952.jpg
    952.jpg
    75.9 KB · Views: 1,107
  • 953.jpg
    953.jpg
    92.1 KB · Views: 1,115
  • 981.jpg
    981.jpg
    117 KB · Views: 1,133
  • 955.jpg
    955.jpg
    107.2 KB · Views: 1,093
  • 1014.jpg
    1014.jpg
    119.6 KB · Views: 1,109
Clam shell repair :
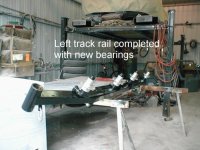
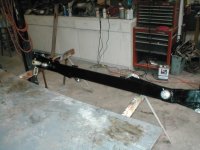
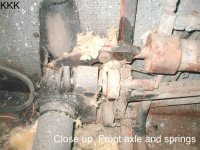
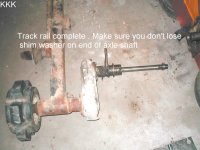
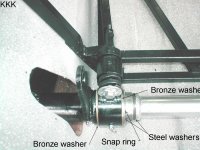
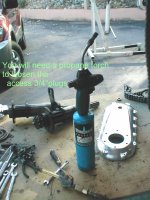
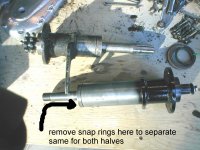
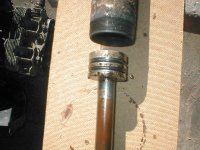
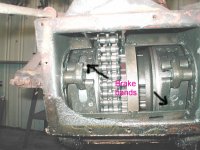
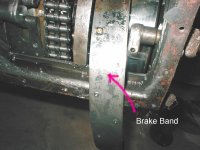
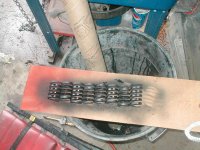
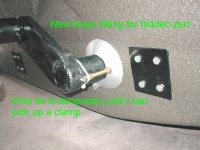
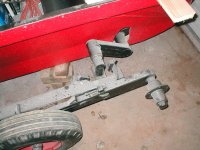
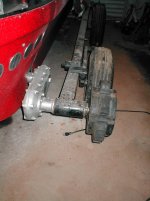
. On each end of the clam shell ,on the flat sides ,you will find a 3/4" Allen head plug . Now I do not own a allen wrench to fit one but one can be made from a 5" bolt with a 9/16 head . Just bend it 90 degrees in a vice using a hammer and you now have the tool to remove them . Wait,,, it ain't going to unscrew until you apply some heat . The case is aluminum and the plug is steel and will be really tough to break loose . Use a propane torch to heat the area around the plug and then use your homemade allen wrench tool to loosen it up . It may even take a little cheater bar to help . Ok now that those are removed you will see a 9/16 bolt head in the hole .Using a socket ,remove the bolt . This will allow you to now unbolt the axle housing and get them to release , but only on one side . The clam shell case bolts will now have to be removed to separate the halves and gently lift the double roller chain off the remaining axle that refuses to come out . You can now slip the remaining axle out of the hole . Now you have a double roller chain ,big gear , two Clam shell case halves and two axles .If you look at the end of the axles ,you will see a internal snap ring that when removed will allow access to the oil seals and bushings/bearings . I ran into trouble on the larger one that has the double spocket gear pressed on it . It seemed to wobble when I was getting ready to take it apart . I removed the inner snap ring and lightly tapped the axle on a wooden block to seperate it from the axle tube housing .
The "Wide inner ring ball bearing" fell out in two pieces !! Oh crap ! Where am I going to find one of these ???? I inspected every thing else and all seems to be ok .
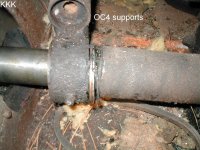
I know what caused the problem . The broken bearing is blue from heat and there was no oil in the clam shell when I took it apart . So last night I got on the old computer and started looking .I did not even know what to call the broken part , I was looking for . About midnight I found it ! McMaster- Carr has them in stock . Part # 8090T14 @ $34.76 each
It is a exact match ,right down to the numbers on the old bearing! . I was able to heat up the old "press on" bearing after removing the double roller chain gear with a 3 jaw puller and pull it off . Boy was that thing stuck on there . I am not looking forward to replacing it ! Anyway tomorrow I will order the new bearing that McMaster=Carr says they have "IN Stock " . I will now go ahead and pull down the other side Clam shell and check it again ,just to make sure there are no surprises .
Lesson Learn ??? Make damn sure that Clam Shell has at least 1 pint of gear oil in it at all times before using . There are no drain plugs on the clam shell and you must remove the access plus on the side to add oil . Too much is better than not enough !
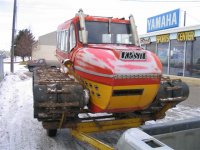
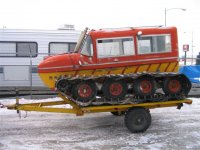
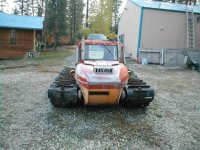
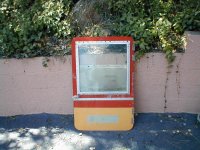
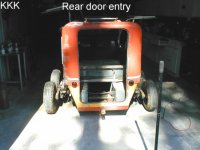
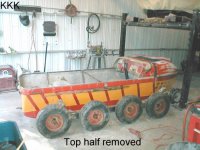
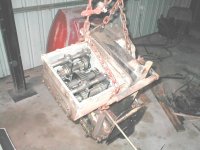
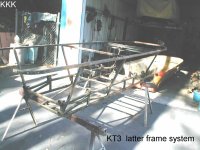
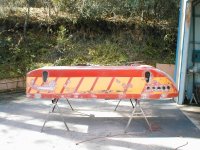
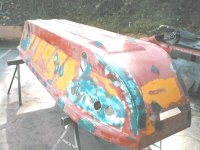
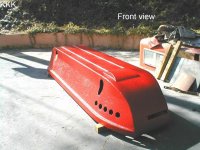
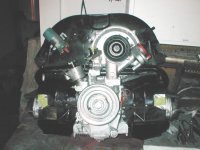
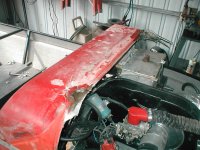
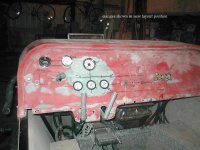
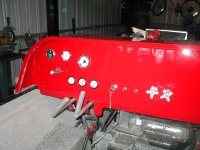


Attachments

  • 1024.jpg
    1024.jpg
    122.3 KB · Views: 1,091
  • 1021.jpg
    1021.jpg
    125.8 KB · Views: 1,078
  • 1020.jpg
    1020.jpg
    127.2 KB · Views: 1,076
  • 1019.jpg
    1019.jpg
    132.3 KB · Views: 1,090
  • 1017.jpg
    1017.jpg
    158.7 KB · Views: 1,098
  • 1016.jpg
    1016.jpg
    100.2 KB · Views: 1,081
Now its time to remove the rear axle if you have not done so already . Its a pretty straight forward process . Unbolt the Pillar block housings and you should be able to slip it right out .
Go ahead and remove the dash and all parts that you can . More than likely the 2 Hydraulic handles leak and you will have a oily film on the dash . They can be rebuilt with new gaskets from the auto parts house .
I am switching out all old gauges and wiring so I just cut everything loose ,but if you intend to reuse the old system which I think is a bad idea ,than mark the wires and take LOTS of pictures . The cowling comes off next and it is a pain in the ass to remove . More rivets !
You should be down to just about a frame/ body and not much else .
Unbolt the frame on the bottom of the body . I placed a 4x12 wood block under the body on 4 corners to reach under the body easier .
The frame should lift out now . It will probably be broken as mine was at the rear section where the Hydraulic Rams needed clearance to pass the frame rail . I rewelded this and added a 6" long piece of 1/8"x1" flat bar stock to reinforce it . It will not interfer with the body . I also redrilled all mounting holes where the two body halves connected . Since I am quite tall I decided to move the front seat back whick involves cutting the seat and gas tank support bar loose and moving in back 4" and rewelding it in place .
This is a great time to take that 4"grinder and sand down any rough spots or sharp corners on your frame ,as much of it will be seen when you are finished with your rebuild . Whats another hour when you are taking it to this point ???
The filler neck on the tank will still work with the original hole in the body as this is a rubber hose connection and can be angled . This greatly increases the front leg room .
Clean , sand , and repaint the frame using a good primer and a good frame paint . There are many brands avalible and since it is a easy job you can do this out of spray cans instead of setting up your spray gun as I did .


Attachments

  • 1093.jpg
    1093.jpg
    115.4 KB · Views: 1,080
  • 1092.jpg
    1092.jpg
    126.4 KB · Views: 1,058
  • 1052.jpg
    1052.jpg
    132.9 KB · Views: 1,046
  • 1054.jpg
    1054.jpg
    78 KB · Views: 1,036
  • 1055.jpg
    1055.jpg
    67.9 KB · Views: 1,035
Ok ???? You now know whats coming next ?? A good cleaning of the lower half of the body . Save yourself a lot of headaches by stealing $20 in quarters out of your kids piggy bank and head to the car wash with your bottom half of the body in your old trusty pickup . Do this at night as most car wash owners don't like piles of gunk and grease left at there place when your done .LOL
Ok ! You made it back and did not get arrested my the cops for polluting the enviroment .
By the way The body is all fiberglass , so be prepared or find someone that knows what they are doing to repair it . BONDO has no strength so don't even think you can patch those holes and cracks with Bondo and expect it to last for even 5 feet !
Bondo is a filler , not a structual repair material
Put the body( upside down ) on a couple saw horses as it is much better than bending over to work on .
Your going to need your 4"grinder , 40 & 80 grit sand ing disk , mask , eye protection ,Omni directional fiberglass cloth , probably a gallon of resin and hardener . Flat cardboard , masking tape . Buy this a at Paint dealer that deals in Automotive type paint . They will know whats best to use .
My KT3 was a mess . Cracks everywhere , sections torn out of the bottom and stress cracks . I started by grinding down through the jell coat and cutting out any loose pieces of fiberglass . All cracks were gound out and a 1/4 hole drilled at each each to stop further cracking in the future . All holes that had previously been marked were ground out .
Get a book on "How to Repair" fiberglass as it will be much easier than me trying to explain it . Build up in layers after each layer is dried . This may take several days . Use the cardboard to tape on the bottom side of holes and rips so the new glass will not sag . Grind off the cardboard after the new fiberglass has dried . Grind down , smooth out , and prep the body as you would any automotive type "fiberglass" repair .


Attachments

  • 1074.jpg
    1074.jpg
    149.3 KB · Views: 1,025
  • 1079.jpg
    1079.jpg
    162.2 KB · Views: 1,018
  • 1041.jpg
    1041.jpg
    112 KB · Views: 1,017
  • 1089.jpg
    1089.jpg
    107.3 KB · Views: 1,030
  • 1073.jpg
    1073.jpg
    148.9 KB · Views: 1,040
  • 1025.jpg
    1025.jpg
    166.8 KB · Views: 1,046
Last edited:
Well Geez ! We are just rolling along now !
All the fiberglass work has been repaired ?
Good cause now its time to sand the body and prep it for painting .
120 , 220 , 360 grit paper and a good DA air sander , Flat air body file and 80 grit paper for that , sanding block .
If you have not done body work now is not the time to learn . find someone that can show you as no book or my explaination will be good enough . You need a lot of practice or all your work will look like shit and you will be out a ton of money .I learned that lesson 40 years ago .
Now after I had my lower half of the KT3 ready to paint I sealed it with a two part expoxey(sp) primer followed with a high quailty bed liner material that I had tinted to the color I wanted . It was not Cheap so expect to pay a few bucks for the good stuff . This way if I scratch the finish the color is all the way through the bed liner material . You can adjust the finish by how high your air pressure is when your spray the material .The lower the air pressure the rougher the finish. Try to spray on a warm day with low humidity . Take your time and use multi coats or expect to see a lot of runs in the finish which is not a professional finish . Your probably going to spent anywhere from $500 -$1000 bucks in Paint and material so now is not the time to get in a hurry and screw it up .
figure a gallon of bedliner for the bottom and a gallon of mathing paint for the top , hood , etc .
I also use 1 gallon of Zoletone paint on the interior . It wears like iron and looks good . See for yourself ...
 

Attachments

  • 1032.jpg
    1032.jpg
    84.8 KB · Views: 696
  • 1083.jpg
    1083.jpg
    127.1 KB · Views: 693
  • 1036.jpg
    1036.jpg
    114.7 KB · Views: 678
  • 1039.jpg
    1039.jpg
    123.7 KB · Views: 685
  • 1051.jpg
    1051.jpg
    143.6 KB · Views: 685
  • 1056.jpg
    1056.jpg
    92.7 KB · Views: 669
Ok , time to bring it back in the shop and start putting it back together . Frame goes in first with new mounting bolts . I install 1/8" x1" foam tape under the frame where it lays against the bed of the body . I Then reattached the frame with new Alum rivets around the perimeter at the top of the body . Take your time .
Clean up any alxe mounting hardware parts and repaint them now . Rear axle assemby goes in next .
Rebuild the 4 hydraulic rams as it is cheap and easy to do . About $20 bucks in O-rings will have then good as new . All you need to do is unscrew the cap to access the orings . Check the rods for dings or scapes . Oil everything as you reassemble . I did take a buffing wheel to my Hydraulic ram rods to clean off any rust . Be careful if you do this .
 

Attachments

  • 1059.jpg
    1059.jpg
    143.3 KB · Views: 673
  • kt3 005.jpg
    kt3 005.jpg
    74.3 KB · Views: 659
  • KT3 002.jpg
    KT3 002.jpg
    99.8 KB · Views: 653
  • 1064.jpg
    1064.jpg
    133.5 KB · Views: 664
  • 1063.jpg
    1063.jpg
    140.4 KB · Views: 677
Time to reinstall the transmission and differential. How do the brake bands Look ? Replace now if in doubt . The little Kristi's operators manual does a pretty good job of explaining this in detail .
Again use new bolts as you reassemble . Don't forget the new springs as you go . Its pretty straight forward and you will need the engine hoist to keep it in place as you reattache the pillar blocks , spings and bolt . Make sure to connect top holding bracket too . Leave everything loose at this point or you will have a hell of a time lining up the clam shells to refit correctly . Make sure you have installed new bronze bushings in the Hydraulic Ram rod connect points .
 

Attachments

  • 1069.jpg
    1069.jpg
    136.4 KB · Views: 680
  • 1072.jpg
    1072.jpg
    111.1 KB · Views: 674
  • kt3 004.jpg
    kt3 004.jpg
    93.5 KB · Views: 656
  • trailer 005.jpg
    trailer 005.jpg
    75.7 KB · Views: 661
  • trailer 003.jpg
    trailer 003.jpg
    97.2 KB · Views: 660
Last edited:
You can now reinstall the rear rotating axle assembly and the front Clam shells . I hope you remember your order on the shims washers ??? Take your time installing the front clam shells as this will be the tough part . You will need to reinstall the fiberglass body axle covers as you go or build a set of new ones as I intend to do later out of Sheet metal . I will include a picture of them that I made for my KT7 . The order of the bronze and steel shim washers are critical and must be in the correct order to insure a tight axle assembly . If you need another one as I did ,they can be purchased through McMaster -Carr . I do not have the part # handy but you can look it up based on size ,thickness, and type of material needed . Also go ahead and reconnect the track rails at this time . You can also put a couple wheels on each side to ease in movement .I still left my 4x12's under the corners at this time . Sorry about the dust on the last two pictures . The housekeeper quit .....
 

Attachments

  • 1110.jpg
    1110.jpg
    111.5 KB · Views: 640
  • motor 007.jpg
    motor 007.jpg
    92.6 KB · Views: 670
  • KT3 002.jpg
    KT3 002.jpg
    86.7 KB · Views: 638
  • KT3 003.jpg
    KT3 003.jpg
    109.6 KB · Views: 634
Last edited:
First finish tightening up the pillar blocks that hold the transmission in place . In fact, you can do the back axle too if they need to be done . Also reattach the hydraulic rams if you have done so already .
Lets reinstall the motor . You are ready and have it all rebuilt ? Did to add a setup for a oil drain hose on the bottom oil pan cover to make it easy to drain the oil ? You can use a Hydraulic hose with a shut off valve . Just get a little trap door for the bottom and cut it in .McMaster -Carr has all kinds . It will make oil changes a lot easier. You are putting in a new pressure plate , clutch and throw out bearing ??? DO IT NOW or you will be sorry:yum: . Remember the motor will need to tip quite a bit to clear the side frame rail and throw out bearing shaft . Did you use a clutch alinging tool to correctly center the clutch on the pressure plate ? It will take a half dozen cuss words , 3 skinned knuckles and one kicked dog to get it lined up to rebolt the 4 bell housing bolts back in . Once your engine is in place start adding back on the starter and anything else that will install without being in the way of something else later .
You can also reinstall the newly painted cowling and dash at this point . My dash fell off the cowling as it was poorly attached with resin when I removed it . I rebuild my dash to acccept new gauges and predrilled the holes for the gauges before installing .
There is a lot of ways to wire up the new electric system and I followed one I found one on another web site which I will add for your use . It is a basic VW motor diagram . I also added a fuse box as I hate inline fuses behind the dash . There be quite a few pictures but I think you will get the idea . You will also notice that I filled in the cowling where the exhaust use to exit . They will now come out the sides
 

Attachments

  • 957.jpg
    957.jpg
    80.5 KB · Views: 651
  • body work 004.jpg
    body work 004.jpg
    91.6 KB · Views: 639
  • dash 008.jpg
    dash 008.jpg
    71.6 KB · Views: 639
  • dash wiring 002.jpg
    dash wiring 002.jpg
    74.5 KB · Views: 653
  • KT3 hydraulics.jpg
    KT3 hydraulics.jpg
    103.2 KB · Views: 636
  • KT3 005.jpg
    KT3 005.jpg
    88.9 KB · Views: 640
Last edited:
Build the exhaust : I wanted something better than I have seen and I have seen 6 different set ups . I decided to come out the sides and turn out with motorcycle Mufflers . JC Whitney had what I wanted in a 32" length . One muffler came in when I ordered them and the other took 6 months on back order before I received it . This was my first attempt at building headers .It was FUN and extremely easy to do !!! I used wire to form the curved angles I desired .My 4" hand grinder and a metal cutting wheel paid for itself on this one project . I then went to a muffler shop and had them bent up the different angles . With new gaskets and steel flanges I have about $100 dollars in this design . That does not include the cost of mufflers .I cut and then wire feed welded the pieces together making sure I had no sharp angles as the pipes came together . They can be removed in one piece and there are "NO" connection points under the hood . This should completely stop the fumes that enter the Operators area through the fire wall area which has been discussed many times in the past about Kristi's . Two flexible chrome brackets will be added to the mufflers after the top of the body is reattached to keep from cracking or loosening the exhaust system .
 

Attachments

  • muffler 001.jpg
    muffler 001.jpg
    81.3 KB · Views: 634
  • mufflers 035.JPG
    mufflers 035.JPG
    86.7 KB · Views: 620
  • muffler 004.jpg
    muffler 004.jpg
    90.3 KB · Views: 617
  • kt3 headers 001.jpg
    kt3 headers 001.jpg
    100.3 KB · Views: 631
  • kt3 headers 003.jpg
    kt3 headers 003.jpg
    82.1 KB · Views: 622
  • muffler 005.jpg
    muffler 005.jpg
    82.4 KB · Views: 632
I found new engine vents at McMaster -Carr for the front end . Part # 2016K35 @ $1.31 each . They look good and fit perfect . They are aluminium. I also order up new track belting through Capitol Rubber in Sacramento . I used #76 which is also called "3/8 thick two ply #303 style" in most rubber outlets . I punched my own holes . Here is my hole layout .
5 11/16
11 6/16
17 1/16
22 12/16
28 7/16
34 2/16
39 13/16
45 8/16
51 3/16
56 14/16
62 9/16
68 4/16
73 15/16
79 10/16
85 5/16
91
96 11/16
102 6/16
108 1/16
113 12/16
119 7/16
125 2/16
130 13/16
136 8/16
142 3/16
147 14/16
153 9/16
159 4/16
164 15/16
170 10/16
176 5/16
182
187 11/16
193 6/16
199 1/16
204 12/16
210 7/16
216 2/16
221 13/16
227 8/16
233 3/16
238 14/16
244 9/16
250 4/16
255 15/16
261 10/16
267 5/16
273
278 11/16
284 6/16
290 1/16
295 12/16
301 7/16
307 2/16
312 13/16
318 8/16
324 3/16
329 14/16
335 9/16
341 4/16
346 15/16
352 10/16
358 5/16
364
369 11/16
375 6/16
381 1/16
386 12/16
392 7/16
398 2/16
403 13/16
409 8/16
415 3/16
420 14/16
426 9/16
432 4/16
437 15/16
443 10/16
449 5/16
455
460 11/16
466 6/16
472 1/16
477 12/16
483 7/16
489 2/16
494 13/16
500 8/16
506 3/16
511 14/16
517 9/16
523 4/16
528 15/16
Check yours before using my measurements as some are different on the KT3's .

No more Hickory cleats for my KT3 as it now has HDPE plastic , the same as I used on my KT7 restore . This is tough stuff and I finished it with a 1 1/4" Channel steel wear bar held in place by SS carriage bolts . I ordered mine through a place back east called Plastic Lumber Company . They make it and I worked with a engineer to make sure the plastic would hold up to my requirements and the temperatures . Cost was about $400 delievered .I milled the angle with my Dado head on my saw .
 

Attachments

  • 003.jpg
    003.jpg
    101.4 KB · Views: 627
  • 001.jpg
    001.jpg
    73.2 KB · Views: 623
  • 002.jpg
    002.jpg
    74.4 KB · Views: 632
  • New Style Track Cleats 005.jpg
    New Style Track Cleats 005.jpg
    80.7 KB · Views: 618
  • New Style Track Cleats 006.jpg
    New Style Track Cleats 006.jpg
    94.6 KB · Views: 625
  • New Style Track Cleats 003.jpg
    New Style Track Cleats 003.jpg
    87.9 KB · Views: 619
Last edited:
OK Folks ! That about catches us back up to present day . 2 /5 / 2010 . sorry about the foul up !
 
Top