• Please be sure to read the rules and adhere to them. Some banned members have complained that they are not spammers. But they spammed us. Some even tried to redirect our members to other forums. Duh. Be smart. Read the rules and adhere to them and we will all get along just fine. Cheers. :beer: Link to the rules: https://www.forumsforums.com/threads/forum-rules-info.2974/

TUCKER TORPEDO Restore

Thanks Davenet for that web site..Though I have talked with the owner of that collection about two months ago, they are still pretty cool to see again, like Snotrans says, ....they were or are, all for sale.

I have been away from any Internet service for the last week wile my hand was healing, I can hold a fork and tie my shoes again.

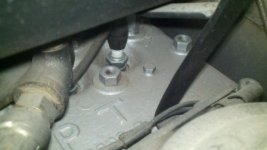
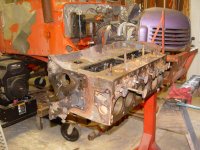
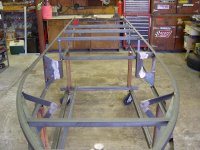
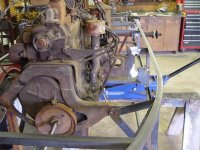
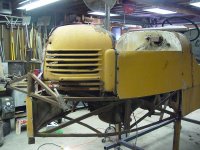
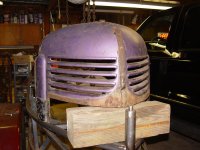
I did get the motor mounts made and located & welded on the frame. I had to put the rear end, drive shaft, transmission, bell housing, and engine in the new frame to get the locations correct for the new mounts, the old frame was not in good enough shape to get accurate measurements and just transfer them over.
 

Attachments

  • 005 (6).jpg
    005 (6).jpg
    89.8 KB · Views: 819
  • 007 (3).jpg
    007 (3).jpg
    100.8 KB · Views: 817
  • 008 (4).jpg
    008 (4).jpg
    94.8 KB · Views: 829
  • 001 (5).jpg
    001 (5).jpg
    94.6 KB · Views: 817
Is that engine capable of being hand started?I ask because of the crank pulley nut.

Yes..The engine is capable, however, only when it is in the intended Dodge truck. Tucker "as far as I know" never made provisions to hand crank the Chrysler 231 flat head in a Torpedo as you can see in these pic.
 

Attachments

  • 001 (2).jpg
    001 (2).jpg
    82.4 KB · Views: 790
  • 002 (2).jpg
    002 (2).jpg
    94.6 KB · Views: 781
Weatherby in the last couple of pics of the front I noticed it looks like it has louvers. Are you planning on making a new piece for there & if so, how will you make the louvers ??

OT.
 
Weatherby in the last couple of pics of the front I noticed it looks like it has louvers. Are you planning on making a new piece for there & if so, how will you make the louvers ??

OT.

Old Trucker.....I found a new grill (used). Tucker used the grill from a 1941 to 46 Dodge light duty truck for the nose on this year of torpedo, they then added two strips of 3/4" flat stock to fill the bottom section of the grill.
 

Attachments

  • 001 (7).jpg
    001 (7).jpg
    73.4 KB · Views: 774
Just want to say I love this project and commend you for taking it on. Can't wait to see it finished, well actually it is more fun to watch the progress! I really enjoy the side story on the history of it as well! You sir are a perfectionist! :tiphat:
Cruizer
 
Yes..The engine is capable, however, only when it is in the intended Dodge truck. Tucker "as far as I know" never made provisions to hand crank the Chrysler 231 flat head in a Torpedo as you can see in these pic.

I don't see how they could have made the provision on your Tucker with the steering post in the center....

On my '53 443, it has a factory "tab" on the nose to support the hand-start crank and also has the same nut on the end of the crankshaft that yours has.


.
 

Attachments

  • 443f.jpg
    443f.jpg
    100.6 KB · Views: 698
Your correct...there is no way they could have made a hand crank work with that center post in the way, however, before they (Tucker) added the grill, I "think" you could hand crank these old torpedo's, like the one you see in my signature Avatar.
Thanks Swamp Cruizer and Snowbird

Just a little update on the history of this Tucker Torpedo......I did get to talk to Mr. Bill Jenkins, He is the man that actually drove and maintained my torpedo back in the 50s. He is now 87 yrs old and still sounds as sharp as a tac. He did say that it did come from the Tucker factory in Oregon and not from a local dealer.

He told me a lot of interesting stories about it during it's life at High Pond Mt.

He is going to try and find what pics. he may have of it (hopefully).
 
Weatherby... how's the hand coming along, getting better ? Must have given it a good smack. Just checking up.... OT.

Thanks for asking...Yes it is getting better ..still sore, but I think I'm to old now for injures to the body to heal back to100% anymore LOL

I have been doing "lighter duty" things though, like rebuilding the carburetor. It looked in pretty bad shape, plus it was missing the float which is nearly impossible to get anymore, to make a long story short, I found a shop near by that had a float for this carb. So with a rebuild kit and the new float I was able to save this original carburetor.
 

Attachments

  • 003.jpg
    003.jpg
    68.4 KB · Views: 618
  • 010 (3).jpg
    010 (3).jpg
    78.3 KB · Views: 625
  • 011 (3).jpg
    011 (3).jpg
    72.2 KB · Views: 623
  • 016 (2).jpg
    016 (2).jpg
    87.4 KB · Views: 610
  • 017 (2).jpg
    017 (2).jpg
    96.4 KB · Views: 614
  • 019 (2).jpg
    019 (2).jpg
    91 KB · Views: 617
  • 020 (2).jpg
    020 (2).jpg
    76.2 KB · Views: 614
  • 022 (2).jpg
    022 (2).jpg
    68.7 KB · Views: 614
I'm going to assume that you have an ultrasonic cleaner for those small items. Man those things work great and bring parts back to new!:clap:
 
I'm going to assume that you have an ultrasonic cleaner for those small items. Man those things work great and bring parts back to new!:clap:
Davenet do you have one of those cleaners & what chemicals do you use to clean parts with ? How does it work. If that"s what Weatherby used, it sure does one heck of a job. OT.
 
We have one at one of our shops for cleaning injectors & small parts.

"The ultrasonic cleaner operates at a frequency of 40-42khz. They pulse a lot of energy. Our small unit generates 160 watts of power into an aqueous solution which creates millions of microscopic bubbles which then collapse and this creates millions of little bitty shock waves which are quite powerful. These shock waves blow off anything that is not bonded to the target immersed in the aqueous solution."

They use 1.5 gallons of water, some simple green and a couple of drops of dish soap. Examples from online are below:
 

Attachments

  • 3.jpg
    3.jpg
    94.6 KB · Views: 554
  • 2.jpg
    2.jpg
    56.2 KB · Views: 564
  • 1.jpg
    1.jpg
    89.2 KB · Views: 558
Davenet & The Old Trucker....I didn't use any solvent for cleaning, this carb was completely froze up, so I used a penetrating oil to free everything up which took about two or three days, then completely dismantled it. I then used glass beads in my blast cabinet to clean everything up. The parts that you see that are black, I coated with black stove polish, a type of metal dye.
 
Been working on the engine, dismantled it and checking all the tolerances. The motor is in surprisingly good shape, all tolerances are still within factory specs. The engine probably doesn't have much more than five thousand miles on it.

The distributor was completely dismantled and bead blasted, it was froze up.

Notice the small hole in the end combustion chamber of the head, I'm assuming it is for a optional compression release for hand cranking the engine. I wonder if most Chrysler flat head motors had this style of head?
 

Attachments

  • 004.jpg
    004.jpg
    91.6 KB · Views: 965
  • 005.jpg
    005.jpg
    89.8 KB · Views: 969
  • 019 (2).jpg
    019 (2).jpg
    85.5 KB · Views: 963
  • 021 (2).jpg
    021 (2).jpg
    96.8 KB · Views: 965
  • 016.jpg
    016.jpg
    68.5 KB · Views: 963
  • 016 (2).jpg
    016 (2).jpg
    100.8 KB · Views: 961
  • 010 (2).jpg
    010 (2).jpg
    75.7 KB · Views: 967
  • 013 (2).jpg
    013 (2).jpg
    76.9 KB · Views: 955
They start easy hand cranking them with no comp release. I will look and see if mine has the hole.
 
Been working on odds & ends parts of the motor while the block is at the Machine Shop being cleaned (boiled) and checked for any problems.

I tested the fuel pump to see if it still worked when I took it off of the motor, and it still worked. From everything I can tell, it is still the original pump, if it is, that's pretty good for 62 years old. Although I did put a new diaphragm in it, the one I took out still looked perfectly fine.

Removing the valves from the motor turned into a major job, they were froze solid in the valve guides.

Like Mbsieg says, this motor turns over by hand crank pretty easy, so I wonder what the hole in the end combustion chamber was used for ?
 

Attachments

  • 012.jpg
    012.jpg
    80.5 KB · Views: 828
  • 001 (5).jpg
    001 (5).jpg
    65 KB · Views: 840
  • 002 (5).jpg
    002 (5).jpg
    49.4 KB · Views: 840
  • 003 (5).jpg
    003 (5).jpg
    92.4 KB · Views: 827
  • 001 (4).jpg
    001 (4).jpg
    99.3 KB · Views: 830
  • 003 (4).jpg
    003 (4).jpg
    91.9 KB · Views: 826
That distributor and fuel pump cleaned up nicely.Did you have to leave it up to the machine shop to pull the valves?I'm kind of concerned about the same issue with my old Buick.
 
ben2go...I ended up driving the valves out myself. The first thing I had to do was pound all the valves back down into there seats (with a heavy rubber mallet) so I could use a valve spring compressor to remove the valve stem "keepers", then I could remove the springs. The next step was to get the cam shaft out, and that took two of us, because now I had to pound each tappet on each lobe of the cam shaft back down to get them off of the cam lobe's as we pulled the cam out. Once the cam was out, I could then take the tappet's out which gave me access to the ends of the valve stems through the tappet bores, which I then made a tool (a piece of harden round stock cut to the length of about 18" and just slightly smaller in dia. than the valve stem) I then used it as a drift, and drove each one of the valves out. As you can see in my last pic. I broke one valve when I was trying to pound it back into it's seat to compress it's valve spring.

I know it sounds like a crude method, but I talked to the machine shop first, and there method was basically the same, so I figured I could save some money and do it myself:whistling:

I have done some old Chevy and Ford engine about the same way.One I actually drilled the valve stem out of the seat using a bit inside of a tube.There a fancy machinist term for that type of drilling apparatus,I just can't think of it.How bad were the tappet bores?How would they fix those?Over bore and larger tappets or over bore and sleeve?I need to go back to school and be a machinist.I am an auto and industrial mechanic.At least that what the papers say that the schools gave me.:biggrin:

I do anything I can to save money.Gotta buy fuel.
 
The tappet bores were fine. The tappet's were not froze up in there bore, but because they come in direct contact with the valve stem (no push rods), they couldn't move because the valve's wouldn't move. once the cam was out, the tappet's easily lifted out.

I'm not sure the method used to correct over size tappet bore's, my guess would be too bore then sleeve.
 
WOW,great job and thanks for all the pics,you seem to have an infinite amount of patients and it shows,looking forward to the rest of the build:clap::clap::clap:
 
The tappet bores were fine. The tappet's were not froze up in there bore, but because they come in direct contact with the valve stem (no push rods), they couldn't move because the valve's wouldn't move. once the cam was out, the tappet's easily lifted out.

I'm not sure the method used to correct over size tappet bore's, my guess would be too bore then sleeve.

You got luck there.Usually if the valves are froze the tappets are too.
 
Top