
-
Please be sure to read the rules and adhere to them. Some banned members have complained that they are not spammers. But they spammed us. Some even tried to redirect our members to other forums. Duh. Be smart. Read the rules and adhere to them and we will all get along just fine. Cheers. :beer: Link to the rules: https://www.forumsforums.com/threads/forum-rules-info.2974/
You are using an out of date browser. It may not display this or other websites correctly.
You should upgrade or use an alternative browser.
You should upgrade or use an alternative browser.
ST4 restoration of Frankie the Frankentrac
- Thread starter Jphoenix
- Start date
nikos
Active member
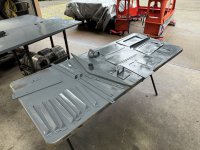
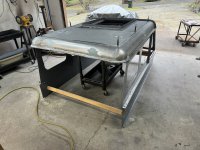
The Photos of the Progress. Part A
Sanding, Drilling, Fabricating, Welding (Hood, Cabin, Panels) & Stickers
Nikos
Sanding, Drilling, Fabricating, Welding (Hood, Cabin, Panels) & Stickers
Nikos
Attachments
nikos
Active member
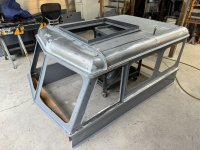
The Photos of the Progress. Part A
Sanding, Drilling, Fabricating, Welding (Hood, Cabin, Panels) & Stickers
Nikos
Sanding, Drilling, Fabricating, Welding (Hood, Cabin, Panels) & Stickers
Nikos
Attachments


nikos
Active member
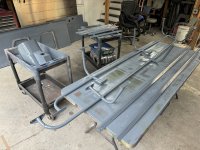
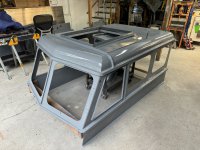
The Photos of the Progress. Part B
Sanding, Drilling, Fabricating, Welding (Hood, Cabin, Panels) & Stickers
Nikos
Sanding, Drilling, Fabricating, Welding (Hood, Cabin, Panels) & Stickers
Nikos
Attachments


nikos
Active member


Rust oleum looks great.
That Wanderlodge paint job is in the 2% category. That is how many could pull off a job that size.
Jphoenix
Well-known member
Yes,

in retrospect, it was a lot of work, especially all the sanding. Most people are not aware that it’s all steel, even the end caps are stamped steel. No fiberglass anywhere. 42,000 lbs. of steelThat Wanderlodge paint job is in the 2% category. That is how many could pull off a job that size.
Jphoenix
Well-known member
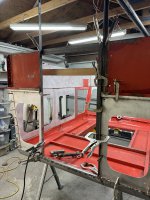
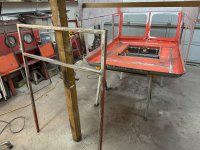
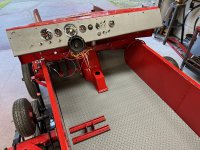
More Sun rise Red going on. Two coats on the interior of the cab now, so next step is to turn it over. Also painted the lower body side panels (not shown) and firewalls, so after I flip the cab over, I can bring the chassis in and start assembling. I'll finish sanding the exterior of the cab and side panels for the final coat of red and white on top.


Jphoenix
Well-known member
Stumbled upon this model ST4 from the UK. Had to order one, of course: https://www.scorpion-miniature-mode.../smm3544-aktiv-st4-snow-trac-civilian-version
Jphoenix
Well-known member
Moved the frame back into the garage so I can remove the engine and variator, put the sides on and drill new holes in the frame angles for the body side panel attach bolts. Also need to sort the handbrake mechanism, free up the handbrake cable (they're rusted frozen) and install a return spring on th handbrake actuating arm.


Good luck with that - I have one and still haven't finished it - very tricky build, much more difficult than the real thing!Stumbled upon this model ST4 from the UK. Had to order one, of course: https://www.scorpion-miniature-mode.../smm3544-aktiv-st4-snow-trac-civilian-version
Jphoenix
Well-known member
I'm sure it is, his description of assembly looks tedious. I see he has a Wombat, and some other cool vehicles.Good luck with that - I have one and still haven't finished it - very tricky build, much more difficult than the real thing!
Jphoenix
Well-known member
As they say in the Haynes manuals: "Reassembly is the reversal of the disassembly procedure." So, I assemble the sides temporarily to drill new holes in the new frame rails. Some minor adjustment required, but they all lined up pretty well. Still have more painting to do, then reassemble wet with sealant and then I can reinstall the drive train, brake system, electrical, transaxle and engine.


Jphoenix
Well-known member
New handbrake cables from the VW Golf are an exact match, so that makes my day. Did some final fitting on the floorboard and painted it with Rustoleum red on both sides over the epoxy, so it's drying. It has to go in first, so while waiting for it to dry I assemble the handbrake mechanism that lives below the floor and do a trial assembly of the firewall bulkhead upper and lower parts to check procedure. Glad I did because the upper bulkhead has to go in first, then lower. and the defroster tube is captured between the upper and apron part. So next is to install the floorboard with 1/4-20 countersunk screws into rivnuts, then the upper bulkhead and lower firewall wet with sealant.
Also painted the instrument panel, added an oil pressure indicator, a voltmeter and a dual USB port. New jewel indicator lamps and sealed switches, along with the new tachometer. I'll give it a final coat of urethane clear to offer up some protection from scratches prior to final assembly and installation.


Also painted the instrument panel, added an oil pressure indicator, a voltmeter and a dual USB port. New jewel indicator lamps and sealed switches, along with the new tachometer. I'll give it a final coat of urethane clear to offer up some protection from scratches prior to final assembly and installation.
Jphoenix
Well-known member
Put the transaxle in today after some preliminary wiring. New rubber flooring cut to size. I learned I have to install the big chain sprockets before I put the engine because i cant get them on with the engine in place Unless I remove the muffler which is a pain, so sprockets and axle housings go in. Next is engine then finish wiring the engine compartment and brakes before I install the cab.
Attachments
Jphoenix
Well-known member
Yeah, the big muffler is my problem. I can lift it out upwards no problem, but once it’s in, the bic chain sprockets won’t go on because of the long axles, even with the brake discs off. Anyhow, so far I haven’t had to disassemble envy thing - yet. I think I’m going to put the drive chains on before putting the engine in, good access to then now. We shall see. Certainly easy to run wires etc. with the cab off.On mine, to remove the engine I have to remove the belly pan, the front end, the brake discs and as I pull the engine forward /drop/ it out the front. Not a whole lot of room any way you do it.
before you put the engine in, have a quick check with a straight edge that the variator belt is running parallel with the pulleys - mine was quite a bit out and was causing a lot of wear on the belt, the only way to correct it is to shim under whichever pulley is low - mine needed 4mm.
nikos
Active member
Put the transaxle in today after some preliminary wiring. New rubber flooring cut to size. I learned I have to install the big chain sprockets before I put the engine because i cant get them on with the engine in place Unless I remove the muffler which is a pain, so sprockets and axle housings go in. Next is engine then finish wiring the engine compartment and brakes before I install the cab.
Attachments


Jphoenix
Well-known member
Good idea, I'll check it.before you put the engine in, have a quick check with a straight edge that the variator belt is running parallel with the pulleys - mine was quite a bit out and was causing a lot of wear on the belt, the only way to correct it is to shim under whichever pulley is low - mine needed 4mm.
Jphoenix
Well-known member
Installed the engine today, I used Tom's suggestion and approached from below the axles and it went right in, everything lined up and bolted. Started assembling the engine wire harnesses, bolting on more parts like the chain covers and assembled the transaxle shifter, adding a short shift spacer. Also measured the alignment of the variator sheaves per Puckle's suggestion and luckily they are parallel with only about .030" offset. so close enough for me. I installed an intake screen in the air horn, I don't like the idea of that intake impeller having nothing to prevent me dropping a 10mm socket down into it. The remote oil filter is just sitting on that shelf temporarily, not going to remain there, I'll find a place for int on the forward side of the firewall, near the grill.


