
-
Please be sure to read the rules and adhere to them. Some banned members have complained that they are not spammers. But they spammed us. Some even tried to redirect our members to other forums. Duh. Be smart. Read the rules and adhere to them and we will all get along just fine. Cheers. :beer: Link to the rules: https://www.forumsforums.com/threads/forum-rules-info.2974/
You are using an out of date browser. It may not display this or other websites correctly.
You should upgrade or use an alternative browser.
You should upgrade or use an alternative browser.
Muskeg hull rebuild
- Thread starter J5 Bombardier
- Start date
J5 Bombardier
Well-known member


J5 Bombardier
Well-known member
Hi Pixie
Top left of dash-Pto lever for pump running off trans, to the right data plate , lights- hi beam, misc warning, horizontal slots for defroster[louvres to cover]. Vertical slots for hydraulic valve levers[to be covered by aluminum plate]. Steering(what's that ?) Oh yeah, hydraulic stick- to be alot like the muskeg steering pics you sent me a long time ago !
J5 Bombardier
Snowtrac Nome
member formerly known as dds
ditto what my buddy Big Al said excelent craftsmanship you should be proud of your work.
brattleborotowing
New member
this is a nice unit you have put a lot of work in to it
J5 Bombardier
Well-known member
A little update on the Muskeg rebuild, dealing with the undercarriage. Replaced two axles on the front beams, rebuilt the grease adjusters,built up the worn rear beams and rear axle saddles (to get rid of the excess play) on the sliders.New wheel seals and replaced 12 out of 32 bearings,16 seal spacers made up and some of the air rims I had were small bearing style which I switched the center hub to large bearing style.
Tires are a mix of old and new style solids on the front and rear and the centers are air . Plan on adjusting the bearings and installing the grease caps next,then take off the rails for the last time and get these suckers installed !
J5 Bombardier
Tires are a mix of old and new style solids on the front and rear and the centers are air . Plan on adjusting the bearings and installing the grease caps next,then take off the rails for the last time and get these suckers installed !
J5 Bombardier
Attachments

J5 Bombardier
Well-known member
Hi Pixie
It's definitely no fun changing an inside tire on a Muskeg,throw in a little slush and slop- pretty nasty ! Replacing small bearing to large bearing you need a very large lathe and mig !
J5 Bombardier
It's definitely no fun changing an inside tire on a Muskeg,throw in a little slush and slop- pretty nasty ! Replacing small bearing to large bearing you need a very large lathe and mig !
J5 Bombardier
sleddogracer
Member
great job!!! - after over 40 years in the painting trade, I'd rather paint than punch holes - lol
J5 Bombardier
Well-known member
great job!!! - after over 40 years in the painting trade, I'd rather paint than punch holes - lol
It's about time to kick start this thread ! Hasn't been much happening on this project, installed the rad and hood for the final time,put in the fuel and hyd tanks,the sprockets are ready to go in. Painting is done,just about ready to punch those 900 plus holes !
J5 Bombardier
J5 Bombardier
Well-known member
Well ,the motivation has kicked in again,I decided to install the front sprockets on the muskeg project.Both tubes have been repaired,straightened the disc's,new sprockets,machined some new wear sleeves for the seals to run on and rebuilt the outer bearing retainers. Instead of bombardier seals(8required), four spacers were made up with an o-ring on the outside and 4double lipped seals were used. The original felt doughnuts were reused between the retainer plates.Next step assemble the diff and install.
J5 Bombardier
J5 Bombardier
Attachments


J5 Bombardier
Well-known member
A bit more accomplished on the Muskeg, diff is in, new outer caps made up for both axles, and started punching track,one done 5 to go. The box for installing the track cleats is a copy of Pixie's design ,works great !
J5 Bombardier
J5 Bombardier
Attachments


J5 Bombardier
Well-known member
Finished swapping the springs in the (spring in a can's ),I had bought a set which weren't strong enough to support a J5 but will work fine for a Muskeg.Stretched them out and clamped (no fingers lost)and installed them.
Halfway done punching belts,opted to use the hammer instead of the hydraulic press,it's faster,not sure how the knees are going to feel tommorrow ! I keep my before pic of the Muskeg handy for "motivation"
J5 Bombardier
Halfway done punching belts,opted to use the hammer instead of the hydraulic press,it's faster,not sure how the knees are going to feel tommorrow ! I keep my before pic of the Muskeg handy for "motivation"
J5 Bombardier
Attachments


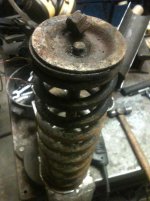
Hello J5 Bombardier, I see you working on your spring in a can. Why were you stretching the spring and clamping it? I have one of my J5 spring in a cans open right now and want to make sure I'm not missing something. Is there a way to tell if the spring is good before I weld the can back up? My can had a hole rubbed in the side so I removed the spring and cut the damaged side of the can out to replace.
J5 Bombardier
Well-known member
Imp, if both cans were open you could compare spring height between the two, but as a rule of thumb the spring will have enough tension at rest that clamps will be required to pull down the rod cap in order to start the nut on the rod. Make sure the internal stop (pipe) is still in the can,a lot of mods can happen over the years. Extending and clamping the cans makes the job easier on re-install .
J5 Bombardier
J5 Bombardier
Ok, I see how extending and clamping the spring rod makes installation easier. I just removed the nut on the spring rod and some threads still show. Does that mean I need a new spring? My other spring in a can looks much newer. Do you have a source for new springs?
Attachments
J5 Bombardier
Well-known member
Weakened some ,but not broken, lucky considering the machines age.The end plate needs a little strengthening,then good to go. I have never found an exact match,other than dealer, for these springs.
J5 Bombardier
J5 Bombardier
the old trucker
New member
My friend went to an auto parts store with the old one & matched it up a new one...Then if another one ever broke, you knew what to send the wife to the store for. Worked for him & he has 5 of them. After he was into it for awhile, he made his own springs, complete, everything new. Never had a problem after...
Thanks guys for all the spring info. Sorry for kind of hi jacking your thread J5 Bombardier but when I see the excellent quality of your work, I know I'm getting expert answers to my questions. At some future point I will post my J5 restoration project to share with everyone, just taking lots of photos now. My progress is painfully slow at this point but I will get r done.
J5 Bombardier
Well-known member
It would be nice to match up a set of springs,I'll have to pull out the spring charts again some time.
IMP , we'll be looking for your pics as your resto takes shape!
J5 Bombardier
IMP , we'll be looking for your pics as your resto takes shape!
J5 Bombardier
J5 Bombardier
Well-known member
It was a pretty successful day,the last 2 lengths of belting were punched,finished building the tracks and managed to get them on the Muskeg.Will get the joints bolted up and the last 8 crossers on tomorrow,tension up the tracks and that should be it for the suspension.
J5 Bombardier
J5 Bombardier
Attachments


Snowtrac Nome
member formerly known as dds
that rig is looking prety good i should get one for summer use
