
-
Please be sure to read the rules and adhere to them. Some banned members have complained that they are not spammers. But they spammed us. Some even tried to redirect our members to other forums. Duh. Be smart. Read the rules and adhere to them and we will all get along just fine. Cheers. :beer: Link to the rules: https://www.forumsforums.com/threads/forum-rules-info.2974/
You are using an out of date browser. It may not display this or other websites correctly.
You should upgrade or use an alternative browser.
You should upgrade or use an alternative browser.
Kitchen Reno
- Thread starter NorthernRedneck
- Start date
NorthernRedneck
Well-known member
Thanks. Like I said, I'm not a carpenter and making this up as I go along but I'm paying close attention as to how it was originally built. Kind of the measure 5 times and cut once. For example, the closet roof is a separate section of roof all screwed together. Of course when I assembled it and wedged it into place, I could see that the door header wasn't sitting flush but rather stuck out about a 1/4" which would have made drywalling interesting trying to line up the new stuff with the existing. So I tore it all back apart and trimmed down the roof. Now it sits flush. Ready for drywall. As long as it's square and everything lines up, it should look like it was always there.
NorthernRedneck
Well-known member


NorthernRedneck
Well-known member
Yep. I have to install wood bracing before I can get to the drywall.
NorthernRedneck
Well-known member
I started the drywall on Monday and finished Tuesday morning.


NorthernRedneck
Well-known member
I got the first coat of mud and tape on yesterday.


NorthernRedneck
Well-known member
I gave it a first sand then went over it with some touch up mud. Thinking ahead when I did the demo, I cut out two samples from the drywall colors to bring to home depot for a color match paint. I did that this morning as hopefully I will be ready for a final sand and a coat of primer tomorrow.


NorthernRedneck
Well-known member
The rounded corners were interesting as they required a tonne of mud to blend in to the drywall. As this is in a very visible spot with sunlight coming in from skylights above, I want the corners and joints to be seamless and smooth. That's the nice thing about drywall and color match paint. It will look like it was always there when I'm done.


NorthernRedneck
Well-known member
I used the white tape. I had a roll of the mesh here too but grabbed the tape. You're right about the mud sand ratio. I'm on the second round of mud waiting for it to dry. That's alright. I was already figuring on a third round of mud and I have electrical to do while waiting for the mud to dry.
are you going to do the floor, cabinets and appliances yourself? really not hard, just have to make sure your measurements are spot on when you order the cabinets. then pay some to do the granite/quartz, that way if they break it ( and its not hard to do) its there problem. you can save enough doing the floor and cabinets yourself to pay for new appliances. It really won't take longer because you won't be waiting on backlogged contractors.
NorthernRedneck
Well-known member
We're actually going to use the same slate floor as it would be a big job and quite costly to replace. We got a quote for the cabinets from one company and are waiting for another for comparison. The cabinets will be installed by professionals. Same for the counter. Plumbing is pretty much staying in the same location. There'll be some relocation of lights in the ceiling as well as adding a few plugs in the closet area. We want one inside the closet for charging portable vacuums. One outside for a central plug in location. And one for the refrigerator. I may actually be installing those this afternoon after more mudding
NorthernRedneck
Well-known member
I didn't get the electrical work done today. I did get a sand and third coat on the closet and wall then turned my attention to the doorway to the basement.
I had removed the doorframe to use on the entrance closet. So now I had to do something with the doorway. I cut and installed drywall strips then began the tedious process of installing the rounded corners. I ran out of mud again so this is as far as I got today.

I had removed the doorframe to use on the entrance closet. So now I had to do something with the doorway. I cut and installed drywall strips then began the tedious process of installing the rounded corners. I ran out of mud again so this is as far as I got today.
NorthernRedneck
Well-known member
Ok. How many of you admit to doing renovations in your sleep? I was wide awake at 2:30am contemplating the days tasks. Thankfully I fell back asleep but I figured since I was up for the kids in the morning to get then to school, I'd get a start and by 7:15am, I had the first of 3 corner rounds installed on the door frame 
NorthernRedneck
Well-known member
I'm getting there. The entrance is ready for primer. The archway to the basement is starting to take shape. Waiting for mud to dry is worse than watching water boil. So I did some clean up upstairs putting away whatever tools I no longer need.

NorthernRedneck
Well-known member
A side note...I narrowly avoided ww3 with the missus earlier today when the Mastercraft shop vac started blowing dust everywhere when I turned it on. Mental note going forward...avoid getting drywall dust on the lovely missus' cross stitch project. 
I had been sanding the mud with a sponge sanding block. This created a lot of dust. I switched to using a wet sponge and it worked great . No more dust. I quickly swept and mopped the entire upstairs 3 times and vacuumed the sofas to avoid the dog house. It must have worked as she opened me a beer and told me to go in the hot tub while she cooks diner.
I had been sanding the mud with a sponge sanding block. This created a lot of dust. I switched to using a wet sponge and it worked great
. No more dust. I quickly swept and mopped the entire upstairs 3 times and vacuumed the sofas to avoid the dog house. It must have worked as she opened me a beer and told me to go in the hot tub while she cooks diner.And you drank that beer without making her sip it first. Brave manA side note...I narrowly avoided ww3 with the missus earlier today when the Mastercraft shop vac started blowing dust everywhere when I turned it on. Mental note going forward...avoid getting drywall dust on the lovely missus' cross stitch project.
I had been sanding the mud with a sponge sanding block. This created a lot of dust. I switched to using a wet sponge and it worked great
NorthernRedneck
Well-known member
I put the first coat of primer sealer on this morning then some touch up mud


 Some touch up mud. That's not a Crack. It's the edge of the original paint.


Some touch up mud. That's not a Crack. It's the edge of the original paint. NorthernRedneck
Well-known member
It doesn't look like much but this archway represents 4 days of mudding and sanding after installing the rounded corner caps. But it now has primer and matches the archway next to it.


NorthernRedneck
Well-known member
Paint is done. 


NorthernRedneck
Well-known member
Today, I did some cleanup and installed the oak trim around the doors. Then, painting a door to replace the one downstairs on my son's room 2 layers each side. I then got them swapped out and the oak one brought upstairs to install. I discovered that I will have to run the door through my table saw in the morning to shave off an 8th of inch. The one downstairs went in perfectly after I removed the door jam. I then had to reinstall it for this door as it wasn't closing. I also decided that I didn't like where I tried to blend the old paint with color match new paint. It's a flat paint as that's what was on the walls. I could still see roller marks after it dried so I ended up painting two walls in the dining room and front entrance.
Tomorrow's task is finishing up the trim around the staircase entryway and reinstalling a hand rail. I decided yesterday after painting the entryway that I wasn't happy with the mud on the walls going to the basement where I installed the corners so I loaded up a wider trawl with mud and smoothed it out. Once it dried, I sanded and painted it again. It's much better now. I don't want to spend the next 35 years looking at it wishing I had put more mud. Lol


Tomorrow's task is finishing up the trim around the staircase entryway and reinstalling a hand rail. I decided yesterday after painting the entryway that I wasn't happy with the mud on the walls going to the basement where I installed the corners so I loaded up a wider trawl with mud and smoothed it out. Once it dried, I sanded and painted it again. It's much better now. I don't want to spend the next 35 years looking at it wishing I had put more mud. Lol
NorthernRedneck
Well-known member
Almost done, then the fun part , clean up. If your wife is like mine she will focus on some dust left behind rather than 2 weeks with of good work.
you've met my wife? All throughout the project she was inspecting and questioning instead of complimenting. Ah well, it's almost done. I was supposed to be installing the oak door but it needs to be trimmed in the table saw and that's down in my shop. We're in the middle of a blizzard. It can wait. I was also going to do the trim for the staircase arch but that requires my radial arm saw in the box of my truck and, well, blizzard. I guess I get a day off.There must be a wife school they all go to, cuz they all act the same.
NorthernRedneck
Well-known member


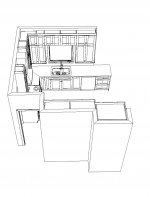
A thought from your rendering. Not sure if you have any more wall space in the area but what worked nicely for us was to have the center island on coasters. The coasters are inset so the island is only raised up about 1/4".
We can then roll the island into another area (an open wall) so it looks just like more cabinets. We then roll it out to the center when and where needed.
When against the wall, it gives a much more open feeling to the kitchen. It's also easier to maneuver around when there's more than one person in the kitchen.
NorthernRedneck
Well-known member
Coasters wouldn't work here. The current flooring is a rough slate tile which would be a bitch to roll around. The island will be fixed as the drawers will have a few fancy gadgets (one of which is her heavy stand mixer mounted on a lift up base) There wouldn't be much room to move it around as you can see. Mind the mess as I'm doing renos. 
If you can picture it from the rendering, the refrigerator is moving over to where the ladders are sitting pretty much square with the corner of the hardwood. The counter on the right is extending to the corner as well.

If you can picture it from the rendering, the refrigerator is moving over to where the ladders are sitting pretty much square with the corner of the hardwood. The counter on the right is extending to the corner as well.
chowderman
Well-known member
also to consider . . .
the kind of work and tasks I do on my island would be seriously impacted if it moving around - i.e. neat idea but only if it has jack wheels to roll around and high friction pads to set down on....
the kind of work and tasks I do on my island would be seriously impacted if it moving around - i.e. neat idea but only if it has jack wheels to roll around and high friction pads to set down on....