• Please be sure to read the rules and adhere to them. Some banned members have complained that they are not spammers. But they spammed us. Some even tried to redirect our members to other forums. Duh. Be smart. Read the rules and adhere to them and we will all get along just fine. Cheers. :beer: Link to the rules: https://www.forumsforums.com/threads/forum-rules-info.2974/

How it works - making plywood

NorthernRedneck

Well-known member
Not sure where to put this but here goes.........

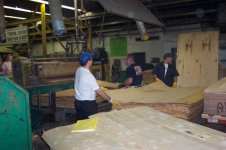
I work in a plywood mill.(or, used to anyways after this week) We made high end plywood used for custom cabinetry and furniture.

The first step in making plywood is to debark the peelers. Here's a video showing this process. The videos are not from the mill I work at but the process is very similar.

[ame="http://www.youtube.com/watch?v=m3LM-sg1Oy8&feature=related"]YouTube - Morbark Debarkers and Peelers[/ame]

After the logs are debarked, they fall into ponds and float down to Jack ladders that bring them up onto a chain system.

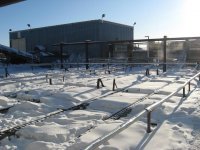
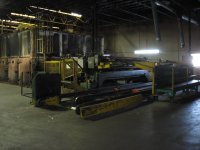
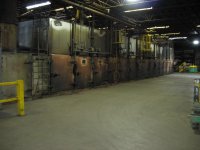
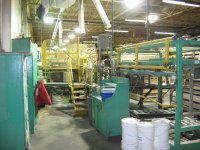
first picture is looking towards the debarker building. We have 8 ponds in which the debarked logs float down.
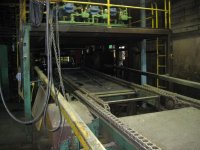
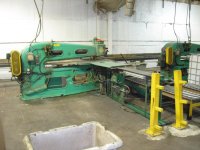
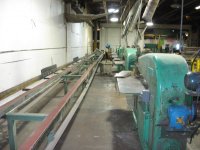
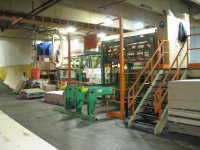
Second picture is of the jackladders that carry the logs from the ponds and place them on a chain/conveyor system.

The logs are emersed in water to get moisture into the wood to make it easier to peel afterwards.
 

Attachments

  • IMG_1299.jpg
    IMG_1299.jpg
    83.9 KB · Views: 44
  • IMG_1301.jpg
    IMG_1301.jpg
    71.7 KB · Views: 44
From the debarker and ponds, the logs travel down a chain conveyor system to the lathe that peels the log into long ribbons of veneer. Here's a video showing how the logs are peeled. Our setup is similar to the one in the video. The logs travel up a chain system(picture #1) to the lathe(picture # 2) that peels the logs. The thin ribbons of veneer travel down a table(picture #3) to a clipper(I didn't get a picture of this but its very similar to the one in the video). The clipper clips the veneer into 4x8 sheets where it heads to a stacker system(picture #4). Our stacker only stacks one pile at a time. The one in the video stacks 4 piles.

[ame="http://www.youtube.com/watch?v=QpeKjmjOWEA"]YouTube - Log Lathe[/ame]
 

Attachments

  • IMG_1298.jpg
    IMG_1298.jpg
    65.8 KB · Views: 41
  • IMG_1295.jpg
    IMG_1295.jpg
    63 KB · Views: 41
  • IMG_1296.jpg
    IMG_1296.jpg
    54.7 KB · Views: 41
  • IMG_1269.jpg
    IMG_1269.jpg
    48 KB · Views: 41
After the logs are peeled and stacked into loads, a lift truck places 3 loads of wet veneer on the infeed of the dryer. A worker feeds the sheets of veneer three at a time into the dryer.(picture #1) I worked at this location quite often. We have two dryers in our mill. This is the one we refer to as the big dryer since its a bit longer and produces more material. The video shows an automatic feeder. We used to have this type of setup but it was apparently more trouble than it was worth so we feed ours manually. The dryer in the video appears to produce allot more material than ours. Our dryers are way outdated being designed and built back in the 40's-50's.

Our dryer has 4 burner sections in it. The heat in the dryer is circulated by fans in each section. Each section is run at 400 degrees. The veneer passes through the dryer and is sorted and stacked at the outfeed. The video shows an automatic stacking system but again, newer technology. Ours is simple. The sheets come out of the dryer, come down a set of belts on a table where two workers sort and stack each sheet. (the buggies in picture #4 are normally lined up in front of the table and as sheets pass down the table, the workers pull them of into their appropriate buggies.)

The dryers would catch fire quite often. This was a normal occurance. The fires were more or less just sparks shooting out from under the doors. We'd simply shut down that section of the dryer(each section in the dryer has 4 fans and a burner), open the doors, and wash the floor with a fire hose.

[ame="http://www.youtube.com/watch?v=z_JufKfBCb8&feature=related"]YouTube - 5 Veneer drying line 23 sections[/ame]
 

Attachments

  • IMG_1266.jpg
    IMG_1266.jpg
    53.5 KB · Views: 39
  • IMG_1261.jpg
    IMG_1261.jpg
    48.6 KB · Views: 38
  • IMG_1263.jpg
    IMG_1263.jpg
    71.3 KB · Views: 36
  • IMG_1259.jpg
    IMG_1259.jpg
    56.2 KB · Views: 36
After the drying process is done, some of the wood is kept in 4x8 form, the rest is cut into 4x4 with this saw that cuts through a load.
 

Attachments

  • IMG_1260.jpg
    IMG_1260.jpg
    42.1 KB · Views: 34
Once the wood is cut into 4x4 loads, the loads are placed on a patcher.(picture #1) The patcher operator(me for the past two yrs) goes through each load of wood looking at each 4x4 sheet of veneer for defects that don't meet the grading specs. For example, if I'm allowed a 3/4" knothole for one of the grades and a sheet of veneer has a 1" knothole but the rest of the sheet meets the specs, I place it on the patcher and press a pedal. The patcher cuts out the 1" knothole and replaces it with a solid peice of wood so now the sheet is within specs. Its all about upgrading the material as much as possible to add value.

Once the wood is patched, is is placed on a set of belts(picture #2) where it goes to a rotating wheel(picture #3.......that's one my my co-workers grading the wood as it comes off the belts onto the wheel)
 

Attachments

  • IMG_1258.jpg
    IMG_1258.jpg
    61 KB · Views: 32
  • IMG_1257.jpg
    IMG_1257.jpg
    60.1 KB · Views: 31
  • work1.jpg
    work1.jpg
    49.9 KB · Views: 32
From the patching line, the upgraded material is sent to the spreader(crew working in picture #1) The 4ft wood is fed through the glue spreaderby the core feeder(worker) and placed by the layup person side by side. The sheet turners(workers again) flip a sheet of 4x8 veneer over the layup persons head
and place it down over the 4ft, then the core feeder feeds 2 more sheets of 4ft veneer, the layup lays it down, the sheet turners then turn a thinner sheet of veneer over for the back and face of each pannel. These thinner sheets of veneer can varry depending on the order. It can be oak, cherry wood, maple, birch, mahogany, knotty pine, hickory etc..... You name it, and we probably do it.
 

Attachments

  • work3.jpg
    work3.jpg
    52.1 KB · Views: 31
  • IMG_1277.jpg
    IMG_1277.jpg
    62.2 KB · Views: 31
Once the spreader crew has laid up a certain number of panels, they send the load over to the press on a roller system. We have two spreaders and two presses. Some mills have as much as 17 presses all lined up. The video shows a whole production line in china.(fast forward to 2:50 to see the presses. The presses at our mill operate in the same fashion as the ones in this video although ours have a better setup with a hoist to go up and down enabling the wood to be loaded into the press faster.

[ame="http://www.youtube.com/watch?v=HbzXr81J6Bg"]YouTube - Veneer plywood production line machines胶合板成套生产设备[/ame]

Each load is placed in a pre-press which starts the glue drying process. After a couple minutes, the panels have bonded enough for the press operators to load them on individual trays in the actual press. Once the trays are loaded, they close the press for a set time. Once that time is up, the press opens and they push each panel out manually onto a hoist.
 

Attachments

  • IMG_1278.jpg
    IMG_1278.jpg
    76.6 KB · Views: 31
Once the loads of plywood come off the press, they head to a trimsaw that trims the 8ft length first, then the 4ft edge before repiling it.
 

Attachments

  • IMG_1284.jpg
    IMG_1284.jpg
    75.7 KB · Views: 31
Once the wood is trimmed, we've now got actual plywood. But, because this is high end plywood used for cabinetry and furniture, there's still a few more steps before we can send it out the door. The loads of trimmed plywood are noe placed at the putty line where workers use putty to repair any defects found on both the edges of the panels or on the face. Each panel must be 100%. A worker works on the far end of this machine puttying one side of the panel, then the panel passes through a sheet flipper and down a set of shorter belts where another worker putties any defects on the back side of the panel. The pannels are then repilled on a hoist.
 

Attachments

  • IMG_1280.jpg
    IMG_1280.jpg
    80.3 KB · Views: 29
Now that we have each pannel trimmed and puttied, they are ready to be sanded. The load is placedon the infeed of the sander. Each pannels travels down a belt into the #1 sander that sands the back of the panel.(the blue dorrs in the pic are attached to the #2 sander) The panel comes out the sander, goes into a pannel flipper onto another set of belts where it passes through the #2 sander to sand the face of the panel. Once, the pannel is through being sanded on both sides, it goes onto an automatic hoist.

Unlike most of the other equipment in the mill, this sander is only 6 yrs old. The old one had to be replaced as it caught fire one too many times and almost burnt the mill down. i was on shift when that happened. About 1 am, I was working on the dryer at the other end of the mill when I looked over and could see flames shooting up. This was an actualy fire(unlike the samll dryer fires mentioned earlier). It was a close call because as you can probably tell in the pictures, the place is kinda dirty with everything covered in sawdust. The flames travel twice as fast on that sawdust. Almost like lighting gas on fire. This is why each work station/ machine has 3-4 firehoses hooked up and ready to go.
 

Attachments

  • IMG_1287.jpg
    IMG_1287.jpg
    69.4 KB · Views: 26
Only one final step before we can send the wood out to the customer. The loads of sanded wood are taken from the sander and placed on the infeed of the gradeline(see picture #1 and #2) The grabeline operator sits in the booth looking for any defects on the panels as they pass by then grades them as either on-grade, shop, or blisters.

Here's a quick description of each.

on-grade- each panel that meets the specs requested by the customer

shop - any panel that has a defect which could not be repaired at the puttyline

blister - this goes all the way back to the beginning of this thread. Remember the ponds with the peeled logs soaking for a bit before being peeled at the lathe and the dryers drying the veneer. Well, if the moisture content in the wood is either too high or too low, the glue at the spreader will have a harder time sticking and the press won't be able to press the glued wood together. Sometimes, just a coner of the panel will be blistered(not glued together) and it will be downgraded. The difference in price is huge. I can buy a blister panel for roughly $15 but if I were to buy the same panel as an on-grade, I'd be paying over $200 for the same panel.

Once the panel is graded, it falls into one of three bins. Once the required number of panels is met for that order, the load come out where it is identified by species, grade, etc and marked as such with specific ink rollers on the sides of the load. A sticker tag prints out and is placed on the cover. The cover is then carried over and placed on the load before the load is strapped up ready to go.

I work here on occassion as well. Just to give a rough idea on the vaule of our products, a 50 peice load of 3/4" low-grade Birch or maple is roughly $1500-2000 a load. For a high end order such as walnut or cherry, the price could be upwards of $5000.00 a load.
 

Attachments

  • work2.jpg
    work2.jpg
    53.4 KB · Views: 26
  • IMG_1286.jpg
    IMG_1286.jpg
    65.3 KB · Views: 26
  • IMG_1285.jpg
    IMG_1285.jpg
    55.6 KB · Views: 26
Top