• Please be sure to read the rules and adhere to them. Some banned members have complained that they are not spammers. But they spammed us. Some even tried to redirect our members to other forums. Duh. Be smart. Read the rules and adhere to them and we will all get along just fine. Cheers. :beer: Link to the rules: https://www.forumsforums.com/threads/forum-rules-info.2974/

Grouser cleat rehab project

paulhenry

New member
Any thoughts?

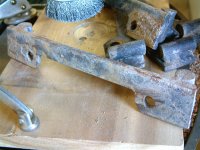
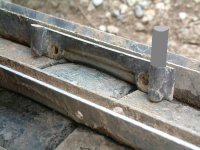
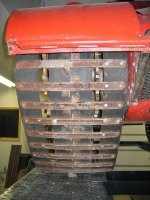
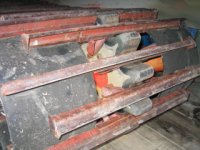
This summer one of my projects is to get my supply of grouser cleats (I don't know the official name) rehabbed.

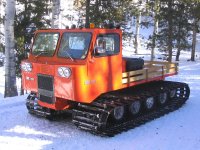
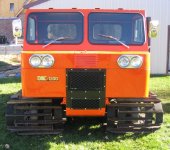
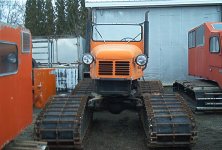
These are used on a Bombardier SV252-G SKIDOZER circa 1986. they bolt to every 4th gouser so that they are centered over the bogie wheels.

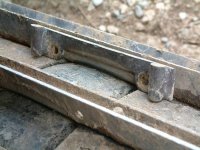
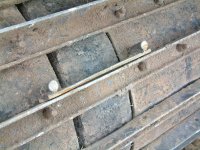
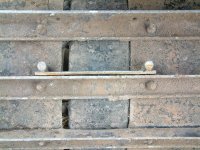
As you can see from the photo they are worn flat. I am thinking that grinding 2 stubs off of a bazillion cleats is going to be my last job on earth. Or, under the heading of never do today what you can put off to tomorrow, I could weld new rods in the pocket outboard of the original rods. The inside is out because that will infringe on the mounting hole space.

Then I wonder, if you don't have the time to do the job right the first time, where the devil are you going to find the time to do it twice?

Is there a standard length that these "spikes" are suppose to protrude?

Any thoughts? You all are a creative group - I could use some brainstorming on this one.
 

Attachments

  • ice cleats.jpg
    ice cleats.jpg
    296.3 KB · Views: 550
B_Skurka said:
Can you give us a photo of an unworn piece?

Unfortunately, no. They are all worn, I will try to describe more clearly. The cleat you see forefront photo would be placed behind and flush to the track grouser in the middle - directly over the space between the two belts and the boggie wheel would pass under the center notch of the cleat. The round, flat and flush rod welded to the back of the plate is worn flat - at one time I believe that they protruded somewhere between 1/4 to 1" I am guessing. Probably some sort of hardened steel - they were designed I suppose to provide grip on icy and sidehill situations. I will try to get a photo of one in the installed position on the track grouser.
 
Ok, here are some photos of a cleat in position taken on the track....
 

Attachments

  • cleat 1.jpg
    cleat 1.jpg
    68.3 KB · Views: 501
  • cleat 2.jpg
    cleat 2.jpg
    84.4 KB · Views: 485
  • cleat 3.jpg
    cleat 3.jpg
    91.7 KB · Views: 480
paulhenry said:
Ok, here are some photos of a cleat in position taken on the track....
So they should look something like this? Should the end be conical, like a bullet?
 

Attachments

  • cleat 1.jpg
    cleat 1.jpg
    70.1 KB · Views: 475
paulhenry said:
I believe that they protruded somewhere between 1/4 to 1" I am guessing. Probably some sort of hardened steel - they were designed I suppose to provide grip on icy and sidehill situations.
If they are supposed to look the the photoshopped image posted by DaveNay, then I would ask a couple questions.

1st, do you really need to replace them? By that I mean do you have ice conditions where you actually need them?

Second, what will they do to your driveway and road? Seems to me if you have a paved road you are going to be tearing it up with those spikes, unless the spikes are kept pretty short.

BTW, I don't see those doing much good on side slopes in deep snow. A small flat piece, welded at a 90 degree angle would do a much better job holding on side slopes.

But if you need them and are going to replace them, then you could probably get some rebar, cut it to length in a chop saw and reweld it right next to the existing spikes that are worn down. I'm not sure I'd spend the time/effort to grind the old spikes off. They are already worn flat, it doesn't harm anything to leave them there. It would be a huge amount of work to grind those off a couple hundred of them and I don't see any real benefit in doing that.

Just a thought.
 
Interesting problem given that you do not have an original to compare with. Not sure if this would work, but what about; (a) grinding the existing stud flat, (b) drill and tap the existing stud, and (c) install short snowmobile stud into tapped hole.

This might not be practical, but it would provide you with replaceble studs, and you could intall what ever length of stud your operating situation requires.

Problems that the snowmobile stud might produce; (a) stud threaded section might not be strong enough for this application, and (b) the cost of the snowmobile studs.

Not sure if this idea is a brain storm or meltdown.

Deep Enough
 
DaveNay said:
So they should look something like this? Should the end be conical, like a bullet?

That is what I thought they looked like - albiet a little shorter than illustrated - I understande the illustration was a quick and dirty.

I don't think they need to be bullet shapes or cut on bias - no need for a Ben Hur Charriot.

See my reply to B_Skurka
 
B_Skurka said:
If they are supposed to look the the photoshopped image posted by DaveNay, then I would ask a couple questions.
Yes I think - albeit shorter...

1st, do you really need to replace them? By that I mean do you have ice conditions where you actually need them?
Well I often do contract work with the rig and blower in a small village for snow removal about 30 miles from here. The only place to get gas up there is a small gas station with a knarly hill going into and out from the pumps. The asphalt is almost always covered in a sheet of ice and I can't tell you how I pucker everytime I have to turn in - go into an uncontrolled side slide past the elevated tanks, the propane refill center and then slide past the gas pumps to a stop, having slid and turned 180 degres I can then go back up to the pumps from the bottom of the hill under some semblance of control. I really hate the idea of putting them on and they really inhibit where you can go.

Second, what will they do to your driveway and road?
They would destroy it in the early and late season.

BTW, I don't see those doing much good on side slopes in deep snow. A small flat piece, welded at a 90 degree angle would do a much better job holding on side slopes.
Would you weld those between the u-shaped gouser, and would you protrude higher and stay level with the grouser edges?

But if you need them and are going to replace them, then you could probably get some rebar, cut it to length in a chop saw and reweld it right next to the existing spikes that are worn down. I'm not sure I'd spend the time/effort to grind the old spikes off.

Rebar was my first instinct - I wondered about the lifespan opposed to hardened steel - then there is the cost consideration. Grinding off was way low on my list too.

Thanks for the input.
 
I will show you some options for screw-in studs at the end of this post, however what about just welding hardfacing on the end of the existing studs. You can create (weld) a rough point with the hardfacing using a wire feed welder. Yes it will take some time, but I would think this will take less time than other options. This is the same thing we do with dozers that have to operate on ice.

With the ground pressure and the side pressure during a turn the snowmobile studs would most likely breakoff, but here are some examples:
 

Attachments

  • widechiselback_web.jpg
    widechiselback_web.jpg
    2.8 KB · Views: 499
  • 30_steel_drag_eliminator.jpg
    30_steel_drag_eliminator.jpg
    2.1 KB · Views: 499
  • 40_steel_hooker_elim.jpg
    40_steel_hooker_elim.jpg
    2.3 KB · Views: 500
paulhenry said:
Would you weld those between the u-shaped gouser, and would you protrude higher and stay level with the grouser edges?

Below are 4 photos, they represent 3 different machines. But they also show something that is very common on many brands. The little tabs are used to prevent side slippage on a cross slope.

Picture 1, a Snow Trac. You will see perpendicular "tabs" running down the center line of the tracks.

Picture 2 and Picture 3. DMC 1200, you will perpendicular "tabs" aternating on the inside and outside ends of of each cleat.

Picture 4, Thiokol Imp. Again you will see "tabs" on the ends.

Not pictured, but Kristi snowcats employed a 4 belt system that had floppy or loose belts on the inside and outside of each track. They claimed the floppy belts prevented side slipping. They also used hydraulic track lifters so they could lower one side and raise the other side of the machine on a side slope, I'm not sure if the hydraulics or the floppy belts was more effective?
 

Attachments

  • 1cleat.jpg
    1cleat.jpg
    254 KB · Views: 475
  • 1 IMP.jpg
    1 IMP.jpg
    60.9 KB · Views: 530
  • 1 dmc-1.jpg
    1 dmc-1.jpg
    181.8 KB · Views: 454
  • 1 dmc.jpg
    1 dmc.jpg
    168.3 KB · Views: 482
Donald McMullin said:
You can create (weld) a rough point with the hardfacing using a wire feed welder.

Very interesting concept - sort of a dimple that would bite into the ice but not protrude very much - like the studs on my snow tires.

It would give me an opportunity to perfect my wirefeed techniques.
 
B_Skurka said:
Below are 4 photos, they represent 3 different machines. But they also show something that is very common on many brands. The little tabs are used to prevent side slippage on a cross slope.

Now that's a great post for the creatively challenged like me! I have seen the end tabs on the DMC before but it did not register as to their purpose. That would seem to work very nicely. And I now understand what you were trying to tell me on the Snow Trac - that configuration seems like they could be prone to bending or breaking - any experience with that?

Thanks for the input.
 
Pardon me if my suggestion is not something that will not work, since I don't know a thing about Snow Cats and the likes, but I do know a bit about metal fabrication.

I tend to try to stay as close to stock as possible. So, to me, it looks like you'd be well served to cut the ole pieces off with a plasma cutter (ideal), or an O/A setup. Then use a 7" grinder to grind off any marks left from where they were. Then, go to just about any metal shop and buy some round stock in the same size of the pieces you cut off. Take an old one in with you. Many of the better metal supply houses can even match you up with a metal with similar if not exact strength and flexible/wear properties. Then use a chop saw to cut all these little pieces of round stock to the proper length and weld them back on where they were originally.

Other than taking a bit of time, it looks like a fairly simple task. I've taken on a lot more complicated tasks and had things turn out well enough that even "experts" couldn't tell that I had fabricated the items. Good luck!
 
Pardons are for felons and politicians.

Thanks for the input - I do have a plasma cutter, but I have never used it to remove a previous weld - think you use a gouge tip for that? I would have to practice that one to get a comfort level.

At the moment I am leaning away from rehabbing these "meat tenderizers" because of the limitations they impose on the functionality of the unit. (almost sounds like I know what I'm talking about!)
 
paulhenry said:
And I now understand what you were trying to tell me on the Snow Trac - that configuration seems like they could be prone to bending or breaking - any experience with that?
My cleats/grousers are all original from 1972. Not one is broken. Others have a lot more experience with their Snow Tracs and may have different experiences.

I'm not sure the Snow Trac tabs would be any more or less prone to bending or breaking than any other brand. I would guess that if run over large rocks there would be a pretty good chance of damage but I've run down loose gravel roads (summer use) and never had any problems with damage. I also don't know what is more effective, the tabs in the middle (like the Snow Trac) or the tabs at the ends (like most other brands).

What I can guess is that they are a very cost effective solution since I've seen some version of the tabs on most brands on the market. Tucker never used them on their "3" digit series, but the design of their steel tracks had plenty of lateral resistance so it was not necessary. When Tucker shifted to belts, they did use a version of the tabs. The Terra Track uses a rubber belt that has a zig-zag pattern that accomplishes the same thing.

There are track designs that don't use tabs, but most of those seem to be for deep powder use and those seem to be deeper and wider tracks. And, as previously mentioned, the Kristis never used them. Some of the Thiokol and Bombardier units had a raised center section of the tracks, those specific models also didn't use separate tabs, but I'd guess that the entire central ridge povided the same effect.
 
Update:

Instead of replacing or rewelding worn down round ice studs, I have been looking at using replaceable horse shoe ice studs. These are used for draft horses and have a larger diameter and are shorter than snowmobile studs.

You could drill and tap existing worn round studs and install these replaceable studs. Many different sizes and shapes to choose from.

See attached sites for more details:

http://www.horsesinsport.co.uk/?subj=Studs

http://www.studsandstuff.com/typesofstuds.html
 

Attachments

  • Ice+stud1.gif
    Ice+stud1.gif
    1.5 KB · Views: 370
  • no18s.gif
    no18s.gif
    5 KB · Views: 362
  • no22s.gif
    no22s.gif
    4.9 KB · Views: 366
  • noU1.gif
    noU1.gif
    4.2 KB · Views: 368
Regarding the use of the horse studs on a sno-cat:

For a horse 16 studs are used, assuming a horse weight of 2,000 to 2,400 lbs the point load on each stud when the horse is standing is 125 to 150 lbs.

My Tucker sno-cat weighs @4,900 lbs (unloaded) @6,000 lbs (loaded). Using on stud per track link, with 40 studs on the ground, the point load is 122 to 150 lbs per stud. This is in the same range as the horse load.

The sno-cat can generate more shear load on the stud because of the engine capacity.

I still have a lot of work on my tracks so I do not know how much testing I will get this winter. My goal is to complete the studding of my tracks by spring which is when we have the greatest ice conditions. In mid winter the powder is so deep that ice is not a problem.
 

Attachments

  • Tucker 543 014.jpg
    Tucker 543 014.jpg
    73.6 KB · Views: 342
Im with McMullin on the idea of a quick spot of hardsurfacing on each stub. You could experiment with height (which would equal penetration depth) to get a good balance of traction vs. road destruction. On glare ice, you would not need really tall deposits to make a diference. I have seen studs installed on bombardiers. they are threaded in to the cleats for replacement. I dont beleive that they replace very easily. they look like horse shoe calks. Borium deposits work well on horse shoes in winter. basically the same idea.
 
Top