• Please be sure to read the rules and adhere to them. Some banned members have complained that they are not spammers. But they spammed us. Some even tried to redirect our members to other forums. Duh. Be smart. Read the rules and adhere to them and we will all get along just fine. Cheers. :beer: Link to the rules: https://www.forumsforums.com/threads/forum-rules-info.2974/

Thiokol Imp 1404 - repair/restoration questions

Snowdancer

New member
I am new to the snowcat world.

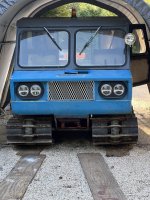
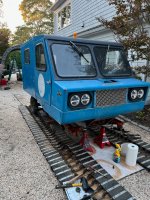
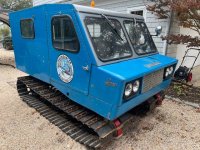
This summer I bought this snowcat 1404 imp and am giving it a top to bottom mechanical checkup before taking it out for the winter.

I have a few items I could use advice on. The first item is the frame.

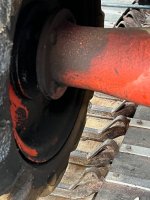
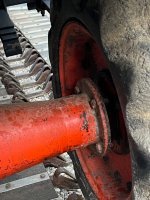
I inspected the frame - all is straight except for the front left strut which bends up 1/4” over its length. Picture attached. Need advise on how significant this is.

The first options I am considering is welding a steel plate diamond to the bottom of the strut to reinforce and prevent any further bending and also shimming the wheel so that it is true to the frame from top to bottom The welding may even pull the member back down a 1/16”.

The other option is to figure out how to straighten the strut using heat and mechanical force. Obviously much more involved and any suggestions on how to straighten are appreciated.

In your experience is the 1/4” bend significant?
 

Attachments

  • IMG_4002.jpeg
    IMG_4002.jpeg
    2.2 MB · Views: 96
  • IMG_3985.jpeg
    IMG_3985.jpeg
    1.7 MB · Views: 83
The undercarriage of my wide track imp is hammered. My front “axle” tube thing has been tweaked, rewelded apparently more than once. I think the big question is if it throws tracks. My setup runs a urethane front idler vs a pneumatic one on the narrow track version. You may be able to heat and bend or put a bottle jack to it somehow but I think it’s probably ok as is. The tracks are fairly forgiving as they travel around circumferentially.

Good luck and welcome to the insanity. Look forward to seeing your rig!
 
I'm with Mr Idaho IMP....leave it alone. I would be reluctant to try bending it, but your thought of reinforcing with a steel plate welded on is not a bad idea.
I'm still running with the more than likely original idler tires, solid rubber...not urethane or pneumatic. They're old but holding together.
Have fun sorting out all the myriad of things (minor or huge, whatever). Do fun stuff like rebuilding the tracks, or removing/gutting/and repairing the C4 differential, replacing windshield, sorting out wiring rats nests, gauge issues,, painting, etc.
At least yours looks to be better cared for than mine was. Season #2 almost upon us, will see if mine performs well once again.

More pictures when you get a chance.
 
Thanks for the advise!

I am going to weld on a reinforcement plate and leave the 1/4” bend in place. I will send pictures.

Any thoughts/advice on adding a 2” hitch receiver to the front end?
 
Thanks for the advise!

I am going to weld on a reinforcement plate and leave the 1/4” bend in place. I will send pictures.

Any thoughts/advice on adding a 2” hitch receiver to the front end?
I just noticed the question. If you not going to be blading snow. Heck yes stick a receiver on there. Basket trays, winches lots of items to stick up there.
 
Thanks for the advise!

I am going to weld on a reinforcement plate and leave the 1/4” bend in place. I will send pictures.

Any thoughts/advice on adding a 2” hitch receiver to the front end?
I’ve got the steel bits to build one for my 1404. My thought is a pair of 3/16 x 6” side plates with 4- 1/2” bolts in a staggered pattern going through the side walls of the tunnel, under the front of the engine. The plates would protrude a few inches out the front, then have a piece of 3-1/2 square tube with a stubby receiver welded into the center of the tube. I do t know how soon I’ll get to it, but I’ll take pictures and post. My purpose was primarily for a winch mount. I would make a receiver mount plate, and make the winch leads long enough to be able to be used off the rear too. For you wide track owners, it’s a bit of a starry, but I’m building a set of new factory tracks for mine. How much clearance do you have between the inner edge of the track and the tub?
 
I removed and replaced the eight idler wheel tires sourced new ones and inner tubes from FallLine - painted the rims - replacing all 16 wheel bearings as well as 8 races, 16 seals, one axle bolt and one spindle w shoulder nuts. Three of the old bearings were totally frozen and one axle bolt was really chewed up. I decided to replace the small front idler wheels while I am at it. I bought the replacements from Spryte Improvement who btw are super helpful. Came with most of the required parts. Both rear drive wheels turn freely and well. However, the left side appears to have an oil leak somewhere as there is dried oil all over the rim and axle (see pictures). Thinking about chasing the leak down but don't relish the idea of disasembling the axle. Anyone have experience with this issue?
 

Attachments

  • IMG_4618.jpg
    IMG_4618.jpg
    1,019.3 KB · Views: 57
  • IMG_4613.jpg
    IMG_4613.jpg
    689.2 KB · Views: 59
  • IMG_4617.jpg
    IMG_4617.jpg
    1 MB · Views: 61
  • IMG_4614.jpg
    IMG_4614.jpg
    453.9 KB · Views: 56
  • IMG_4615.jpg
    IMG_4615.jpg
    489.4 KB · Views: 57
I removed and replaced the eight idler wheel tires sourced new ones and inner tubes from FallLine - painted the rims - replacing all 16 wheel bearings as well as 8 races, 16 seals, one axle bolt and one spindle w shoulder nuts. Three of the old bearings were totally frozen and one axle bolt was really chewed up. I decided to replace the small front idler wheels while I am at it. I bought the replacements from Spryte Improvement who btw are super helpful. Came with most of the required parts. Both rear drive wheels turn freely and well. However, the left side appears to have an oil leak somewhere as there is dried oil all over the rim and axle (see pictures). Thinking about chasing the leak down but don't relish the idea of disasembling the axle. Anyone have experience with this issue?
You can just pull the axle straight out of the differential with a little force, then replace the seal at the end of the tube.
When I had my C4 assembly out and siting in my garage for some internal repairs, those axles pulled out pretty easily.
 
I finished installing all of the new idler wheel and decided to tackle the rear left drive wheel oil leak.

For the life of me I couldn't get drive wheel lug nuts loosened but I was able to easily remove the four very small bolts on the backing plate and then with some force pulled the axle out with the drive wheel attached. Getting the bearing off the axle to replace it was quite the job - but it is done - used steel wedges to jack it off.

Tomorrow I will buy 3 feet of 1 1/2" steel black pipe to slide over the axle to set the new bearing. The bearing is sealed so I assume I can't really heat it to expand it and the axle is too big for me to freeze it to shrink. So hopefully,the new bearing will be set with some oil to lubricate and a couple of wacks on the 1 1/2 pipe bearing only on the inner bearing ring. Any other ideas?

I also removed the axle tube as there was a small drip there. Surprise to me - removing the bottom bolt drains the differential. The was about two quarts of oil in the axle tube. Is this normal?
 

Attachments

  • IMG_4629.jpg
    IMG_4629.jpg
    99.2 KB · Views: 42
  • IMG_4636.jpg
    IMG_4636.jpg
    69.7 KB · Views: 54
  • IMG_4639.jpg
    IMG_4639.jpg
    99.3 KB · Views: 45
I don't have enough miles under my belt to definitively answer what's normal for oil accumulation in the axle tubes. When I tore into my C4 to correct what a previous mechanic had done wrong (I had to turn the entire carrier assembly 180°...long story). I was puzzling how to seal the differential carrier bearing between the shims and the housing to prevent oil from oozing into the axle tubes. No easy solution, didn't want to screw up shim placement and R&P lash adjustment.

Bottom line: Some oil will eventually make it through. In my case only a couple ounces, but my Imp had been driven very little before I fixed the issue (initially I had but one forward gear by putting the front transmission in reverse, or by selecting reverse in the differential to get 3 forward gears).

I would guess that overfilling the differential would obviously result in lots of oil in the tubes. And that bottom bolt...it goes without saying to apply a sealer to the threads since it's a through hole.

Curious to see what our more seasoned Imp'sters have to say on this topic.
 
Imp tracks are back on.... I decided the 1/4" bend in the front axle is ok as is.

Currently working on fitting a new weber carb which only fits when I rotate it 25 degrees to clear the hot water outlet and install on top of an 040" thick adapter plate. My son is making the plate for me. Picture is the trial adapter plate in plastic. He will now mill it out of aluminum. The new carb gives me a vacuum port which the old carb did not have and I will use it to set the timing on the engine.

BTW, does anyone know if the flexible brake hoses to the slave cylinders are available as as stock item or do I have to get them custom made?
 

Attachments

  • IMG_4707 (1).jpg
    IMG_4707 (1).jpg
    108.6 KB · Views: 41
  • IMG_4678.jpg
    IMG_4678.jpg
    91 KB · Views: 47
  • IMG_4677.jpg
    IMG_4677.jpg
    100.3 KB · Views: 43
Cool. I spent a lot of time researching Webers and almost bit the bullet but instead rebuilt and rejetted my original Solex. I was planning on one with a 27mm venturi vs the more common 29mm...the thought being to shift the power band a bit lower. I did a lengthy writeup complete with calculations somewhere on the forum. I'm no expert but more like a tenacious dog once I get my teeth into something.
Interesting, the need for a spacer. I didn't realize they aren't plug and play.
Many many moons ago I got intimate with Webers on my British sports cars. Wonderful carbs, so easy to tune in situ.
 
I am finished - at least I hope so! Last major item was Changing out the two master cylinders and flexible brake hoses. I changes the master cylinders because I broke the reservoir covers trying to get them off and the master cylinders had different strokes - one engaged immediately and the other pulled back 4 " before it started to engage and pump fluid out. The brake lines were full of nasty gunky cloudy fluid. Blew out both lines and then flushed the lines with a quart of brake fluid before filling and bleeding system with new fluid. I don't think I have any leaks - time will tell.

So this fall's journey:

Rewired the imp
Replaced the four headlamps with Led bulbs
Replaced rear spot light
added digital voltage meter and charging ports for i-phones etc
added interior lights
added a 120 volt converter
Two new 800 amp batteries with three way switch
Tested alternator - works but not a big power producer
added induction tach as backup to factory tach
new engine temp gauge and thermostat
new fuel gauge and sender unit
new fuel line and filters
replaced electric fuel pump to get rid of led light flicker - mostly but not all gone
new radiator hoses, heater hosed, engine hoses and fan belt
flushed and replaced radiator fluid
eight new idler wheels, tubes and 16 bearings and seals - all air filled
replaced two front idler wheels solid wheels
replaced rear left axle bearing to hopefully fix leak
drained and replaced differential fluid - interior and brake bands looked good
changed engine oil and filter
replaced carb and added vacuum takeoff for distributor advance
serviced oil bath air cleaner
checked cylinder compression - all good and consistent
set engine timing using vacuum gauge
new spark plugs and wires
Replaced exhaust system - old one leaked into cab
repaired tracks - replaced missing bolts and several missing backing plates
cleaned up interior and painted interior front cab
added seat belt
replaced master cylinders, flexible brake lines, flushed and refilled system
greased all fittings
new wiper blades

A shout out and thank you to Nancy at Sprite Improvement for many of the harder to find parts

Now to find some snow!!
 
Nice work! Where did you find idler wheels? I could use a few and they’re like hens teeth.
Also, I’m in the process of converting to a 130a 3g alternator vs the 1g unit. I’ve ran 2 AWG welding cable for all battery and charge leads with an inline kill relay. My plan is to make a front receiver and use an apex 5500# long drum winch, or my 12k Apex if needed from my truck. I’ve rewired about 90% of the gauges and controls using a full relay panel under the dash and a master solenoid for everything but the starter circuit.
I too installed a different tach, a NOS autometer. It’s for a 4 cylinder but seems to read quite high. I’ll run a new ground lead to the coil and see if that makes a difference….
 
That is one huge laundry list! You've been working your arse off and spending some serious coin.

I didn't go to quite that extent for my restoration a couple summers ago, just typical stuff like new track belts and hardware (uggg, never again!), engine tuning (plugs/wires, timing, carb rebuild, valves adjustment, alternator wiring, air cleaner, oil filter, electronic ignition swap+ coil), new tach, new oil pressure gauge, electric pump in-line with the mechanical, wiper blades, LED lights front and back, wire tracing and switch fixing, new fluid in the tranny and C4.

Plus the fun stuff like removing and repairing the C4 differential, replacing passenger windshield, paint removal and body work, and finally painting the exterior as well as the dog house inside.

All my tires are "serviceable", all but one are foam filled. Should have taken the time to remove them all and check bearings etc while I had the belts off but got burned out and ran out of time to haul up to the cabin.

Final comment: I too have the same issue with the steering levers, one having a much longer throw than the other, I believe one cylinder is stock and other a different make. And yes, I too broke off the top on one (metal cap, vs the other which has a plastic cap). I have a new cylinder on hand but haven't bothered to replace it yet. Just stuffed a cork in the hole where I broke the cap (crude, I know).
 
Nice work! Where did you find idler wheels? I could use a few and they’re like hens teeth.
Also, I’m in the process of converting to a 130a 3g alternator vs the 1g unit. I’ve ran 2 AWG welding cable for all battery and charge leads with an inline kill relay. My plan is to make a front receiver and use an apex 5500# long drum winch, or my 12k Apex if needed from my truck. I’ve rewired about 90% of the gauges and controls using a full relay panel under the dash and a master solenoid for everything but the starter circuit.
I too installed a different tach, a NOS autometer. It’s for a 4 cylinder but seems to read quite high. I’ll run a new ground lead to the coil and see if that makes a difference….
A winch would be nice. My Imp is also wired for all circuits but the starter to go through a solenoid. I kind of like the audible click when you turn the key and everything lights up.
 
Thanks all for the feedback! I didn't plan to do as much as I did but as I stated to peal back the onion, I kept finding stuff not to my satisfaction and so decided I should tackle that too. I just retired so I have the time. The machine has Peterson service stickers on it and I have the feeling the machine was overhauled 20 or so years ago by them and then not touched again

The one thing I didn't do a deep dive into is the ignition system. On my list for next year. I keep debating if I should upgrade to electronic ignition. The distributor is so small I am not sure I can fit my fat fingers in there so I din't change the points. Seems to work well for now - until it doesn't.....

Also maybe I will upgrade/change out the alternator. My new voltage meter shows (voltage < 12.3 volts) indicates I am power user below 2,000 RPMs which I haven't quite figured out. I figured switching to LED lights throughout would cut the load significantly but when I turn on the headlights voltage drops by 1 volt. I also did observed the heating fan is a big power eater.

In terms of the idler tires, the previous owner had purchased but never got around to installing eight new idler tires and inner tubes he had bought from FallLine. I paid a local tire shop $20 per wheel to mount the new tires while I worked on the bearings/races and axles

Since I was deep into the in-line idler wheels/bearings and after seeing that most of the bearings were in rough condition, I then decided to replace the two solid Bear Cat tires with new solid front Idler wheels and bearings. I bought these from Spryte Improvement. I saved the Bear Cat tires and on close inspection the tires are actually still in good shape but the bearings have seen better days.
 
Top