• Please be sure to read the rules and adhere to them. Some banned members have complained that they are not spammers. But they spammed us. Some even tried to redirect our members to other forums. Duh. Be smart. Read the rules and adhere to them and we will all get along just fine. Cheers. :beer: Link to the rules: https://www.forumsforums.com/threads/forum-rules-info.2974/

The never (finally?) ending "library" remodel project . . .

Melensdad

Jerk in a Hawaiian Shirt & SNOWCAT Moderator
Staff member
GOLD Site Supporter
I started this in the spring???

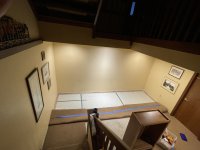
We used to have a pond at the lower level of our foyer. Basically a 5' by 8' rectangle. 25+ years ago we converted that to a planter.

This spring I tore out the planter and laid out plans for book cases. And then Melen bought a condo in Chicago that needed to be remodeled so one of the main focal points in my home looked like a construction project. The lovely Mrs_Bob put down a play rug and turned it into toy land for Kobe and so it sat until recently. Ordered some cherry book cases from Thomasville. Started the install today. My plan was to work with my friend Ricardo, who is a master carpenter. He showed up with his son Ed. So the 2 of them basically pushed me out of the way and I was relegated to getting sandwiches. Literally I did 10% of today's work. Love these guys, work much faster than I do.


DEMO DAYS

IMG_6875.jpeg69696284992__9A804F16-4301-4DD7-9A8A-2EFA26C31DA8.jpegIMG_6922.jpeg
 

Melensdad

Jerk in a Hawaiian Shirt & SNOWCAT Moderator
Staff member
GOLD Site Supporter
Reconstruction begins . . . .

The space is roughly 16' across:
img_0102-jpeg.170018


This should be picture 3, the tall end cases were actually set on top of 2x lumber to raise them slightly. A 7" box was built under the center shelves.
IMG_0106.jpeg

This is the test fit for spacing photo, notice that there is a gap between each bookshelf, that is on purpose.
IMG_0105.jpeg

As it sits now.

A soffit is PARTIALLY built over the top of it, there will be a mural above the 4 shorter book cases. We will finish the soffit tomorrow, install wiring for 3 gallery light fixtures that will shine down onto the mural. Then drywall it.

After drywall we will trim it in with solid cherry boards.

Just to try to put some scale to the space, the bottom step ends 6 feet from the face of the new book shelves.

IMG_0109.jpeg
 

Attachments

  • IMG_0102.jpeg
    IMG_0102.jpeg
    2.6 MB · Views: 49
Last edited:

Melensdad

Jerk in a Hawaiian Shirt & SNOWCAT Moderator
Staff member
GOLD Site Supporter
Kobe went to the park and to run errands with the lovely Mrs_Bob so I opened up a new tub of Minwax wood putty and filled some nail holes and a couple of the joints that were less than perfect. Not exciting enough to show a photo! But I forgot how much that stuff stinks. Whole house smells like a chemical factory now.
 

Melensdad

Jerk in a Hawaiian Shirt & SNOWCAT Moderator
Staff member
GOLD Site Supporter
I was not 100% happy with the finish color. Despite the fact that I bought the stain from the same company that made the bookshelves, in the same color as the bookshelves, and the fact that the bookshelves are cherry and the trim I used is also cherry, the stain on the trim did not quite match. It was close, but not quite. Went out to my workshop with a piece of scrap cherry that was stained with the factory stain. Over-stained it with several other stains in hopes of finding a perfect match.

This morning, with the sun coming in, I compared the scrap lumber with the various stain samples on the wood and found one that was a perfect match.

So I retrieved the can of stain from my workshop, used the contents to do a light coat of stain over the factory stain and ended up with a perfect match. Literally can't tell the difference. Not happy the factory stain was not perfect, but over-staining is a simple job, didn't take long, solved the problem. It now has just a hint of red that matches the shelves

I'll probably pick up varnish today while I'm out running errands. I have some, in Satin finish, but the shelves are semi-gloss so I want the trim to be semi-gloss to match.

IMG_0153.jpeg
 

m1west

Well-known member
GOLD Site Supporter
I was not 100% happy with the finish color. Despite the fact that I bought the stain from the same company that made the bookshelves, in the same color as the bookshelves, and the fact that the bookshelves are cherry and the trim I used is also cherry, the stain on the trim did not quite match. It was close, but not quite. Went out to my workshop with a piece of scrap cherry that was stained with the factory stain. Over-stained it with several other stains in hopes of finding a perfect match.

This morning, with the sun coming in, I compared the scrap lumber with the various stain samples on the wood and found one that was a perfect match.

So I retrieved the can of stain from my workshop, used the contents to do a light coat of stain over the factory stain and ended up with a perfect match. Literally can't tell the difference. Not happy the factory stain was not perfect, but over-staining is a simple job, didn't take long, solved the problem. It now has just a hint of red that matches the shelves

I'll probably pick up varnish today while I'm out running errands. I have some, in Satin finish, but the shelves are semi-gloss so I want the trim to be semi-gloss to match.

View attachment 170256
Turned out great.
 

Melensdad

Jerk in a Hawaiian Shirt & SNOWCAT Moderator
Staff member
GOLD Site Supporter
Turned out great.
Still in progress.

1st coat of varnish went on yesterday, it will be sanded with 600 grit, then varnished again today. Minimum of 2 coats. But might need 3? Then I'll install the gallery lights and it will be ready for the mural. The new rug was shipped, but it is coming from, so we are just hoping it arrives before Thanksgiving.
 

Melensdad

Jerk in a Hawaiian Shirt & SNOWCAT Moderator
Staff member
GOLD Site Supporter
Final sanding was this morning followed by final coat of varnish. Dry enough that I mounted the gallery lights over the mural area, the lights are controlled by a voice activated ‘smart’ switch that is hidden out of the way.

Started putting some books and some of the lovely Mrs_Bob’s collection of Staub cast iron bake ware on the shelves

IMG_0158.jpeg
 
Top