
-
Please be sure to read the rules and adhere to them. Some banned members have complained that they are not spammers. But they spammed us. Some even tried to redirect our members to other forums. Duh. Be smart. Read the rules and adhere to them and we will all get along just fine. Cheers. :beer: Link to the rules: https://www.forumsforums.com/threads/forum-rules-info.2974/
You are using an out of date browser. It may not display this or other websites correctly.
You should upgrade or use an alternative browser.
You should upgrade or use an alternative browser.
Tucker 222, 1957 Kitten
- Thread starter GMoose
- Start date
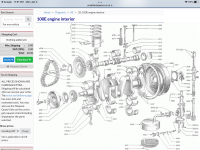
Thank you for the information. I was able to order all the current parts I need for the engine from the place in Texas, we will see what shows up next week.My 1957 Kitten has the same Anglia 100e engine series 10HP. But it actually has 36 English horse power. Small Ford Spares in Malvern Worcestershire UK has all the Aquaplane high performance parts.
Opened up the pontoons today all the mechanicals look good as far as I can tell. Did some lubrication, now need to clean up the excess grease, clean out the corrosion (chunks of rust) then put it back together. I did adjust the chains, one was tight, one was loose, I kind of split the difference and left about 2 inches of free play (see the attached video). Is there a spec or tension for the chains, my manual does not specify.
Good news today, the package of Ford Anglia engine parts arrived (with a few backordered). Everything for the ignition refresh showed up. Installed new points, condenser, plugs, coil, rotor, dist. cap, and plug wires. Man does it start SOOOO much better now and runs way better. Still have to rebuild the carburetor, set the timing, change the engine oil, figure out an air cleaner, look into cooling system but I am very pleased with how much better it starts and runs now.
Before: look at those spark plug wires, trash.

New parts, plus a manual from Kip Motor Company in Dallas Texas - very happy with this company, ordered on the 23rd, parts here on the 30th (with a holiday in there to boot). Some items (cooling system) are backordered, but I can wait for them. I also bought a spare set of points, condenser, and plugs, just in case.

Here is the after:

Before: look at those spark plug wires, trash.
New parts, plus a manual from Kip Motor Company in Dallas Texas - very happy with this company, ordered on the 23rd, parts here on the 30th (with a holiday in there to boot). Some items (cooling system) are backordered, but I can wait for them. I also bought a spare set of points, condenser, and plugs, just in case.
Here is the after:
I had a friend tell me how much of a pain in the ass these kittens are to work on, well I can agree with him after this weekend. After replacing the ignition parts I was ready to set the timing, cleaned off the pulley, found the mark, marked it red, got the timing light set up, read the manual to determine what to set it for, then shit hit the fan. The distributor would not budge, at all. It took two days of working it, heat, penetrant oil (Kroil), more heat, more oil, time, more oil, lots of force with some huge channel locks and some chisels under it. Had to remove the outer side cover and the carburetor so I could get to it to do all this work. Then finally it came out, rusted in bad. Cleaned it all up, soda blasted it, cleaned the mating hole in the head, greased it up and now it works great. Wow, you would think this would solve all the problems. No it did not. Could not get the timing set, it was wayyyyyy off, showed about 60 degrees before TDC, but it ran. Finally pulled #1 plug, verified on compression (you can see the sides of both valves, but not the piston). Then ran a piece of wire in the plug hole over to the piston, then rotating engine with fan and feeling the piston with the wire I determined where TDC was (at least fairly close). Well the timing mark was about 60 degrees off so I made a new mark on the pulley at TDC for #1. Someone at sometime has put this pulley on wrong. So now with this I set the timing at about 8 degrees before TDC, runs good.


And the saga continues, while the carburetor was off I rebuilt it. First time I have worked on one of these Solex carburetors, they have a funky "choke" known as the starter assembly. After the rebuild I could not figure out where to set the choke lever, that is because the back stop was broken off, which I did not realize until fiddling forever. I did see the chipped section where the stop was suppose to be when I rebuilt it but it did not register until later when I did some internet image searches and determined the forward stop was missing. Then I discovered that at sometime the carburetor had been apart and rebuilt incorrectly. In fact I found out that the engine was running with the starter assembly partially engaged all the time when I bought it. After finally getting the starter assembly assembled correctly and guesstimating where the choke lever should stop when the choke is off I was able to get everything set. Still several hours later. Frustrating to say the least. Everything works correctly now and the engine runs well, will probably get better gas mileage also since it wont be running with the choke half on all the time now. Someday I will have to find a new carburetor starter assembly and replace the broken end stop.
This is a before picture with the "choke" knob in the fully pushed in position, as you can see the lever the choke cable is attached to is basically straight up, well this is the intermediate choke position of this starter assembly. This is how the engine ran, with choke half on all the time. This picture does not show how the internals of the starter assembly were incorrectly assembled.

This is where the lever is now when the engine in running with the choke fully pushed in.

Here is a face shot of the starter assembly, you can see that something is missing to the left of the lever, that was the forward stop that is missing. There is also a spring and ball missing that indent into the hole in the lever, not sure this is needed for the kitten, but will probably install them someday when I replace the starter assembly body where the end stop is broken.

All rebuilt and ready to be installed:


This is a before picture with the "choke" knob in the fully pushed in position, as you can see the lever the choke cable is attached to is basically straight up, well this is the intermediate choke position of this starter assembly. This is how the engine ran, with choke half on all the time. This picture does not show how the internals of the starter assembly were incorrectly assembled.
This is where the lever is now when the engine in running with the choke fully pushed in.
Here is a face shot of the starter assembly, you can see that something is missing to the left of the lever, that was the forward stop that is missing. There is also a spring and ball missing that indent into the hole in the lever, not sure this is needed for the kitten, but will probably install them someday when I replace the starter assembly body where the end stop is broken.
All rebuilt and ready to be installed:
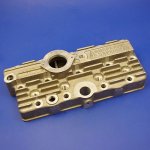
Got the grill back together today. As you recall it had a grate over the vertical bars. I removed the grate, made four new bars to replace the ones that were missing, installed them and painted. I used 3/4" square tube, the original is 13/16 C channel X 18 gauge. This fix is temporary, in the future when I perform the complete tear down and restoration back to original I will replace all the bars with the correct material. I did find a very good replacement, B-Line B62 strut, however I need to pursue procurement of this at a later date, not an easy product to come by.
Years ago when I built and raced stock cars we called the paint jobs 50 yard paint jobs because at 50 yards away they looked pretty good. This might pass as a 10 or 20 yard paint job.
I still have to make a hood latch, it just never ends.
Before:

With grate off, 4 bars missing:

All done:

Years ago when I built and raced stock cars we called the paint jobs 50 yard paint jobs because at 50 yards away they looked pretty good. This might pass as a 10 or 20 yard paint job.
I still have to make a hood latch, it just never ends.
Before:
With grate off, 4 bars missing:
All done:
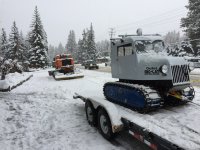
Thanks, it is coming along. I have Tucker stickers on order, once I get them here and on I will send some more pictures. Still have to grease the rollers, waiting for the grease to arrive, already have the new cordless grease gun and grease tip ready to go. Less than a month now to get everything done so I can take it to Joseph Oregon for the Alpine Cat Jamboree.Looking good...
w
when greasing the rollers, not to much pressure, you can push the covers off the back of rollers and then you have a bigger issue to deal with, take it slow and just as you see the grease squeezing out the front side, STOP., all is good, always watch the back side of the roller.
make sure, the link pins and sprocket rollers are free and turn freely, look at the ears of the grousers where the rollers bolt on, if, the ear is bent, it will need to be straighten so the roller face is flat on the rails, do not use heat to straighten, also look for cracks and welds that have failed
looking forward to taking it for a spin around the mountain
Thanks, it is coming along. I have Tucker stickers on order, once I get them here and on I will send some more pictures. Still have to grease the rollers, waiting for the grease to arrive, already have the new cordless grease gun and grease tip ready to go. Less than a month now to get everything done so I can take it to Joseph Oregon for the Alpine Cat Jamboree.
when greasing the rollers, not to much pressure, you can push the covers off the back of rollers and then you have a bigger issue to deal with, take it slow and just as you see the grease squeezing out the front side, STOP., all is good, always watch the back side of the roller.
make sure, the link pins and sprocket rollers are free and turn freely, look at the ears of the grousers where the rollers bolt on, if, the ear is bent, it will need to be straighten so the roller face is flat on the rails, do not use heat to straighten, also look for cracks and welds that have failed
looking forward to taking it for a spin around the mountain
Last edited:
Thanks for the tips, this will be my first roller greasing event (roller virgin). I did find that some of the cotter pins were missing. Also there are several links that must be a 500 series or something because they have longer pins and double end plates to take up the extra length. I also think the left steering linkage needs some fine adjustment, but it works fine so I am going to leave it for now. It just acts a little different from the right side and the right side seems to operate smoother.w
when greasing the rollers, not to much pressure, you can push the covers off the back of rollers and then you have a bigger issue to deal with, take it slow and just as you see the grease squeezing out the front side, STOP., all is good
make sure, the link pins and sprocket rollers are free and the like rollers turn easy, look at the ears of the grousers where the rollers bolt on, if, the ear is bent, it will need to be straighten so the roller face is flat on the rails, do not use heat to straighten, also look for cracks and welds that have failed
looking forward to taking it for a spin around the mountain
So the kitten had that oil bath air filter from a tractor on it, attached to the outside, but there was no oil in it. I think they put it on for the look, not the function. Anyway, I didn't like it so I removed it, however I wanted some type of air cleaner so I found this small unit for a motorcycle. Fits perfectly, does not interfere with the throttle linkage. Also replace the fuel filter and fuel line. Line had two leaks, dry rot. All good now.

I would guess you have 442/3A pins. Should be about 1/2" too long
Thanks, I will have to measure them. I have eight 500 series pontoons, I will have to compare the links to the ones on those. But I have no 400 series other than what is on the kitten to compare to. Didn't know there were different link sizes. One learns a lot working on these cats, and I sure appreciate all the help everyone provides.I would guess you have 442/3A pins. Should be about 1/2" too long
yes, 400 pontoon 3/4 roller grouser uses one size of link pin and the 400 pontoon with 1inch rollers use the same link pin as does the 500 series pontoon, also the axle shaft size for the roller is bigger on the 400 roller, which is the same roller as used on the 500
3/4 vs the A models of 1"
500 series may be another animal altogether.
Kitten looking great. K&N website should have a number of stock filters you can buy with varying carb flange id, width length, and outer dust filter to match.
500 series may be another animal altogether.
Kitten looking great. K&N website should have a number of stock filters you can buy with varying carb flange id, width length, and outer dust filter to match.
A
400 A models / 1 inch rollers from a 500 are one in the same and so are the grouser links3/4 vs the A models of 1"
500 series may be another animal altogether.
Kitten looking great. K&N website should have a number of stock filters you can buy with varying carb flange id, width length, and outer dust filter to match.
Anyone that happen to look at the Alpine Cat Jamboree posts knows that I lost the drive in the left pontoon a couple miles out on our first adventure and we had to tow it back to the truck. I had looked at the drives in both the pontoons quickly before we left for Oregon, lubricated and adjusted the chains but did not see the failing drive mechanism. I knew something was not quite right before we left for Oregon, but short on time and without the knowledge of how this drive works, I did not look into it deep enough. I just assumed (you know what assumed means) that the mechanism was just a bit out of adjustment and we would be fine, WRONG.
Here is the problem, broken welds on the clutch engagement/drive mechanism. These two parts should be one. Plus it is a bit bent.


Here is the part mostly complete on the repair. This is after straightening, welding, and sandblasting but before a little lathe and file work to recover the necessary clearances.

Partial test fit assembly:


Assembly complete. Adjustment is a PITA, I think I may have it a little tight, we will see once I get it out on the snow soon.

Here is the problem, broken welds on the clutch engagement/drive mechanism. These two parts should be one. Plus it is a bit bent.
Here is the part mostly complete on the repair. This is after straightening, welding, and sandblasting but before a little lathe and file work to recover the necessary clearances.
Partial test fit assembly:
Assembly complete. Adjustment is a PITA, I think I may have it a little tight, we will see once I get it out on the snow soon.
Getting the Kitten ready for the Joseph Oregon Jamboree, so a few weeks ago I filed the points, set them, and gapped the plugs. Found that all the plug gaps were way small, much less than the .025" specified by the manual. Got all this done and engine started right up and ran great. Ran the cat around the yard a few times over the last couple weeks. Now it has gotten very cold here and engine will only fire on one cylinder, and rarely two, and will not start. WTF. So today I pulled the plugs again and found that on 1 and 4 the gaps were all but gone, 2 was in spec, 3 was down a bit. So, I think the valves on that old flathead engine are moving up enough to just barely touch the plugs and reduce the gaps. I re-gapped all plugs to .025" and added a second copper plug washer to lift the plug up a bit, maybe around 1/16". Engine started right up. I will see how it starts in the morning after it is good and cold. Just thought I would mention this to help out anyone running that Anglia 100e engine that may have starting problems.
the anglia engine is known to float valves, as they age the valve springs get weak, thus, it does not like rpm above 2000 maybe a little less, maybe 3 washers and or shorter length of the plug
as for the drive/brake system, pulling hard on the levers of power, spinning pontoon tricks, etc all lead a fragile system to fail and fail big time,
be gentle on the kitten
as for the drive/brake system, pulling hard on the levers of power, spinning pontoon tricks, etc all lead a fragile system to fail and fail big time,
be gentle on the kitten
Last edited:
vintagebike
Well-known member
Except for this one…
or this one
or this one
Attachments

vintagebike
Well-known member
j
or you can enjoy it as it was built, of which seems to have worked just fine, and I have used mine enough to say without question, the kitten is able to run and keep up with a 443 in most given conditions, JUST FINE, there is over 90 kittens of out the 110 built, still exists and that says quite a bit about their abilities.
and have lots of smiles per snowflake mile, get out and enjoy your kitten
basically you can't fix stupid
or one last quest idea, dual electric motors, one in each pontoon along with the batteries, completely eliminate the tucker inferior drive train, then use the space under the hood for your "on the trail" BBQ grill setup....
and final thought to all tucker owners, in the food chain of over the snow travel, Tuckers, are barely one step above, and I mean barely, snow shoes !!!
enjoy the journey and leave well enough alone
just built it new, from scratch and just use the body panels so it looks like a kitten, otherwise you are just building upon failed designs,Looks like the major weak points in the Kitten drive train are the Tucker engineered brake and chain systems? Has there been any work done to improve them and make our Undercover Kitten into more of a ‘working cat’?
or you can enjoy it as it was built, of which seems to have worked just fine, and I have used mine enough to say without question, the kitten is able to run and keep up with a 443 in most given conditions, JUST FINE, there is over 90 kittens of out the 110 built, still exists and that says quite a bit about their abilities.
and have lots of smiles per snowflake mile, get out and enjoy your kitten
basically you can't fix stupid
or one last quest idea, dual electric motors, one in each pontoon along with the batteries, completely eliminate the tucker inferior drive train, then use the space under the hood for your "on the trail" BBQ grill setup....
and final thought to all tucker owners, in the food chain of over the snow travel, Tuckers, are barely one step above, and I mean barely, snow shoes !!!
enjoy the journey and leave well enough alone
Last edited:
Well the kitten started up good this morning, so having a spark plug gap makes a big difference, who knew. I do think I am going to take some advice and add even one more copper washer on each plug to lift them just a little more and further from those valves. I am sure those valves are floating a bit, it is an abused 65 year old engine, valve springs are tired. Also, my son, and even I, drive that toy at well over 2000 rpm at times. Track on!
Thebartman
Active member
Napa has spark plug extensions or non-foulers if these are of interest.Well the kitten started up good this morning, so having a spark plug gap makes a big difference, who knew. I do think I am going to take some advice and add even one more copper washer on each plug to lift them just a little more and further from those valves. I am sure those valves are floating a bit, it is an abused 65 year old engine, valve springs are tired. Also, my son, and even I, drive that toy at well over 2000 rpm at times. Track on!