Needle valves seem a rather simple concept. Replacement valves appear to be available from several suppliers, with most designed to handle significant hydro pressures. I just like the appearance of these, which were made by Republic Mfg out of Cleveland. That outfit does not seem to exist anymore. For now, I have just changed out w/ standard plumbing gaskets, which should hold up for a season or two. When the valve is fully seated, just tighten up the fittings; no other adjustments that I know of.

-
Please be sure to read the rules and adhere to them. Some banned members have complained that they are not spammers. But they spammed us. Some even tried to redirect our members to other forums. Duh. Be smart. Read the rules and adhere to them and we will all get along just fine. Cheers. :beer: Link to the rules: https://www.forumsforums.com/threads/forum-rules-info.2974/
You are using an out of date browser. It may not display this or other websites correctly.
You should upgrade or use an alternative browser.
You should upgrade or use an alternative browser.
KRISTI KT2A “Rescue” of Sorts
- Thread starter Rover’n
- Start date
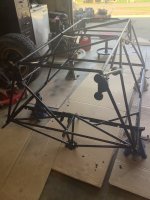
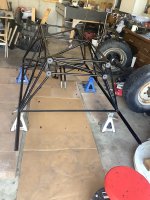
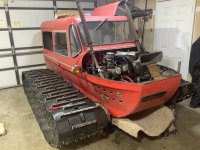
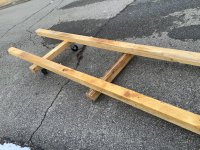
The chassis frame of the KT2A seems almost delicate. It is upside down and the levers are the steering on the front. Primed and painted for storage this winter. Will need some minor spot welding at some juncture.
Attachments
KT3survivor
Active member
glad to see this. would love to chat about the trans/diff removal as i need to do the same on mine soon. im actually hoping i can pluck the engine along with them. glad you are making the commitment to restore it. cant be more than a handfull of kt2's left. probably none in running driving condition.
Hey KT3survivor,
I highly recommend pulling the motor first. It is only 4 total bolts/studs+nuts to dismount, a few wires, and I imagine you'd unbolt the hydraulic pump for clearance (mine was missing so idk). The differential balances very well from a hoist with the transmission still attached.
The hard part is going to be sneaking out that diff+trans from the two axle holes in the fiberglass body; after you remove the fiberglass covers I think it should barely make it out whole. I tryed this briefly when I broke apart the KT2, which has a narrower bay by a few inches than a KT3, and thought I could angle and flex the whole thing out in the future without unbolting an axle tube from the either end of the diff. In this case I had a hugely smashed up front end anyway and opted to cut the hole in the fiberglass a little bigger for easy clearance. Im not sure if removing an axle tube from the diff is the way to go for easy clearance, and I hope removing those covers is enough
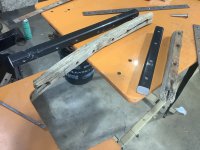
Now those are OLD grousers. Original cleats are hickory. Ten to fifteen years sitting idle outdoors will do that. Experimenting w/ composite material similar to Trex. Did a rather unscientific strength test involving a deep freezer and an overweight old man. Couldn’t break a cold, drilled long cleat. Thinking this might be a good solution.
Attachments

KT3survivor
Active member
not sure about the kt2 but on my kt3 i actually have to pull the crank pulley and the #2/#4 cylinder head in order to remove the engine. thats why i was hoping to pluck it all at once next time. sounds like removing one or both axle tubes is the way to go. thanks for the reply!Hey KT3survivor,
I highly recommend pulling the motor first. It is only 4 total bolts/studs+nuts to dismount, a few wires, and I imagine you'd unbolt the hydraulic pump for clearance (mine was missing so idk). The differential balances very well from a hoist with the transmission still attached.
The hard part is going to be sneaking out that diff+trans from the two axle holes in the fiberglass body; after you remove the fiberglass covers I think it should barely make it out whole. I tryed this briefly when I broke apart the KT2, which has a narrower bay by a few inches than a KT3, and thought I could angle and flex the whole thing out in the future without unbolting an axle tube from the either end of the diff. In this case I had a hugely smashed up front end anyway and opted to cut the hole in the fiberglass a little bigger for easy clearance. Im not sure if removing an axle tube from the diff is the way to go for easy clearance, and I hope removing those covers is enough
I would use nyloc nuts on the cleats and torque them to spec if they listed or at least set them equal. Seen non lock grouser bolts loosen and fly off in life.
Overtime you may have to re torque as the rubber and grouser set/wear in as well. Nice work!
Overtime you may have to re torque as the rubber and grouser set/wear in as well. Nice work!
is trex a building material?Now those are OLD grousers. Original cleats are hickory. Ten to fifteen years sitting idle outdoors will do that. Experimenting w/ composite material similar to Trex. Did a rather unscientific strength test involving a deep freezer and an overweight old man. Couldn’t break a cold, drilled long cleat. Thinking this might be a good solution.
like decking type use?
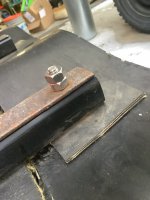
TA: Our solution to torque on the grade 8 SS nuts will be to either add a cheaper steel nut to lock them, or peen the bolt thread that sticks through. (After tightening and setting the carriage bolts, a fair amount of thread extends beyond the single nut.) Previous arrangement appeared to have a spot of weld on the nut. We will probably postpone final solution until after we can do some shakeout runs.
Redsqwrl: Yes, this composite is essentially the vertical balusters used on outdoor decking, 2X2-inch with rounded shoulders, which seats nicely in the drive slot.
Redsqwrl: Yes, this composite is essentially the vertical balusters used on outdoor decking, 2X2-inch with rounded shoulders, which seats nicely in the drive slot.
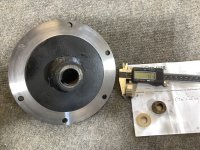
With track work mostly out of the way, starting on other tasks. The sprocket drive backing plate and bronze bushings came back from machine shop yesterday. The bushings are for the piston forks on the hydraulic system. You can see the bad one that has become oval.
Attachments
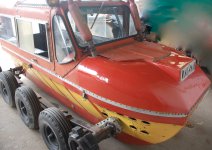
This KT3 seems about ready for some testing in the field. A few things we did. Bought four new tires. We went with grade 8 SS nuts because, well, that’s where the cleats meet the ice. Doubled them for security. In a perfect world, the bolt threads would be recessed about a sixteenth of an inch. On the floater track, a bit of thread shows through on the original-style “curtain” configuration. (Hell on the shop’s concrete floor. Probably the trailer deck, too.) Kristi cats have hydraulics to raise the coach, which we raised and rolled a dolly underneath lined with carpet scraps, which you see in the photo above. This allowed us to do the track and hydraulic work. When done, we just raised the coach again and removed the dolly and drove the machine out. When I bought the unit a few years ago, it came with a fresh set of the narrow sprockets. The old ones were pretty worn out. Need to stabilize the exhaust stacks which are prone to getting hit by tree snags. Thanks to all of you who commented. This is all experimental and I will keep the group posted on how it performs.
Attachments

Last edited:
KT3survivor
Active member
I'm curious to see how the trex works out. My father and I have been talking about switching to that material as well.
I'd say the most common problem I have had is the exhaust stacks breaking off. Once from a tree limb, every other time was from the crazy harmonic vibrations at certain track speeds, causing them to contact the cowl and top of the cab. Getting them as far away from the body as possible helped them survive the last 2 years but I'm about ready to change it up somehow.
Good luck on the shakedown. Can't wait to see another one throwing snow.
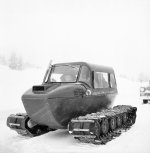
Here’s a KT2 reportedly purchased by the Montana Dept of Transportation in 1958. I have heard that it may have been used for recon ahead of big spring snowplowing of high elevation highways such as Beartooth Pass. I spoke with an elderly gentleman recently who used to run these for Mtn Bell Telephone. He found them to be a bit uncomfortable and noisy, but capable.
Yes, Survivor, I too have had similar problems with the stacks. Have even broken one off at a manifold bolt, which was a major PIA. Going to bracket mine across both stacks and anchor to the top of the hydraulic reservoir. Still, they just stick up too high.
Vid clip is more than a year ago and shows that harmonic shaking of the stacks.
Attachments
Last edited:
Never knew (or imagined) those were free floating and not braced. Tuckers have them and even the KT2 above has an upper brace. Since the exhaust is obviously solid w/ no flex pipe I would definitely find a way to brace the top and dampen it with some sort of rubber bushing to stop that.
Roger that, Davenet. Should have addressed it long ago, it’s just that we could see no evidence that it was ever supported in its past life. I am now leaning toward individual upper supports similar to the bracing on that KT2 in the old pic. Or maybe even both upper and lower bracing.Never knew (or imagined) those were free floating and not braced. Tuckers have them and even the KT2 above has an upper brace. Since the exhaust is obviously solid w/ no flex pipe I would definitely find a way to brace the top and dampen it with some sort of rubber bushing to stop that.
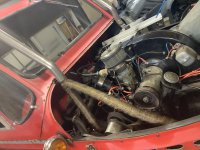
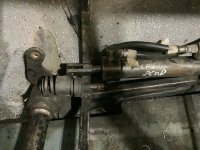
Hydraulics seem good, btw. Leaking needle valves seem fixed and the system appears fully functional.
Last edited:
vintagebike
Well-known member
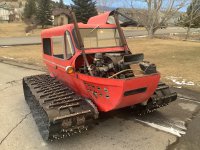
Stabilized the stacks using holes already drilled through the frame just under the hood. Buffered with rubber bushings. Seems a good solution through end of the spring season anyway. Took the rig out for a run today, hitting good snow at about 6,900 ft. The Kristi performed well w/ no issues. Note that unique hydraulic action.
Attachments
It‘s been a while since we have posted to this site. In the off-season had some exhaust work done on the KT3. Installed header wrap on the portions under the hood. The machine is quieter with way less fumes coming into the cab. Also remounted a rear window. Used the Kristi in January to accompany a Thiokol Imp on a trip into the backcountry along Montana’s Continental Divide to pick up a failed generator at an off-grid cabin. Machine is running well.