• Please be sure to read the rules and adhere to them. Some banned members have complained that they are not spammers. But they spammed us. Some even tried to redirect our members to other forums. Duh. Be smart. Read the rules and adhere to them and we will all get along just fine. Cheers. :beer: Link to the rules: https://www.forumsforums.com/threads/forum-rules-info.2974/

Installing new Imp 1404 brake bands

rodre

Member
Hi Everyone!

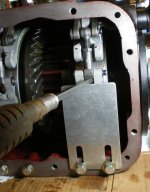
I finally got around to installing the freshly relined brake bands I got relined last year. I am now at the point where I am trying to cinch them up to install the top clevis pins. Apparently the distance between the centers of the top and bottom clevis pins is supposed to be 2 13/16 inches. I used a caliper and set the distance between the pins on the assembly before I went to install them on the bands. I left the jam nut a little loose so that the top clevis pin would have a better chance of sliding through the top eye. I am using a floor jack with a steel bar to push up from the bottom of the assembly. It gets to within about an eighth of an inch but then the whole back of the cat starts to lift up. I even tried to put in about 300lbs of weight in the cargo area but it lifts that too. I had to stop before something broke or someone got hurt :bonk:

I read a thread years ago by @cloudcap (can't find it now) where he used a 6 foot pry bar and some wood as a fulcrum to lift the bottom of the band up. The back of the cat is too close to the shop wall for me to try this and it has its bogies and tracks off and is sitting on jack stands. If I recall I don't believe he got it to 2 13/16 inches using this method but I could be wrong. I had also read another thread where someone had used ratchet straps to hold down the C4 transaxle while the cat was sitting on a trailer, binding it to the trailer, but I can't do this either because again no bogies and my trailer is for a bigger cat and has the empty center channel so no where to put the jack.

At this point I figured that either I am missing something or there has to be a better way. Apparently if you don't get the distance right at 2 13/16 inches the new bands won't bed correctly. Any advice would be much appreciated. Thanks!

~Rodre
 

Snowcat Pat

Active member
I think this was written by mtntopper. With thanks.

Start by completely loosening the external
adjustment nuts on the allthread rod that passes
through the actuating levers. Move to the inside
where the end of the bands have a looped end
through which a clevis pin attaches them to
adjustment bolts. pull the pin, take up some slack
with the bolt, replace the pin and secure it with a
cotter pin. Get them as tight as you can by hand
and then do fine adjustment externally. If the
external actuating levers are too far forward, take
up more slack at t,he band adjustment. As the bands
wear you can make external adjustments up to the
point where the actuating levers start pushing down
on the allthread that pulls them. Then pull the
back cover and tighten the bands again.

I will add;

The distance 2-13/16 is to help you get started. The actual installation may require a slightly different setting, usually less but in your case apparently more. The idea is to get the band as tight as you can internally making sure the external adjustment is backed off completely. Yes the brakes will drag until they bed in but if the internal adjustment is tight the external adjustment range will go farther before having to readjust the internal (clevis) again.

Make sure the clevis jam nut is tight before you put the cover back on. I take the clevis out, adjust, and tighten the jam nut (ensuring the pinholes are parallel) then try to get the pins in while prying the looped end up. I put the lower pin in first then pry up on the flat end of the clevis to line up for the upper pin, to pull all the slack out of the clevis assembly.

I use a big flat blade screwdriver to pry up the looped end of the band (with the clevis) using a fulcrum resting on the bottom edge of the diff case. More than enough pressure that way. I made a simple 1/8" thick aluminum plate for a fulcrum that I bolt onto the rear cover mounting face lower edge to make it a little easier. A block of wood or plastic will work too.

Looking for a photo, I'll post if I find it but its here on the forum probably in the cloudcap thread.

Best I can do for now.

-Pat
 

rodre

Member
Thanks @Snowcat Pat

I have been running this through my mind...if I understand correctly the 2 13/26" is what it needs to be inside the C4 transaxle and I can finish the adjustment with the external adjustment nuts?

~Rod
 

Snowcat Pat

Active member
"Get them as tight as you can by hand
and then do fine adjustment externally."
-Pat
 

Attachments

  • Si OC-4 brake band install_adjust.JPG
    Si OC-4 brake band install_adjust.JPG
    673.1 KB · Views: 237

zspryte

Member
Site Supporter
"Get them as tight as you can by hand
and then do fine adjustment externally."
-Pat
Glad to see you got a new web site - looks really nice. Your bolted on fulcrum plate definitely not likely to move like a block on the trailer hitch can.
 

rodre

Member
Thanks @Snowcat Pat!

I was finally able to get them on at 2 13/16 inches by loosening the outside adjustment nuts on the all thread connected to the brake actuator cams. In fact I had to remove the all threads completely to be able to move that slave cylinder mounting plate that sits on top of the C4 so I could get at removing the old gasket on the top edge of the C4. Adjusting everything is going to be fun, I read the manual but it didn't make much sense to me. I don't have it in front of me now but it was saying something about 1 inch of free play or movement before you tighten the forward nut and jam nut on the all thread but this didn't make sense to me.
 

rodre

Member
Looking at the manual again this is what it says:

1607991397829.png


The part that is confusing me is specifically:

"Adjust the knife-edge nut to obtain approximately one inch free travel of the steering lever handle..."

When it says "steering lever handle" I am guessing that it means the operator/driver steering levers in the cab? This is confusing me because it starts by saying "The adjustment is performed on the linkage between the slave cylinder and the BRAKE LEVER on the differential". I am guessing that it must mean the steering levers in the cab because now that the new brake bands are on there tight the brake levers on the differential will only move maybe a couple of millimeters by hand force...

I am guessing that one inch free play on the cab steering levers equates to a millimeter or two on the slave cylinder/all thread that goes through the brake lever eyes on the differential? I don't have anyone around right now that can move the lever while I watch the action on the all thread and brake levers on the differential...LoL
 
Last edited:

zspryte

Member
Site Supporter
When I pull my cab steering lever to stop, it moves six inches or more from the fully forward position until resistance starts. As more force is applied, the lever moves a bit further back, maybe a couple of inches, until the brake fully engages. Adjusting so the total steering control lever travel at its top is only one inch doesn't seem possible. Perhaps they mean one inch of travel after first resistance.

The cab steering lever travel distance between when it first encounters resistance and the brakes fully engage changes when you adjust the knife-edge nut. If the knife-edge nut is not screwed in enough, the brakes won't be fully apply even when the lever is pulled all the way. If it is screwed in too much, the brake liner will constantly rub the drum with barely any lever travel after first resistance. The goal is to find the spot where the brake liner is just about to touch.

I've only made adjustments for long term wear a few times. I did this by turning the knife-edge nut in 1/2 turn at a time until when I pull the lever fully back it felt firm without excessive travel after first resistance. I'll measure the lever travel the next time I use it and post it.

If someone experienced could chime that would be great. I'm a bit of a novice -
 
Top