Hi all, now that the mini mini van is done I am going to move on to the COOT. I bought it couple years ago and used it one season on the mountain, the previous owner changed the drive system from the original Salsbury clutch system and transmission with 2 forward and 1 reverse to hydrostatic. With the Salisbury clutch in low it is something like 68:1 so it will climb over anything, in second it will do over 20mph. The hydrostatic system didn't have enough gear spread in it to climb or go fast. It had a 20hp Kohler that you could stall out. I recently bought the Salsbury clutch system and I already had the original trans. Today I stripped it out completely to do the conversion I had to get a new engine also. The kohler has a 1-1/4" pto shaft and there is no clutch made for that size. I bought a new 16hp motor and that is plenty, as they originally had 12hp. Reading on the COOT forum the 20 hp and 22 hp engines tend to break drive parts and add weight. Tomorrow I will start making a new engine mount plate as what was there is hokie and I want to clean up the installation. Its not going to take much time ( a couple weekends ) and I will be playing with it before you know it. Also I am going to weld up all the holes in the tubs so it will be amphibious again.I have been on the Coot forum getting ideas, I want to modify the roll cage and add a winch at a later date.

-
Please be sure to read the rules and adhere to them. Some banned members have complained that they are not spammers. But they spammed us. Some even tried to redirect our members to other forums. Duh. Be smart. Read the rules and adhere to them and we will all get along just fine. Cheers. :beer: Link to the rules: https://www.forumsforums.com/threads/forum-rules-info.2974/
You are using an out of date browser. It may not display this or other websites correctly.
You should upgrade or use an alternative browser.
You should upgrade or use an alternative browser.
COOT ATV
- Thread starter m1west
- Start date
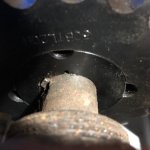
So today, I removed some more Okie engineering. What I ended up with is the original transmission mount with a bunch of extra holes and slots. I plan to cut the top off and weld in a new 3/16" plate the same size so I can start with a clean slate. The motor plate will be all new. I put the clutch pulleys on the transmission and engine for mock up. Most likely I will use a remote gas tank as it is going to interfere with the seat, make it harder to work on and I'm not a fan of the gas tank riding around with me in a sealed tub. I got some good ideas from COOT WORLD forum and also a couple of screen shots of where we are headed with it. The red one with hydraulic dump bed would be very handy on the mountain. I am thinking of a removable one so when not used I can put the seat back on. The camo one is nice to and the owner extended the front area out for more leg room and incorporated a winch. I may end up with both modifications in the end.
Today I removed the gas tank from the new motor, lots more room now. I cut a new base for the motor mount. I plan to add a sliding mount with jack bolts so it can't move after being tightened. The cylinder head protrudes slightly outside the tub. I will fabricate a open top box and weld it to the tub so it will seal up that area for going into water, originally they came that way and someone hacked it up. I think it was clearance for the Carburator and muffler on the Briggs. The engine would fit completely inside the tub if not for the starter hitting the drive line, but then it would be almost impossible to get the spark plug out. Im still somewhat in the design stage. The plan is a clean simple installation that is easy to adjust the motor plate, stays where you put it and easy to service the motor. ( spark plug and oil change ) I thought about rubber isolaters on the motor or motor plate but the 15-1/2" centerline for the transmission and engine relationship is critical for proper Salisbury clutch operation and I don't want the motor bobbing around.
I'm still learning how to load pictures with the new program, some loaded some did not and some twice? Anyway the picture the new engine mount didn't load, The other pictures are the transmission mount that repaired yesterday and some more Okie engineering removed ( Jethro mount that battery in the COOT, OK uncle Jed )
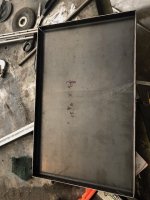
Still trying to figure out how to put text with the pictures. The photos above are of yesterday when I plugged all of the extra holes and slots in the tubs so it will float again as intended. I made drain plug plates for front and rear then welded them in while plugging holes, I used a piece of 1/4" plate , drilled and tapped 1/2" and will use a bolt with an O ring. I thought about a pipe plug but the coupling would have either left 1/2" of water in the tub or hung down under the tub ready to snag something. Next I cleaned up the hole in the side that looked like Texas. Today I plan to set the motor back in and build the box that will allow motor clearance and seal the big hole in the side, it should float after that.
I've been using an app called image size. It's very easy to use.
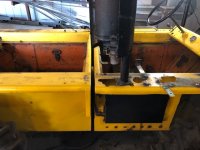
So today I made the pillow block bearing support that stabilizes both the transmission shaft and the drive line shaft. Original coot it was a box made from sheet metal that everyone I have seen is tweeked. I made mine from 3/8"X
 2" flat bar and 1/4" wall 2"X3" tube. Then when looking at the whole thing I realized that if I relocated the starter key box and the starter solenoid I could move the engine closer to the drive line and possibly get the engine to fit inside the tub. Then I would just have to patch the hole instead of a box. I will take a closer look tomorrow, I will also have to relocate the transmission the same amount, that does not seem to be a problem.
After looking it over again today, I won't be that hard to move the engine and transmission over, I may not get it completely inside but very close where there may be about an inch of pop out there and that enough where there is good clearance when the wheel is turned to full lock. Moving everything over will be about a 4 hour penalty but worth it.
Finally had enough time t get back on the COOT today. After raising the motor plate about an inch it allowed me to slide the motor over more and now
 the motor fits inside the tub. This solves a lot of clearance problems for the air cleaner and exhaust. I will still put a 1/2" bump out on the box that will fill the hole for a little clearance, there is plenty of room with the wheel at full right turn. The motor plate is completely done with adjustment front to back and side to side with jack bolts both ways. I will be relocating the transmission about 1-1/2" to get the correct shaft center to center at 15-1/2" then do a final alignment and weld the motor plate in. When that is done it will come together pretty quickly.
Today got the transmission mount modified by welding in a 2" channel so I cold move it back. Got the transmission installed, the motor lined up and the motor mount tacked in. Tomorrow I will weld it out and move on to mounting the gas tank, patching the hole in the side, welding the tub holes on the outside that I welded on the inside. Also I have to make a new seat. Its coming along but there is still plenty to do.


This morning I was in the field so I went and picked up my new taper lock sprockets and an idler sprocket for the transmission to driveline link up. I got them installed and now can move on with the project. I found a new home for the disc brake and caliper on the front end of the torque transmitter. The shaft passes thru the unit and comes out the front, thats the perfect place, it does the same on the rear one that drives a propeller on some models. If you are not familiar with taper lock sprockets, the are the Cadillac, no walking around or keys falling out ever and are easy to install to take apart. The picture that shows the one on the drive line the 3 set screws tighten up or take it apart. There is a tapered inner hub that is split and the inside bore of the sprocket is tapered, the 2 opposing set screws tighten it and the one in the center loosens it. They are expensive , the 2 sprockets and the idler was $97.00 but I'm going to be broke down looking for the keyway in the back country.
Attachments

thats a cool set up now you have me thinking about doing teh same thing with my raid track so the grand children have a toy to play with when they come to visit.
My raid track is next, I work on it in-between projects and the COOT is the last project for a while. I got it about 50% complete, pretty cool little rigsthats a cool set up now you have me thinking about doing teh same thing with my raid track so the grand children have a toy to play with when they come to visit.

Today I removed some more Okie rigging from the Front of the COOT and then welded up all the holes I could fill without making patches. I also tacked welded the bumped out patch on the side. In all I welded about 50 holes today and at least that many in the bottom a couple weeks ago. The engine and transmission mounts are now done and welded out as well as the bearing support for the transmission and drive line.
Attachments

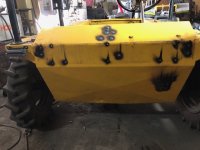

today I finished welding the side patch and made some other patches and welded them in and sanded them down on the engine side of the flat that covers the tires. I have welded up more than 150 holes in this thing of all sizes and keep finding more ,WTF. I saw an aluminum boat one time that had been shot with a shotgun, it may have had less holes in it. I still have to weld the holes on the bottom that I plug welded from the inside ( about 50 of them and sand them down.) Im sure I missed something but its about time to scuff it, clean it and camo it. then do a final assembly. Work in the field is getting to be where I have been helping out a lot more and I have some weekends to work this month, so I won't get much more done anytime soon.
Attachments
I got super busy with work at that time and put it all together in the back of the shop. I was only a week or 2 from finishing it. Now other projects have taken precedence over it and its its busy time again. Next time I get a break I need to finish it.
its 2 speeds forward and reverseI am going to repower one and benefited from you thread to gain understanding. Lots of the coot world post reference a 2 spd trans this one is just forward and reverse