• Please be sure to read the rules and adhere to them. Some banned members have complained that they are not spammers. But they spammed us. Some even tried to redirect our members to other forums. Duh. Be smart. Read the rules and adhere to them and we will all get along just fine. Cheers. :beer: Link to the rules: https://www.forumsforums.com/threads/forum-rules-info.2974/

Snowtrack restauration project

nwerring

Member
I am changeing the front gear drive from a Master to the smaller SnowTrac style. I'll check the x-member to see if there might be a clearance issue with a 17 tooth "small" gear. Thank's for the tip though.
Here is a photo of the Master before any work started..
I am building new tracks with the standard SnowTrac grousers. Have a full hi-cab instead of the pick-up version.
 

Attachments

  • image.jpeg
    image.jpeg
    122.5 KB · Views: 802

Snowtrac Nome

member formerly known as dds
GOLD Site Supporter
that sucks to see a master all butchered up like that I think they look cool with tall groomer cabs lots of room for cowboy hats. do you still have the hydraulic package lookslike some of it is still on they fender
 

louis

Member
Niels Excellent idea replacing the front gear drive from the Snow Master to the smaller SnowTrac style !!!!

For the electronic throttle pedal i used a GM #258 30024
MONTE CARLO 2006 /2007 GRAND PRIX 2004 / 2008

On my installation i shorten the levers 2" ( see the picture )

For the custom sprockets i can give you the complete procedure if you want ??

LOUIS

..
 

Attachments

  • gmpedale.jpg
    gmpedale.jpg
    58.6 KB · Views: 778
  • pedal.jpg
    pedal.jpg
    92.1 KB · Views: 787

jask

Member
that sucks to see a master all butchered up like that I think they look cool with tall groomer cabs lots of room for cowboy hats. do you still have the hydraulic package lookslike some of it is still on they fender
That is not butchered Don, that is a factory cab- like the ones used in the Sapporo winter Olympics. I also think those tall cabs are great! looking forward to following this build:smile:

Nwering, if you have a chance could you post some pictures of the back of the cab and how it joins on to the machine? I have always wondered how hard it would be to remove the "top" on one of these half cabs, I assume the back wall is one piece all the way to the floor on each side of the door?
 

nwerring

Member
That's correct. This was a factory option, actually also for the standard SnowTrac. Both high and low roof versions, and sometimes with a triangular toolbox on each rear bench. One thing that make them not so smart.. is that there is a tendency for the tracks to throw up snow that settles behind the entrance door. This makes the door allmost impossible to open from the innside ? Looks darn silly when you are trapped innside.
All the panels are bolt on. Many small panels.. I'll post photos later.

One other thing. I dont want to hijack Louis' restoration thred, even though it will also cover the Ecotec upgrade. Should I make a new seperate thred?


That is not butchered Don, that is a factory cab- like the ones used in the Sapporo winter Olympics. I also think those tall cabs are great! looking forward to following this build:smile:

Nwering, if you have a chance could you post some pictures of the back of the cab and how it joins on to the machine? I have always wondered how hard it would be to remove the "top" on one of these half cabs, I assume the back wall is one piece all the way to the floor on each side of the door?
 

Attachments

  • image.jpg
    image.jpg
    108.6 KB · Views: 772

Snowtrac Nome

member formerly known as dds
GOLD Site Supporter
That is not butchered Don, that is a factory cab- like the ones used in the Sapporo winter Olympics. I also think those tall cabs are great! looking forward to following this build:smile:

Nwering, if you have a chance could you post some pictures of the back of the cab and how it joins on to the machine? I have always wondered how hard it would be to remove the "top" on one of these half cabs, I assume the back wall is one piece all the way to the floor on each side of the door?
I wasn't referring to the cab I was talking about the cut down tracks. I never thought about the cab door getting stuck with snow, there is one here I tried to acquire some time back my plans were to add a roof hatch so I could load the bed to the and still get in and out
 

louis

Member
Niels

For the benefit of the Snow Track community, it would be highly useful to have all the Ecotec posts at the same place !!!! What do you think ???

I will post in more details the ECOTEC conversion program

A - Engine / B- Transmission / C - Fuel system / D - Exhaust system
E - Cooling system / F - Computer system


A - ENGINE " GM ECOTEC 2.4 LE 5 "

First picture:
You see the intake and exhaust cam position transmeter (with the green tape)
With the electrical connector in place, the clearance with the strap was not perfect

Second picture:
Red brackets i have made to hold the cam position transmeter in new 180 degrees position

Third picture:
You see the new position of the cam transmeter with the custom brackets

Fourth picture:
View of the clearance between the connector and the strap (intake side); you can also see the thermostat housing (the overflow port has been welded closed) NOTE: you must install a new ground wire ( braided ) in the original mounting bolt hole

Fifth picture:
View of the clearance between the connector and the strap (exhaust side)

Sixth picture:
Custom adaptor for oil information: oil temperature (gage), mechanical oil pressure ( gauge ) , low oil pressure light ( VW type ) and computer oil temperature

Seventh picture:
Opening in bottom pan for engine oil drain plug
NOTE: the Ecotec engine in the Snowtrack is not in the same position as of the GM front wheel drive car; it is almost vertical now ; you must re-mark the deep stick to make sure you have the right quantity of oil in the engine

to be continued ..............

Louis
 

Attachments

  • campos ori.jpg
    campos ori.jpg
    99.4 KB · Views: 767
  • braket for camposi.jpg
    braket for camposi.jpg
    67.5 KB · Views: 756
  • new posi.jpg
    new posi.jpg
    102.9 KB · Views: 774
  • vew clea intake side.jpg
    vew clea intake side.jpg
    104.2 KB · Views: 751
  • vew clear exhaust side.jpg
    vew clear exhaust side.jpg
    107.9 KB · Views: 762
  • oil adap.jpg
    oil adap.jpg
    38 KB · Views: 756
  • oil plug acc.jpg
    oil plug acc.jpg
    95 KB · Views: 753

louis

Member
ENGINE " GM ECOTEC 2.4 LE 5 "

A- Water temp sender ( gauge )
B- Thermostat housing overflow port has been welded closed
C- New ground wire ( braided )
D- New position of the cam position transmeter
E- Cam position transmeter custom brackets
F - Custom adaptor for oil information

ENGINE READY TO INSTALL

to be continued ..............

Louis
 

Attachments

  • BACK ENG.jpg
    BACK ENG.jpg
    113.6 KB · Views: 767

nwerring

Member
Great photos and descriptions Louis! They will make my work so much easier.
I will continue to post my conversion work on your thread, to keep the Ecotec info together.
 

louis

Member
ENGINE " GM ECOTEC 2.4 LE 5 "

In the picture of my last post, #190, i forgot to specify there is a clearance issue with the two bottom bolts fixing the adaptor plate to the Ecotec engine; i replaced the two sockets head cap screws by two 90* countersunk flat head screws!

In this picture, ECOTEC engine intake side

A- Vacuum port for brake booster : permanently shut off

B- Vacuum port : permanently shut off

C- Cooling system port : i have installed a valve to remove air bubble from . . the cooling system

D- Crank case vent port : must be open all the time

.
to be continued ..............

Louis
 

Attachments

  • intakeside.jpg
    intakeside.jpg
    110.2 KB · Views: 724

louis

Member
B - Transmission

The transmission must be in fresh rebuilt condition (to cope with 185 HP)

I've installed all new german quality rubber transmission mounts

I've grinded the bell housing for the bigger 1600 CC 130 teeth 12 volts flywheel (like the ECOTEC engine flywheel)

I've installed a new high torque starter IMI-101 # ACC-C10-5767; " the BOSH starter can not crank the ECOTEC engine

The clutch release mechanism and the clutch cross shaft must be in excellent condition because it has to handle the heavy duty clutch pressure plate!!!

I've also installed a new clutch release bearing

Note: You must install a heavy duty 2100 lb KENNEDY STAGE II clutch pressure plate to handle the torque of the ECOTEC engine

Louis
 

louis

Member
C - Fuel system

Many ECOTEC dune buggy on different forums use this fuel system and it works fine in my ECOTEC snowtrac

A- Fuel filter "to protect the fuel pump"

B- High pressure in line fuel pump ( WALBRO GSL-392 )

C- Fuel connectors ( DORMAN # 800-120 , # 800-121 )

D- Fuel filter regulator ( WIX #33737 ) used Chevolet Corvet from 1999-2004

E- Fuel connector ( DORMAN # 800-155 )

F- Fuel gauge : EFI fuel pressure gauge ( FUELAB #71501)
Fuel gauge adapter (MR.GASKET # 2975)

Note (1): Use only high pressure fuel rubber hose
Note (2): Return line must be at the bottom of the fuel tank

.
Louis
 

Attachments

  • fuel good.jpg
    fuel good.jpg
    63.2 KB · Views: 693

nwerring

Member
My Ecotec engine arrived by ship from the US today:biggrin:
Hopefully I can get it ready by next winter...
 

Attachments

  • image.jpg
    image.jpg
    109.5 KB · Views: 640

louis

Member
NICE ENGINE !!!

Alternator missing ;
Used AC DELCO Part # 13944

Shorter strap for alternator ; GATES # K050345 5PK880

QUESTION ;
A - Are you full time on the ECOTEC projet !!!
b - Tell me something about your experiences ( mechanical / technical ) in custom project ????


LOUIS
 

louis

Member
[ame="http://www.youtube.com/watch?v=XrJVDoAW4og"]http://www.youtube.com/watch?v=XrJVDoAW4og[/ame]NOT A SNOWTRAC (WINTER TOY ) A SUMMER TOY !!!!!!!!!!!!!!!
1953 NASH HEALEY PININ FARINA ROADSTER " 1 OF 150 "
 

Attachments

  • nashhealey 1.jpg
    nashhealey 1.jpg
    137.7 KB · Views: 518

louis

Member
SOME TOOLS I USED TO KEEP MY TOYS IN TOP CONDITION !!!!!!


[ame="www.youtube.com/watch?v=cc4dx9T3viQ"]www.youtube.com/watch?v=cc4dx9T3viQ[/ame]
 

Attachments

  • shoplouis.jpg
    shoplouis.jpg
    119.1 KB · Views: 423

louis

Member
Now, winter is coming; sorry for the delay

Let's get back to the Ecotec conversion program description

A - Engine, B - transmission and C - fuel system have been described

See page 10 , post 194 for the last one ( fuel system )

D - Exhaust system

For the Ecotec exhaust, I've connected in the bigger exhaust (1 3/4 in. tube) that i previously made for the high power VW engine and i used a straight flow muffler (see picture)

NOTE: For the exhaust, 1 3/4 in. is OK but 2 in. is even better
 

Attachments

  • exhaustsystem.jpg
    exhaustsystem.jpg
    80.3 KB · Views: 942

louis

Member
E - Cooling system

The cooling system is the most IMPORTANT in the ECOTEC conversion; the three parameters that impact the cooling are:
Air Flow -- Thermodynamic -- Weight and balance

Air flow:
In a vehicle running at 55 M.P.H. , the radiator must be in front to get the benefits of the air flow; in the SNOWTRAC , the travel speed is generally very slow; there is no air flow to impact the cooling system. So the radiator position can be in the back of the vehicle

Thermodynamic:
The thermodynamic is directly impacted by the air flow; a bigger radiator must be used with a slow vehicle like a SNOWTRAC that do not have the benefit of free air flow

Weight and balance:
The weight and balance in an oversnow vehicle is very important; too much weight in the front (nose heavy) will limit the performance in deep powder snow. The weight of the radiator , electric fan and the PRESTONE weigh around forty pound; forty pound upfront of the Snowtrac will directly impact the critical balance (performance) of the SNOWTRAC

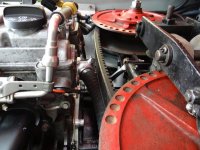
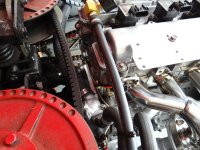
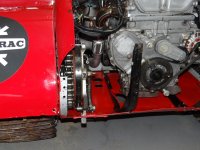
In the SNOWTRAC ECOTEC Conversion there is no adequate place in the engine compartment with the front engine mount to install the radiator , so a rear position was selected
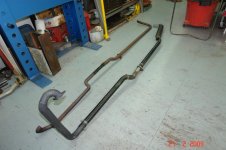
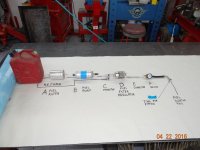
The use of heat exchanger ; the black tubings that carry the “ Prestone “ from the engine to the radiator and diffuse by the splash of the snow at least 35% of the heat are an important part in the complex cooling system ( see VIDEO page 5 post 81 )
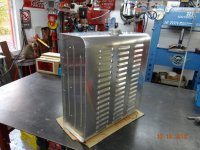
To install and protect the radiator and electric fans I have made an aluminium capsule

NOTE

The capacity for the ECM ( engine computer ) to monitor the temp in the radiator and control the fans are not good with a radiator installation at great distance from the engine ; so I installed a HAYDEN 3654 “ in radiator electronic thermostat “ to control the electric fans at the selected temperature
You can see all the picture at page 5

HEAT EXCHANGER TUBE PICTURE ; PAGE 5 POST # 82
RADIATOR CAPSULE PICTURE ; " POST # 84
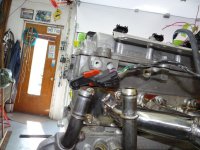
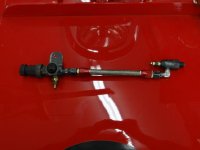
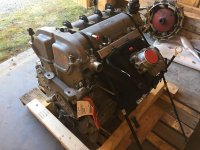
FRONT ENGINE MOUNT PICTURE ; " POST # 86

You can see a video during the fabrication of a radiator capsule for an other snowmobile project ( the process is the same for the SNOWTRAC application):whistling:

[ame="http://www.youtube.com/watch?v=3K72C_NJw_o"]http://www.youtube.com/watch?v=3K72C_NJw_o[/ame]
 

Attachments

  • RADIATORCAPSULE.jpg
    RADIATORCAPSULE.jpg
    100.9 KB · Views: 928

nwerring

Member
Hi Louis, The more I see of your project, the more impressed I get. My own Ecotec conversion is coming along slowly. Before starting the conversion though, I want the rest of the Snow Trac to be 100% ok. I´m in the process of changing all the bushings, bearings, tires, renovating transmission etc etc. Hopefully I´ll get there in the end :)

What tyres are you using for the big wheels? I have some Alpine-Guide tires, but they look a little to wide... I also have some Bombardier (?) slick tires. they look very good, but I would like to try the Alpine-Guide tires if they fit inside the track guides..

Alpine-Guide on the right in the photo..
 

Attachments

  • IMG_0918.jpg
    IMG_0918.jpg
    149.1 KB · Views: 841

louis

Member
Hi nwerring ,

I will use this occasion to give you and all members of Forums Forums, my best wishes for 2017

You will see on the picture I've used four Alpine guide tires for my big wheels.

In my opinion, they do the job very well !!

Here are some comments for the installation of the Alpine guide:

1) If you are planing to do business with a tire company and they say they have a $ 10 000 computer assist machine , please do yourself a favor and run away as fast as you can ! A new technology tire machine will surely damage the tire, the tube or the rim and they will say the $ 10 000 machine is OK and your tire and rim set up are wrong.

2) The only way to have a successful installation is to use a vintage manual machine

3) During the installation, you should use powder between the tube and the tire. Between the tire and the rim, you should use soap.

4) The temperature in the shop must be at least 25 degrees Celcius and your assistant must apply heat with a heat gun on the tire
The three most important things are: HEAT, HEAT, HEAT
If the tire reaches the right temperature it will go easily!
Hope you will have a success with the installation !!!!!!!!!!!!!!!

LOUIS
 

Attachments

  • alpineguide2.jpg
    alpineguide2.jpg
    88.3 KB · Views: 832

Cidertom

Chionophile
GOLD Site Supporter
Hi nwerring ,
4) The temperature in the shop must be at least 25 degrees Celcius ...
LOUIS

When I went to mount the big tires I bought from MNOutdoors, I was having a heck of a time. I called the Harley shop where I bought the tubes for advice. The tire guy asked: Do you have a coat on? When I replied "yes", he told me my shop was too cold to mount those tires. After getting the shop to temperature they went on easily using the cheap manual tire changer I bought.


I too, would like to find a 6 lug big wheel. I need a spare.
 

DAVENET

Bronze Member
GOLD Site Supporter
4) The temperature in the shop must be at least 25 degrees Celcius and your assistant must apply heat with a heat gun on the tire
The three most important things are: HEAT, HEAT, HEAT
If the tire reaches the right temperature it will go easily!
Hope you will have a success with the installation !!!!!!!!!!!!!!!

LOUIS

Just like mounting dirt bike ice tires or Trelliborgs. A wasted effort unless you let them heat by the woodstove for the night then immediately shoe them onto the rim!
 
Top