-
Please be sure to read the rules and adhere to them. Some banned members have complained that they are not spammers. But they spammed us. Some even tried to redirect our members to other forums. Duh. Be smart. Read the rules and adhere to them and we will all get along just fine. Cheers. :beer: Link to the rules: https://www.forumsforums.com/threads/forum-rules-info.2974/
You are using an out of date browser. It may not display this or other websites correctly.
You should upgrade or use an alternative browser.
You should upgrade or use an alternative browser.
1962 snowtrac restore
- Thread starter KRC
- Start date
Contact BSKURKA he seems to be our resident pic expert.
here are some more pics I think I figured it out
Yep ! Bob was right .... You have some major rust going on there . You need to just start spraying everything with a "Rust stopper/preventive" now .
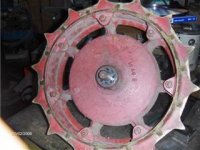
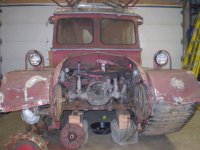
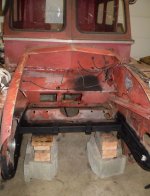
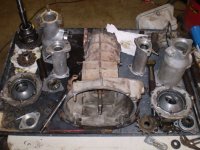
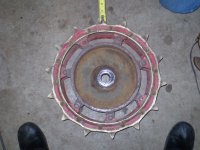
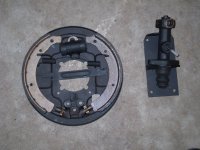
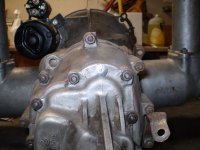
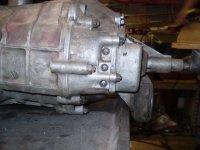
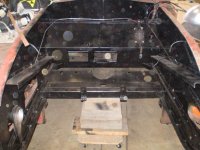
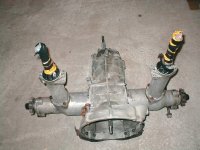
Here are some more current photos. We took the tranny and variator out and tore them down. We came across a couple of bad bearings. We are waiting for one of the bearings and should be able to start putting this back together pretty soon. Engine compartment has been cleaned and is ready to be painted. The brakes were non functional but we got new parts and cleaned some up and are ready to go back on. We need some wisdom on the track drive sprockets. They are worn to a point, they are about an inch long. Is there any life left in these? The engine wasn't in it when we got it but is being rebuilt and should be done this week. We weren't sure what size it was but after it was torn down it was discovered to be a 1600cc with fairly new pistons ,rings etc. the only thing we replaced were valves and valve guides.
We are going to replace the tracks and got a track schematic from "teledawg" Any info on that process would be helpful.
We are going to replace the tracks and got a track schematic from "teledawg" Any info on that process would be helpful.
Attachments
Make sure those are like tracks before you start to assemble them and punch holes. Theres two diffrent style of tracks and 4 diffrent sizes. Snow Trac old style (like yours). Track master 28" wide. Modern Snow Trac new style (brakes inside and Snow Master 28 1/2" wide tracks brakes inside) Theres a company that is now making those older style sprockets. There about $300 each (1200) but last you 30 years if flipped around once a year or so. Not sure how much yours are worn down if any. I have the newer style so I dont know. Remember when you put your transmission back together make sure you put the ring gear in backwards so you have 4 reverse gears and one forward gear. Other than that you look in good shape! Theres an article by LYNDON who tells all about rebuilding the Variator.
VARIATOR REBUILD by LYNDON:http://www.forumsforums.com/3_9/showthread.php?t=4113&highlight=Variator+rebuild
Brake rebuild for snow tracs by LYNDON:http://www.forumsforums.com/3_9/showthread.php?t=9181&highlight=Variator+rebuild
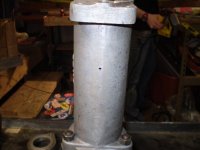
Well it has been awhile but here are a few new pics of the project. I took Lyndons advice and put a rivet in the vent hole between the two top closet nuts and drilled vent holes in the variater risers. Took a picture of one but did it in both. also plugged the the holes that had the little rubber plugs (the originals were hard, brittle and loose) in them, with expandable rubber plugs.
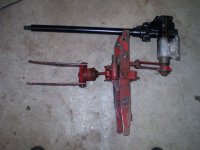
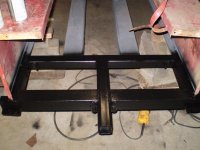
I also made new brackets to mount the new starter. I decided to use an all thread for the top engine to tranny bolt and left it long so I can put the starter clip on and off without taking off the engine bolt. Hopefully the pictures do a better job explaining it, then I can with words. I also rebuild the the hitch at the back. The original pindal (spelling ?) hitch frame was all bent up so I cut it out and put in a 2 inch receiver tube, this I felt gave me more options for towing, it sounds like from what I have been reading that if I ever did run across one of those Kristi things it would be stopped, unable to move and need a tow.
I also made new brackets to mount the new starter. I decided to use an all thread for the top engine to tranny bolt and left it long so I can put the starter clip on and off without taking off the engine bolt. Hopefully the pictures do a better job explaining it, then I can with words. I also rebuild the the hitch at the back. The original pindal (spelling ?) hitch frame was all bent up so I cut it out and put in a 2 inch receiver tube, this I felt gave me more options for towing, it sounds like from what I have been reading that if I ever did run across one of those Kristi things it would be stopped, unable to move and need a tow.
Attachments
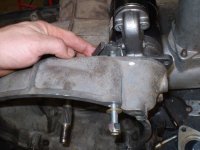

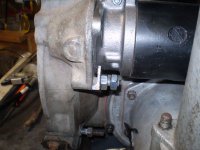
forgot this picture of the clip on the other side of the starter.
Nice pics KRC, are you any relation to KFC they do chicken right.
 because it looks like you are doing it right.
<snip>
The original pindal (spelling ?) hitch frame was all bent up so I cut it out and put in a 2 inch receiver tube, this I felt gave me more options for towing, it sounds like from what I have been reading that if I ever did run across one of those Kristi things it would be stopped, unable to move and need a tow.
Now you went and done did it, pal! You've been taken off the K.R.I.S.T.I. rescue list. When you're hoofing it back to the parking lot, we're just going to putter on by while sipping our hot chocolate and staring at you out the window of our cozy little cats.

All content copyright K.R.I.S.T.I. - Kristis Rescuing Impotent Snow Tracs, International.
Attachments

This all looks so strangely fimiliar. That's absolutely the best picture of the starter clips. We will need to add that to the Threads on Starter's as I have had to describe this part to people who generally lost theirs, no less than a hundred times! There should be one on each side. Nice Restoration. As far as the brakes go, all the parts are obtainable from VW as New Parts except the sheetmatal back plates which are Modified VW ones and the Emergency Brake Cables. Another ST4 Reserected! Far Out!
ALLEN PARSONS
New member
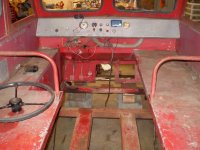
Pardon my stupidty, But just how dos the streering work on on this rig.
It Looks like you a doing a great job on her.
It Looks like you a doing a great job on her.
Its really an amazing system, it only requires about 1% of the engine's horsepower to operate the steering so it is a very efficient system. Basically it is a proportional steering system that directs more or less power to one track while directly proportionally more to the opposing track. So when the steering wheel is centered, 50% of the power is sent to each track, but as you start to turn to the right, more power is directed to the left track and proportionally less power is sent to the right track. It is totally different from a "brake steer" or a hydraulic steering machine, which are commonly used systems on 2 track snowcats.Pardon my stupidty, But just how dos the streering work on on this rig.
It Looks like you a doing a great job on her.
ALLEN PARSONS
New member
Do you still have to brake the opposeing track. I must find some photos of this system.
No, there is no braking at all. That is the genius of the system and that is why it does not rob the engine of horsepower. Most snowcats require far more horsepower to run because most rob the engine every time you try to steer. The Snow Trac is so different from these systems because the main steering mechanism does not require track braking or inefficient hydraulics to move power from one track to the other.Do you still have to brake the opposeing track. I must find some photos of this system.
Do some searches here for the VARIATOR system. There are several threads on it, Lyndon did a detailed thread on the topic. The Snow Trac uses a Variator belt to direct the power from one track to the other, or to allow some power to both. A normal track brake system on a dual track snowcat provides full power to both tracks for operation, but to initiate a turn you mechanically slow down one of the track while the other track maintains a constant level of power and this results in a skid, or near skid, type of turn.
But on the Snow Trac the variator system proportionally INCREASES power to the outside track and proportionally DECREASES power to the track that is on the inside radius of the turn. So if you want to make a wide turn to the right, the left track may receive 15% more power while the right track receives 15% less power. In a tighter turn, the left track may receive 40% more power while the left track receives 40% less power. But in all cases, both tracks remain powered and the turns are very smooth and the sensation is very much like driving a normal family car.
Attached are some images & files that show the technical aspects of the Variator system.
Attachments
ALLEN PARSONS
New member
Very interesting. Said the blind man. Thank you for the info
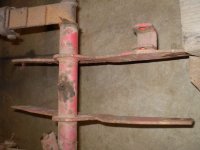
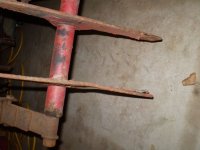
The boggie wheel supports are twisted and bent is it alright to weld a length of angle iron on them to stiffen them up or are they suppose to have some flex in them. I noticed on the track master the front set looks like it has some sort of stiffener welded on to it.
Attachments
Now you went and done did it, pal! You've been taken off the K.R.I.S.T.I. rescue list. When you're hoofing it back to the parking lot, we're just going to putter on by while sipping our hot chocolate and staring at you out the window of our cozy little cats.
Well Bob, that warm cozy feeling you'll have is the later stages of hypothermia (with hallucinations) , but hopefully we will get you into the snowtrac to warm up before it's to late.
Re: 1962 snowtrac restore - floor
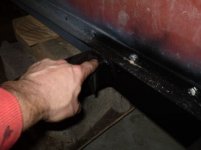
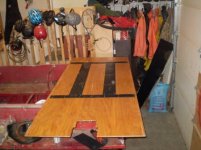
After I took out the old plywood on the floor it measured about 5/8 in. thick. I couldn't find any 5/8 marine plywood. Also the edges on the bottom were notched about 1/8 for the angle iron it sat on. The angle iron sat on top of the frame so the notch let the plywood sit down on the frame. I could find 1/2 or 3/4 marine plywood so I opted for the 1/2 and put some 1/8 hmw plastic for a filler were this part would sit on the frame. The first picture is a poor picture of the angle iron that runs the length of the floor on each side of the cabin. The second picture is the bottom side of the plywood with the plastic screwed on. I counter sunk the heads and used 1/2 wood screws. The last picture is why you don't want your christmas tree to catch fire in your house. I let my son use a propane torch to get it started and this was the result in a matter of seconds (sorry I couldn't get it to turn upright).
After I took out the old plywood on the floor it measured about 5/8 in. thick. I couldn't find any 5/8 marine plywood. Also the edges on the bottom were notched about 1/8 for the angle iron it sat on. The angle iron sat on top of the frame so the notch let the plywood sit down on the frame. I could find 1/2 or 3/4 marine plywood so I opted for the 1/2 and put some 1/8 hmw plastic for a filler were this part would sit on the frame. The first picture is a poor picture of the angle iron that runs the length of the floor on each side of the cabin. The second picture is the bottom side of the plywood with the plastic screwed on. I counter sunk the heads and used 1/2 wood screws. The last picture is why you don't want your christmas tree to catch fire in your house. I let my son use a propane torch to get it started and this was the result in a matter of seconds (sorry I couldn't get it to turn upright).
Attachments

gordon robertson
New member
we where lucky i found new old stock track in alaska did you see the frame up restoration of my st4- under gordons ugly check this web - site
regards, Gordon Robertson
regards, Gordon Robertson
Here are some more current photos. We took the tranny and variator out and tore them down. We came across a couple of bad bearings. We are waiting for one of the bearings and should be able to start putting this back together pretty soon. Engine compartment has been cleaned and is ready to be painted. The brakes were non functional but we got new parts and cleaned some up and are ready to go back on. We need some wisdom on the track drive sprockets. They are worn to a point, they are about an inch long. Is there any life left in these? The engine wasn't in it when we got it but is being rebuilt and should be done this week. We weren't sure what size it was but after it was torn down it was discovered to be a 1600cc with fairly new pistons ,rings etc. the only thing we replaced were valves and valve guides.
We are going to replace the tracks and got a track schematic from "teledawg" Any info on that process would be helpful.
gordon robertson
New member
Re: 1962 snowtrac restore - floor
one suggestion would be to use west system on the plywood floor board... in effect would be sealing it forever... it will never rot out ... it will last longer than the rest of the beast... regards, Gordon Robertson
grobertson@kncinc.com
one suggestion would be to use west system on the plywood floor board... in effect would be sealing it forever... it will never rot out ... it will last longer than the rest of the beast... regards, Gordon Robertson
grobertson@kncinc.com
After I took out the old plywood on the floor it measured about 5/8 in. thick. I couldn't find any 5/8 marine plywood. Also the edges on the bottom were notched about 1/8 for the angle iron it sat on. The angle iron sat on top of the frame so the notch let the plywood sit down on the frame. I could find 1/2 or 3/4 marine plywood so I opted for the 1/2 and put some 1/8 hmw plastic for a filler were this part would sit on the frame. The first picture is a poor picture of the angle iron that runs the length of the floor on each side of the cabin. The second picture is the bottom side of the plywood with the plastic screwed on. I counter sunk the heads and used 1/2 wood screws. The last picture is why you don't want your christmas tree to catch fire in your house. I let my son use a propane torch to get it started and this was the result in a matter of seconds (sorry I couldn't get it to turn upright).
Thanks Gordon I have looked at your thread and thought you did a great job. We have found some free belting but it is 1/2 inch thick and I think it would add alot more weight and more stress on everything. I think we will purchase the original size and stay with that thickness. I was looking at the belting on your machine and it looks thicker then the original stuff am I right about that.
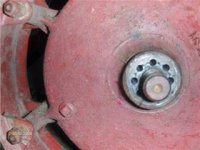
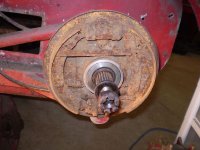
I think we came up with a solution to tighten up loose splines.
First a new nut was made with pilot holes for drilling half way into the axle splines and hub housing.
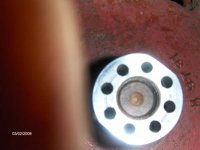
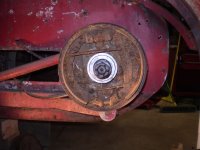
We put the bearing on and the seal spacer and tightened the unit up with the new nut to make sure the axle was perpendicular to drum
My friend has a milling machine with a 90 degree attachment for drilling. The unit was clamped in place and he drilled 8 -3/16 inch holes into the hub and spline stopping about an 1/8 of an inch from the spacer on the other side. We will put 3/16 inch pins in the holes. The holes go in about 1 3/4 th inches. We racked our brains pretty hard about how to deal with loose splines and I think this should be a permanent solution.
First a new nut was made with pilot holes for drilling half way into the axle splines and hub housing.
We put the bearing on and the seal spacer and tightened the unit up with the new nut to make sure the axle was perpendicular to drum
My friend has a milling machine with a 90 degree attachment for drilling. The unit was clamped in place and he drilled 8 -3/16 inch holes into the hub and spline stopping about an 1/8 of an inch from the spacer on the other side. We will put 3/16 inch pins in the holes. The holes go in about 1 3/4 th inches. We racked our brains pretty hard about how to deal with loose splines and I think this should be a permanent solution.