• Please be sure to read the rules and adhere to them. Some banned members have complained that they are not spammers. But they spammed us. Some even tried to redirect our members to other forums. Duh. Be smart. Read the rules and adhere to them and we will all get along just fine. Cheers. :beer: Link to the rules: https://www.forumsforums.com/threads/forum-rules-info.2974/

snow trac VW *alternator* crank nut

mtmogs

New member
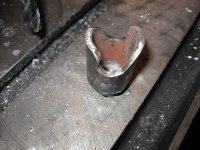
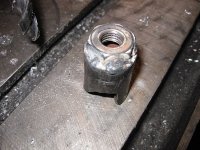
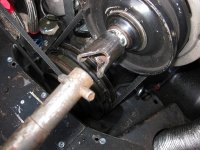
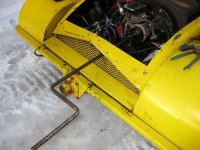
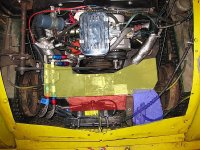
Since I installed a built-up 1995cc VW type 1 engine in my ST4, I lost the utility of the hand starting with the crank nut as it is now obscured behind the exhaust headers and the oil cooler. I figured why not see if I could make a crank fixture for the alternator nut.

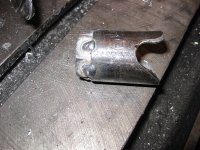
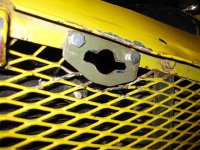
Anyway I did and it was very simple to do, took less than 30 minutes total. It's just a piece of 3/4" steel pipe (1.05" O.D.) with some notches milled in it that's welded to the alternator pulley nut. It started cold after only about 3 or 4 attempts, and the angled notch in the nut ejected the crank without injury.

It's not like I can stand there and crank on it all day like a grist mill mind you, just through 1 maybe 2 compression strokes, but that's apparently all it needs to start. I suppose ff I was in a jam and it was very cold and I was low on motrin, I might cheat and use a squirt of ether. It's a great feature to have if you're out in the bush, and it's a good substitute for the hard-to-find crank nuts.
 

Attachments

  • crank_nut_persp.jpg
    crank_nut_persp.jpg
    143.7 KB · Views: 450
  • crank_nut_side.jpg
    crank_nut_side.jpg
    174.4 KB · Views: 454
  • crank_nut_base.jpg
    crank_nut_base.jpg
    156.5 KB · Views: 428
  • crank_nut_mounted.jpg
    crank_nut_mounted.jpg
    137.2 KB · Views: 436
  • crank_nut_crank.jpg
    crank_nut_crank.jpg
    136.5 KB · Views: 446
  • cranking.jpg
    cranking.jpg
    145 KB · Views: 437

Snowtrac Nome

member formerly known as dds
GOLD Site Supporter
good idea i like that drill a hole streight trrough the pipe and you could also change or adjust the belts with only a bar or screw driver.
 

mtmogs

New member
drill a hole streight trrough the pipe and you could also change or adjust the belts with only a bar or screw driver.

Exactly! Otherwise you'll have to carry around a channel grip or other plier/wrench to grab onto the pipe.

Everybody be real careful if you make one of these. If the crank doesn't eject properly, it could badly injure you in the blink of an eye. Safety first! It's one thing to be stuck in the bush with a snowcat that won't start, but a whole 'nother ball of wax to be stuck and require immediate medical attention. I tested mine by chucking the crank nut in a lathe to simulate the driven alternator while clamping the crank against the tailstock to be sure it would eject.
 

couchloafer

Member
SUPER Site Supporter
mtmogs,
can you post a good picture of a top view of your engine compartment. It appears you have most of the original tin in place. I would like to get a better top down look at it if you could. If anyone has all of the actual tin and would make a pattern I would love to hear from you!
Kevin
 

mtmogs

New member
Kevin, I have *some* of the original tin in place but had to make some modifications. I will snap a picture for you later on. Looking at leadviller's photos, his looks pretty original. I've added on to mine in places, subtracted in others. One thing that's helped keep the compartment cool is that I lined the underside of the tins with heat shield fabric to reflect exhaust heat downward.

mtmogs,
can you post a good picture of a top view of your engine compartment. It appears you have most of the original tin in place. I would like to get a better top down look at it if you could. If anyone has all of the actual tin and would make a pattern I would love to hear from you!
Kevin
 

mtmogs

New member
Kevin, I only have some of the original tin. The attached pic shows original snow-trac tin showed in yellow. This bolts to the standard VW engine apron. I added a front heat sheild (blue) to the front left side of the compartment, and I'm making it's twin for the right side. I had to remove a flat tin where the oil cooler now sits at the front of the compartment, but added one that angles down from the yellow tins to below the oil cooler. This tin protects the cooler from the exhaust headers that lie underneath. I've lined the undersides of all shields with aluminized heat shield fabric.

If you take a look at a VW bug engine compartment, you'll see that it has tins that are sealed around the bottom perimeter with a rubber gasket. It is essentially airtight except for the intake louvers. With that engineering in mind, I guess the more you can make your engine compartment resemble a bug's then the better off you are. There are obvious barriers to sealing the compartment like in a bug like chains and sprockets, but you can do a lot to reflect exhaust and cooling heat downward. I suspect that's why drilling some silver dollar sized holes in the belly pan as Lyndon mentioned works - it gives the heat reflected by the tins someplace to go other than up.

mtmogs,
can you post a good picture of a top view of your engine compartment. It appears you have most of the original tin in place. I would like to get a better top down look at it if you could. If anyone has all of the actual tin and would make a pattern I would love to hear from you!


Kevin
 

Attachments

  • eng_tins.jpg
    eng_tins.jpg
    177 KB · Views: 371

mtmogs

New member
...forgot this pic showing a flange bolted to the front grille area that supports the crank. I mushed my mesh without it and torqued the top of the oil cooler...not a good thing.
 

Attachments

  • crank_hole.jpg
    crank_hole.jpg
    108.4 KB · Views: 297
Top