The main power panel is on the firewall in the engine compartment of mine.

-
Please be sure to read the rules and adhere to them. Some banned members have complained that they are not spammers. But they spammed us. Some even tried to redirect our members to other forums. Duh. Be smart. Read the rules and adhere to them and we will all get along just fine. Cheers. :beer: Link to the rules: https://www.forumsforums.com/threads/forum-rules-info.2974/
You are using an out of date browser. It may not display this or other websites correctly.
You should upgrade or use an alternative browser.
You should upgrade or use an alternative browser.
Nellie ''Bell''
- Thread starter olympicorange
- Start date
olympicorange
Active member
Funny thing, I've thought about going suicidal on the door's version as well (hope that came out right) LOL
I guess its a simple swap of Passenger door to the driver's door, and vise versa...")
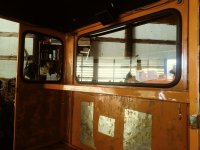
Only issue with our stuff I thought is that the dash is in the way more or less, unless you trim it.
….. right ''O'' ,.. yes , by a quick measurement , it appears the door handle is dead ''nutz'' of the dash ,... correct. so , how about relocating the box , to either,... up or down ,. of the dash . arm length dictates,...lol. I know for me , reaching behind , towards the rear of cab , to operate door handle was ,.. p.i.a. …..
olympicorange
Active member
The main power panel is on the firewall in the engine compartment of mine.
……….. ahhhh ,.. an accessible location,... could we get a pic of it's location.... I love wiring , also.... hint ,..

….. right ''O'' ,.. yes , by a quick measurement , it appears the door handle is dead ''nutz'' of the dash ,... correct. so , how about relocating the box , to either,... up or down ,. of the dash . arm length dictates,...lol. I know for me , reaching behind , towards the rear of cab , to operate door handle was ,.. p.i.a. …..
I just about could chop that dash up and remove it for all I care... make a new one that will include the defrost channels
olympicorange
Active member
well that's an option, hadn't thought about that. also could cut out ''notches'' , or bevel dash ends,.. for access /clearance ...for door handles ...and more importantly...your hands...
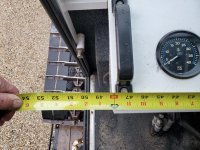
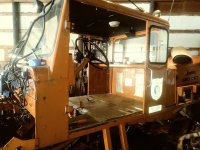
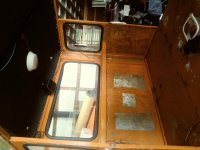
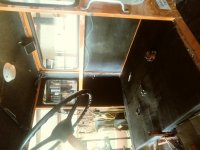
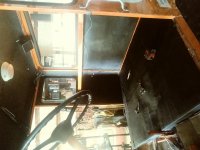
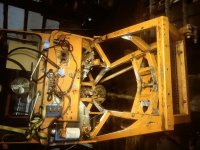
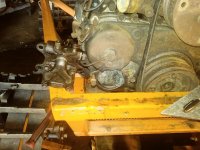
Couple pics. The firewall in the engine compartment, and the dash as it's ended short to allow for the door handles. Also when BFT asked if my engine had the governor/rev limiter, I said no since it's not under the carb. and I assumed the red box that was an aftermarket add on was an electronic ignition, but I see it's an electronic governor.
Attachments


olympicorange
Active member
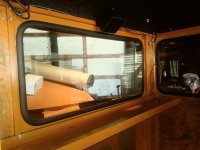
nice package grouping on the firewall... thx . yes, your ICU is on the lower left side. the EGC does look like the ICU. everything is nicely accessible; ballast resistor , V/R, relays, etc. does the primary power relay (C/B) , on the left side of cab still function. it has only one cable attached to it. so I wonder what year they swapped the hyd. tank to the drivers side?? is the hyd. pump still mounted on the R/S of engine , or did they swap that over to the L/S also. having 5 extra inches of cab width , on each side is a huge asset . I would guess that the width of your dash is the same as the older models , we have ,... the larger windows in your doors are a nice feature also.... I can barely stick my elbow out the window to stretch.... 
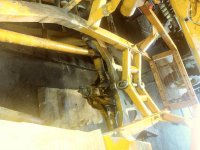
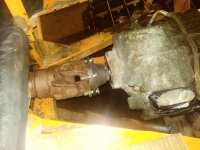
Yes, belt driven hydraulic pump on drivers side as well. Alt, fuel pump, and radiator hose on passenger side. Perhaps changes in engine/waterpump necessitated moving the hydraulic pump?
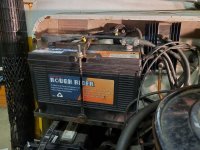
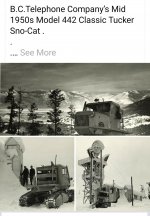
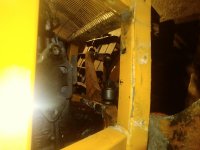
This machine was speced from the factory with dual batteries. The isolator can handle 3, two in use and one cable goes to that relay on the drivers side. You can see where BC Tel (Telus) had some of their, I'm guessing, job related equipment mounted in the cat. Perhaps they had some onboard equipment wired to that relay that they only wanted powered with the engine running, or perhaps another battery in that equipment? Anyway I'll leave it installed since it was part of that factory installed option. One can imagine the factory options on this cat being well suited the a telephone company operation. Suppose by 1989 they had a pretty good idea what they needed, since it seems they have had a long relationship with Tucker by then. The pic below is from the Tucker FB page.
You called it right on the dash, 48". Just extend the cab 5" on either side of your cab and your set
Attachments


Last edited:
olympicorange
Active member
…… ah yes,... that explains all the extras. that's a nice bonus, that usually also means a well maintained . fleet machine. great pics. I guess they were just breaking ''stride'' , swapping right to left , components under the hood . the fuel lift pump is much more accessible , with the hyd. pump on the left. yes, i'm going to go alittle wider than 5'' on the cab width, still in the works. I've seen a few models with smaller glass in the lower front , of a wider cab .
olympicorange
Active member
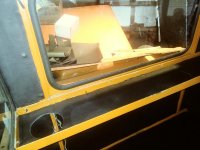
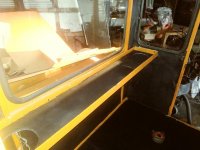
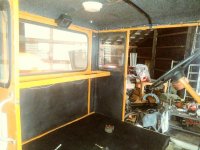
……… so, finally got to get back onto 'ol Nellie ,.... ( been having withdrawls) ,..... feb. is always crazy. did some interior cab /walls cleaning prepping for sound suppression material. nice material to work with,... some ''sticky''. was so involved , forgot the pics,... will take pics 2mrw,... unless we get the big one ………
olympicorange
Active member
…….. here's a few from last week,..also finished pulling the carpet out of the cab corners & tray. installed the sound suppression ,.... it was like spring here today,...
Attachments
-
 0303201252_Film2.jpg101.7 KB · Views: 268
 -
 0303201252a_Film2.jpg99.2 KB · Views: 245
 -
 0303201252b_Film2.jpg99.2 KB · Views: 255
 -
 0303201333_Film2.jpg74.6 KB · Views: 259
 -
 0303201333a_Film2.jpg75.9 KB · Views: 260
 -
 0303201333b_Film2.jpg150 KB · Views: 250
 -
 0303201333c_Film2.jpg89.5 KB · Views: 255
 -
 0303201603_Film2.jpg74.6 KB · Views: 241
 -
 0303201603b_Film2.jpg76.8 KB · Views: 244
 -
 0303201603c_Film2.jpg81.2 KB · Views: 241
 -
 0303201603d_Film2.jpg92.7 KB · Views: 249
 -
 0303201603e_Film2.jpg85.8 KB · Views: 245
 -
 0303201608_Film2.jpg82.7 KB · Views: 231
 -
 0303201609_Film2.jpg69.5 KB · Views: 258
 -
 0303201610_Film2.jpg83 KB · Views: 250
 -
 0303201610a_Film2.jpg100.7 KB · Views: 262
 -
 0303201610b_Film2.jpg108.4 KB · Views: 253
olympicorange
Active member
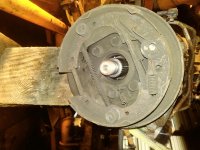
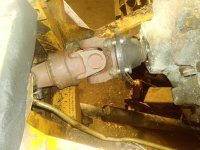
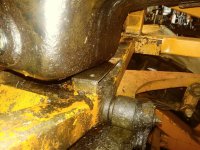
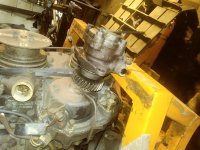
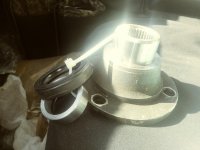
………. back to the transmission , P/B assy. , output yolk , removal ,.... to address the ''intermediate '' shaft assy. next is to reinstall eng./trans. , back into position,.....
Attachments
-
 0304201643b_Film2.jpg114.9 KB · Views: 236
 -
 0304201657_Film2.jpg101.6 KB · Views: 224
 -
 0304201658_Film2.jpg47.2 KB · Views: 233
 -
 0304201658a_Film2.jpg83.5 KB · Views: 228
 -
 0304201701_Film2.jpg108.7 KB · Views: 225
 -
 0304201703_Film2.jpg115.4 KB · Views: 223
 -
 0304201703a_Film2.jpg107.5 KB · Views: 236
 -
 0304201706_Film2.jpg116.5 KB · Views: 224
 -
 0304201707_Film2.jpg110.1 KB · Views: 225
olympicorange
Active member
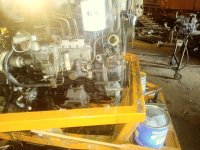
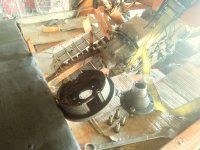
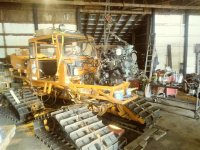
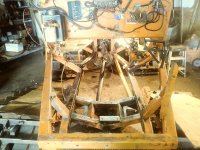
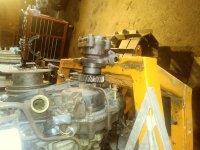
…… re-check eng./trans. fitment again,... so a few gas items need to be removed next,... removed eng./trans. assy., cleaned/degreased front frame/trunnion areas, etc. removed rad. brackets, frt. gas eng. mount, batt. box , etc... also old fuel line ( not sure how it ever ran/starved for fuel, damage from last engine overhaul). some grinding required,....
Attachments
-
 0305201500_Film2.jpg137.2 KB · Views: 208
 -
 0305201523_Film2.jpg113.3 KB · Views: 202
 -
 0305201342_Film2.jpg95.7 KB · Views: 213
 -
 0305201355a_Film2.jpg97.2 KB · Views: 209
 -
 0305201523a_Film2.jpg111.5 KB · Views: 213
 -
 0305201527_Film2.jpg143.5 KB · Views: 213
 -
 0305201536_Film2.jpg131.9 KB · Views: 220
 -
 0305201545_Film2.jpg89.3 KB · Views: 203
 -
 0305201546_Film2.jpg148 KB · Views: 206
 -
 0305201547a_Film2.jpg152.1 KB · Views: 210
 -
 0305201547b_Film2.jpg136 KB · Views: 209
 -
 0305201615_Film2.jpg122.6 KB · Views: 208
 -
 0305201715a_Film2.jpg114.8 KB · Views: 203
Snowy Rivers
Well-known member
So many places to have LOTTSSA fun working on stuff.
Looking good.....
Looking good.....
olympicorange
Active member
…….. finished up the grinding process, and cleaning the main frame assy . up front,… mock up #3 ,..next,...…...
Attachments
-
 0306201201_Film2.jpg95.8 KB · Views: 208
 -
 0306201333_Film2.jpg102.3 KB · Views: 198
 -
 0306201333a_Film2.jpg98.6 KB · Views: 195
 -
 0306201333c_Film2.jpg128.4 KB · Views: 201
 -
 0306201334_Film2.jpg120.7 KB · Views: 191
 -
 0306201431_Film2.jpg108.7 KB · Views: 199
 -
 0306201431a_Film2.jpg111.5 KB · Views: 199
 -
 0306201432_Film2.jpg107.1 KB · Views: 202
OO,
You put that together and take it back apart over and over like it was made of Lego's
You put that together and take it back apart over and over like it was made of Lego's
olympicorange
Active member
hello 1BG, … lol... yes, all part of the process to ''mock up'' , when doing an update/conversion. things don't fit ''dead nutz'' the first time or so,... unlike taking the original powerunit out & and putting the same . but different one in it's place. even the simplest swap has a lot of little pieces.... gotta be the ''kool-aide''
Good to see your project moving along,
I'm kinda "congested" on the wiring process of figuring out what to keep or not as far as the actual engine stuff goes (the engine stop/start servo) than all the wires from the thermostat housing, as they all serve a purpose of getting the tranny to run smoother I guess overall.
Anyways, if you have any simplification ideas - email me, we might have a useful chat.
N
olympicorange
Active member
……. hello Nikson, will do for sure ,....any way I can help , thx my man...……..
olympicorange
Active member
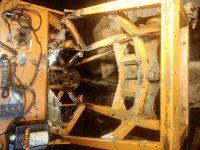
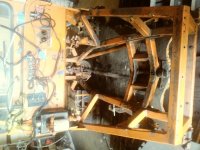
……. Mock #3 ,.. install,... unit sits lower in chassis,... remeasure ,... interference fit with frt. of engine, crossframe….. mounting radiator in bed (BAJA style) vetoed,... no room for powersteering pump , so gameplan is to extend frt. frame to accept engine, p/s pump, radiator, etc... hood extension ,removed p/s lines from pump, removed yolk again to have machined, etc...…
no room for powersteering pump , so gameplan is to extend frt. frame to accept engine, p/s pump, radiator, etc... hood extension ,removed p/s lines from pump, removed yolk again to have machined, etc...… Attachments
-
 0309201501_Film2.jpg115.3 KB · Views: 121
 -
 0309201533_Film2.jpg135.8 KB · Views: 125
 -
 0309201601_Film2.jpg108.5 KB · Views: 127
 -
 0309201601a_Film2.jpg94.6 KB · Views: 128
 -
 0309201601b_Film2.jpg101.9 KB · Views: 124
 -
 0309201609_Film2.jpg98.7 KB · Views: 124
 -
 0309201626_Film2.jpg117.9 KB · Views: 129
 -
 0309201626a_Film2.jpg108.7 KB · Views: 124
 -
 0309201627_Film2.jpg106 KB · Views: 125
 -
 0309201639_Film2.jpg108.8 KB · Views: 126
 -
 0309201640_Film2.jpg109 KB · Views: 126
 -
 0309201642_Film2.jpg100 KB · Views: 124
 -
 0309201642a_Film2.jpg69.3 KB · Views: 126
 -
 0309201704_Film2.jpg123.1 KB · Views: 135
I dont see the engine start/stop servo pack on your setup.
I'm kinda stuck on deciding what to do with it, - delete it all together, or figure out how to wire it up in the new setup with the cat's wire works.
Another note - you plan on running the factory steering pump for R&D first, right?
I'm kinda stuck on deciding what to do with it, - delete it all together, or figure out how to wire it up in the new setup with the cat's wire works.
Another note - you plan on running the factory steering pump for R&D first, right?
olympicorange
Active member
I dont see the engine start/stop servo pack on your setup.
I'm kinda stuck on deciding what to do with it, - delete it all together, or figure out how to wire it up in the new setup with the cat's wire works.
Another note - you plan on running the factory steering pump for R&D first, right?
…. N, post a pic of yours, and I ll see if its the same ,... correct.. going to use the truck factory p/s pump ,... but for that to fit , mod's to frt. frame will need to happen,...also for pullies, room for rad., etc...
This grey "baggie" in my case holds the engine stop (fuel shut-off) and fuel enrichment (for cold starts) servo.
Its connected to the QOS box (basically timer device) - that controls glow plug timing / exhaust brake valve and gets info from the glow plug thermo-sensor on thermostat housing (one that has 2 wires on it, mounted on the drivers side of the motor)
Basically - can be removed if its there, or used (wired up with ignition switch) to turn off the engine with just the ignition key, rather than manual cable of some sort.
I find that it will be simpler to just wire it up to a regular relay (as relay would be used to control it) and feed it off the ignition switch.
olympicorange
Active member
………. roger that,...…..I will take a look , possibly today...….. and compare pics. I ll post whats on this one,....
olympicorange
Active member
olympicorange
Active member
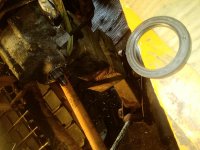
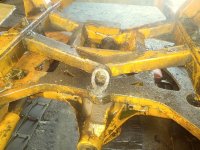
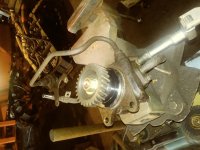
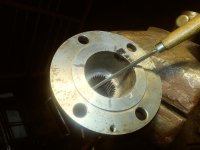
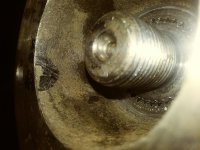
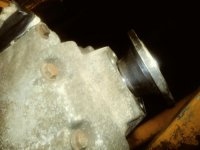
…… back on it, alittle ''prep'' work on the output yolk. problem was always too tight a fit onto the output shaft,...always needed to be ''pressed off & onto'' the shaft. not a good setup due to the ''lack'' of room /access , once everything is in place,...to remove for any future service/repairs , of any kind. a 120 mins. of filing & buffing, good to go now,.....
Attachments


So with all the work you are doing with "hardware side" of things like driveline hook up to the tranny - did you get to figure on the transmission controller (TCU)?
I've gotten most of the things together, wired up - for some reason my reverse isnt "functioning" as well as it should. Almost done with the hydro pump bracket as well.
if you get to the point - I might have the files for the pump bracket if you want to have those to cut them.
I've gotten most of the things together, wired up - for some reason my reverse isnt "functioning" as well as it should. Almost done with the hydro pump bracket as well.
if you get to the point - I might have the files for the pump bracket if you want to have those to cut them.
olympicorange
Active member
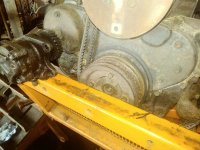
……… so, the major hangup from the ''get-go'' ,... has been the lack of ''axial'' room ; from the ''intermediate '' shaft to the front crankshaft pulley & front frame crossmember. both were '' maxed'' out at each end. simply meaning ; that the ''intermediate'' shaft was slid into transfer case all the way, & the crank pulley was wedged up against the crossmember. no room what so ever. so, after talking with ''Sandy'' , about the different options, he authorized the ''lengthening'' of the front frame assy. to fit engine, and room for the radiator. didn't want to take up room in the ''cargo'' area for the relocation of the rad. so basically going to update the frame like the 80's models; much like yours, & 1BG'S, BFT'S, etc.... which will mean ; sliding the hood ahead & making a ''skirt'' to take up the difference , between the hood & firewall. so, right now working on the tranny & engine mounts /locations, etc. couldn't do any progress in that area , due to lack of room & locations. so, not at that point yet, to hook up eng./tranny, and fire up to test operations,... but coming soon. so, with the ''added room'' up front, that will allow the use of the original p/s pump to be bolted back onto the front of the engine timing cover again. which will be solely only for the p/s system. much like what I did on the Cummins ''B'' project. that was clean & easy, no brackets, belts, etc. …. so, do you think you have an issue with the new tranny controller you incorporated, or an internal issue with the trans. itself. did you drive the donor in which you used the power plant from,..... any pics of controller …..thx
……… so, the major hangup from the ''get-go'' ... any pics of controller …..thx
My setup is completely out of the donor, nothing changed on the controller/wiring side, other than if I made a mistake on wiring up something along the way (which is possible as always) - yet in my case, my buddies and I gone over the wiring diagram/wires that I've connected multiple times - everything seems to be the way it should have been.
I recently came across that "buzzing" solenoid in the tranny, seems like it might be the cause of my issues, as its been suggested by other fellas from other forums (like the 4btswaps.com) - where they have section for the 4BD swaps as well.
I guess JR403e is known for failing solenoids especially after donors sat around for extended period (like in my case over 10 years).
In any case - took the Tucker over to the hydralic shop to plum the hoses, I'm pretty close to finishing/wrapping up things, still pretty hopeful on taking out for a test run this season.
Probably just gonna have another mechanic buddy look it over on tranny issue; if not - I'll be on a look out for the manual tranny that Isuzu offered for their boxtrucks - and than all issues will be solved IMHO