• Please be sure to read the rules and adhere to them. Some banned members have complained that they are not spammers. But they spammed us. Some even tried to redirect our members to other forums. Duh. Be smart. Read the rules and adhere to them and we will all get along just fine. Cheers. :beer: Link to the rules: https://www.forumsforums.com/threads/forum-rules-info.2974/

Brakes for Snow Trac, Snow Master & Trac Master

Lyndon

Bronze Member
GOLD Site Supporter
Introduction: Snow Trac BRAKE SYSTEMS

ST 4 brakes are a world unto themselves. They are so difficult to get at when the machine is assembled that during the course of overhauling some dozen machines I made the Brake work one of the highest priorities. Without the brakes the machines can be dangerous on hills and when loading on tilt bed trailers. If you pull your engine or especially Variator out REDO the brakes system while the stuff is accessible. The entire brakes system only cost about 100 to 200 dollars to replace with entirely new components.

VW Automobiles had 4 brakes to stop a 2000 Lb. Machine. ST4's weigh upwards of 3000Lbs and only have 2 brakes to achieve the same effect. They in fact a bit under braked. At significant portion of the some hundred ST4's I've inspected had front end damage as a result of not servicing the brakes.

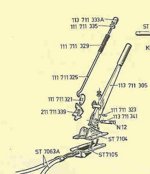
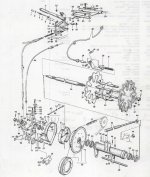
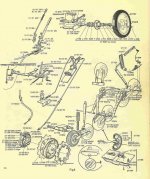
The images below are from a mid-1970's manual (I believe 1975).
 

Attachments

  • 1.jpg
    1.jpg
    182.5 KB · Views: 1,540
  • 11.jpg
    11.jpg
    193.7 KB · Views: 1,432

Lyndon

Bronze Member
GOLD Site Supporter
To correctly adjust the brakes on an ST4 you really need the tracks broken loose, and the drive chains broken in the engine compartment. In addition the Variator blocks access to the master cylinder. The combined elements are against you and the whole thing becomes a big pain. They had a tendancy to need bleeding on a yearly basis. This is probably due to the downward slant of the 2 lines running to the wheel cylinders. Early Tucker Sno Cat's didn't even Have brakes. It was an option that you could pay extra for which consisted of a small drum on the drive shaft with a band brake operated by a hand lever thru a cable.NO Pedal!

Anyway ST4's used VW brakes. In the early Snow Trac Service Manuals they gave the actual VW part numbers. VW uses 111 as the prefix for a Bug part, 211 for the prefix for a Bus part, 311 for Type 3 and so on. Later year ST4 Manuals dropped the VW part numbers.

Not all of the parts are available. Snow Trac used a 7 MM Master Cylinder that is no longer available. I don't think you can even get rebuild kits for them. But the 9MM works fine. The smaller cylinder generated more pressure with the same amount of pedal pressure. There are Genuine VW parts available as well as 'Aftermarket' that come from Spain, Brazil, and Mexico and likely many other countries. When it comes to the Master Cylinder, the real German one fit's in better than most of the aftermarket. The aftermarket tend to be longer and require some cutting, hammering and grinding to get them to fit in. The German parts tend to be a bit more expensive, but as previously stated the entire set of brake parts consisting of a Master Cylinder, 2 slave Cylinders, 2 sets of brake shoes and some hoses will only set you back 100 to 200 $. The Little fluid reservoir is available from VW specialty shops, as is the little rubber stopper for the top. Usually you can just clean it out, but if it's rusted out beyond being servicable get a new one.

The Hoses to the wheel cylinders are not readily available from VW sources. The one's they will want to sell you will be too short. Our local hose supplier makes up custom ones the right length for about 10$ for both, in your choice of fancy braided stainless steel or standard rubber jacketed. Almost every machine that I have overhauled had plugged up brake hoses. Seems they swell up enough that fluid won't pass thru. Plan on replacing them. The Wheel cylinders can be aftermarket.
 

Lyndon

Bronze Member
GOLD Site Supporter
VW once used the wheel cylinder for some Early Trucks and Busses that were not imported to the US. They discontinued them, or their use, for some years then started using them again for a Type 3. In any event it took a bit of research to find out how a 1974 VW wheel cylinder came as standard equipment on a Snow Trac built in 1963? Some kind of Time Warp? Once again it was the Snow Trac manufacturer using up all of VW's Old parts that were not going on to current and later model Bug's & Busses. Any after market works as well as the original German. I prefer the German, primarily because the Quality is better, but if your local VW supplier doesn't have them the after market are OK.

The next several posts will deal with:The E Brake, the handle, foot pedal, brake switch, bleeding, brake bands (parking brake on 'Big Wheel machines only), Skid pan WARNING!, Cables and adjusters, not necessarily in that order. Feel free to chime in, add comments, pictures, etc. (This includes Big Al's 2 cents which always seem to liven up the site!)

PHOTO #1: Below is a page from a Snow Master Operator's Manual. The entire text regarding the brake system is only 2 sentences.

PHOTO #2: Below is a parts diagram from a 1963 manual that illustrates the older style ST4 system.
 

Attachments

  • 111.jpg
    111.jpg
    171.1 KB · Views: 1,439
  • 2.jpg
    2.jpg
    197.1 KB · Views: 1,427

Melensdad

Jerk in a Hawaiian Shirt & SNOWCAT Moderator
Staff member
GOLD Site Supporter
Lyndon, I noticed in the Operators Manual page for the Snow Master that it says: "The hand-brake is mechanical and acts on the front wheels."

I don't have a Snow Master, mine is a Snow Trac, but doesn't the hand-brake act on the drive sprockets?
 

Snowcat Operations

Active member
SUPER Site Supporter
It depends on the year. The early style had the drum brakes inside the drive cog assemblies which are of course located outside the engine compartment. The later version like the ones we own have the brake drums on the front drive sprockets inside the engine compartment. NON had the front wheels which braked. Only the drive mechanism.
 

Snowcat Operations

Active member
SUPER Site Supporter
LYNDON on your pictures above #1 I see you have added some notes for yourself. What are those part numbers for? I see they are VW.
 

Snowcat Operations

Active member
SUPER Site Supporter

Snowcat Operations

Active member
SUPER Site Supporter
Lyndon you said you have a shop in your neck of the woods that custom makes the hoses? Can you give us this contact? I would like mine to be made out of Stainless steel braided lines. This provides much better braking power over standard lines. The standard lines actually expand then start to apply breaking force. On braided lines this expanding is kept to a very minimum.
 

Lyndon

Bronze Member
GOLD Site Supporter
Early "2 Belt" Snow Trac's and "4 Belt" trac Master's have a Special brake drum that is VW size, but has 7 cast ears that carry the brass drive sprockets. These are not a VW part. On these models the foot brakes are hydrolic and the emergency brakes or parking brakes operate on the same shoes via a pair of cables that mechanically operate levers. >

On the later model "Big Wheel" 3 belt Snow Trac and 5 belt Snow Master
the brake drum has been moved into the Engine compartment and mounted on the chain drive sprockets. They came as separate drums that could be riveted to the chain sprocket or as an entire pre-made assembly. On these later models the foot pedal brakes were hydraulic and the Emergency/Parking Brake was a separate cable operated band that goes on the outside of the same drum that has the shoes for the hydraulic brakes on the inside. What prompted the design change was that the exposed outside drums would get ice and snow build up which led to the brakes freezing up. With the brakes in the engine compartment this didn't happen.
 

Lyndon

Bronze Member
GOLD Site Supporter
***WARNING*** If you remove the skid pan from the bottom of your "Big Wheel" (Late style) machine DO NOT ATTEMPT TO MOVE THE MACHINE!

What results is catastrophic.

The Skid pan has reinforced oval pockets that prevent the brakes from rotating around. What happens, EVERY TIME, is that the brake assembly starts to turn with the drum, the emergency/parking brake cable clamps shut and this in turn breaks off the actuator arm. This in turn jambs up against the muffler and the machine is permanently stuck. Freeing up the stuck assemblies requires a bunch of sawing and cutting of parts. Now you have a bunch of busted parts, and they are ST4 parts, NOT VW parts making them hard to obtain.

I did it once, :smileywac and have seen several other people do it. DON"T GO THERE! BIG MISTAKE!
 

Lyndon

Bronze Member
GOLD Site Supporter
E-Brake Cables:

The Emergency Brake/ Parking Brake cables are an ST4 part, Not VW. They came with a grease zerk in the outer housing. If your's are still operational keep them greased. This is one part that is not available from any source.
If you have to replace them you have 2 options as follows:>
  • 1) you can take them to a shop that Makes replacement Motorcycle cables and have Copies made. > OR >
  • 2) you can get replacement VW Bus Cables and an aftermarket 'Set Screw' cable end kit for dune buggies. The cable end kit is for the adjuster end at the Handel/Lever. It's a short sleeve with a threaded (10MM, Metric) bolt end.
The Bus cable will come with sweaged ends on both ends. You have to cut off the threaded bolt end but leave the "EYE" end that attaches to the brakes on. slide the short piece of cable housing off. Next get either a piece of cable housing from a motor cycle shop or you can us 5/16 Copper tubing. Gresse it well. I generally pack the entire length. The home made "Tubing" fix takes a bit of time and patience but seems to last indefinitely.
 

Lyndon

Bronze Member
GOLD Site Supporter
"E-Brake" Handle:

The Emergency Brake/Parking Brake handle is stock VW Bug, but if you look closely at the parts manual the ratchet assembly is BUS(has 211 prefix). I tried putting an upright BUS lever right behind the shifter in an ST4 that was missing the brake handel, instead of having it laying on the floor where it is a trip hazard and it did not work especially well. It was still in the way of accessing the drivers seat. >

The 'Boot' that is used in a BUG will fit nicely over the lever and requires one to make a trim piece that is just a flat piece of metal with a rectangular hole the size of the boot where it hits the floor. This does add a finished touch to the installation.

Picture 1, early models
Picture 2, late models
 

Attachments

  • 1.jpg
    1.jpg
    59.4 KB · Views: 1,272
  • 2.jpg
    2.jpg
    79.8 KB · Views: 1,271

Lyndon

Bronze Member
GOLD Site Supporter
Transitional year brakes:

There are quite a few Snow Trac's out there that are "Transitional Year" machines. These had parts from both the "old style"(2 belt tracks) and the "new style"(3 belt tracks).

Transitional year machines have Brake drums that carry the brass sprockets and 2 belt tracks. But there are no brake assemblies in the drums on the outside of the machine, the brakes were moved to the inside of the engine compartment where they are the same as on a "Big Wheel" machine. These were produced around the time that they produced the Asymetrical Grousers. Asymetrical Grousers only came on one or two years of machines and were the ones with White Tracks that the Matchbox Toy was modeled after. They were coated with a white plastic to retard rusting, but is quickly wore off. Unlike the early grousers that were welded or "Built-up", the Asymetrical grousers were cast.
 

Lyndon

Bronze Member
GOLD Site Supporter
E-Brake Bands: Got a little sidetracked with some historical note there on that last post.

Anyhow, on "Big Wheel" models, 3 & 5 belt late model ST4's and Transitional year models that have the brakes in the engine compartment the Emergency Brake/Parking Brake is a Band that goes around the outside of the drum. These are NOT a VW part. I'm not sure if Christer has them. I believe that they are no longer being manufactured. Some Ex dealer might have a set, but I wouldn't get my hopes up. Your best bet is to have the old ones re-lined or copied.
 

Lyndon

Bronze Member
GOLD Site Supporter
Bleeding: To get all the air out of the system there are 3 routes one can go.>

  • 1) with 2 people, one to pump the brakes, one to hold his/her finger over the bleeder nipple. I usually wore surgical gloves and put my finger over the bleeder to prevent air from being sucked back in. The "Operator" needs to press the pedal down at any speed, but let it back up slowly. It is imperative that there is a good seal at the top of the master cylinder where fluid goes in from the reservoir. On most models this is a rubber stopper with a small hole for a 1/8 inch line plugged in to it. It may be necessary to seal this with silicone to prevent air from being sucked in.>
  • 2) for one person there is a proceedure where you put a hose on the bleeder and stick it in a small bottle.once a bit of fluid runs in the bottle you have to make sure that the end of the hose is in, or under this fluid. this procedure is in old VW repair manuals and works well.>
  • 3) the 3rd method is called 'Positive displacement' which is where, using a pump, one pushes fluid in from the bleeder. this works the best. Some automotive suppliers sell a small hand pump that will draw a vacume on the bleeder but they don't work very well. A positive displacement unit consists of either a pump OR and canister full of brake fluid that can be pressurized to force fluid into the bleeder.
 

Lyndon

Bronze Member
GOLD Site Supporter
Brake adjustment:

VW brake adjusters are a little brass cup with a star wheel. they may be frozen when you go to first work on them but they can almost always be freed up. I have never had to replace them. clean them, grese them up, run them all the way in. Assemble the brakes, and on the "Old" style, put the drum on. On the New style they have to be assembled in place, into the already mounted drum. >

NEW STYLE:
Tighten adjusters until they wont tighten any more, press the pedal hard, then go back out and de-adjust them a couple of clicks(a click is one tooth, not one revolution) Once the drum is freely turning press the pedal, HARD, again and you may find that you can tighten back up a little more. >

OLD STYLE:
After putting the drum back on, and removing the access port cap(pipe plug in side of drum), take a screw driver or brake tool and tighten them untill the drum doesn't turn. Now go in the vehicle and press the foot pedal hard, let off the pedal and pull the emergency brake. Let off the E-Brake, and de-adjust the adjusters until the drum is free. You have to get the Emergency Brake/ Parking Brake adjusted first, then let it off before adjusting the foot or Hydrolic brakes. Don't forget to replace bleeder covers and definately put the plug that accesses the adjusters back in the Brake Drum. It's a standard american(SAE) pipe plug. If yours gets lost or is missing get a new one from a hardware store. Without it water and snow will get in and freeze up the brakes.​
 

Lyndon

Bronze Member
GOLD Site Supporter
Oh yes, as previously mentioned at the start of this thread, you must make these adjustments with the drive chains off and the tracks off. The tracks don't have to be removed from the vehicle, but they do have to be off the drive sprockets. See:" Tracks On/Tracks Off" for the best methods and especially best place to break the tracks. It doesn't have to be as bad as you might think. I routinely changed out tracks this way in half an hour, by myself, many times.
 

Snowcat Operations

Active member
SUPER Site Supporter
Lyndon,
I found a much better improved braking material that I will be using on my rebuilds. I will send you the details and post them here later.
 
Top