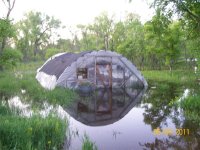
Due to a slight problem with water this summer and then a tree falling on it placed a little stress on the old greenhouse so I decided to replace it. The first picture was taken June 6 and the second one take on June 20 when we went in by boat. This was the peak of the flood.

-
Please be sure to read the rules and adhere to them. Some banned members have complained that they are not spammers. But they spammed us. Some even tried to redirect our members to other forums. Duh. Be smart. Read the rules and adhere to them and we will all get along just fine. Cheers. :beer: Link to the rules: https://www.forumsforums.com/threads/forum-rules-info.2974/
You are using an out of date browser. It may not display this or other websites correctly.
You should upgrade or use an alternative browser.
You should upgrade or use an alternative browser.
Replaced the old greenhouse
- Thread starter REDDOGTWO
- Start date

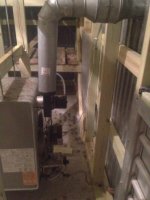
Pulled the intake louvers, exhaust fan and furnace before we left. The furnace and intake louvers would have been ruined in the water if they had been left in.
Three tandem loads of sandbags and eight loads of fill later was able to pour the cement. Notice the additional elevation to the new site.
Three tandem loads of sandbags and eight loads of fill later was able to pour the cement. Notice the additional elevation to the new site.
Attachments

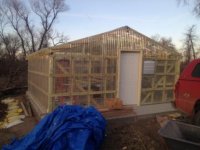
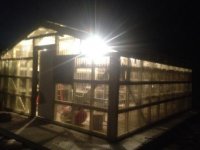
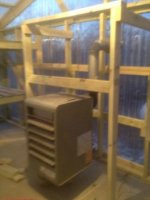
The building is enclosed and electricity is installed. The new one has a cement floor which should eliminate most of the ticks the plagued me in the old one. The floor is sloped with a drain in the middle for runoff of excess water during watering. I also added lights this time to make seeding the pots in March a little easier.
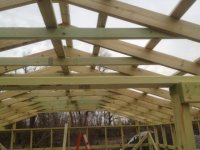
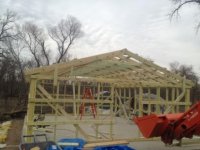
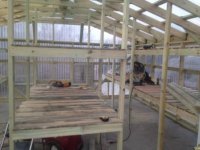
My first experience with building rafters so by the time that it is done in the inside they will be well overbuilt.
The exterior dimensions are 18 X 20 which is a lot smaller the the original which was 22 X 32.
My first experience with building rafters so by the time that it is done in the inside they will be well overbuilt.
The exterior dimensions are 18 X 20 which is a lot smaller the the original which was 22 X 32.
Attachments
The old one had two sets of shelves on each side. The middle two rows had three sets of shelves, the outside were for single rows of flats, the inside had room for double rows of flats. There was also a couple rows of shelves on one end.
The old greenhouse had room for about 474 flats.
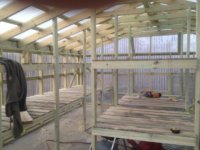
The new one has three rows instead of the four in the old one, however all are set up for double rows. There are two sets of shelves but room was left so that the floor can also be used for flats.
The new one has room for about 292 flats with the one additional shelve in addition to the regular shelving. Who knows how many extra I can make room for once it is done.
I can get by with a lot less room now as when the first one was built I had my brother, wife, the two kids and two of their friends helping me. Next year the only help that I have for sure is one part timer.
Over the last few years I have added a few things to increase efficiency such as a vegetable washer but the step down from six people helping to a part timer means a lot more work for me.
The old greenhouse had room for about 474 flats.
The new one has three rows instead of the four in the old one, however all are set up for double rows. There are two sets of shelves but room was left so that the floor can also be used for flats.
The new one has room for about 292 flats with the one additional shelve in addition to the regular shelving. Who knows how many extra I can make room for once it is done.
I can get by with a lot less room now as when the first one was built I had my brother, wife, the two kids and two of their friends helping me. Next year the only help that I have for sure is one part timer.
Over the last few years I have added a few things to increase efficiency such as a vegetable washer but the step down from six people helping to a part timer means a lot more work for me.
Attachments
I used all treated lumber to build the greenhouse in addition to exterior wiring. I have to build the potting bench, run one more set of outlets and to wire in the intake louver and exhaust fan. Clean up and then it will be done.
Hopefully next summer will be able to install a hydrant in the pvc pipe left in the floor. The installation will depend upon on how low the groundwater will be. It is still to high because of the recent flooding to hook it up to the rural water.
Here are the major electrical components.
Hopefully next summer will be able to install a hydrant in the pvc pipe left in the floor. The installation will depend upon on how low the groundwater will be. It is still to high because of the recent flooding to hook it up to the rural water.
Here are the major electrical components.
Attachments

Great job!!!!!
Ditto , looks great RD .Interesting thread. Great pictures too... Thanks for sharing RedDogTwo.


Looks great, Red. Nothing wrong with overbuilding when it comes to structure.
Thanks for the compliments.
The record for snow here is a little over a hundred inches, however this year they are predicting over 200 inches if that makes any sense what so ever. As of the current date we may have had two inches so far.
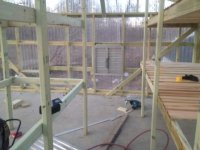
The roof worked out to be a 4.11 pitch. The pictures are kind of deceiving as the sidewalls are only 73 inches.
Instructions for the roof panels calls for purlins at 36 inches, these are at 23 inches. There will be 2 X 4 's at the roof line to provide additional support for the shelves and the roof on the inside of the exterior shelves and on both sides of the interior shelf. Based upon on line calculators for rafters the live load limit for the rafters would be in excess of 100 pounds psf.
There are two reasons for the low sidewalls, one is I do not see a reason to heat space that cannot be used and the second is I do not like heights. When putting up the rafter by myself on the north end and looking out I got a little dizzy as the height of my head was about fourteen feet above the ground with all the fill dirt used. What can I say I am a wuss when it comes to heights.
The good news is that the roof panels have a fifteen year warranty and if they need to be replaced at that time I should be over my fear of heights as I would be over seventy then.
Looks good. Seems like a low pitch for the roof. Don't you get much snow?
The record for snow here is a little over a hundred inches, however this year they are predicting over 200 inches if that makes any sense what so ever. As of the current date we may have had two inches so far.
The roof worked out to be a 4.11 pitch. The pictures are kind of deceiving as the sidewalls are only 73 inches.
Instructions for the roof panels calls for purlins at 36 inches, these are at 23 inches. There will be 2 X 4 's at the roof line to provide additional support for the shelves and the roof on the inside of the exterior shelves and on both sides of the interior shelf. Based upon on line calculators for rafters the live load limit for the rafters would be in excess of 100 pounds psf.
There are two reasons for the low sidewalls, one is I do not see a reason to heat space that cannot be used and the second is I do not like heights. When putting up the rafter by myself on the north end and looking out I got a little dizzy as the height of my head was about fourteen feet above the ground with all the fill dirt used. What can I say I am a wuss when it comes to heights.
The good news is that the roof panels have a fifteen year warranty and if they need to be replaced at that time I should be over my fear of heights as I would be over seventy then.

I would think the plastic panels would transmit enough heat to keep the snow levels down. Even with heavy snowfall the bottom will continue to melt away with no more than 12 inches accumulation on the roof.
Snow adds insulation so only the contact surface will be wam enough to melt. And with a 4:11 pitch it will just slide off in big chunks. I wouldn't spend anytime under the eaves during snow falls.
Snow adds insulation so only the contact surface will be wam enough to melt. And with a 4:11 pitch it will just slide off in big chunks. I wouldn't spend anytime under the eaves during snow falls.
Last edited:
Do you have the wind like my inlaws do? If so that will keep the roof fairly clean.
Down in the trees, some wind without the leaves but nothing like out in the prairie.
Last winter the snow piled up on the shed then the edges turned to ice and a big chuck slid off on to the pickup I inherited from my brother and did close to $3k damages to it.
I would think the plastic panels would transmit enoyugh heat tokeepthe snow levels down. Even with heavy snowfall the bottom will continue to melt away with no more than 12 inches accumulation on the roof.
Snow adds insulation so only the contact surface will be wam enough to melt. And with a 4:11 pitch it will just slide off in big chunks. I would spend anytime under the eaves during snow falls.
I will not be spending a lot of time under the eaves, leave this week for Fargo to do my daughters floor, then the cities to work om a house I bought down there until Christmas, then home for the holidays, back to the cities then head to Florida until the end of March.

I will be building one quite similar to the unit you abandoned. PVC pie frame covered in welded mesh fencing for summer gardening and then plastic for winter green house use. Other than an errant tree trunk and some apparent dampness (LOL) what other issues did you have with the old unit?
Ventilation is needed. Turned off the power once the plants were out and the door blew shut. It became so hot in there that the pvc became black and brittle and then broke. The one that I just built cost about the same to build for the framing after considering all of the fittings on the old one, only half the size. The covering for the new one was about $2 a square foot.
My plan is for a 24' X 16' and the PVC pipe and fittings would be under $500.00. Fence wire and plastic covering another $800.
The end bulkheads and rolled plastic sheeting would be removed come warm weather as all I want is protection from varmits.
I am near Springfield MO with only 4 months of freezing weather. But I want year round produce.
Thanks for the warning about the heat. I hadn't thought of that.
franc
The end bulkheads and rolled plastic sheeting would be removed come warm weather as all I want is protection from varmits.
I am near Springfield MO with only 4 months of freezing weather. But I want year round produce.
Thanks for the warning about the heat. I hadn't thought of that.
franc