• Please be sure to read the rules and adhere to them. Some banned members have complained that they are not spammers. But they spammed us. Some even tried to redirect our members to other forums. Duh. Be smart. Read the rules and adhere to them and we will all get along just fine. Cheers. :beer: Link to the rules: https://www.forumsforums.com/threads/forum-rules-info.2974/

Astro van cat conversion

Snowy Rivers

Well-known member
Re: An introduction/hello and my project.

Hi all...:clap::clap:
I'm back..
Scored a 2100 Packmaster that's only 30 miles away.

Sealed up the deal this morning.
Very pleasant fellow to deal with.

Area is very sloppy right now, so will wait to drag it out in a few weeks or at least when things are much less wet.

It is on a trailer and will be a breeze to move.

The van cat project is still the goal.

I am also helping and old friend fix his 2100.
Some materials from this cat will go to fix his unit.

CAT VAN project has been refined a bit...

Going to narrow the 2100 up a bunch.
shooting for 102" OVERALL WIDTH.

Looking like narrowing the tub, the frame, the axles and go from there.

No engine.
No hood or radiator.
THE BEAST LOOKS PRETTY GOOD the chassis has not been thrashed.

Came from a ski resort not all that far away....

Been a long dry spell and finally a good score.

Something to work with.

After we get it home I will get more pixs as I get going on the beast.
 

Attachments

  • 2100..7.jpg
    2100..7.jpg
    127.4 KB · Views: 262
  • 2100..10.jpg
    2100..10.jpg
    155.8 KB · Views: 263
  • 2100..2.JPG
    2100..2.JPG
    96.7 KB · Views: 251
  • 2100..9.JPG
    2100..9.JPG
    208.6 KB · Views: 266
  • 2100..6.jpg
    2100..6.jpg
    135.5 KB · Views: 270

Snowy Rivers

Well-known member
Re: An introduction/hello and my project.

As was pointed out by others here....Get a 2100...they can be had reasonable.

I found many...just did not want to drive across the continent..and to find this sweet heart 30 miles away was a godsend.

It's good to finally have something other than a dream and ideas.
 

Jim_S

Gone But Not Forgotten
GOLD Site Supporter
Re: An introduction/hello and my project.

Hi all...:clap::clap:
I'm back..
Scored a 2100 Packmaster that's only 30 miles away.

Sealed up the deal this morning.
Very pleasant fellow to deal with.

Area is very sloppy right now, so will wait to drag it out in a few weeks or at least when things are much less wet.

It is on a trailer and will be a breeze to move.

The van cat project is still the goal.

I am also helping and old friend fix his 2100.
Some materials from this cat will go to fix his unit.

CAT VAN project has been refined a bit...

Going to narrow the 2100 up a bunch.
shooting for 102" OVERALL WIDTH.

Looking like narrowing the tub, the frame, the axles and go from there.

No engine.
No hood or radiator.
THE BEAST LOOKS PRETTY GOOD the chassis has not been thrashed.

Came from a ski resort not all that far away....

Been a long dry spell and finally a good score.

Something to work with.

After we get it home I will get more pixs as I get going on the beast.

Welcome back Snowy!

Jim
 

Snowy Rivers

Well-known member
Re: An introduction/hello and my project.

Thanks Jim.

Been a long dry spell....and I missed y'all.....but until I found a good pile of junk that resembled a cat....it made little sense to post of my dreams and plans.

But now there can be some progress moving in the right direction.

The weather was decent this morning and I got a good chance to check out the kitty up close and personal.

I am not sure how much the tub weighs with everything stripped off of it, but I hope I can lift it off the frame with my skidsteer.

Looks like the machine weighed about 7000# ready to go..
So without the engine, tranny, cab, rear axle, track frame..... and all the other crap that's bolted to it , it's got to be waaaaay lighter.

If I can manage the tub readily life will be great.

Going to narrow the tub 4 inches, narrow the track frame and axles 26 inches it looks like to get the beast so it can carry 36" tracks and be street legal.

Our Big Tex trailer is 102" wide, so no worries to transport the cat.

24" tub width
36" tracks with 3 inches between the inner belts and the tub.

102" the way I measure ???? :smile:

I had posted many ideas in the past and most ideas are still on the table.

What has changed is this..

The plan is to drive the van onto the cat chassis...unbolt the tires/wheels and mount the van to the cat using the 4 hubs and lugs.

Remove the van drive shaft and swap in a custom Double double from an S10 extended cab.

Mounting an NP 241 Transfer case on end and use the front output to drive the box and use it as a drop box.

The OC12 will connect via a short shaft from the rear output of the NP241 AND LIFE should be good.

The little V6 in the Astro should propel the rig fine.

Going to be a cruiser and not a plowing/grooming buggy.

I have spent a bunch of time doing the math on the drive shafts, TCASE/DROP BOX and looked at the overall picture.

IT SHOULD WORK FINE.

A buddy who is an engineer for Boeing checked over my calcs and smiled.

We both mentioned....737 max "IT SHOULD WORK"


i am very excited to finally find a cat that I could afford and that was not 3000 miles away.


:thumbup::thumbup:
 

Snowy Rivers

Well-known member
Re: An introduction/hello and my project.

Here is the NP241 with the adapter turned to place the (What will be the input)
at 5.750 inches to the right

(Astro drive train is offset 5-3/4" to the right to allow foot room for the driver.

Already been working on the clocking ring to fasten the Adapter to the Tcase.

None made to do what I want/need...so we make one.

I am using the adapter for a 4L60 tranny....cheaper and it will get a bracket bolted to the 4 bolt end to allow a second mount.
Third mount under the rear output housing to assure the case will stay stable...

A lot of work lies ahead....

I can see many months of things to do without spending much in the way of extra $$$$$ .

Hopefully I can get the tub, frame and axles all finished through the summer.

Gonna be an outside project.
No room in the shop building large enough for the cat....


Hey

back in the day when I ran a groomer on the Mt.... I did run a 2100 a few times.

How do the track adjusters work ????

The 2100 is different than the Spryte.

Does the 2100 use a cylinder with grease in it to adjust the front axle ????

I can't see any adjusting bolt ??????

Any manuals available for a 2100B ??????
 

Attachments

  • IMG_2122.jpg
    IMG_2122.jpg
    320 KB · Views: 238

rdynes01

Active member
Re: An introduction/hello and my project.

Welcome back and best of luck with the project.But those pictures give new meaning to the words "basket case":smile::smile::smile:
 

Snowy Rivers

Well-known member
Re: An introduction/hello and my project.

A real pile of scrap iron.....

But after crawling around it things look pretty good.

There is not the usual weld upon welds upon cracks.

The engine likely went away...as it's not there.
The tires are sketchy.

Front foam filled units seem like we can get some use out of them.

One hub lost the bearings, but the spindle seems fine....not chewed and somebody slathered it with grease (not all rusted)

Rear end is empty.

Likely had a cooler on it and was drained.

Going to get the diffy out and take a peek inside.

I hope that I can use it as is for a while....

Time will tell.

Yes....I real pile of goodies :thumbup:


But I am just happy as a clam to get it..

I have been snooping for nearly 5 years to find a cat close by and affordable....

This old codger is about as happy as can be.

Like a kid at Christmas time.

JUST LOOK AT MY PILE OF SCRAP IRON :clap:
 

olympicorange

Active member
Re: An introduction/hello and my project.

….. congrats,.... this project will certainly keep you busy for awhile,... let the parts list begin,... :thumbup:
 

Snowy Rivers

Well-known member
Re: An introduction/hello and my project.

YES INDEED ON THE PARTS LIST..

Since the van is providing the controls, power train (Except the rear diffy) the list of parts is greatly reduced.

I have the bulk of the drive shaft parts to connect the vans tranny to the OC12

BIG JOB is narrowing up the tub, track frame and axles.

The tires are pretty sketchy.

Front filled ones will likely get us running.

The mid tires are mostly crap.

Sprockets will get us up through the maiden voyage...gonna need to be recovered sooner or later..

I will know a lot more once we get the beast home and tear all the unnecessary crap off it.

With a bit of luck maybe the blade, hydraulics, tilt cab and other goodies can find new homes and get back some of the $$$$ spent.

GONNA BE A DIRTY JOB STRIPPING THE CRITTER APART.

Fair weather stuff.

But...I knew what I was getting into when I decided to do this thing....
 

Snowy Rivers

Well-known member
Re: An introduction/hello and my project.

My oldest grandson turned 13 just before Christmas....I am going to see if he would like to come out here to the ranch and spend a bit of time this summer off and on helping on the Van cat.

He is old enough now to learn a lot about such things as Welding, cutting, designing, fabricating and the how and why things work in the world of building machines.

He and his dad are resurrecting a 1990 Bronco at home now for his first rig.

I would love to teach him many of the things about building machine toys.

We had a daughter and she learned which end of the wrench to hang onto... but never really got into the innards of any of my old exploits.

I converted a big bus to a motor home back in the 80's but she was way to young (Born in 82)

The grand kid loves dirt bikes and such...

I am hoping he will be interested in the cat project.....

Having a little helper will be a lot of fun.....

Depending on his level of interest we may get him cranking the handles on the lathe and the mill.. :smile:

My dad got me into things at a very young age.....GO KARTS AND OTHER TOYS.
 

redsqwrl

Bronze Member
GOLD Site Supporter
Re: An introduction/hello and my project.

I have chopped up and repurposed a 2100 or two, you will be able to slide and lift the tub as necessary, my skid steer is a older Gehl 4400 and it can lift more than it should and has no trouble.

Not much left when you empty them out.
 

Snowy Rivers

Well-known member
Re: An introduction/hello and my project.

We have a Scat Trak 1300 with a big bucket.

Use it mostly for carrying horse poop to the pile and sawdust to the stable

Specs say the 4400 is 1150 capacity
Our Scat is 1300.....

That will make life much better.
I have not been able to get right up into the 2100 yet as its all lashed down on a trailer.

I figure that after getting the cab off, fuel and hyd tank, tranny and everything else off that a wrench can get loose it should be fairly easy to handle.

Gonna set up ( 4) 24.5 truck wheels and shoot them in with the level scope..

Sit the tub down on top of the wheels.

Upside down.

Jig the tub using the axle and track frame holes with an extra set of holes 4 inches narrower.
Probably build the jigs out of flat bar or ????? thats handy.

Go after the tub with the Plasma and knock 4 inches out.

Realign the tub using the jigs and stitch it back up.

Do basically the same with the axles and track frame and then reassemble things using the tub as a build jig.

Be far easier in a shop with an overhead crane like I used back when I was in the machinery bizz.

We also have a WEEEEEE Tractor with a bucket..

Very handy...will lift 500 pounds ???

Some pix using the Scat and Little Red dismantling an M211 Deuce N 1/2

I have used the Scat to lift several pickup diesels out with my air chain fall.

I think the cat is gonna be a fairly easy go after we prune it down.

The cab on the Deuce was a pain to get off.

My neighbor came over with his "Widdle Excavator" and we grabbed the cab with some straps and it came right off.

Mostly the elevation was the issue...

I was not cozy with having that cab as far out away from me and as high as it was and maybe UPSET things.

The roll up door behind the truck is my little machine shop and right where that truck is sitting is where the cat will sit during the tear down and refit.

Actually the cat will be stripped behind where the truck was and then after the tub and frame are separated....we will get the tub over by the front of the shop.

The cat will not fit in the one building with a slab floor
 

Attachments

  • Sumnerapart2.jpg
    Sumnerapart2.jpg
    297.4 KB · Views: 419
  • Sumnerapart1.jpg
    Sumnerapart1.jpg
    301 KB · Views: 412
  • Sumnerapart4.jpg
    Sumnerapart4.jpg
    298.4 KB · Views: 398
  • Sumnerteardown1.JPG
    Sumnerteardown1.JPG
    387.1 KB · Views: 425
Last edited:

Snowy Rivers

Well-known member
Re: An introduction/hello and my project.

There is a hefty frame assembly on the rear of the cat that has a big cylinder on it.
Must have been for a groomer/drag/tiller

That bad boy looks heavy too.

I want to remove the sprockets before we unload the cat...the sprockets are usable...and I don't want to booger one up during the unloading.

The guys trailer is narrow and one set of wheels are hanging over the side and he stuffed timbers under the axles to rest it on.

I can just see a trashed sprocket happening real quick.
 

Attachments

  • 2100..3.jpg
    2100..3.jpg
    188.6 KB · Views: 407

Snowy Rivers

Well-known member
Re: An introduction/hello and my project.

Can anyone tell me what the axle rating is on the torsion axles are for the 2100 packer??

Thanks
 

Snowy Rivers

Well-known member
Re: An introduction/hello and my project.

Just some tech stuff for those interested.

With an actual Cat in my possession to be able to look at and get real time measurements I have been able to confirm my plans for the steering controls.

Air was the only simple way to add controls to the Astro and work within the constraints of the cockpit.

Also anything added MUST be able to come and go easily without major changes to the van.

The pressures needed to lock the bands can readily be achieved using a Number 9 air brake chamber (Big truck stuff) Had many years as an owner operator and did most of my own work (Except major engine and really heavy stuff)

The #9 chambers can easily be adapted with a bracket on the rear of the OC12 to connect with the band actuators.

About 45 psi on the chambers will produce 405 pounds on the linkage.

This number was derived from a few cat owners that I was able to get info from.

Air is simple to plumb in and deal with... no oily mess if there is a leak :thumbup:
Fix the leak and go on about your business.

Here is a picture of the steering control interface....


Simple alloy bracket that fastens easily to the steering wheel

****For the question....what about the air bag*****

It gets unplugged during CAT OPERATIONS

There was no real good way to get an air pump on the engine in an Astro

VIAIR makes some very nice 12 volt 100% duty cycle air pumps that are more than capable of supplying the air needed.

The interface fastens to the wheel with 3 heavy zip ties (Yes...hinky...but simple and easy on/off)

Nylon DOT air lines run from the front to the rear of the van.

The two spring loaded joy sticks control the air to the chambers/bands
Each delivery line will have a flow control to stop the bands from SLAMMING on.
A quick release valve will allow fast release.

There will be two pressure regulators on the pump/tank valve control panel (Behind the rear most seat)

The one regulator will deliver 45 psi to the pressure select valve (Not shown in piccy)

The second regulator will be adjusted to allow a lower pressure to the joy stick for making small steering corrections at speed (Adjust after the build to get the sweet spot)

The idea of a foot brake had always bothered me.

A neophyte driver could readily mash the brake and panic when nothing happens.

Decided to add a single circuit air brake treadle on a little bracket alongside the vans brake pedal arm (There is room in there )

A small bracket that fastens to the pedal arm will activate the treadle to allow the existing pedal travel to apply air to the air chambers through a pair of double check valves.

All other equipment will operate normally (Brake lights..yada yada yada)

This equipment can be removed within minutes when non cat operation is desired.

All the nylon air lines will bundle down past the RH side of the drivers seat and then down the LH side of the interior.

All lines will be of a different color (RED-GREEN-BLUE-YELLOW-ORANGE-BLACK)
Lines will couple to the control panel manifold with standard air line quick couplers (Just like we use on our air tools)

Lines from the Control center will attach to through hull fittings in the rear of the van body and then connect to the air chambers.

Quick release valves at each chamber to allow fast exhaust.
Flow controls on each line from the joy sticks to the chambers to stop bands being slammed.

Double check valves to allow the foot brakes to work separately of the joy sticks, and have the ability to vary the pressure from zero to a predetermined max pressure (Likely the same as full turning pressure)

The foot brake will also allow a controlled braking for stopping without tossing passengers about as well as the on/off from the trailer.

Big picture is still to be able to CAT/DECAT the van in short order.

Drive the van onto the cat frame....remove the tires and wheels and attache using the lug studs/nuts with fabricated brackets.

Swap the stock drive shaft with the special longer two piece shaft that has 3 double cardan joints.

I have hopes that once we get the bugs out...that Cat'n up will take less than an hour....


Wishful thinking...maybe...we shall see.

Overall I want to be able to take the van off the Cat and within a short time head off grocery shopping.

The long term plan is to scare up a much nicer van for a permanent attachment...


After sketching out the air schematic....I am fairly confident it will work sweet.

And...all the parts are off the shelf stuff...much of it standard parts house items for big rigs....

Gonna be a while before much more happens with this stuff beyond what has been done.

The immediate work needs to be on cutting up the Packer and getting the tub and frame narrowed down.

Then the tracks gotta get narrowed up.

36" wide.

Probably add whatever is needed along side each center belt and cut the grousers and redrill.

We will go for symmetrical track to make life easy.

Gonna be a bastard no matter what....so lets make it a good one....

OH AND FOR THE QUESTION "WHATS THE BLUE THING"
It's a pool noodle Charlie Brown....
I hacked that chunk off one laying in the corner...A black one will replace it when I finish the Interface assembly.

ITS A HAND REST TO TO MAKE OPERATIONS COMFORTABLE.

The next question asked will be.

What about the ABS on the van and what will happen with the drive shaft running and the wheels not moving ????

Pull the ABS fuse and go on about the Cat'n business.

The ABS and air bag lights will come on the dash...BIG DEAL..
 

Attachments

  • IMG_1947.jpg
    IMG_1947.jpg
    365.8 KB · Views: 372
  • IMG_1974.jpg
    IMG_1974.jpg
    292 KB · Views: 367
  • IMG_1955.jpg
    IMG_1955.jpg
    288.3 KB · Views: 359
  • IMG_1972.jpg
    IMG_1972.jpg
    299.3 KB · Views: 374
  • IMG_1971.jpg
    IMG_1971.jpg
    348.1 KB · Views: 368
Last edited:

PJL

Well-known member
Re: An introduction/hello and my project.

Now I see, you are building the worlds only Astro Converti-Cat.
 

Snowy Rivers

Well-known member
Re: An introduction/hello and my project.

ASTRO-PACKER
2100 X
:thumbup::thumbup:

I originally planned on removing the suspension, front/rear, but after giving it a lot of thought it seemed like a better idea to just use the hubs/lug nuts and some easily fabricated brackets to anchor the van to the cat chassis.

Add a link at each corner to render the van suspension inert so the cat chassis will not twist with the vans suspension.

Yeah...Astro/convertacat....

The plan has morphed some since I got into doing this thing.

After getting a really good look at the Packer I decided that with the herky frame on that machine doing the convertible thing would be a breeze.

I would love to leave the Cat WIDE but I really want to be able to haul it.

We have this 25+5 Big Tex gooseneck trailer to haul toys with. (And horse hay)

The trailer is 102" wide across the deck....
No worries.

I still think that the little Astro Van on those huge azz tracks would look soooooo cool.

But being usable is far more important.

The green brush rig is the same one pictured earlier being dismantled.

The sucker was heavy too.

We hauled it down here from Sumner Washington

We wanted it because it had a viable title that matched the serial # on the truck.(Some get dummied up)

The Son in law is working on a repower with later model diesel power and modifying the cab...take two cabs and make a quad cab...

That's his toy.

The Pickup, trailer and the brush rig was way more weight than we thought......

The big dog handled it well though (08 with the 6.7)
 

Attachments

  • Fort sumner readytogo.jpg
    Fort sumner readytogo.jpg
    79.5 KB · Views: 355
Last edited:

KickerM

Active member
Site Supporter
GOLD Site Supporter
Re: An introduction/hello and my project.

Thanks for the great info on the brake bands! 405#s? I've been trying to devise a way to measure mine but without a compression scale I'm striking out, Your Air method sounds right in your wheelhouse, mine is electrical as I am trying to figure out an electric actuator set-up....but I've been lost on how many pounds of force I need! Thanks again!
 

Snowy Rivers

Well-known member
Re: An introduction/hello and my project.

The rigs like the Weasel and various Oliver crawlers of times gone past used just plain metal levers connected to the band actuator arms.

The mechanical advantage in their linkage gave the needed pressure to lock/slow down the band.

We had an Oliver OC4 crawler here at the ranch for years (Same rear box as the early Sprytes and Imp's

The lever did not require a lot of pressure to turn the cat...

I am not sure what you will use as far as an electrical actuator to apply the needed force.

I chose air because it is simple and parts can be purchased easily.

The brake chambers are available in various sizes (Square inch of the diaphram) sizes (Type) 9, 12,16, 20, 24, 30....30 is the most common rear air chamber on class 8 trucks.

My control center if you will has two pressure regulators mounted.

One (High pressure) will allow for a full hard application of the band.

The other is lower pressure to allow for much less application pressure to give a "Slight change" in direction

Both of the regulators are fully adjustable and have a gauge on them.

The nice part of the "on off" air valve will be that it will be nearly impossible to "drag" a band.

Some people get in the habit of dragging the bands (Like those who drag the brakes on their car)

Creates heat and wear the bands out.

I am curious about what you are using for an electric actuator.

Servo motor with axial piston ???

With the air the pressure can be tweaked up/down to suit the need.

Adding a flow control in the line from the joy stick can be used to "Soften" the application.

The pressure will be the same, but the speed at which the band is applied can be slowed down to avoid "Slamming"

The flow control has a one way check valve that allows the release to be free flowing back (Band will not be inclined to drag as the air slowly released from the air chambers)


Back many many years ago when I worked in the wood products bizz we used a lot of pneumatics on the various machines.

Air has issues, as does hydraulics, but I chose air simply because it is clean and a leak will not quickly leave you up to your butt in something messy and the rig not moving.

I have chosen a dual electric pump system to allow for one pump to do the work and the second pump to act as a back up "GET US HOME" UNIT.

Very few repair parts would be needed on board the cat to deal with an issue.

A couple spare diaphrams for the chambers.
Some nylon tubing and a few fittings and a handful of wrenches.

Ya can't plan for every possibility... but vital items can at least be given a bit of thought.

Steering is nice :mrgreen:
 

redsqwrl

Bronze Member
GOLD Site Supporter
Re: An introduction/hello and my project.

any thought of running your second compressor off the drive shaft?

Primary air system becomes secondary after you mover a bit. and a secondary air system the is d shaft mounted might actually unload the electrical system,

Just thinking outside of the square
 

Snowy Rivers

Well-known member
Re: An introduction/hello and my project.

I have flirted with that thought....

Look at the piccy.

This is the NOW drop box.

The 700R4 adapter is only there to be used as a mounting point.

The has been a plan to simply bolt a plate over the opening.

The normal input internal spline is standard TH400 4L80

Be very easy to machine the plate to fit the register and add a flange bearing to it

Mount a twin cylinder compressor (Craig's list) ahead of the drop box.

Should be an easy do.

Use the Electric compressor/s to fill the tanks for a "Dead start" and then let the drive shaft mounted unit deal with the air while moving.

Have to set the pump controller up to simply unload the compressor as it will still be turning.

I am not sure what speed most compressors actually run and then make sure the rotation is right.

It is a possibility that this could be a great idea.

The Astro van has zero room for an engine mounted unit.

Just too tight.

An Aluminum/rubber coupling would run the compressor fine.

Being down in the tub things will be somewhat protected.

A remote air filter to keep out water and dirt should be an easy go too.

Yessssss..definitely would help on the electric use.

I have thought about a bigger alternator....
A compressor with a oil filled crank case would be sweet...
Twin cylinder 12 cuft would suffice.

Definitely a plan to consider.

Easy to connect via a stainless braided HOT SIDE tubing and then a regular braided hose to a quick connect to the inside tank.

Put the female coupler in on the tank and just the open male on the compressor hose

Maybe even add a cooler in the feed line to get rid of some of the heat.

Water is always the bane of any air system...
 

Attachments

  • IMG_2122.jpg
    IMG_2122.jpg
    320 KB · Views: 347
Last edited:

Snowy Rivers

Well-known member
Re: An introduction/hello and my project.

Speed of the compressor could possible be an issue.

Maybe offset mount the pump slightly away from the drive shaft input to the drop box and drive it with a cog belt

Gear the ratio down to about 1/4 shaft speed.
Drive shaft likely going to be running at 2500 RPM or ???? depending on what you are doing.

What ever we use has to be self contained as far as oiling and cooling.
Free air cooling should be OK

My one worry about running a belt drive would be getting snow, dirt and debris into the belt arrangement.....
 

Snowy Rivers

Well-known member
Re: An introduction/hello and my project.

Some gum shoe and bingo.

The YORK AC compressors used on a lot of older rigs (Ford) work sweet as an air pump.

Go the stub shaft route off the drop box and drive the York with a serp belt.

Easy to rig up a tensioner pulley.

The York can handle a lot of speed too...so running at 2500 RPM is no sweat.

Standard pressure switch to cut the power to the clutch.

The pumps should be easy to find.....

Maybe a way to go.

Got lots of work on the old packer to do before this becomes an issue...
 

olympicorange

Active member
Re: An introduction/hello and my project.

…. sounds like quite a unique project S/R,... looking forward to the progress /pics. most of your old big rig air compressors run at engine speeds (1800/2500) rpm's. with the ''unloader'' circuit hooked up, the a/c only cycles between 60-120 psi, then opens & freewheels , till needed again. if you could adapt a/c to t/f case splined shaft, with a splined adapter to match each shaft, then you wouldn't have to worry about belt slippage/failure, etc. you wouldn't need a support brg. you would need an a/c that is ''closed'' in the front, not open for oil to case drain out the front, as in the truck application. truck a/c's are oil pressure fed off the oil galley, and case drained, back to oil pan. so a custom oil pan /reservoir , for the bottom of a/c, remove flat plate , for ''splash'' oiling/cooling be sufficient. or an electric sump pump to pressure lube top-end of a/c, plumbed into new oil pan, etc... lot's of options ….:thumbup:
 

Snowy Rivers

Well-known member
Re: An introduction/hello and my project.

I ran class 8 heavy haul dump trucks for years.

Every air pump was bolted to the front gear case (Cat power) and was supplied force fed oil off the engine and the compressor drained back to the gear case out the drive end of the pump.

Water cooling was also supplied to the compressor head.

The 4x4 guys use the YORK A/C pumps as air pumps and they seem to do well.

I am liking the idea of a belt drive and using the electric clutch on the compressor..

IF the pump dies.....the belt will fail and not tear up things.

Having the electric clutch on the pump will make life easy as well..

Pretty easy to install an unloader/check valve in the tank to control the shaft driven pump.

Having the electric pump will certainly be desirable to charge the system from a dead start....

Also be handy if the shaft driven GIZMO fails.

Some guys are using the A6 Frigidaire pumps off older GM rigs.

These are a tough pump with cast iron cylinders (6) and will pump huge amounts of air.
They have an oil sump too.

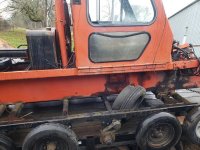
I got out yesterday afternoon hoping to get the cat home (Sitting in a pond on the trailer...4 inches of wet slop we must back through to get the truck in there....)

Gotta wait for the weather to cooperate more.

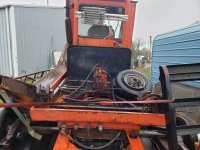
I did get some more peeks into the rear frame/tub area ahead of the OC12

My Micky mouse drop box will be able to sit down in the tub just ahead of the OC12

Looks very promising that there will be enough room on the LH side of the tub right alongside the drop box to mount the compressor.

May need to do some rearranging of the frame work in that area though.

The Cat has a heavy tube platform/frame that a big azz cylinder is mounted bolted to the rear area.

Since my application is only for a cruiser....all the heavy rigging in the rear is not needed.

Should be plenty of room to get things snuggled in there.

I am thinking that we are going to need to butch some fairly large round access holes in the tub near the area where the drop box will mount and up near where the vans tranny (Rear output) is located to allow access to the drive shaft.

THE PLAN is top be able to run the van up a pair of temporary channel ramps and locate it on the cat frame....

Until I can get the van and the packer close to each other and do some measuring I can't do much more than speculate....but the idea looks good.

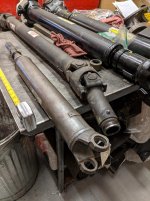
I have a complete two piece drive shaft from an S10 Extended cab with double cardan joints on both ends of the rear shaft..
Thinking seriously about adding another double cardan joint where the front shaft plugs into the 4L60 tranny....

This menagerie of goodies called a drive shaft will allow rules to be broken in a big way.

GM used the "Double Double" setup to fix issues with the layout on the extended pickup..

They were a failure....

Issue being that the center ball of the CV unit was usually never greased..

Once the ball wears out the CV started to wobble and will vibrate badly...

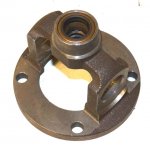
The shaft I got was bad, but not destroyed.
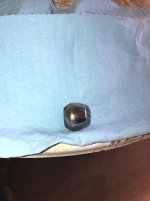
The centering ball was shot and the grease passage was totally devoid of grease....not one bit..and the ball and its socket were dusted dry.

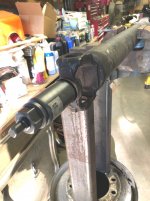
I have the rear shaft all repaired and ready to go.
Not sure yet on the overall length needed in the cat, so just cooling my heals until a time when we can see exactly where stuff will end up.

The length of the cat, location of the diffy, wheel base of the van and probable spot the van chassis will end up all seem to indicate that the van may be able to be moved a bit fore/aft to be able to get the parts to all talk to each other without a lot of trouble...

I will need to mount a REMOVABLE bracket to hang the center carrier bearing for the driveshaft as well.

Must be removable to allow the van to drive over the cat frame to mount it...

The Astro drive train is offset to the RIGHT 5.750" this creates issues...hence the drop box and the weird shaft set up.

I am still trying to stay with as much off the shelf parts as possible

The OC12 uses a 1410 u joint on it's input yoke.

The plan is a short shaft plugged into the slip yoke on the output of the drop box (NP241) with a 1350 slip yoke and u joint at the case end

(Setup maybe a foot long max)

If all goes as planned the drop box may wind up being just ahead of the vans rear diffy.

Once the tires/wheels are off and the chassis is lowered into position and the hub mounts are attached, the drop box input hopefully will be close to the same elevation as the vans pinion shaft...


A lot of WHAT IF's at this point... but the preliminary measurements look promising.

The big V8 power and auto tranny that was in the Packer (Plus pumps etc) was heavy and far forward.

The Astro powerpack is a lot lighter....so this certainly should allow some discretion on locating the van fore and aft on the cat chassis.

I do not want it nose heavy..
BUT.....I may well need to run things forward some to allow all the goodies to fit.

The only other Astro I have seen on a cat was on a 3700 hydro and the van had it's power pack removed and they used the Cats power.


Just a lot to think about.

Lots of engineering to make sure things can/will work and that we don't end up with an issue here and there.

The more room we have the better life will be.....
I am just sitting here chomping at the bit wanting the cat home.....

Oh well.

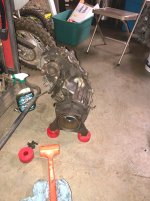
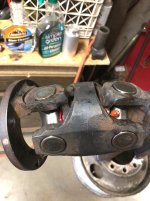
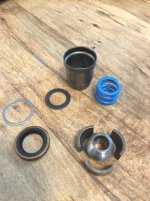
Pix of the Doble double shaft.

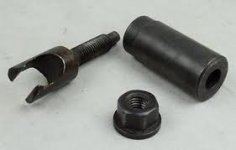
Getting the centering ball off the little stub requires a special tool.....

$300 special Kent Moore tool... remover and installer

Found one on ebay for $12 :clap:

The shaft uses readily available Saginaw 3R CV JOINTS/PARTS

With the proper tools these bad boys are a snap to rebuild.

The one shot of the ball that LOOKS LIKE A PEAR Supposed to be round
No grease being the cause.

With some care in locating the shaft it should run smooth.

Luckily the shaft was still in factory trim and had not had the plastic melted to remove the u joints...marked everything well before the tear down...
Balance should be fine.

The front shaft tube will need to be cut and a CV installed...so it may need to be balanced.

We can get this RUBE GOLDBERG together and do some testing and react accordingly.

Sort of like building a boat in a basement I guess...need to be sure we can get it out the door.. :hammer:

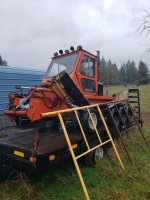
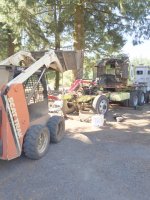
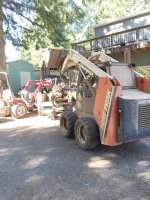
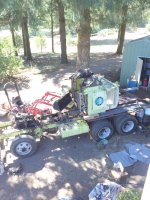
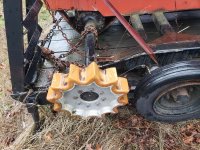
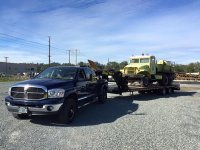
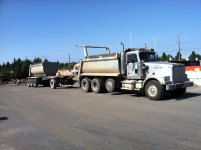
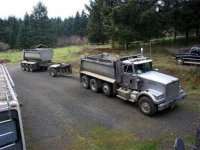
Couple pix of the Slam bang We had up until I retired in 2012
 

Attachments

  • CV ASSEMBLED3.jpg
    CV ASSEMBLED3.jpg
    290.6 KB · Views: 309
  • IMG_1977.JPG
    IMG_1977.JPG
    314.3 KB · Views: 326
  • download.jpg
    download.jpg
    4.5 KB · Views: 306
  • IMG_1985.jpg
    IMG_1985.jpg
    274.6 KB · Views: 323
  • IMG_1989.jpg
    IMG_1989.jpg
    262.2 KB · Views: 328
  • CV ASSEMBLED4.jpg
    CV ASSEMBLED4.jpg
    325.6 KB · Views: 306
  • Centering yoke.jpg
    Centering yoke.jpg
    40 KB · Views: 306
  • TRANSFER1.JPG
    TRANSFER1.JPG
    176 KB · Views: 321
  • WSTFR2.jpg
    WSTFR2.jpg
    24.8 KB · Views: 296
Last edited:

Snowcat Pat

Active member
Re: An introduction/hello and my project.

Snowy, I just got your message, to answer your OC-12 question.

The center case width is 16.625 inches gasket to gasket (varies a little, # stamped on the back, used for carrier bearing setup), but,

The top of the case where the lid goes is a skosh wider than 17 inches.

-Pat
 

Snowy Rivers

Well-known member
Re: An introduction/hello and my project.

Pat.

Thank you much for the reply.

Since I sent that mssg to you I got close to my cat with a tape measure and paper and pencil.

When I sent the message I had only seen it in pictures.

Going to be no sweat to narrow the tub up to 24" wide.

I may have to get a tad creative with the brackets that hold the center section...but there is room.

The only spot that's going to take outside help is getting the axle shafts cut and the splines recut.

Fella up in Portland says he can do it without annealing and re-heat treat.

13" gotta come out of each one.

Not sure if he grinds them in, or uses an EDM ????

I will machine a tube/sleeve for the axle tubes and locate them after the tub and track frame are done.

Cut the axle tubes to length and weld them up....easy job....

Do you know if the Tilt cab and hydraulic (grease) track tensioner's were a "C" model thing on the packers ????

I have snooped all over and can't find much info.....

Thanks
 

Snowcat Pat

Active member
Re: An introduction/hello and my project.

Well we are both wrong on the steering cylinder pressures. The page 8 of the 2100 manual says,and I quote,

"This pressure should be set at 400 psi for best all around results."

-Pat
 

Snowy Rivers

Well-known member
Re: An introduction/hello and my project.

Copy that...

Thanks for looking in the book.

It would seem that there are some materials floating around that are in error.

Anyway..
No worries...A type 24 air brake chamber can easily dish out the needed PUSH @ 50-66 psi

The factory specs are no doubt designed to handle the heavy weight of the 2100 plus the tools it would be carrying ...BLADE, GROOMER ETC.....

This would be " Best all around results"

My cut down version with narrower tracks and no tools should not require as much pressure to get the job done.

Easy to work the pressures up and see how things behave.

As long as the turning is satisfactory it will be fine.

With the numbers I was able to calculate for the Spryte with a manual steering system this all seems to fall into line.

Again...thank you for the data and taking the time to look...
 
Top