• Please be sure to read the rules and adhere to them. Some banned members have complained that they are not spammers. But they spammed us. Some even tried to redirect our members to other forums. Duh. Be smart. Read the rules and adhere to them and we will all get along just fine. Cheers. :beer: Link to the rules: https://www.forumsforums.com/threads/forum-rules-info.2974/

1968 Tucker 442 New to Me

Track Addict

Bronze Member
GOLD Site Supporter
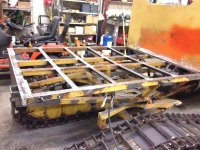
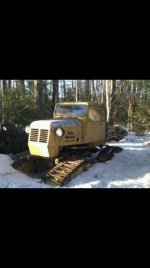
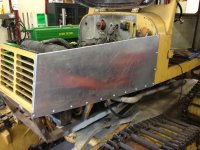
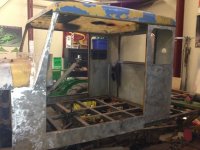
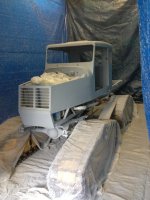
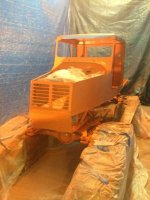
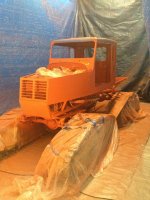
Progress. Friend made me all new 2x4 stake pockets and new aluminum side panels over the weekend. Just slapped them on for the photo. One little trim and it is an exact fit. Much better than what was on there.

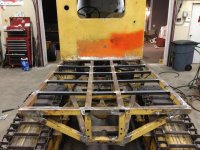
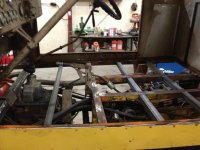
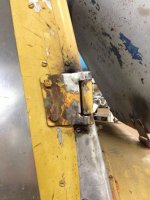
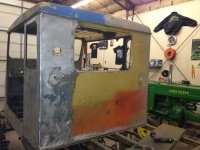
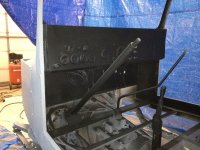
Many many hours of welding and grinding on this thing. There were a number of make it happen get grooming repairs. If this was a groomer which I believe it was I am surprised the rear frame is not worse off. It has a little bow to it on the rear. Looks like they pulled it off in live and half ass repaired it. Surprised they did not destroy it.

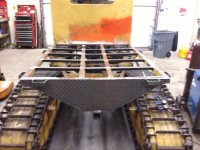
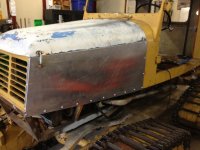
Fixed now. Adding some supports for the diamond plate. Have a new 12" receiver tube to well on the bottom as a hitch. Almost done the metal phase.
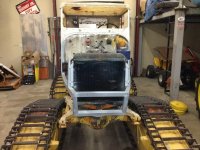
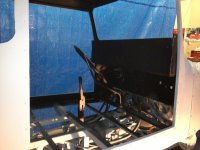
 

Attachments

  • photo (13).jpg
    photo (13).jpg
    78.7 KB · Views: 963
  • photo (12).jpg
    photo (12).jpg
    57.8 KB · Views: 941
  • photo (9).jpg
    photo (9).jpg
    68.2 KB · Views: 949

Blackfoot Tucker

Well-known member
GOLD Site Supporter
Looks Great B4B!

I've seen some Tucker "repairs" that make you shake your head and say "What were they thinking"? Just absolute mechanical buffoonery.

NICE John Deere!
 

Track Addict

Bronze Member
GOLD Site Supporter
added in the angle to support the 1/8 inch aluminum diamond plate deck.

Will help stiffen the back imagine as well. The two deck top center tubes. Up by the cab it is 9 1/2 inches and at the rear it is 8 1/2 inches. Don't think that was factory and the rear hack job backs it up.

Good news is the outside is square which I can't see how but it will work.
 

Attachments

  • photo (14).jpg
    photo (14).jpg
    84.2 KB · Views: 931

Track Addict

Bronze Member
GOLD Site Supporter
Got some more progress done last night with some help from the boys. Had to go to a wedding in Seattle, WA for a week but made up for lost time last night. Glad to be back.

Added the Diamond Plate Steel to the back to clean it up. You can see how lightly off each side is but not much I could do other than cut the back to pieces.

Added Receiver Tube for hitch.

2x4 stake pockets.

More floor supports.
 

Attachments

  • photo (16).jpg
    photo (16).jpg
    70.2 KB · Views: 893
  • photo (15).jpg
    photo (15).jpg
    88.6 KB · Views: 887
  • photo (17).jpg
    photo (17).jpg
    70.2 KB · Views: 890

Track Addict

Bronze Member
GOLD Site Supporter
This is a picture from a few years ago. The Tucker sat in this spot not moved since the 90's. Glad it rescued me and has a good home now!
 

Attachments

  • photo_renamed_31237.jpg
    photo_renamed_31237.jpg
    32.8 KB · Views: 879

Track Addict

Bronze Member
GOLD Site Supporter
More progress. Metal work nearing completion.
 

Attachments

  • photo (18).jpg
    photo (18).jpg
    77.4 KB · Views: 852
  • photo (19).jpg
    photo (19).jpg
    63 KB · Views: 860

Track Addict

Bronze Member
GOLD Site Supporter
After experimenting with some sanding and priming working with the paint there it was very clear that this thing needed to be stripped down to bare metal.

Found some bondo over small dents. Used a block and hammer and got them back mint. Maybe they did not have blocks and hammers years ago?

This was orange when new. Metal is in great shape. Tried some primer over he aluminum after sanding with 120 grit and it looks good. Some wear and dings etc but I like the character and I am sure I will add some.
 

Attachments

  • photo (20).jpg
    photo (20).jpg
    73 KB · Views: 828

Track Addict

Bronze Member
GOLD Site Supporter
Friend of mine came by today and saw the above picture. Said I am crazy and to have it sandblasted. Looks like that is the way to go.

He wants to da it work the body and paint it right. Can't disagree. Donated time so I will have to take him up on it.

Will keep you updated.
 

Northcoast

Member
GOLD Site Supporter
Really enjoy seeing you bring her back to life ! Can't wait to see the finished product in the snow. While you have everything taken apart,may as well do it right.
 

Track Addict

Bronze Member
GOLD Site Supporter
Got the door hinges fixed last night. When I got the Tucker the passenger hinges were both broke off. The bottom one had the top piece that sits on the pin the top did not.

Bent some 1/8 steel after heating it with a torch to duplicate the bottom. Came out alright. Got the door edge back flat. The top hinge must have held for awhile while the bottom one was broke and they continued to use the door The top hinge and door was bent out about 1/4 inch so when you closed it there was a gap. Bent and hammered it flat and it looks nice, closes nice. Other side is good to go.

Have two other tucker doors with hinges on one. The door fits exact but the hinges are in a different location but appear factory mounted. Different staff working on different tuckers must have done things their own way.

Does anyone know where I can get new weather stripping for the top and bottom of the sliding windows? Some sort of felt stuff with a clip holding it in?
 

Attachments

  • photo (22).jpg
    photo (22).jpg
    64.8 KB · Views: 954
  • photo (21).jpg
    photo (21).jpg
    55.9 KB · Views: 944
  • photo (23).jpg
    photo (23).jpg
    65.9 KB · Views: 954

Blackfoot Tucker

Well-known member
GOLD Site Supporter
B4B,

When I re-cabbed a 1642 we replaced the window channel on the doors. I got the replacement from a company called Restoration Specialties and Supply in Windber, PA. The item number was AS1526-96WIN.

I would also suggest you keep the name Austin Hardware and Supply in your back pocket. I found some things there that I was unable to get elsewhere. I don't know about your situation but here it's just me. I don't have a business or company name that I can use for those "difficult" (the word difficult isn't strong enough...let's try PITA) firms that only sell to other businesses.
 

Track Addict

Bronze Member
GOLD Site Supporter
Wanted to update the progress. Sandblasting got canceled. Too much money and I got it all stripped with a wire wheel. Took the two outer layers of paint off with a twist wheel then da it down with 80 then 120. Some areas are done you can see.

The roof is another story . The gelcoat was garbage so I had to take the sides and most of the roof down to bare. I plan on priming it with the then putting this on: monstaliner: http://www.monstaliner.com/

I would paint everything else orange but keep the roof top black. Think it will look good.

As for the inside someone used truck paint so I plan on Rustoleum under coating (paintable) the inside then spraying the orange over it. Did a test area and it looks good.

Little bondo on the back. Should be painting this thing next weekend.
 

Attachments

  • photo (27).jpg
    photo (27).jpg
    64.2 KB · Views: 866
  • photo (32).jpg
    photo (32).jpg
    65 KB · Views: 876
  • photo (29).jpg
    photo (29).jpg
    65.4 KB · Views: 878

Track Addict

Bronze Member
GOLD Site Supporter
Hammering, pounding, sanding, and grinding this is good as I can get it. Bondo tonight.

Paint this weekend. Amazing what a hammer and block will do on aluminum. The amount of bondo they had on this body they must not have known about pounding dents back in the day.
 

Attachments

  • photo (34).jpg
    photo (34).jpg
    56.8 KB · Views: 833

Track Addict

Bronze Member
GOLD Site Supporter
Got some major progress done in the last week. Body work. Make shift paint booth. Tins primed painted.

Used rustoleum undercoating in the cab and roof to hide the trunk paint and some of the body. Stuff works great but is tough to paint over even though it is paintable. Took a number of coats in the cab to cover the black.

Few touch up spots underneath. Tractor supply alice chalmers orange close enough for me and I can get it in brush and spray can form.
 

Attachments

  • photo (49).jpg
    photo (49).jpg
    63.7 KB · Views: 824
  • photo (48).jpg
    photo (48).jpg
    79 KB · Views: 800
  • photo (47).jpg
    photo (47).jpg
    80.6 KB · Views: 775
  • photo (46).jpg
    photo (46).jpg
    76.5 KB · Views: 778
  • photo (45).jpg
    photo (45).jpg
    59.6 KB · Views: 776

Track Addict

Bronze Member
GOLD Site Supporter
More pics. Dashboard is on the list to be redone but I figured paint it for now. It is rough but functional for this season.
 

Attachments

  • photo (37).jpg
    photo (37).jpg
    66.1 KB · Views: 767
  • photo (38).jpg
    photo (38).jpg
    69.5 KB · Views: 775
  • photo (39).jpg
    photo (39).jpg
    66.6 KB · Views: 774
  • photo (40).jpg
    photo (40).jpg
    78.6 KB · Views: 771
  • photo (41).jpg
    photo (41).jpg
    62.5 KB · Views: 771
  • photo (42).jpg
    photo (42).jpg
    52.9 KB · Views: 773
  • photo (43).jpg
    photo (43).jpg
    68.5 KB · Views: 787
  • photo (44).jpg
    photo (44).jpg
    73.5 KB · Views: 770

Doc

Bottoms Up
Staff member
GOLD Site Supporter
Looking good. You have made some real progress for sure. :thumb: :clap: :clap:

Keep up the good work. :tiphat:
 

muleman

Gone But Not Forgotten
GOLD Site Supporter
That orange sure brings it to life. Good progress. Soon time to get it out in the snow.:clap:
 

Track Addict

Bronze Member
GOLD Site Supporter
This picture represents the quality and price they put into manufacturing back in the day. You probably won't see dates and logos cast into parts like this again.
 

Attachments

  • photo (51).jpg
    photo (51).jpg
    33.4 KB · Views: 717

Track Addict

Bronze Member
GOLD Site Supporter
Got one of the headlights redone. The amount of rot and rust on the trim rings and inside almost made it parts but I got it done. Not sure how the wires were sealed from the factory but mine have been inserted through the hole allowing water to enter and pool with not drain.

Drilled out the hold and added these rubber grommets which allow the 3/8 wire loom to fit perfect. This should end the problem and makes a much neater install.

Also was missing one of the headlight cups that locks it in position once adjusted. I took some 1 1/2 inch pipe and welded it to some large washers. Functional and looks good.
 

Attachments

  • photo (52).jpg
    photo (52).jpg
    42.6 KB · Views: 708
  • photo (53).jpg
    photo (53).jpg
    67.8 KB · Views: 720
Top