• Please be sure to read the rules and adhere to them. Some banned members have complained that they are not spammers. But they spammed us. Some even tried to redirect our members to other forums. Duh. Be smart. Read the rules and adhere to them and we will all get along just fine. Cheers. :beer: Link to the rules: https://www.forumsforums.com/threads/forum-rules-info.2974/

Astro van cat conversion

Re: An introduction/hello and my project.

my sv-200 and the new/used cab and yes I have the doors---this will be one of my summer projects when I know iam done grooming
 

Attachments

  • IMG_20180219_155838173_HDR.jpg
    IMG_20180219_155838173_HDR.jpg
    120.1 KB · Views: 342
  • IMG_20180219_152545398.jpg
    IMG_20180219_152545398.jpg
    51.4 KB · Views: 330
  • IMG_20170218_114948640.jpg
    IMG_20170218_114948640.jpg
    87.3 KB · Views: 339

Snowy Rivers

Well-known member
Re: An introduction/hello and my project.

So good of you to ask the question...

Mess OMG...Messss

Well it will be a beast for sure.

Everything that may need service will be accessible.

Already laying out the areas of the floor to get some access ports to be able to service the fuel pump from the top, fuel filter from the top, the area over the Weasel diffy and the pillow block.

The main drive line from the 4L60 back to the pillow block will be able to be removed from the pillow block from the top and the shaft slid out between the van chassis and the sub frame.

I am currently studying a plan for getting the starter out in a pinch.

A couple ideas are starting to form for this.

The van chassis will mount in the front using the original wheel hubs/lug studs and the rear will be two small frames that will bolt to the original rear spring hangers and have a single round boss on the bottom in the middle with a urethane bushing and a 1 inch bolt through.

This would allow the front attachment to be removed and the body jacked up off the "Track frame" and simply pivot on the rear attachments.

This will allow for some extra access room between the engine/tranny and the track frame.

I don't want a boat in a basement thing ya know.

The fuel pump is a beotch even with just tires and wheels.

The area above the spare tire can be opened up to allow a nice access to things.

Truth is that the ASTRO IS A PAIN TO WORK ON PERIOD.

With the easy mounting, if work like the tranny is needed the body can be jacked up and the track frame rolled out and the front wheels bolted back on and the rear end supported on stands.

I am going top keep this as simple as possible.

I am not spending $$$$ to replace anything that is already paid for and functional.

The front frame of the van will be anchored with either one large plate or possibly two smaller ones to prevent the original suspension from flexing and force the cat axles to do the flexing.

The idea is to keep the track frame from twisting.

Access for repair is right up front on the drawing board.

After repairing the heater and a couple other things that were not functioning it really reinforced my disgust for any mini van.

I though of other chassis that might work, but I love the forward seating of the Astros.

Just mod things to be able to get at stuff.

Make cover plates to cover the access ports/holes and roll with it.

My plan is to use nearly everything thats in the van.

The steering column is already there and has many controls, so it stays...(Remove the wheel and install one that has the spokes removed (air bag vehicle)


The control sticks will mount to a bracket on the floor and will use two HD PUSH PULL jacketed cables to operate the steering band control levers.

The cables can go under the drivers seat and lay on the carpet and then through the floor in the rear and connect to a bracket close to the Weasel diffy.

A local company made several of these types of cables for me over the years for our dump trucks (Hydraulic controls)

Simple and not spendy.

The rest of the ASTRO MESS will remain as it came from Ma General.

I have given thought to fabricating a complete light bar that will bolt to the cat frame and come up each side of the front fenders (Far enough forward so doors do not hit)

Room for super bright white off road lights and amber beacons and or amber LED flashers and maybe a long white LED in the center.

Way too soon to do more than think about possibilities as far as the light bar goes.

The biggy is getting the Weasel home..

Still under 6 feet of snow. Will be April/May before we can snag the Weasel.

The basic drawings are coming together but until the Weasel is sitting in the shop so I can get good dims off it there is little I can really do as far as the Frame goes.

I have a good supply of box tubing for the sub frame, but not gonna cut anything until I am sure of a few more dims.

Too miserable outside anyway..


So thats the mess as we are now.

Ahhh the freeze up thing

Our weather here rarely gets to the sort of temps that require heat guns and other tools of the far north trade.

I have seen single digits here, but not recently.

20's and maybe a few teens.

Usually when we get our snow its 20's and the thing drops a bunch of wet slop.

I live just south of Portland Oregon about 30 miles and at about 1200' Elevation.

In 08 we had 4 feet of snow in here. Was nasty getting in and out...A cat would have been sweet.

Neighbor had his big Tucker at home and bladed the road so we could get out at least.

FUN FUN FUN
 
Last edited:

Snowy Rivers

Well-known member
Re: An introduction/hello and my project.

Got the new seals today for the M211 pillow block

I can clean the thing and put it back together.
 

Attachments

  • SEAL4.jpg
    SEAL4.jpg
    111.9 KB · Views: 319
  • SEAL3.JPG
    SEAL3.JPG
    319 KB · Views: 330
  • SEAL2.JPG
    SEAL2.JPG
    243.7 KB · Views: 322
  • SEAL1.JPG
    SEAL1.JPG
    265.3 KB · Views: 315

Snowy Rivers

Well-known member
Re: An introduction/hello and my project.

No cat stuff...but the snow is here and we spent the morning down at horse arena setting and wedging center poles under the trusses on the 60 foot span.

The 4x4 posts under the king pins really raises the load handling of the roof.

Back in 08 we had 4 feet of some very heavy snow here and the roof held fine.

Sadly many arenas in the area went flat.

The weather folks started making noises about more snow and then a bunch possible.

We have about 3-4 inches up there now and there is a very real possibility of 6-8 inches more by tomorrow night and more later in the week.

That big roof collects a lot of weight, and I dont want to be sweeping up a mess.

Good to be in where its warm now.

Both pellet stoves are running now and it feels good

We burn hazel nut shells in the stoves instead of pellets.

Another one of my McGyver maneuvers

Some off the wall mods to the burners and we have done this since 1992.

Wish the van cat was done.. :wink:

Oh well...
 

Snowy Rivers

Well-known member
Re: An introduction/hello and my project.

The project got stopped last spring and everything I had in the way of materials were sold due to the failure of my main well pump here at the ranch.

That mess cost me nearly $9000

Now I am back to work on things and have gathered things back to build the project.

A nicer newer van, a free weasel rear end and several other items.

Soon as the weather gets warmer and I can get the Weasel home and see what I have to work with and what in the way of dimensions I have on the Weasel then the frame can proceed.

Not going to start building a frame and using good materials when I don't have all the reliable data.

I have some of the Flexiride half axles needed, but still need a few sets.

I am not going to thrash something together only to have to cut it apart.

I spent too many years in the wood products machinery business as a field service engineer /installer cutting stuff apart and rebuilding it to fit where the shop engineers screwed up.

One time through and think through as much as possible and really look it over well.

I just got back to deciding to try and do this thing again and then found a good van.

I do not have a bottomless wallet, nor the desire to waste what limited resources I do have just thrashing about welding steel together.

The sub frame can be welded up in a weekend.. (At least the basics)

I am in no hurry (actually I am in a big sweat)

I am 66 yo now and not in great health.
Been through 6 strokes and a bout with kidney cancer (tumor caused the strokes and lead us to the cause)

So...

My body ain't what it once was, but my desire to build this critter is strong.

A BIG BAG of $$$$ would make things go real fast... sorry, the bag is small.

BUY SOME GOODIES..HIGH GRADE THEM..KEEP SOME AND SELL THE REST FOR MORE THAN I PAID ORIGINALLY.. DO IT AGAIN.

I have an amount of 3" steel tube for the frame and its in random lengths.

I traded a fella a transfer case for the steel.

I bought two cases, sold one for what I paid for the two and then traded the second for the steel.

I am at status quo right now.

That deal just completed the other day.

The Flexiride half axles are 3500# units (Will go up front) and they were left overs from a small trailer builder that closed its doors...GUY DIED

The business was liquidated and I picked up the 3500 pound set for $25

I seem to get the idea that you doubt my abilities ???

You are welcome to doubt what you like.

Doubt how deep my pockets are and you will be spot on.

The entire design has to revolve around re purposing materials, and not just spending mega $$$ for new everything...

Sorry if you are not impressed.

Give it a chance.

I am one of the mods over at THE DIESEL PAGE
Been there for many many years.

Been through a lot of Diesel projects and helped others many times.

No hard feelings.

Maybe its my fault for being too excited about a long overdue dream.

:thumbup::thumbup:
 

Snowy Rivers

Well-known member
Re: An introduction/hello and my project.

If it makes a big zippidy do dah

My handle at the diesel page is Robyn (Missy Good Wench)

You are welcome to drop by as a guest and check things out.

Pretty good bunch of troops.

I been there since April 2001
 

Snowy Rivers

Well-known member
Re: An introduction/hello and my project.

Thank you.

I think the hardest part of this project is the gathering of funds...not the actual task at hand.

Brings to mind a cute little quote.

"We the unwilling, led by the unknowing, are doing for the ungrateful, we have done so much for so long with so little that we are now qualified to do anything with NOTHING"

Ah well, such is life.

Persistence does help...I think
 

Snowy Rivers

Well-known member
Re: An introduction/hello and my project.

Got out this morning and cleaned the PILLOW BLOCK all up and got it ready to go back together.

Got the new seals, so things can go back together.

Been doing some engineering on where to put the steering levers, and the realization is that they can't go directly in front of the driver.

The foot pocket/pedal area is just too cramped to place the controls in there and then manage to get in the van.

Originally I had planned (last year) on using an air assisted set up but this time around the plan is to go push pull sheathed cable.

Far easier and way cheaper.

No compressor, valves, hoses and or other stuff that cost big $$$$


Anyway I drove the rig to the stable to feed horses a bit ago and a plan gelled.

I can't readily bolt the steering lever bracket in the area between the seats, at least not to the floor as there is a heater duct just under the carpet.

Buuuuuuuuuuuuuuuuuut, the seat pedestals are plenty stout and will lend nicely to supporting the needed bracket for the levers to pivot on.

Mounting in the center will keep the drivers area clean and neat as well.

The right lever can come up and over to a point directly in front of the operators right arm with the levers rubber grip handle horizontal rather than vertical.

The left lever can also sneak up and over so it is readily accessible with its rubber grip horizontal.

At present I see no reason to even remove the steering wheel as it can remain and do no harm, nor really get in the way.

The controls in the column are quite functional and are PAID FOR :thumbup:

The original Weasel steering levers can be copied as far as the measurements go from the clevis pin hole to the lever pivot point and this will keep the ratio the same as it was in the Weasel.

The Weasel rear axle is complete with all the original parts, so getting the push pull cables connected will be a snap.

Spoke with my guy that we are getting the Weasel from and late April/may as the Snow is DEEEEEEEEEEEEEP IN THERE NOW
 

DAVENET

Bronze Member
GOLD Site Supporter
Re: An introduction/hello and my project.

Well that's an easy fix. Control your left finger.
 

vintagebike

Well-known member
Re: An introduction/hello and my project.

Thanks for sharing your ambitious project. Wish I had better skills, much more time and lots more money.:thumbup:
 
Re: An introduction/hello and my project.

Sitting here watching the snow come down and going over the Safari electrical manual.

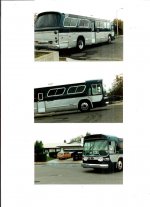
Came to the conclusion that retaining the steering column to keep the ignition key switch, the multi function switch (Dimmer, wiper and turn signals) and the shifter for the auto tranny.
The dash is the digital unit, so keeping things intact will facilitate an easy conversion.

Spoke with a fella this morning about re calibrating the Drac module (Drives the speedo) to reflect as close as possible the real time vehicle speed.

He told me he needed the tire size :ermm: ????
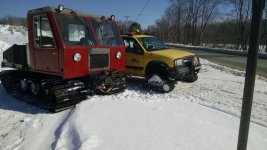
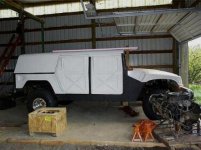
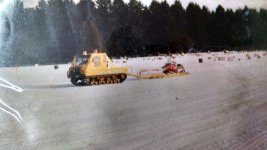
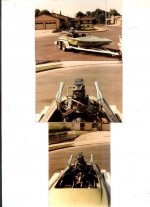
I sent him a piccy of the Astro cat and got him on the same page.

He says if we can pace the rig and note the actual speed vs what the speedo reads that he can mod the drac to get real close to actual speed.

Going to retain the factory fuel tank/ sender etc, but mod the pickup tube to allow a low pressure external electric pump that will work with the Carter carburetor.


Looking at some purpose designed brake line quick disconnects to allow the body to be rolled back for service as well as quick connects for the fuel, heater lines etc.

The ideas just keep flowing and I'm getting them jotted down on a build sheet to refer to later as time goes by.

Looking for a pair of original steering cylinders and levers, but may end up building the set up from scratch.

Will just remove the steering wheel and add a flange adapter to keep all the stuff in the column where it belongs.

Obviously the turn signals will not turn off after a turn :yum:

Will be nice to be able to leave almost all the wiring and stuff from the body intact.

Decided that during the overhaul of the 4L60 that I will mod the box to delete the lockup converter.

This feature was designed for light cruise loads anyway and there is no light cruise in a cat... it's all uphill...

A heavier converter can be built that will offer better power/torque with less heat.

Not sure if the overdrive 4th gear will be of any real advantage, butttttttttttt ????

Gonna set up a disc type drive line brake to work off the stock brake pedal in the Safari.
That will make the driveability more user friendly than needing to haul back on both steering levers to make a normal stop.

Looking like we will need to get a custom shifter cable made to work with the set up due to the relocation of the engine and tranny.

Was thinking about the other engine systems and the power steering pump will not be needed, so an idler for the serp belt will be a must have.

Again thinking about engine stuff and gave though to the AC system, hmmmm AC IN A SNOW CAT :yum:

May keep it for summer excursions in the dirt. :brows:

And the snow is falling

in ten years ( +/- ) of driving a snow cat, the only time I ever stepped on the brake of a snow cat, was the time I found out the brake didn't work - lol - snow cats don't coast worth a damn - lol - it takes a very steep hill to encourage them to roll
 
Re: An introduction/hello and my project.

my first cat after having a junk Cushman trackster ----the last thing the guy told me was----remember if you need to stop ----pull both handles back------ive done it winching----I have a real nice pb240 the spedo I use is on my phone ---the app is a free down load----lol------last year I bought a sv200 it had more crap in it from over the years and everyone had to add something to the inside of the cab---radio/tack/flashing lights-ect.---this thing ran like crap and nothing worked----I gutted it all out got it running great and stuff u need in the cab works now even the fuel guage----kiss-----keep it simple stupid works the best
 

Snowy Rivers

Well-known member
Re: An introduction/hello and my project.

Yesssss.

The simple plan is a good one indeed, especially when it in a piece of equipment that can be asked to perform under less than stellar weather conditions.

Hey...have you ever had anything to do with Dutchman axles ???

I contacted them recently about making me a set of upgraded shafts for the Weasel rear end.

They used to be a great outfit when they were here locally...but I have not had anything to do with them in a long time.

I have heard that the Weasel rear end is plenty stout, but the axles can be a tad sketchy...

Again...
Simple is good.

My first idea of using the complete van was to have everything all in a package that is proven and works well.

All the lighting and important stuff (Creature comforts too) are all present and accounted for.

My son in law has been bugging me to go radical on the mods, and I keep telling him...
Use whats paid for and if it works good then leave it be...

Other than a few minor fabricated attachment points on the van chassis to bolt it to the cat frame I see zero sense in spending $$$$ just because ya can to mod stuff...

The van has a hitch on it and I was thinking about adding a receiver on the cat frame and then tying the two together with a sort of drop hitch to have a good stout pull hitch.

Likely will add a couple large D Rings up front to tie the beast off to our big trailer or to use as a lookup spot for whatever needs doing (pulling some hapless Jeep from a drift)

Never know :thumbup:

Or get dragged home :th_lmao:


JUST SAYIN

Likely will find a place in the "Catvan II" to hang my 2510 President Radio

10 meter Ham with the CB channels activated.

I had two of these back in my heavy trucking days.

With a good whip or twins they will really talk.

25 watts is good.

CB though is still limited, but power does not hurt
 

Snowy Rivers

Well-known member
Re: An introduction/hello and my project.

Yess racer.
Cats are an uphill all the way thing.

I do want a separate brake to stop the rig especially if there should be a reason.

Vintage bike

Thanks a bunch.

Been on the boards for many years and through myriad projects


rdynes01

Hey.

Sorry if its boring.

Engineering and building stuff from scratch is boring.

Buying a ready made unit and spiffing it up is far simpler and takes less calculations...

I always liked the roll yer own.


WE won't force you to read the post :clap:
 
Re: An introduction/hello and my project.

I ran hundreds of miles grooming with my weasel ----I would have to get really rolling and bang the next gear ----never broke an axle-----way better choices out there for a rear end----weasel sprockets are steel on steel tracks--very high wear factor
 

Attachments

  • IMG_20170321_193006044.jpg
    IMG_20170321_193006044.jpg
    67.1 KB · Views: 308
Re: An introduction/hello and my project.

not sure y they are upside down
 

Attachments

  • IMG_20170321_192956851_HDR (1).jpg
    IMG_20170321_192956851_HDR (1).jpg
    65.2 KB · Views: 297
Re: An introduction/hello and my project.

the m29 was a great machine---these pics. were grooming 2 other clubs trails and my trails before a poker run-----they were broken down and the OLD m29 came through----I started first thing in the morning ended very late that night----and I was hammered----it was my poker run----lol-------the pics were from the mid to late 90s-----been grooming a long time--------remember KISS
 

Snowy Rivers

Well-known member
Re: An introduction/hello and my project.

Yeah

The steel sprockets are an issue.

The plan is to fab up and machine a couple adapters to allow the use of the standard Thiokol Spryte sprockets (IIRC 12 tooth rings a bell)

The Weasel rear is narrower than the Thiokol.

I want to end up with 66" centers on the sprockets so the overall width of the tracks ends up at 102"

I can trailer it without needing permits or when weather permits just run it into town to the store if I want and not have issue with width.


The Astro drive train is offset to the right 5 inches, so the Weasel can be offset 5 inches and the adapters made to get the package spot on at 66"

The calcs all work on paper...buttttttttttttttttttttttt, I want the Weasel in front of me before I get all excited about turning chips on the Lathe..

My Takisawa lathe can easily swing the size materials needed to make the sprocket adapters.

I have the Takisawa TSL-800 Lathe witch will handle 16" diameter, but the bed is not all that long.

Sadly I can't do drive shafts in my lathe due to the fairly short bed.

I have a 9 x 42 Bridgeport mill too that will come in handy along the way..

Here is the last BIG project I did.

Badlands HUMMER kit car.

82 Suburban frame with the KIT mounted.

A lot of work.

The kit was not bad, but left a lot to be desired.

Turned out OK

Fella caught me in a parking lot and made me an offer I had to take :smile:


This beast was an everything needed kit.

I had to do the fab work, the mechanical, the wiring for everything, the interior.

Gawd what a chore.
The fiberglass top was OK but the attachment was a tad flaky and took a lot of work to get it water tight and secure.

Other stuff like the radiator was a pain too.
The Kit spec'd out a 350 Chevy and I used a 6.2 Diesel and needed a much bigger radiator to cool the thing.

Just got tedious in some areas.

This is why I want the Van cat concept... Far less fooling about with the nick knack crap..

A piccy of my machine shop.
Tight in there but functional.
 

Attachments

  • badlands06.jpg
    badlands06.jpg
    29.9 KB · Views: 297
  • SHOP.jpg
    SHOP.jpg
    122.5 KB · Views: 294
Last edited:

Snowy Rivers

Well-known member
Re: An introduction/hello and my project.

I turned your cats over...
 

Attachments

  • IMG_20170321_193006044.jpg
    IMG_20170321_193006044.jpg
    128.7 KB · Views: 299
  • IMG_20170321_192956851_HDR (1).jpg
    IMG_20170321_192956851_HDR (1).jpg
    121.5 KB · Views: 297
Re: An introduction/hello and my project.

don't waste your time on the lathe ----they have a tool called high def. plazma cutter I build adapter plates all they time--- they do the burn outs with the bolt patterns also---very cost effective-----this is what I call my 2 plate adapter
 

Attachments

  • IMG_20161212_123816378_HDR.jpg
    IMG_20161212_123816378_HDR.jpg
    70.7 KB · Views: 287

Snowy Rivers

Well-known member
Re: An introduction/hello and my project.

Hmmmmmm

Interesting..
The RPM is low so bad vibes are not gonna be an issue, plus as long as the plates are pretty close (Jigged) these gotta be sweeeeeet.

Thanks for sharing...

Once the Weasel is home and I get a good solid look at the hubs things can come together.

I like the dual plate idea.

They can easily be made to get the offset I need and the RH and LH will be different length due to the Astros offset power train.


I like it...
 
Re: An introduction/hello and my project.

don't worry about the offset-----ford vans have off set rear ends with motor and tranny on center that's what u joints are for----if a shaft can drop from tranny to rear end it can run side ways also build everything on center and let drive shaft do its job----not sure if u drive the best trucks on the road(chevy)but if u have a chevy you will be changing the rear joint---the shaft to pinion angle is almost none and the joint does not move much and they go bad with no grease movement in the joint--movement is good for a u joint--------------and when I build adapters I center off my center hole---I use a piece of uhmw down the center like a wooden dowl
 

Snowy Rivers

Well-known member
Re: An introduction/hello and my project.

Copy on the drive line angle.

Yessss. joints need a bit of wiggle to be happy.

YUP
We have GM stuff.

1995 Burb K2500
97 ASTRO for the cat project and a 2017 Mercedes C300 4 matic.

The Merc is nice, but I love my old GM $hit boxes :thumbup:

I really no not like running a compound angle on a standard joint type shaft.

Far better to keep them just in a single plane and not sideways as well as a down angle.

The Ford has the pinion and the tranny looking at one another in the one plane and the offset is the actual included angle.

My primary shaft needs to be at 5 degrees (Van is right in there) and the pinion and tranny are looking at each other front and back, so if I add the offset too I will have a compound angle...

Used to work in a heavy truck and equipment shop and we got into loads of odd crap.

I want this thing smooth.

I have a pillow block from a Deuce and a half that's getting mounted in the sub frame to be at the same location as the original diffy, and then from the PB its a short run through a CV shaft down to the Weasel box.


All will be pretty good.

I just do not want any shaft vibes in this beast...


Not sure what this thing is gonna do for top speed...but if it will make 25 or so easily I'm good..


Gotta love the challenge of a "ROLL YER OWN".


The Hummer project was fun, bought the used Burb and drove it home.

Was a 4x4 and not until I got the rig going did it become obvious that the rear axle had been swapped.

The idiots did not worry about ratios.

The factory front was obviously from the factory (judging by the dirt and rusty bolts) but the rear had been swapped out at some time not too long before I got the truck.

Front was a 3.42 and the rear was a 3.73 OHHHHH SHHHHH*t

Ended up swapping the gear set in the butt end as I had a set of 3.42 in the closet new in the box...
 

Snowy Rivers

Well-known member
Re: An introduction/hello and my project.

Looking at the tech materials on doing a compound angle drive shaft.

Been a few years since I was working with that stuff a lot, and even though it's doable I don't want the hassle of dealing with the careful angles required to keep things smooth. A single plane set up seems far more comfortable..

If shaft speed was to be very low I would likely thing differently about things.

The Astro has a very limited amount of room between the drive shaft and the fuel tank now with everything stock, and moving thing around is going to complicate things a bunch.

The intent is to add a drive line "loop" in a good spot to add a bit of life insurance to the fuel tank in case of a shaft/joint failure.

The Astro's are not known for issues, but as we both know, when ya modify stuff Chit happens.
 

Snowy Rivers

Well-known member
Re: An introduction/hello and my project.

Got out today as the weather is finally lovely.

Decided to get the drive line idler pillow block reassembled.

For being 65 years old it's literally like new inside.

All cleaned up and reassembled now..

Decided that the OD green paint left from 1953 was just not gonna hack it, and a can of high heat header paint was sitting conspicuously on the edge of the shelf... so it's black now.
 

Attachments

  • PBOH1.JPG
    PBOH1.JPG
    178 KB · Views: 209
  • PBOH2.JPG
    PBOH2.JPG
    170.4 KB · Views: 217
  • PBOH3.JPG
    PBOH3.JPG
    196 KB · Views: 211

Snowy Rivers

Well-known member
Re: An introduction/hello and my project.

I was sifting through a couple Thumb drives looking for a piccy of some sledding from years past...did not find.


But found a few pics of some fun project from my past exploits.

Though someone might enjoy.

The GMC was a sweet little ride.

WE enjoyed it a lot, but when we built the new place here at the ranch we did not have a good place for it for far too long and I did not want the rodents finding their was in.

The Sanger boat was fast and, well I'm too old for that now.

Body took too much beating from that beast...
 

Attachments

  • GM Coach.jpg
    GM Coach.jpg
    88.5 KB · Views: 222
  • River Rat.jpg
    River Rat.jpg
    75.6 KB · Views: 219
Top