• Please be sure to read the rules and adhere to them. Some banned members have complained that they are not spammers. But they spammed us. Some even tried to redirect our members to other forums. Duh. Be smart. Read the rules and adhere to them and we will all get along just fine. Cheers. :beer: Link to the rules: https://www.forumsforums.com/threads/forum-rules-info.2974/

Astro van cat conversion

Snowy Rivers

Well-known member
I hope everyone had a wonderful "Catish" Christmas......

Things got sideways here back earlier this month and I spent a couple weeks mostly having to fool with my internet service.....Our Choices are cellular and satellite out here at the ranch.

After some very severe cases of "Phone rage" I finally stuck a fork in Verizon and signed on with AT&T
All fixed now.

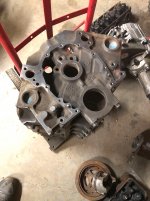
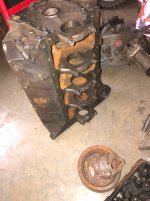
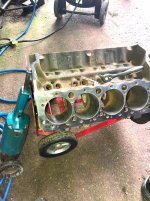
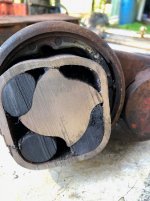
The FrankenCat is back up on the front burner again......
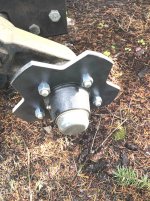
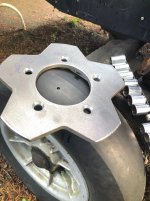
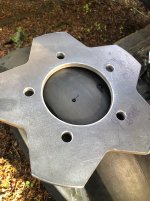
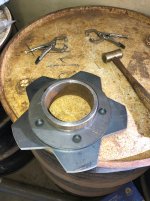
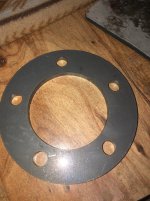
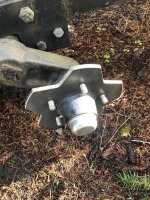
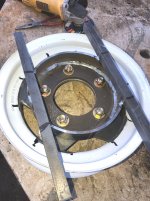
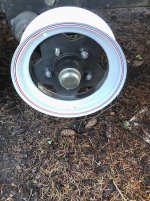
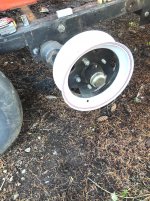
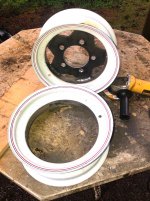
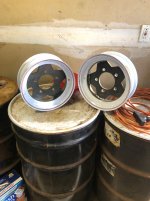
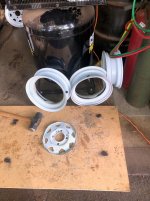
With the weather keeping me pretty much inside, things like the new wheels are in the forefront at this time.

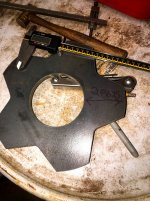
I will get back to work on the new wheel centers now.
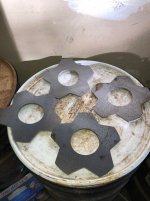
The tooling is all here now to do the lug stud holes....so they can be drilled and countersunk

I will get some pics posted as soon as possible.

With the new year holiday coming at us fast.

Be safe and "GOOD CATTIN" ALL..:clap:
 

Snowy Rivers

Well-known member
OK
Weather is somewhat decent.
Got after the lug hole jig....got that done and the center "Snoflake" drilled and countersunk for the lug nuts

I drilled the holes at 17/32" and the plate slid right onto the hub/lug studs.

Countersunk the holes for the nut to fit in.

I am very happy with the results....

The next thing is to finish the JIG that sets the snoflake into the wheel for welding.

A bit of machining and a couple pieces of 3/4" square stock welded to the jig.

The jig uses the outer edge of the wheel to register from.

The factory wheels are 1-1/4" from the face that contacts the hub.

The new wheels are 4" wide instead of 3" so added 1/2" to the jig.

This will set the center plate at 1-3/4" from the outer lip to the center plate.

Close enough for the crowd I run with.....

Plus or minus 1/16" and nobody gonna care.......

The plan is to get the positioning jig finished and the wheel center tack welded in and see how it all looks and how true it actually runs......
Once this first wheel is complete more can follow really easy......
 

Attachments

  • Buttoned up.jpg
    Buttoned up.jpg
    503.1 KB · Views: 64
  • Countersunk holes.jpg
    Countersunk holes.jpg
    310.4 KB · Views: 64
  • Drilled to size.jpg
    Drilled to size.jpg
    334.4 KB · Views: 62
  • Drill jig with pilot.jpg
    Drill jig with pilot.jpg
    396.1 KB · Views: 93
  • DrillJIG .jpg
    DrillJIG .jpg
    402.4 KB · Views: 57
  • Test fit.jpg
    Test fit.jpg
    978.5 KB · Views: 66
Last edited:

Snowy Rivers

Well-known member
Weather was good.
Got after that jigs/fixtures to finish the wheel.

The locating fixture was a repurposed wheel offset setup from the jalopy shop.
I tossed it in the lathe and trued up the back face and the trimmed it to 1-3/4" thickness and welded the bars on.
Bolted the jig to the Snowflake
Tacked the Snowflake in place and then tried it on the hub.
The unit runs very nice. Tiny bit of overall run out radially. NONE AXIALLY
I am not totally sure the wheels are perfect before I got hold of them...They may have a tiny run out ....no worries.
A good deal for fresh wheels.......at an affordable price.

All welded up and ready for a clean up and some paint......

Not sure on color....likely go with a silver gray to look good with the 4 alloys.

Checked the dims from the cat tub to the center of the tires.....New wheel is spot on with the original location.
Gotta love it when a plan comes together....
 

Attachments

  • Locating jig 1.jpg
    Locating jig 1.jpg
    306.6 KB · Views: 75
  • Locating jig 2.jpg
    Locating jig 2.jpg
    351.6 KB · Views: 73
  • All tacked up.jpg
    All tacked up.jpg
    495.5 KB · Views: 82
  • Tacked up 2.jpg
    Tacked up 2.jpg
    527.3 KB · Views: 71
  • All wqelded up.jpg
    All wqelded up.jpg
    362.6 KB · Views: 76
Last edited:

Bobcatbob

Active member
GOLD Site Supporter
Nice jig! Unless you’re really moving, a small radial runout should have no impact. Welds look great (a skill I have yet to master).
 

Snowy Rivers

Well-known member
Thank you Bob
I am pretty sure that these wheels may have/have had a slight bit of wiggle from the factory.... I am talking just enough to see if you hold a solid marker up close to the rim and spin it slowly ....and then the run out is is a couple places and not 180 degrees out, making me suspicious that the wheels may not be perfect...
Whatcha spect for a $20 wheel from across the pond (Not China though.....South Korea)

No wobble back and forth (In and out )

At 10-15 mph the RPM is just way too slow to ever cause issues....even if they ran out 1/4" I doubt you could notice it.

Not like hitting the slab with your Caddy having a wheel out of round and running 80 mph...

The welding thing. Yeah..Back in the day...before the eyes got old and the need for progressive lenses came along I had a lot better looking welds.... but they will hold things together good..

Some folks can make welds look like they came from a box and you stuck them on ..... A steady hand and good sharp well focused eyes helps a bunch.

My hat is off to the folks that make welds look like a "Stack of dimes"

Preparation is a big chunk of getting great looking welds.
Clean bare metal with no paint, dirt, rust or grease on the surface to be welded.

If you're using a mig welder.... Adjustments on the machine are critical and if you are working outside....old ma wind come around and the gas shield goes away. phhhhhht = ugly welds

I use 75/25 gas (75% argon...25% Co2)
Buying run of the mill gas cylinders from the local "mom and pop" Welding store can be a crap shoot....Are the contents of the cylinders certified to meet specs ???? If the mix is sloppy the gases can stratify and the argon comes off first and then a much higher ratio of Co2 comes off later as the content is used up.
Straight Co2 does not make as nice of a weld.
Pure Co2 is cheap.....
Pure Argon is a tad spendy for run of the mill welding.

Now if you are doing stuff that has to meet very high specs ....different story.

I have run the gamut from the old AC stick welders to the fancy Migs with all the bells and whistles ...I never did anything that had to be certified.... Just mill machinery for making lumber.

I am excited to have the first wheel basically finished....Still needs the valve stem hole enlarged a bit for the tubes....
I'll hit that with a bridge reamer and we'll be good to go....

I do plan to add a stem guard to keep the tire guides from knocking off the Valve stems.....

Just a thought.

If you are running Co2 gas with a Mig (Wire feed) switch to 75/25

Co2 causes a lot more spatter than the 75/25
Spraying parts with the Anti spatter (Bomb can) is a big help keeping the "Dill berries" off the parts, and saves a lot of extra clean up time....
 

Snowy Rivers

Well-known member
Sitting here watching the rain come down and listen to the wind howl.....

With the Wheel engineering handled and the plan fully implemented to the point that more wheels can easily be made.....my attention has turned back to the front axle suspension.

The plan is pretty well in place...other than having a good (SIMPLE) device to control the flex on the axle.

Been thinking about an air bag.... This would be sweet..BUTTTTTTTTTTTTTTTT...An air bag is vulnerable and should be considered a "consumable" especially on the front axle.

Mostly the front axle needs to be flexible enough to take the sharp impact loading off the chassis.....The factory torsion axles were rated at 2500 LB if I remember correctly.

The spindle arm is a fair bit shorter than the arms on Axles 2 ------> 5
I have been thinking seriously on using a Timbre rubber spring mounted in a bracket on the frame that the new front axle reaction arm can push against.
Adjustable at assembly to get the axle located correctly with the chassis flat and a normal load on the road wheels.

Timbren "TORTUN4" units are rated at 6000# max and should be quite satisfactory to do the job. Durable and easily replaced if need be.

Looking at the original Torsion axle that I cut apart the internals can be seen well.
This axle was junk. The Rubber on the one corner had disintegrated and the internal shaft had shifted....Wear can be seen in the steel tube as to the shaft itself.

The plastic split bushing that was installed to help support the assembly is badly worn.

I can't say which went first....the bushing or the rubber....The rubber up in the corner that is missing was just chewed up mush and fell out when I sawed the tube off to salvage the Spindle arm.....


So.....If you have an axle that the bushing is badly worn and things have shifted.....What this picture shows is pretty much what's in there..
Sadly replacing the components is an issue.......
Hence my decision to go another route.......
 

Attachments

  • Axle cutup6.jpg
    Axle cutup6.jpg
    276.3 KB · Views: 60
  • Like
Reactions: PJL

Snowy Rivers

Well-known member
Got after the second wheel in the new series.
The water jet cutter gave us a perfect center hole in the plate at 4.015".....
So all that is needed is to trim the OD of the plate so it just taps into the rim.

From here on the centers will all be the same.....The first one was the prototype...and I allowed way too much material to bore out of the center as well as too much on the OD as well.

We made adjustments to the drawing and they changed the dims in the data going to the water jet.

Now the center hole is perfect...My original ended up at 4.020" and that is fine...but getting the rest to a standard size that I do not need to machine will be sweet.

The hubs have a pilot that is 4"....so a few thou clearance is perfect.

The rain had been nasty today...but got a break for about an hour earlier and decided to gitterdone.
Cut the factory center out and smoothed up things....Did the calculations and got the numbers so the OD of the snowflake can be cut.
2.8625" from the outer edge of the pilot hole to the OD of the snowflake....then this leave a tiny tiny bit to trim and get the rim to just tap onto the snowflake.

From now on these wheels will be very easy to do the rework on.

The centers will be identical and the entire process will be pretty much a slam dunk.

Cut the 4 welds loose
Knock out the old centers
Clean up the weld area
Machine the Snowflake OD
Transfer the lug stud holes
Drill and countersink the holes
Bolt the Snowflake to the alignment jig and fit to the wheel.
Weld the snowflake into the rim

DONE DEAL.....PAINT...

On a nice day these bad boys should be very easy to knock out quickly.

I think on Monday I will call the steel outfit and have them cut the last 4.... this will make 6 wheels of this type
Later on I think I will have a couple extras cut and then toss them on the shelf for spares.
Very pleased that this idea is working out well.....
 

Attachments

  • Number 2 being cut.jpg
    Number 2 being cut.jpg
    432.1 KB · Views: 56
  • Number 2 center.jpg
    Number 2 center.jpg
    439 KB · Views: 57

Snowy Rivers

Well-known member
Weather was decent (Subjective term) and I dragged the box of 4 more wheels out of the truck and went after knocking the centers out.

Takes about 5 minutes to cut the welds loose and the cutoff wheel is good for two wheels before it is too small to gitterdone....
I had cut the second wheel the other day....and had 1 full disc and the last half of the first one left
So three down & one to go
Need to pick up more discs tomorrow.

But got something done.

The dims on the Snowflake from OD of the pilot hole to the OD of the Snowflake I said was to be 2.8625"
I got the Snowflake close and then did trial fits to get a "TAP" fit into the wheel.....
Came out to 2.858" when I could lightly tap things together.

SWEEEEEEEEEEEEEEEEEEET.

Tomorrow I will order the last 4 Snowflakes.....
 

Attachments

  • Second batch4.jpg
    Second batch4.jpg
    283.5 KB · Views: 65
  • Second batch2.jpg
    Second batch2.jpg
    282.4 KB · Views: 63
  • Second batch1.jpg
    Second batch1.jpg
    354.7 KB · Views: 67

Snowy Rivers

Well-known member
Dan....

Thank you for the compliment...

Finding these lovely little wheels so cheap just makes me all warm and fuzzy....

Truth is I would love to have a complete set of the factory alloy HUB/WHEEL combos like whats up front...

Sadly the budget will not permit it.

But....after some trading with our member "Thefatsquatch" I have two more alloys that can go on the rear axle.

The 6 wheels in the piccy are gonna go on the center 3 axles.

Stinking weather has been horrible the past week or so....work has been limited to NOT MUCH

We get a bit of nice weather I want to lay tools on the Alloy tire wheels and get the tires cut off of the wheel and things cleaned up....
The remaining 4 "Snowflake" centers are in the works and should be along soon.

When I spoke with Jay at Forest Grove Iron the other day I mentioned... "No hurry.....fit these in when you can can cut them from scrap pieces"

No sense in paying full bore on the steel just to get them quickly.....if he cuts them from scrap...$1 per pound.....
They end up about $37 each.....Mostly labor
The tariff on the water jet is rather $$$$$$$ per hour....but that machine did not come cheap...plus it needs to make $$$$ too.

The close tolerance that can be obtained makes parts so nice.....Very little machine work needed.......plus the cuts do not mess up carbide tooling like flame cut stuff...and there is zero warping due to heat.
 

Snowy Rivers

Well-known member
Got a call from the steel shop.....The last 4 Snowflake wheel centers are done :clap: :mrgreen: :mrgreen:

Gotta get over and grab those bad boys in the next day or so......

The next major move as soon as we get some weather that allows outside work is to yank the cab back off and yank the power pack out and finish welding the engine mounts.
Steam clean the entire package, replace the soft plugs in the engine, change the oil in the tranny and replace the pan gasket and filter.
There is also a non stock hole in the tub under the tranny that needs to be closed up.
I have the cover...gonna weld it in as it is worthless with the repower..

Then the subject of the engine oil pan comes into view.
The factory Ford 391 had a super deep sump and the cat tub has a boxed in area to allow the sump extension to fit.

The 305 Chevy has a tiny 4 quart pan......this is not gonna cut it for running off road and at weird angles.

Waaaaaaaaaaaaaaay TOO LITTLE OIL.

Figure while the engine/tranny is out to weld up the mounts.....a great time to remove that ugly sump extension (Been hacked by previous owners) and fit in a nice neat extension of about 4 inches deep and large enough to allow a baffled and gated 8 quart pan.

Found a nice "Road race" pan for the Small block Chevy that has a windage tray hinged trap doors and baffles to keep the oil at the pump inlet.

Uses a flexible dipstick tube that screws in on the LH kickout.....
This pan is gonna be plenty of oil for the application.

Possibly super steep nose down might be an issue....but I think this will work fine..

Far better than the 4 quart stock Camaro pan.....

Another thing...this pan will fit any small block with the dipstick notch in the LH side...be it a 305, 350, 400
These pans are not cheap....do not want to do it twice.....
 

Attachments

  • PAN.JPG
    PAN.JPG
    130.2 KB · Views: 60
Last edited:
  • Like
Reactions: PJL

HillBilt

Active member
Great work on the wheels Snowy (y) On the oil pan, great choice, you could also run an accumulator for some added safety and piece of mind. It's also something you could add in later if you run into oil starvation/low pressure issues often.
 

Snowy Rivers

Well-known member
Thanks Hillbilt

I ran an accumulator on my Blown big block Chevies in the drag boats....
I did more snooping and found a great deal (Shipping included to my door) for a KEVKO 1091RR pan that will fit any of the two piece rear main Chevy small blocks.
It does not have the dipstick notch in either side......
Has a kickout on both sides with a plug for a screw in dipstick tube.

7-1/2 quart in the pan
For a play toy...should be fine.
Now is the time to get this stuff dealt with.......come good weather I want to get haulin on this beast....

A winch cat....not so much :lmao:
This pan is better suited than the other one I was looking at.
The fact that pan will fit pretty much any of the two piece rear main small blocks is good.
 

Attachments

  • Screenshot from 2021-01-20 16:59:23.png
    Screenshot from 2021-01-20 16:59:23.png
    310.9 KB · Views: 57
  • Screenshot from 2021-01-20 06:39:57.png
    Screenshot from 2021-01-20 06:39:57.png
    172.6 KB · Views: 59

Snowy Rivers

Well-known member
Got to thinking last night...(I KNOW....BAD IDEA)
Butttttttttttttttt....With the engine back out of the cat and getting some cleaning and then the bigger oil pan.....
Why not check the bearings in the bottom end, replace the rear main seal, timing chain and sprockets, timing cover seal/gasket.

I want to do the soft plugs in the block and add a block heater as well..............
Having the pan off presents a great time to check things over.

The heads have been off....The block is blue, the heads black and I think the timing cover is orange.....

The heads are 305 heads according to the markings on them.

Would seem that a cursory peek would be a good idea.....
Definitely gonna Hot wash that bad boy....and paint it.. CAT YELLOW....
 
  • Like
Reactions: PJL

Snowy Rivers

Well-known member
Sitting here watching the snow fall....(Not much....just on the edge of it. about 500 feet higher would be in the snow real good.

Surfing Craig's list and and spotted a CHEVY SMALL BLOCK 400
Block, crank, heads, rods and pistons.
All apart.
Comes with a nice engine stand too....$50 for all of it.

I have been toying with the idea of a 400 SBC for the FrankenCat.
These engines were made from 1970 to 1980 ...so they are not that plentiful any more.
For the price I can't afford to say no.
I definitely can justify dragging it home and sticking it in the corner of the shop.....

If this works out I may hold off on putting the new pan on the 305....but instead just get the 305 cleaned up and use it as is to get the cat operational....

Build the 400 and put the new goodies on it instead.

I can go ahead and modify the belly of the cat to accept the new pan and then just move on with things as we are heading now.

I found some of the Flexco 550 belt lacing hinges on ebay yesterday.....Now we have enough to do both tracks plus spares...
 

Snowy Rivers

Well-known member
Still snooping to see what can be done with this Small block 400
Vortec 350 heads
Drill the 6 steam holes in the Vortec heads before sticking them on the 400 block
The Vortec heads have smaller chambers and will bump Compression ratio up to 9.5:1
Add a nice thumpy cam Maybe an L79 knockoff
Intakes for the Vortec heads (4 barrel Carburetor type) are easy to find.

This should make a very good engine for the old 2100 chassis.
Decent RPM and gobs of torque.....

FrankenMouse..... :lmao:
We got out first decent snow today.
About 4-5" out there.
Stuff was just snot.
We were out for the day and had a real beotch getting back up to the ranch.
Road all plugged up with little cars with street tires and all tied up in a knot.

Took about 2 hours to get what normally take 15 minutes to drive.

The Avy has street tires on it...but the 4x4 worked (I have never used it since we got the rig back in 2018)
We normally use the Burb in the nasty weather.

But all home safe and sound.....fires all stoked up.....

Would be a sweet evening to be "Gone Cattin" ah well.
 

Snowy Rivers

Well-known member
More goodies.

Just had a fella call me up in regards to an ad I placed in Craig's list

Trying to scare up a set of Vortec heads..

Dude offered me a complete 1998 Vortec 350 Fan to flex plate $150
Has all the serpentine equipment on the front too...PS pump.

Low mile...spun a bearing...

This find will definitely stock up a lot of needed parts for the build
 

Snowy Rivers

Well-known member
Took some much needed time WITHOUT SIDEWAYS RAIN to check out the Burb for this weekends Scrap iron run.
Tomorrow is pretty mundane.
A couple hours total across town to load up the 400 small block and all the junk with it.

Sunday is about 2 hours each way......to get the 98 vortec engine...
Aired up all the tires on the rig and the trailer.....all were a touch low.
Tossed in all the stuff one usually needs.
Ratchet straps, come along's, chain....a good sized tire to sit the engine on and a few tools....a tarp.

Really want to keep the rain out of it if at all possible.

Be way more fun if the weather was gonna be nice...but the goodies are available now and at a great price.

A lot of work to do before this iron will be needed.....but as they say..Get while the gettin is good.
 

Snowy Rivers

Well-known member
Made the first haul yesterday.
All went well and was a very smooth transaction.
The 400 block is a tad rusty, but will clean up fine.
Crank is a boat anchor....rusty......

Got the con rods. ...they look to be quite usable.....
Going to bore the block .030" over.....

Today we head south to get the complete 98 Vortec engine.....
Lets hope things go smooth.

With these goodies there does exist a wide range of options as far as what can be tossed together
 

Attachments

  • 400iron1.jpg
    400iron1.jpg
    352.9 KB · Views: 67
  • VORTEC350.jpg
    VORTEC350.jpg
    270.7 KB · Views: 66
Last edited:

Snowy Rivers

Well-known member
Day two of "Scrapin"
All back safe and sound.
All loaded up.....was a 6 hour trip from start to finish.

This may be a foundation for the Cat....we shall see.
 

Attachments

  • VORTECATCG.jpg
    VORTECATCG.jpg
    582.9 KB · Views: 68
  • Like
Reactions: PJL

Snowy Rivers

Well-known member
Raining cats and dogs outside.....so decided to do some snooping and try to find a crank for the 400 SB

Called up the machine shop I know and asked him if he had any 400 cranks.. NOOOOOOOOOOOOOOOOOOOOOOOO LONG AGO THEY WENT AWAY.

I called up a rebuilder supply over in Troutdale...

Fella not only had one...he had a good one that has standard journals all the way.

A trip through the hot tank and a polish and it will be ready for prime time.

$125 for the crank....Just need a flex plate with the balance weight and we are set.

A bit of decent weather and I can get the block outside and clean it up......
 

Snowy Rivers

Well-known member
Snow coming tonight.
Still snooping about for a set of pistons for the 400.
May have a set of .030" overs on the rods from the same outfit I got the crank from.
Lets hope......
A good set of used slugs on rods would be sweet.

I am really looking forward to some decent weather to be able to get back onto the cat.

But at least some progress is being made.....
 
  • Like
Reactions: PJL

Snowy Rivers

Well-known member
Looking in the Cat yesterday between rain and shine.
Getting the idea in my head that after building the fresh engine for the cat that it would be a smart idea to run test it out of the chassis.
Only take an afternoon to toss together a test stand and be able to do a complete warm up and run test of the engine where we can see everything.
Be able to see any oil leaks or ????

Set the timing and adjust the carburetor....yada yada yada.

Got an email from the outfit I bought the big oil pan from and they said they did not have any more.

Hmmmmm...an ebay ad and they don't have the item....
Buttttttttttt...They promptly refunded the $$$$$$

I ordered the same pan from another seller...Cost $20 more.....but it is marked as shipped and be here the 6th

Sooo
I am snooping for a chevy 4 spd bell housing to bolt the engine to.... I have a heavy set of casters left from another project and they came off of a car roll around plate....plenty heavy.

Real easy to set up a oil pressure gauge.....Ign switch and such......

Considering that the cab must come off the cat to get the engine out/in.....having the engine up to "TURN KEY STATUS" will be good insurance and possibly save "Blue air and tool throwing" :lmao:

Somebody was talking about a big Arctic blast coming......not conducive to working outside.
 
  • Like
Reactions: PJL

western auto

Active member
Looking in the Cat yesterday between rain and shine.
Getting the idea in my head that after building the fresh engine for the cat that it would be a smart idea to run test it out of the chassis.
Only take an afternoon to toss together a test stand and be able to do a complete warm up and run test of the engine where we can see everything.
Be able to see any oil leaks or ????

Set the timing and adjust the carburetor....yada yada yada.

Got an email from the outfit I bought the big oil pan from and they said they did not have any more.

Hmmmmm...an ebay ad and they don't have the item....
Buttttttttttt...They promptly refunded the $$$$$$

I ordered the same pan from another seller...Cost $20 more.....but it is marked as shipped and be here the 6th

Sooo
I am snooping for a chevy 4 spd bell housing to bolt the engine to.... I have a heavy set of casters left from another project and they came off of a car roll around plate....plenty heavy.

Real easy to set up a oil pressure gauge.....Ign switch and such......

Considering that the cab must come off the cat to get the engine out/in.....having the engine up to "TURN KEY STATUS" will be good insurance and possibly save "Blue air and tool throwing" :lmao:

Somebody was talking about a big Arctic blast coming......not conducive to working outside.
personally id drop a junkyard ls motor in there with a fresh set if lifters/oil pump/rod bolts and never look back.......anything earlier than a vortec seems to not like constant load/rpm without pushing oil out everywhere ....... at least in the boat world
 

Snowy Rivers

Well-known member
I ran boats for quite a few years.

If the PCV system is connected up they should not leak oil.
I am not an LS fan myself (Have one in the Avy) Building this 400 with the Vortec heads and a few things should make a really nice power plant.

AS long as the crankcase runs a slight negative pressure there should not be issues.

We always ran Rat motors in our boats.......never an issue...least not with oil leaks.
 

Snowy Rivers

Well-known member
Got some progress made today...
The "Promised good" .030" OS pistons turned out to be junk.

Not worth wasting the time on.
Took the rods I got with the 400 to the machine shop to be resized.

I set the rods up and measured them....they are the standard Small block 400 rods at 5.565" long Center to Center.

So the big issue...without numbers on the caps and rods there is no good way to be sure the parts are in the same place they were back when the engine was together last..

Told the shop to clean them and resize to specs.

I got the Mic's on the crank this morning.

ABSOLUTELY SPOT ON FACTORY SPECS...The mains and rods are perfect.....

Standard bearings will make this little beast fine and dandy.

The pistons...
Block should clean up at .030 oversize..

Make this a 406 Cube FrankenMouse

Snooping around and found some NEW OLD STOCK +.030 standard dish type pistons.

With the Vortec heads the calculations gets this widdle mouse in the 9.5:1 compression arena.

This should be sweet on pump gas....

I hate to trip the trigger on the pistons until I get the block cleaned up a bit and make sure there are no surprises.

Fella has several sets of slugs....Hopefully I can get the block outside and have a good look at it soon.

Just a few more details and I can stick this stuff on the shelf and hopefully get back on other details on the cat.

We have enough parts now to finish a complete set of wheels....

Before I yank the cab back off I want to finish the nose on this thing.....the ant eater hood and cowl needs to be fabricated....

Then I won't need to be worrying about welding over the new engine.

Gawd....there is no end to this thing....Actually a lot of progress has been made and we are not quite a year since it came home.

Diffy is basically complete now......Just need to toss the axle tubes on and bolt it back in.....
Thing is too long with the tubes bolted on....and will be a PITA in the shop that way.


A little here and a little there until spring gets here.

My next major thing is to get the Vortec 350 apart and the goodies cleaned up and on the shelf....
I need the trailer soon to get another task done and that Small block is in the way......

Fun Fun Fun.
 

Snowy Rivers

Well-known member
Weather was basically dry today....but windy and cold.
Said T'Hell with it......gotta get some work done.

Got the 400 block outside and went after it.

Took the 9" grinder with the big cup brush after all the surfaces...
Decks
Pan rail.
Bell housing surface
Timing cover and fuel pump flange area.
Ran a bottle brush hone through the cylinders....yeah.... we gotta bore it .030.
One has a place water had been there....just too ugly to let go.

I tapped all the threaded holes to clean them up.

Took a magnifying glass to the area between the upper steam holes and the adjacent head bolt hole....NO APPARENT CRACKS.
Marked the main caps and got them off.
Wire brushed the seat in the block....not much rust...but grungy.
Washed up the main bolts and buffed them up well.
Main caps fit nice and snug.....Yesssssssssssssssssss.

The main bearing are likely what came in it new (GM200 3-78) March of 78 so this block is not older than a 1978....

Ordered up a set of bottom end bearings this morning.

Think I am gonna have the shop check the main line with a bar to see it we need to do an align hone on it...

The front and rear caps can't be mixed up...but the center 3 can......The were not numbered....most big block Chevy's have the numbers cast into the caps....Not these.

I marked them.....so we shall see...

It was nice to get all the threaded holes cleaned up....and not find any broken bolts or messed up threads.

One missing head dowel....no worries....more in the store.....If we deck the block they come out anyway.....

The dusting of Orange still showing inside the block will go away after the hot tank gets after it.......

Main caps and block bores look great..
No signs of the bearings moving about.....

Now.......
If the heads off the Vortec are usable ...as in....NO CRACKS...We are golden....

Unless something hinky shows it's head....things should have been worth the effort.
 

Attachments

  • 400 CLEANING UP1.JPG
    400 CLEANING UP1.JPG
    283.4 KB · Views: 64
  • 400 CLEANING UP2.jpg
    400 CLEANING UP2.jpg
    320.4 KB · Views: 62
  • 400 CLEANING UP3.jpg
    400 CLEANING UP3.jpg
    473.8 KB · Views: 66

Snowy Rivers

Well-known member
I looked up the numbers off the engine deck
Final assembly Flint
Date May 18 1980
GMC 1 ton standard cab
TH400 trans
175 hp 4 barrel carb
California truck
 
Top