
-
Please be sure to read the rules and adhere to them. Some banned members have complained that they are not spammers. But they spammed us. Some even tried to redirect our members to other forums. Duh. Be smart. Read the rules and adhere to them and we will all get along just fine. Cheers. :beer: Link to the rules: https://www.forumsforums.com/threads/forum-rules-info.2974/
You are using an out of date browser. It may not display this or other websites correctly.
You should upgrade or use an alternative browser.
You should upgrade or use an alternative browser.
Converting to a 5 man cab!
- Thread starter KickerM
- Start date
Making progress on the motor as Parts show up...lol bit frustrated that I order the Industrial water pump for my Industrial Ford, only to find that it is 3/4 thicker and unless I remake my alternator bracket it won’t work...so back to the automotive version, I cross referenced FoMoCo C8AE -8505 K to a Gates 42057 so that will be good and now it’s mounted!


Sent from my iPhone using Tapatalk
Sent from my iPhone using Tapatalk
Last edited:


PJL
Well-known member
http://www.forumsforums.com/3_9/showthread.php?p=20688562
Here is the thread where I documented the install. There were a few bugs but minor. The coolant temp sensor was installed incorrectly. I removed the T and threaded it right into the block. My coolant guage sensor is now in the block drain. I removed the tank heater that was there. The heater hoses go to the water pump and thermostat housing.
Here is the thread where I documented the install. There were a few bugs but minor. The coolant temp sensor was installed incorrectly. I removed the T and threaded it right into the block. My coolant guage sensor is now in the block drain. I removed the tank heater that was there. The heater hoses go to the water pump and thermostat housing.


I have the FMX but it Looks like I will have to fabricate a new kick down lever for mine, mine is too tight to the throttle body to make it easy to connect, i better get my tranny mounted back to the motor!
Sent from my iPhone using Tapatalk
Sent from my iPhone using Tapatalk
I’ve got a M925......and thinking you suffer the same disease ....”what else works well in the snow besides a 6x6 with super singles”.
Engine looks great! When I sought out a water pump for my SW48 with a Ford 300 industrial, almost fell over on the OEM price....luckily found a used one for less, but HOLY COW....nothing is cheap on the industrial engines.
Bob
Engine looks great! When I sought out a water pump for my SW48 with a Ford 300 industrial, almost fell over on the OEM price....luckily found a used one for less, but HOLY COW....nothing is cheap on the industrial engines.
Bob
Progress is slow but a few updates...
So the AFI kits ECT (water temp) sensor has to have constant flow on it to read accurately, so I was able to install this 3/8” T (Thanks PJL!!) inline with my heater hose to make everything work since the factory temp sensor is in the thermostat housing.
Next pics are of the bracket I made to hold the ECM off of the Hyd pump bracket as the AFI kits one wouldn’t work where the old mech Fuel pump goes
Then I went to mount my coil but come to find out the Ford guy must of forgot to drill and tap the second hole[emoji849], coil still fits and I was able to get all my plug wires lined up...
I used Moroso Mag tune wires 9003M
They are supposed to be the best....we’ll see!
Last edited:


Snowy Rivers
Well-known member
Great looking details.
Making them look factory is A SWEET TOUCH
Making them look factory is A SWEET TOUCH
The AFI Kit has a few components that mount around the engine, but I like to try and keep everything compartmentalized, so I straightened the old plate that had the starter relay solenoid and voltage regulator, added some angle iron and drilled a bunch of mounting holes and got all the components on the plate. Now to order battery cables and the 6 GA wires for the Alternator. Any suggestions on places to get Cables???


Snowy Rivers
Well-known member
Very very nice....Getting all the electronics in one easy to reach spot.....perfect.
As far as cables go..... solder on copper ends are the catsass....and they will not leave you scratching your butt when corrosion sets in where you can't see it.
I have fought bad cables many times and crimped joints are a no no on anything mission critical...
Get the copper solder on ends... slip a short length of heat shrink tubing over the cable.
Put the copper end in the vice and add a bit of soldering paste to the cup and work it around.
Strip the cable insulation back and insert into cup.
Heat the assembly with a propane torch and add solder and allow to flow into the wire/cup until the cable has saturated and the solder is at the top lip of the cup.
Let cool.... DO NOT USE ACID CORE OR SILVER.
Use a good lead rosin core solder and life is good.
Slip the heat shrink tube over the cup end of the assembly and wave the torch across it just heating enough to shrink it to form a nice tight fit over the cable and copper end.
This cable will never leave you stranded with a corroded crimp buried where you can't see it.
Crimps are a ticking time bomb on the heavy battery cables.
I have had to deal with this crap in the cold....no fun.
A soldered connection is 100%
The crimps will always start to oxidize in the area the metal is crushed together.
The inner strands eventually loose contact and the entire assembly fails.
Soldering forms a 100% reliable connection....and you can get your custom fit just perfect.
Lay it all up...mark things...solder...good to go
Try and get as fine of stranded wire as possible.
USE the Marine type battery terminals with the stud and wing nut.. Connect the copper terminals to the studs... Always carry a couple spares in the tool box..
If a battery terminal fails...simply toss it in the dirt and put in a new one... Light coating of white grease on the terminals helps to stop corossion is a plus.
A Glass mat battery like the Optima is a real plus too....they don't eat up battery trays and terminals....also they can be had with top terminals as well as side terminals
Any battery with access covers on top of the cells is a liability and will contribute to failure you don't need/want CORROSION ACID LEAKAGE
Welding cables are the ticket... fine strand...https://www.googleadservices.com/pa...i76-a7t-XnAhWbKDQIHT3YBi8Q9aACegQIDRA0&adurl=
Hope this helps.
Last edited:
olympicorange
Active member
………. well said ,..... 
Very very nice....Getting all the electronics in one easy to reach spot.....perfect.
As far as cables go..... solder on copper ends are the catsass....and they will not leave you scratching your butt when corrosion sets in where you can't see it.
I agree whole heartedly with the connection methodology outlined above.
I however want to share a non argumentative approach to the crimp is evil thought.
I have quite a few hours engineering and installing wire harness and power distribution on off road race trucks.
Solder on joints are an art. there is a differing approach to the junction of where the solder does not get. shaking and bending a soldered conductor quickly work hardens the copper and copper becomes brittle very quickly.
we tried crimping and soldering after crimping and still found a crimp only to survive the fatigue better.
so here is the rationalization. ( i feel ) the bigger the cable the better it takes to the soldering only technique. Silver soldering is best due to the high melting point.
the cables have some mass to them and are not prone to wiggle about.
Crimping with a No-lox type product eliminates the corrosion element
the race program did not use branch circuit protection on non critical loads. we undersized conductors and relied on heat to limit current.
there is no point preserving a failing component in a RACE. with an eye on the prize mentality we refined the harnesses to be a light and durable as possible. BMW and AUDI are working on raising voltages in cars to get the wiring smaller and the there is something to be said for that.
there is no end all be all in the wire connections world. but clean secure and properly sized is the key.
Connect how you would like but there is multiple approaches. properly applied all have there merits
alryA
Well-known member
I'll throw in my 2 cents,, which is not really worth that much.  Concerning the whole "crimp verse soldering argument. I was assembling the circuit for an all-way blade for use on a UTV and planned to solder for the corrosion/wet/dependability thing. I pulled in the help of a Electrical Engineer who specialized in power circuity and he had just graduated from MI tech. He said he had helped on a satellite project and they had used crimps because they had found those to be more dependable than solder. Ask if you like to see the all-way blade thingy...
Today I crimp.
Concerning the whole "crimp verse soldering argument. I was assembling the circuit for an all-way blade for use on a UTV and planned to solder for the corrosion/wet/dependability thing. I pulled in the help of a Electrical Engineer who specialized in power circuity and he had just graduated from MI tech. He said he had helped on a satellite project and they had used crimps because they had found those to be more dependable than solder. Ask if you like to see the all-way blade thingy...Today I crimp.
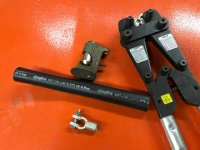
As I understand from a friend who was chief engineer for Freightliner Trucks, USAF, aircraft builders (Boeing), and their trucks, use only crimp connectors. I used them forty years ago on a vehicle which now has over 600,000 miles on it and no failures. Here's a couple of options for crimping battery cables, the two handle crimping tool is the best way but the hammer and anvil, which is cheaper will do a good job too. The shrink tube shown is super with a silicon type inside which makes for an air tight seal and stiffens the connection where it is most likely to fail; the area where the wire insulation ends and the terminal begins. Sigmaform is the manufacturer of the shrink tube. Find it on the interweb.
Attachments
Snowy Rivers
Well-known member
Well now....
Many ideas.
My stead fast opinion comes from over 40 years in the automotive, trucking and other machinery building bizz
The crimps are FAST and this makes for ease of assembly...
Corrosion will happen....and is most common at the battery ends.
I have seen it on the block ends of ground cables.
This entire issue seems to be limited to heavy battery cables mostly.
Dampness is a killer....get moisture in the connections and electrolysis can set up in any circuit.
Dissimilar metals....yada yada yada.
Bottom line.
Whatever you are comfortable with.....
Myself, I will continue to use lead solder on the heavy cables...
Main reason is that every strand in the conductor is making 100% connection and corrosion that creates high resistance will not occur.
this is better than 2 track vs 4 track debate.....
Snowy Rivers
Well-known member
I agree with Redsqwrl 100%
Light weight wiring that's soldered and allowed to flex certainly can break due to fatigue.
My prime example as to why I still believe what I do.
Years ago were were out in the winter -20 F
One of the rigs would not start....
New batteries
Cables were only 4-5 years old (GM SIDE TERMINAL)
Everything looked super...
Jumped the thing and still no joy.
Much to the alarm of the owner I grabbed a knife and started hacking the RED plastic off the battery cable end.
The cable was one of those dipped type that has the crimped connector totally encased in the polymer.
Deep in the connector was a mass of white corrosion.... Cable end junk.
The side terminal was spotless at the battery.....absolutely perfect.
We cut off the old end and cleaned things up.
Then came a RUBE GOLDBERG MIX AND MATCH of junk several of us had in our tool boxes to get the cable connected to the battery.
Cable was long enough thankfully to allow for the Mickey Mouse.
Had we not had tools and several bunches of junk to sift through that great looking factory cable would/could have been a serious issue....even life threatening.
Points to consider
Automotive
Marine
Snowcat
Heavy equipment
These bad boys operate in pretty nasty environments with water, slush, dirt and GAWD knows what all else getting tossed at the equipment.
Snow water is the softest water on the planet....and it can get into nearly anyplace.
Then add minerals in the dirt that will come over time and the recipe is perfect for corrosion to get a foothold.
The chances of a large heavy battery cable breaking off due to fatigue is likely zip.0
If it's swinging around loose ummmmm .....We don't build stuff that way.
Rough off road is a special place with it's own rules.
Engineering is fine....real world performance is yet another place altogether.
Just sayin..
Not to argue...but simply point out what I have seen and learned from...
this is better than 2 track vs 4 track debate.....
Sorry to disagree, but I think three tracks are the best choice. All tracks on the ground in any situation.
Sorry to disagree, but I think three tracks are the best choice. All tracks on the ground in any situation.
but but but, three tracks, how did get off track, 2 vs 4 track,
to crimp or not to crimp, that is the question,
Squirrel?
Snowy Rivers
Well-known member
Tricycle cat ????? :th_lmao:
Two tracks up front and one in the rear...LIKE A SPYDER ????
Hmmmmmm
I still like 2 tracks.....Tucker 4 trackers are cool though.....
Two tracks up front and one in the rear...LIKE A SPYDER ????
Hmmmmmm
I still like 2 tracks.....Tucker 4 trackers are cool though.....