
-
Please be sure to read the rules and adhere to them. Some banned members have complained that they are not spammers. But they spammed us. Some even tried to redirect our members to other forums. Duh. Be smart. Read the rules and adhere to them and we will all get along just fine. Cheers. :beer: Link to the rules: https://www.forumsforums.com/threads/forum-rules-info.2974/
You are using an out of date browser. It may not display this or other websites correctly.
You should upgrade or use an alternative browser.
You should upgrade or use an alternative browser.
Astro van cat conversion
- Thread starter Snowy Rivers
- Start date

Snowy Rivers
Well-known member
Either that or grab a chunk of pipe and toss it in the lathe and chew on it...
Ahhhh...it got the task done :th_lmao:
Ahhhh...it got the task done :th_lmao:
Snowy Rivers
Well-known member
The materials for the new axle mountings will be in today.My head is still spinning after yesterdays imagineering and drawing session.
Going over availability of materials to see if what I want is available.
Schedule 80 steel pipe for the adjuster bracket bushing tubes, and some 3" DOM tube (3" OD X 2" ID) For the airbag/rubber spring mounting arm.
So far the availability looks good....will know in a while.
Most of the other materials are standard stuff and just a matter of grabbing it and cutting to length and getting the tools on it.
Seems that some of the pictures for the last few pages are MIA
I will put them in this post and maybe the others will show up soon
Snowy Rivers
Well-known member
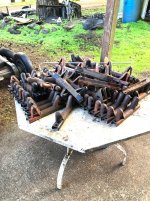
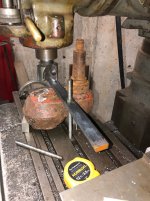
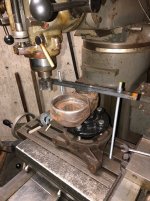
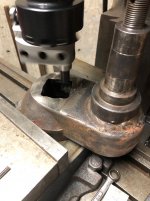
The actual slider track adjuster tubes are still in the cat along with the old bent axle.
I need to remove the axle and the adjusters so I can measure up the slider tubes.
This cat has the Hydraulic (Grease filled) Cylinders to adjust the tracks.....I will remove that entire assembly and while they are out they can be checked over.
The new slider/adjuster/axle mounts will need to be machined to allow the adjuster cylinders connect as they did to the factory parts.....
The plan is to keep the factory parts intact so if at some point they are needed they will be available.
my last .02 cents
golly geez this would look so kewl on the rat cat

golly geez this would look so kewl on the rat cat
Last edited:
Snowy Rivers
Well-known member
I think I will need to build a much heavier Front axle to hold things up  with the big Detroit sitting on the front....
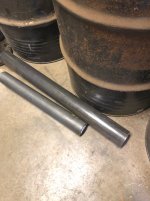
Got the materials to start building the new axle support tubes today.....
3" Schedule 80 pipe in the back and the 3" DOM in front....
Need to cut to length and machine the ends.....
with the big Detroit sitting on the front....Got the materials to start building the new axle support tubes today.....
3" Schedule 80 pipe in the back and the 3" DOM in front....
Need to cut to length and machine the ends.....
Snowy Rivers
Well-known member
Well...It appears that pics are still not fully back up and running...
Good news
Got the UHMW Bushing materials for the new front axles on it's way.
Did a bit of snooping in the grease seal handbook and found some seals that will go into the axle bushing tubes to keep water and debris out.
Normally UHMW is not used with grease....but after a chat with the folks that make the stuff they informed me that grease will not hurt the polymer.....The grease will however keep the axle shaft from rusting...
I got seals coming that use a "VH" type seal lip (Lip facing outward to keep water and dirt out and let grease purge through.
This is the same arrangement that was/is in the hubs on the 2100 bogies.
As soon as the materials arrive things can get to going on the new axle assemblies.
Snowy Rivers
Well-known member
Materials for the front axles (Redesign for separate axles on each side) are drizzling in.
Getting ready to start machining some of the parts and discovered that the supply of carbide inserts for my bring boring bars had dwindled to ZERO
The bar set was made over seas and was a great deal at the time.....but the carbide triangle inserts did not have any markings on them.....
The cutters were a low grade insert anyway....time for new ones.
After much thrashing about and several phone calls I was able to identify the boring bar inserts by size, thickness and relief angle.
Luckily these boring bars use an industry standard insert
Decided to take a trip across town to a tool supply house and make sure the story was real and the new inserts will fit the bars.
YESSSSSSSSSSSSSSSSSSSSSS.....
Bought a couple inserts while we were there (They only had two anyway) Normally these come in packs of 10 pieces.
With this info in hand I now have a very broad range of choices to be able to use depending on the task at hand.
So....with the tooling issue handled we're off to the rodeo...
As soon as the rest of the materials get here the chips can fly.....
I will get pics as soon as the forum is fully functional.
Seems the pics I posted the other day went MIA again..
Doc says it may take a few days for things to completely get back to full function.
western auto
Active member
too funny i know the guy that bought that cab its in yuma az nowmy last .02 cents
golly geez this would look so kewl on the rat cat
Snowy Rivers
Well-known member
Seems we had a glitch and some pix vanished into the ether....
I will try to put up as many pics that I can remember from the last ones on page 38 forward
I will try to put up as many pics that I can remember from the last ones on page 38 forward
Attachments


Snowy Rivers
Well-known member
More pics
Attachments
-
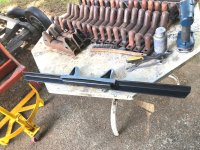
 Final chunk of track2.jpg652.5 KB · Views: 63
 -
 Final chunk of track3.jpg650.6 KB · Views: 62
 -
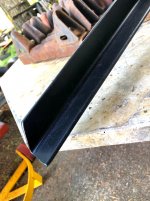
 Guide3.jpg345 KB · Views: 57
 -
 Guide4.jpg345.7 KB · Views: 60
 -
 Guide6.jpg369.7 KB · Views: 58
 -
 Guide7.jpg368.8 KB · Views: 62
 -
 Last guide to come off in the mill.jpg338.1 KB · Views: 66
 -
 Last guide all the soldiers.jpg537.8 KB · Views: 65
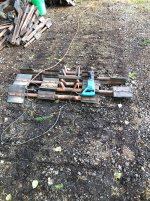
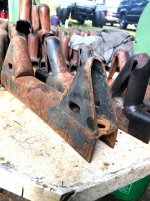
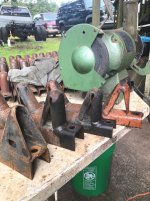
Snowy Rivers
Well-known member
More pics
Axle spindle arms and such
Axle spindle arms and such
Attachments
-
 Axle cutup1.jpg309.1 KB · Views: 64
 -
 Axle cutup2.jpg319.2 KB · Views: 59
 -
 Axle cutup5.jpg335.1 KB · Views: 60
 -
 Axle cutup8.jpg296.6 KB · Views: 58
 -
 Axle cutup11.jpg373.2 KB · Views: 66
 -
 Front swing axle1.jpg721.4 KB · Views: 65
 -
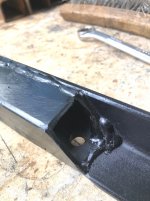
 LH REPAIR1.jpg354 KB · Views: 67
 -
 LH REPAIR2.jpg312.8 KB · Views: 59
 -
 LH REPAIR3.jpg283.2 KB · Views: 63
 -
 LH REPAIR4.jpg297.2 KB · Views: 60
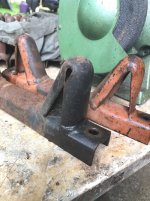
Snowy Rivers
Well-known member
Trying to play catch up here.
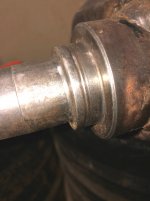
Piccy of the real time (Actual size) drawing of the new front axle and the new steel tube to machine the new parts from.
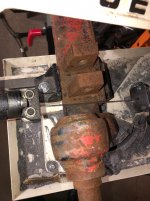
A shot of the worn seal area.
A speedi sleeve will deal with this issue
Piccy of the real time (Actual size) drawing of the new front axle and the new steel tube to machine the new parts from.
A shot of the worn seal area.
A speedi sleeve will deal with this issue
Attachments
Snowy Rivers
Well-known member
I will get some more pics as time and such permits.
Slow at the moment with nasty weather.
I plan on getting going on getting the old front axle out of the cat soon......This will allow me to check out the track adjusters and the cylinders.
Once this is done we will have the final measurements needed to start cutting and machining the parts for the new axles.
Snowy Rivers
Well-known member

Snowy Rivers
Well-known member
Sitting here watching the rain come down and thinking about wheels for the cat.
We all know that the 12" wheels for the Thiokols and others use the 5 x 5.5 bolt pattern..... no longer produced and the cost of the spoke'd alloy cat wheels is off in the ozones....
There are a metric buttload of nice steel 12" wheels available for other apps from Ag stuff to boat trailers. yada yada yada ...butttttttttttttttttttttt 5 x 4.5 is the lug centers of 4x4 ?????? Arrrrrrrgh
Found an outfit the makes some cool stuff for Destruction Derby cars and other off road hard usage toys.
Here is an answer to the problem.
Pick your fav wheel style.....cut the center out and drop on one of these bad boys and good to go.
Countersink the holes to suit with a 60 degree countersink and you are set
 nlrderbyparts.com
At $15 each and a few shekles for shipping What a deal.
3/8" plate with the holes already drilled and the center hole at 4"........ A perfect solution.
A bit of set up and a bit of welding and toss on a fav color paint job.....Good to go.
We all know that the 12" wheels for the Thiokols and others use the 5 x 5.5 bolt pattern..... no longer produced and the cost of the spoke'd alloy cat wheels is off in the ozones....
There are a metric buttload of nice steel 12" wheels available for other apps from Ag stuff to boat trailers. yada yada yada ...butttttttttttttttttttttt 5 x 4.5 is the lug centers of 4x4 ?????? Arrrrrrrgh
Found an outfit the makes some cool stuff for Destruction Derby cars and other off road hard usage toys.
Here is an answer to the problem.
Pick your fav wheel style.....cut the center out and drop on one of these bad boys and good to go.
Countersink the holes to suit with a 60 degree countersink and you are set
ski small center – NLR Derby Parts
nlrderbyparts.com
At $15 each and a few shekles for shipping What a deal.
3/8" plate with the holes already drilled and the center hole at 4"........ A perfect solution.
A bit of set up and a bit of welding and toss on a fav color paint job.....Good to go.
Last edited:
HillBilt
Active member
Sitting here watching the rain come down and thinking about wheels for the cat.
We all know that the 12" wheels for the Thiokols and others use the 5 x 5.5 bolt pattern..... no longer produced and the cost of the spoke'd alloy cat wheels is off in the ozones....
There are a metric buttload of nice steel 12" wheels available for other apps from Ag stuff to boat trailers. yada yada yada ...butttttttttttttttttttttt 5 x 4.5 is the lug centers of 4x4 ?????? Arrrrrrrgh
Found an outfit the makes some cool stuff for Destruction Derby cars and other off road hard usage toys.
Here is an answer to the problem.
Pick your fav wheel style.....cut the center out and drop on one of these bad boys and good to go.
Countersink the holes to suit with a 60 degree countersink and you are set
ski small center – NLR Derby Parts
At $15 each and a few shekles for shipping What a deal.
3/8" plate with the holes already drilled and the center hole at 4"........ A perfect solution.
A bit of set up and a bit of welding and toss on a fav color paint job.....Good to go.
Im not sure how many you need but If you know anyone with a CNC table they could spit those out in a few minutes, might save you some bucks
Snowy Rivers
Well-known member
Nobody I know has that kind of machinery.....
Be cool though
Be cool though
Snowy Rivers
Well-known member
Headed to town a bit ago
Stropped off at the post office and picked up the UHMW tube for the axle bushings.
Also got the seals I ordered for the ends of the bushing housings......
I ordered up one of those rings I mentioned yesterday too..
Gonna use that sucker for part of the tool to locate the centers in the new wheels.
After crunching the numbers on things....buying regular 12" wheels and then changing the centers out was just too much extra $$$$$$$ and a lot more work.
Spoke again with Hey Wheel company and they can supply a 12" wheel blank and a center formed from 1/4" plate that will just slip into the wheel blank to be welded.
Each package is $67
Buying complete wheels are on average about $35 to $50 each, then the cost of the centers at $15
THEN there is the fact that the ready made wheels have a zero offset....and the cat needs 3/4" negative offset.
This made it necessary to use an extra spacer in the wheel.
Far less issue to use the Hey Wheel materials and just locate the centers and weld them in.
The 1/4" plate centers (Come drilled for 5" on 5-1/2" pattern with a 4" pilot hole and the holes are countersunk 60 degrees too.
A no brainer....on this one.
And all of the wheels will end up identical too.
These wheels are heavier material as well;
Attachments

Snowy Rivers
Well-known member
Another slight skew to the plan.
The steel wheel rings cost to ship from Kansas to Newberg Oregon makes the wheel rings cost half again the the amount.
Local sourcing is the ticket....but where ?????
The answer presented itself from a very unlikely source.
I was on the phone with the outfit that actually makes the 12" wheel rings (No center) and they sell the rings to the outfit I had contacted originally.
The manufacture also sells complete wheels with the same rings to several other resellers.
Only caveat is the bolt circle is wrong and they do not offer the 5 on 5-1/2 BC .
The thickness of the material is the same as the original wheels on the cat.
OK.....Sooooooooooooooooo...The unlikely supplier was HOME DEPOT.
12" SPOKE'D WHEELS FOR $20 EACH....Hot Damn....
I can get the custom centers I designed a while back for $40 each....
So $60 per wheel.
The other outfit wants $29 per wheel ring, $38 per center....Plus a hefty shipping cost.
Be near $100 per wheel.
So..Remove the centers on the wheels from HD and weld in my custom centers.
The one thing that adds complexity is the NEGATIVE offset on the original wheels....3/4" negative that has to be there so the tracks will run correctly.
Most standard wheels are Zero offset.
So...Got a couple wheels coming to make up a a pair of prototypes.....
The plan is to simply cut the centers at the triangle openings and leave the remainder of the ring. The ring is welded 100% and would be a tough slog to cut without compromising the wheels integrity.
I have the material coming to build a jig to align the center ring with the wheel at the correct offset to allow welding.....
Piccy shows the point of cut....the remaining ring can remain and will hurt nothing.
The new 3/8" center plate is ready to drill and countersink the lug stud holes....the locate and weld into the wheel.
There is a possibility of adding a piece of steel between the original ring ( spokes cut off) and the 5 spoke 3/8" center plate
My air reciprocating saw will make quick work of the spokes.
I am anxious to get the wheels in my paws and see wassssssup.
I had given thought to machining the center ring out....Way too much and no safe way to grab the wheels in the lathe (That I have anyway.....)
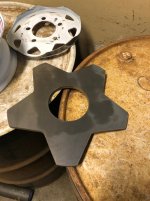
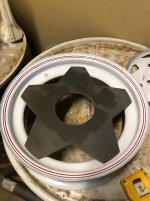
Some decent pics of the water cut centers.
A local shop did this one and they have the details on their machine for subsequent parts.
Adding the extra support might help.....
Sadly a blown tire will end up dinging up the wheels rims with the tire guides.
But the cost of the alloy wheels is outside my paygrade
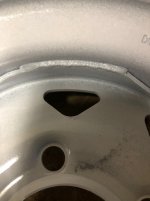
The other piccy is one of the stock Thiokol wheels.
Bead area has been welded up in several places...some places more than once.
The rust is terrible too....JUNK...ALMOST ALL OF THEM.
The steel wheel rings cost to ship from Kansas to Newberg Oregon makes the wheel rings cost half again the the amount.
Local sourcing is the ticket....but where ?????
The answer presented itself from a very unlikely source.
I was on the phone with the outfit that actually makes the 12" wheel rings (No center) and they sell the rings to the outfit I had contacted originally.
The manufacture also sells complete wheels with the same rings to several other resellers.
Only caveat is the bolt circle is wrong and they do not offer the 5 on 5-1/2 BC .
The thickness of the material is the same as the original wheels on the cat.
OK.....Sooooooooooooooooo...The unlikely supplier was HOME DEPOT.
12" SPOKE'D WHEELS FOR $20 EACH....Hot Damn....
I can get the custom centers I designed a while back for $40 each....
So $60 per wheel.
The other outfit wants $29 per wheel ring, $38 per center....Plus a hefty shipping cost.
Be near $100 per wheel.
So..Remove the centers on the wheels from HD and weld in my custom centers.
The one thing that adds complexity is the NEGATIVE offset on the original wheels....3/4" negative that has to be there so the tracks will run correctly.
Most standard wheels are Zero offset.
So...Got a couple wheels coming to make up a a pair of prototypes.....
The plan is to simply cut the centers at the triangle openings and leave the remainder of the ring. The ring is welded 100% and would be a tough slog to cut without compromising the wheels integrity.
I have the material coming to build a jig to align the center ring with the wheel at the correct offset to allow welding.....
Piccy shows the point of cut....the remaining ring can remain and will hurt nothing.
The new 3/8" center plate is ready to drill and countersink the lug stud holes....the locate and weld into the wheel.
There is a possibility of adding a piece of steel between the original ring ( spokes cut off) and the 5 spoke 3/8" center plate
My air reciprocating saw will make quick work of the spokes.
I am anxious to get the wheels in my paws and see wassssssup.
I had given thought to machining the center ring out....Way too much and no safe way to grab the wheels in the lathe (That I have anyway.....)
Some decent pics of the water cut centers.
A local shop did this one and they have the details on their machine for subsequent parts.
Adding the extra support might help.....
Sadly a blown tire will end up dinging up the wheels rims with the tire guides.
But the cost of the alloy wheels is outside my paygrade
The other piccy is one of the stock Thiokol wheels.
Bead area has been welded up in several places...some places more than once.
The rust is terrible too....JUNK...ALMOST ALL OF THEM.
Attachments
HillBilt
Active member
I was thinking about the rim/valve stem issues you brought up on my thread, and now looking at the shape of that wheel you posted. Ever thought of using a rim stiffner? I re-centered a set of Hummer H1 double beadlock wheels for one of my rigs and the outside has just a weld on rim stiffner. I think a set of stiffners might help with the rim damage and protect the valve stem. Just a thought. Hes a photo of said stiffners
![IMG_3904[1].JPG](https://www.forumsforums.com/attachments/img_3904-1-jpg.131557/ "IMG_3904[1].JPG")
Snowy Rivers
Well-known member
Thanks for bringing that up.
Yes...the though has crossed my mind.
Nobody I has found so far offers these for the diminutive little 12" wheels.
Getting the rings cut with water blast would be sweet.
Local shop charges me $40 per piece for the snowflake wheel center in my piccy in 3/8" plate
The issue is when the tire goes flat and the tire guides get after the rim.....the edges of the rim just get beat to Rat Crap
Not just the valve stem. the actual rim gets dented up.
I am not sure that a weld on ring is going to fix the problem.
The alloy wheels like whats up front (Many Thiokols can be seen with the alloy wheel/hub combo in all 10 positions) have a wide flat face that is shaped such that if there is a tire guide strike the wheels seem to shrug it off pretty well.
The steel wheels seem to get hit directly on the edge of the lip area.
Several of mine are just well dented up..
Big huge dents.
I think the solution is keeping the tires from going flat... ??????
I would love a full set of the spoke'd aluminum wheels....but my pay grade will not deal with the cost..
The one downside to the wheel/hub combo is the extra work and tools needed to change the beast in the field.
Snowy Rivers
Well-known member
Weather been nasty....Leaves a lot of time to look for parts needed and figure stuff out and get more engineering done.
Wheels coming....be here this coming Friday.
Have been casually looking for a power steering pump that fits the 305 Chevy and hugs the block.
Have had a want ad running on Craig's list looking for such
Yesterday a fella called up with a pile of GM pumps and one had the perfect brackets to gitterdone.
We are meeting here in about an hour to do the deed.
This will solve the biggest part of the issue with operating the Steering cylinders.
I abandoned the air idea for several reasons.....Mostly due to the issue with finding an air pump small enough and designed for 100% duty cycle that will fit in the cat.
The PS pump will be a snap to control with a couple electric valves.....
A Pressure relief valve, and the two control valves and some good Hydraulic hose.
Possibly a few other goodies....but all simple and easy to find.
This brings up the service brakes.
The steering brakes will be similar in operation to what the 2100 had originally...ON OR OFF
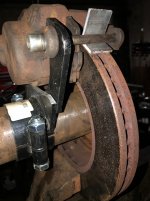
Decided to go with outboard disc brakes at each sprocket.
Found a simple disc brake adapter bracket that can be adapter to with with S10 calipers and rotors.
The brake booster and pedal in the cab will run it well.
Simple and real inexpensive.
Slowly solving the issues ass time goes by.....
Wheels coming....be here this coming Friday.
Have been casually looking for a power steering pump that fits the 305 Chevy and hugs the block.
Have had a want ad running on Craig's list looking for such
Yesterday a fella called up with a pile of GM pumps and one had the perfect brackets to gitterdone.
We are meeting here in about an hour to do the deed.
This will solve the biggest part of the issue with operating the Steering cylinders.
I abandoned the air idea for several reasons.....Mostly due to the issue with finding an air pump small enough and designed for 100% duty cycle that will fit in the cat.
The PS pump will be a snap to control with a couple electric valves.....
A Pressure relief valve, and the two control valves and some good Hydraulic hose.
Possibly a few other goodies....but all simple and easy to find.
This brings up the service brakes.
The steering brakes will be similar in operation to what the 2100 had originally...ON OR OFF
Decided to go with outboard disc brakes at each sprocket.
Found a simple disc brake adapter bracket that can be adapter to with with S10 calipers and rotors.
The brake booster and pedal in the cab will run it well.
Simple and real inexpensive.
Slowly solving the issues ass time goes by.....
Snowy Rivers
Well-known member
Good score yesterday.
Picked up a great power steering pump and it was attached to a hydroboost unit.
Came from a 1 ton Chevy with a 350.....
The pump has to return lines which will be quite nice for the FrankenCat as there needs to be two oil return lines back to the tank.
One from the steering cylinders and one back from the loop circuit through the cooler..
The bracket was not suitable so we hit the U PULLIT this afternoon and found a complete pump, brackets and the works.
Nice to get all the bolts and such too.....
Snowy Rivers
Well-known member
Weather sucks and with the holiday upon us.....Arrrrrrrgh
Finally got over my funk and headed downstairs to the shop.
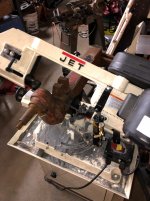
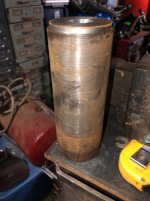
Grabbed the steel tube for the new front axle bushing brackets and tossed it in the saw.
Got the inner and outer tubes cut to length..
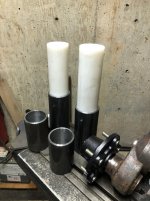
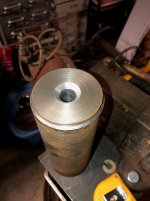
Next they go to the lathe to get the ends faced off, the bore cleaned up at 3" (2-7/8" rough now) and the ends bored for the seals to press in.
The plan is to have the 3" UHMW be able to "just tap in" Two drilled and tapped holes in the side of the tube will have 1/2" brass bolts threaded in through the UHMW bushing to retain the bushing (Bolts will be 1/16" to 1/8" from the shaft surface)
This plan will allow easy replacement of the bushings at a time in the future when/if they need replacing......
I will get some pics when the tools hit the tubing and things look like Cat parts...
Finally got over my funk and headed downstairs to the shop.
Grabbed the steel tube for the new front axle bushing brackets and tossed it in the saw.
Got the inner and outer tubes cut to length..
Next they go to the lathe to get the ends faced off, the bore cleaned up at 3" (2-7/8" rough now) and the ends bored for the seals to press in.
The plan is to have the 3" UHMW be able to "just tap in" Two drilled and tapped holes in the side of the tube will have 1/2" brass bolts threaded in through the UHMW bushing to retain the bushing (Bolts will be 1/16" to 1/8" from the shaft surface)
This plan will allow easy replacement of the bushings at a time in the future when/if they need replacing......
I will get some pics when the tools hit the tubing and things look like Cat parts...
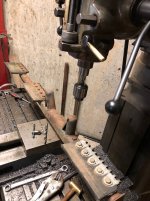
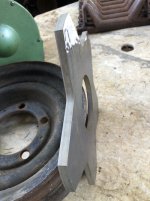
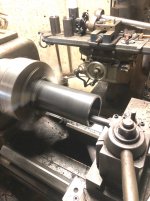
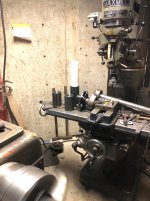
Snowy Rivers
Well-known member
Good things happening.
I got the new front axle pivot tubes in the lathe this morning and machined them for length and then bored them for the UHMW tube to just slip inside...Maybe with a bit of tapping from the Orange dead blow club.
The bushings will be retained in the housings with a couple 1/2" brass bolts that thread through the tube and UHMW
The brass bolts will be short enough that they won't hit the shaft....and even if the bushings wear some the bras will not hurt the shaft.....
Got some new carbide inserts for the boring bar....OH BOY...THESE ARE SWEET.....The overseas bars are fine....but the carbide inserts are rat crap....
A few pics
The lathe is running...not just sloppy picture taking ....
I need to bore each end of the tubes for the seals now.....then they will be ready to weld on the mounting plates..
I need to get the old front axle out of thew cat and remove the adjuster brackets so I can design the new ones.
Fun fun fun
Attachments
Snowy Rivers
Well-known member
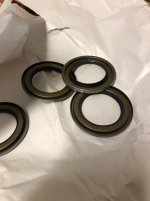
More machine work done today. Got the seal counter bores done on each end of the new axle pivot tubes.
These went well.
Welded steel heavy wall pipe is not bad to work with....just does not machine as nice as some materials though....
Goodies showed up today.
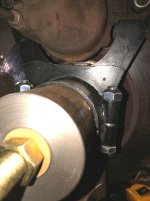
I found some very nice ready made disc brake caliper brackets at a hot rod outfit.
They bolt onto the axle tube and the once things are all hunky dory you simple weld in a couple spots to anchor them.
So...these will actually fasten to an outboard pivot tube the has a couple bearings that idle in the adapter that bolts to the sprocket....
There will be a reaction arm that will fasten to the cat frame to handle the braking torque transmitted by the caliper to the bracket. Having the foot operated caliper brakes on the outside should make for gentle smooth stops....
With the full on or off controls on the steering bands, braking would likely be ugly....
These will be sweet on the outboard disc brakes.
The new brackets allow the "Metric" calipers (S10 fronts) to slip right in and go to work.
A simple adapter bolted to the track sprockets will allow the stock S10 brake disc to fit right up.
Pretty happy at not having to design and build the caliper brackets. $18 each.....Helluva deal...
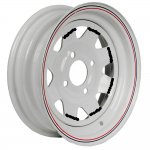
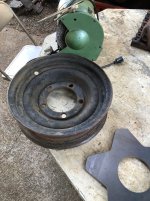
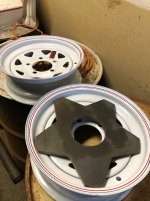
The little wheels I ordered showed up today too.
Got them bad boys outta the box and to my delight they are welded in 4 places . Thought about cutting the welds in the lathe....but the "Grab" in the chuck was sketchy at best....Decided against it....too much danger of a bad wreck...
Cut the wheel center welds with the die grinder and a cutoff wheel.
A swat with a 5 pound club and the center was out.
Measured the thickness of the wheel material.....1/8" thick rim and 1/8" center
The stock wheels on the cat are about the same....After the rust gets scraped off....Yeah buddy
Several wheels I looked at were spec'd at .097" thick material....so the .125" is a good thing.
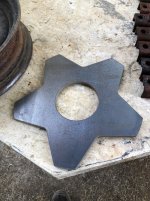
NOW....THE NEW 3/8" THICK "SNOFLAKE" CENTERS ARE GONNA BE TOUGH TO BEAT....They are not gonna bend like the stock stuff does.
5 welds (Both sides of the plate)
If these go away something is not going as planned.....
I ordered the 4 hole wheels as they were cheaper, and the material is the same....but 5 hole ones came...oh well.
Some pics
These went well.
Welded steel heavy wall pipe is not bad to work with....just does not machine as nice as some materials though....
Goodies showed up today.
I found some very nice ready made disc brake caliper brackets at a hot rod outfit.
They bolt onto the axle tube and the once things are all hunky dory you simple weld in a couple spots to anchor them.
So...these will actually fasten to an outboard pivot tube the has a couple bearings that idle in the adapter that bolts to the sprocket....
There will be a reaction arm that will fasten to the cat frame to handle the braking torque transmitted by the caliper to the bracket. Having the foot operated caliper brakes on the outside should make for gentle smooth stops....
With the full on or off controls on the steering bands, braking would likely be ugly....
These will be sweet on the outboard disc brakes.
The new brackets allow the "Metric" calipers (S10 fronts) to slip right in and go to work.
A simple adapter bolted to the track sprockets will allow the stock S10 brake disc to fit right up.
Pretty happy at not having to design and build the caliper brackets. $18 each.....Helluva deal...
The little wheels I ordered showed up today too.
Got them bad boys outta the box and to my delight they are welded in 4 places . Thought about cutting the welds in the lathe....but the "Grab" in the chuck was sketchy at best....Decided against it....too much danger of a bad wreck...
Cut the wheel center welds with the die grinder and a cutoff wheel.
A swat with a 5 pound club and the center was out.
Measured the thickness of the wheel material.....1/8" thick rim and 1/8" center
The stock wheels on the cat are about the same....After the rust gets scraped off....Yeah buddy
Several wheels I looked at were spec'd at .097" thick material....so the .125" is a good thing.
NOW....THE NEW 3/8" THICK "SNOFLAKE" CENTERS ARE GONNA BE TOUGH TO BEAT....They are not gonna bend like the stock stuff does.
5 welds (Both sides of the plate)
If these go away something is not going as planned.....
I ordered the 4 hole wheels as they were cheaper, and the material is the same....but 5 hole ones came...oh well.
Some pics
Attachments
-
 Bushing tubes5.jpg210.8 KB · Views: 56
 -
 Bushing tube6.jpg223.6 KB · Views: 62
 -
 New wheel2.jpg187.6 KB · Views: 62
 -
 New wheel3.jpg296 KB · Views: 60
 -
 New wheels1.jpg291.4 KB · Views: 60
 -
 New wheels4.jpg318.9 KB · Views: 57
 -
 New wheels5.jpg296.7 KB · Views: 60
 -
 New wheels6.jpg272.8 KB · Views: 56
 -
 New wheels7.jpg156.5 KB · Views: 61
 -
 Caliper bracket1.jpg695.5 KB · Views: 59
Last edited:
Snowy Rivers
Well-known member
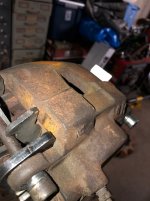
Got a chance today to head to the bone yard....Snooped up a set of the proper Disc brake calipers and rotors for the rear of the cat.
So we find a 96 S10 Blazer with calipers and rotors that looks nearly fresh.
10 minutes and them bad boys are on the ground....Into my 5 gallon bucket and heading to the check out.
Two rotors, calipers and the pads are not light to pack about a quarter mile up hill back to the office...Plus the tool bag..
Get home and try assembling the new brackets.
Wellllllllllllllllllllllllllllllll......Some tweaking was needed to get the anchor pins to thread into the new brackets.
Squeezed the bracket in the vise a tiny bit and thing were sweet.
Then it became obvious that things were a tad askew .
Dug through the info on the caliper brackets and in very tiny print it says use 11-3/4" rotors.
The ad online did not mention this tid bit.
So the nice 10-1/2" rotors will not work.....Huh....You betcha they will.
Brackets will get shortened a bit and the stock S10 Blazer rotors will do fine.
Been nice if they had been a tad more obvious with the requirements.....
This is why a lathe, mill and a welder are so stinking handy....if it don't fit....Hold my beer....watch this.....IT WILL WHEN I'M DONE WITH IT......
Snow cat parts are like hot rod stuff....some modifications are necessary for proper fit...
I want to keep with very easy to find parts.......The 11-3/4" rotors that work with the small metric caliper are not one thats gonna be found at the corner parts house easily......
The 10-1/2" rotors will be quite adequate to reign in the FrankenCat......
Gonna be great to have a separate braking system that is stand alone....
I will get more pics as soon as possible.
With the bad weather these little bits and pieces will keep me in stuff to fool with until things get such that being outside is a bunch more fun....
Snowy Rivers
Well-known member
Let the modifications begin.
Did some measuring this morning and made shopping list.
I needed to make a "Tool" to fit into the disc brake rotors pilot bore and be able to secure it solid.
Once the tool was secure the New caliper bracket could be located....marked and cut.
The bracket needed to be shortened about 3/4" to allow the 10-1/2" rotors to be used.
The bracket is supposed to be used with a 11-3/4" rotor.
These are a hard one to source....and not a local parts house dash in and grab one thing.
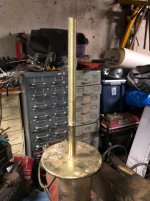
Got the pilot shaft machined to just fit in the rotor....Drilled it full length and then needed a way to secure it to the rotor so the assembly can be lined up and welded....AND KEEP THINGS STRAIGHT.
I had a left over style 30 brake chamber rod/piston on the shelf and it was a perfect fit to act as a clamp to hold the "Tool" in solid.
With the new bracket cut and finished up.....just a matter of getting the slide bolts and the new bracket arms in position and then sliding the lower portion up and behind the arms.
All fit and two little aluminum angle pieces 1/8" thick slipped in to position the caliper correctly and locate the pads at the top of the rotor..
A couple picks of the other new one that still needs cutting.
The assembly ready to weld.
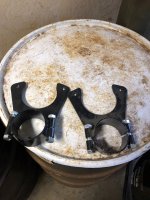
The completed assembly will clamp to the pivot arm that has two pilot bearings to allow the caliper assembly to remain stationary.
A short arm will connect from the pivot to the cat frame....and likely ride in a slot in a frame bracket....
****NOTE****
Once the caliper brackets are located and everything is hunky dory the brackets are skip welded....the clamp setup just allows things to be set up easily....
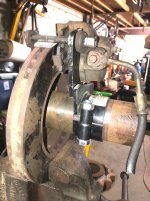
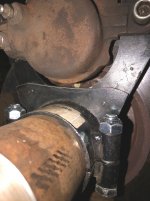
A piccy of what another member did in a similar situation on his 2100.
Did some measuring this morning and made shopping list.
I needed to make a "Tool" to fit into the disc brake rotors pilot bore and be able to secure it solid.
Once the tool was secure the New caliper bracket could be located....marked and cut.
The bracket needed to be shortened about 3/4" to allow the 10-1/2" rotors to be used.
The bracket is supposed to be used with a 11-3/4" rotor.
These are a hard one to source....and not a local parts house dash in and grab one thing.
Got the pilot shaft machined to just fit in the rotor....Drilled it full length and then needed a way to secure it to the rotor so the assembly can be lined up and welded....AND KEEP THINGS STRAIGHT.
I had a left over style 30 brake chamber rod/piston on the shelf and it was a perfect fit to act as a clamp to hold the "Tool" in solid.
With the new bracket cut and finished up.....just a matter of getting the slide bolts and the new bracket arms in position and then sliding the lower portion up and behind the arms.
All fit and two little aluminum angle pieces 1/8" thick slipped in to position the caliper correctly and locate the pads at the top of the rotor..
A couple picks of the other new one that still needs cutting.
The assembly ready to weld.
The completed assembly will clamp to the pivot arm that has two pilot bearings to allow the caliper assembly to remain stationary.
A short arm will connect from the pivot to the cat frame....and likely ride in a slot in a frame bracket....
****NOTE****
Once the caliper brackets are located and everything is hunky dory the brackets are skip welded....the clamp setup just allows things to be set up easily....
A piccy of what another member did in a similar situation on his 2100.
Attachments
-
 New caliper brackets1.jpg245.7 KB · Views: 61
 -
 New caliper brackets3.jpg258.7 KB · Views: 68
 -
 New caliper brackets2.jpg217.7 KB · Views: 67
 -
 New caliper brackets4.jpg344 KB · Views: 59
 -
 New caliper brackets5.jpg273.3 KB · Views: 60
 -
 New caliper brackets6.jpg302.5 KB · Views: 62
 -
 New caliper brackets7.jpg288.6 KB · Views: 64
 -
 New caliper brackets8.jpg240.1 KB · Views: 62
 -
 New caliper brackets9.jpg290.7 KB · Views: 64
 -
 New caliper brackets11.jpg370.5 KB · Views: 64
Last edited: