• Please be sure to read the rules and adhere to them. Some banned members have complained that they are not spammers. But they spammed us. Some even tried to redirect our members to other forums. Duh. Be smart. Read the rules and adhere to them and we will all get along just fine. Cheers. :beer: Link to the rules: https://www.forumsforums.com/threads/forum-rules-info.2974/

Astro van cat conversion

Snowy Rivers

Well-known member
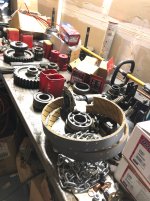
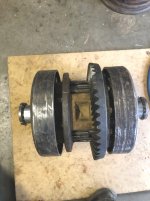
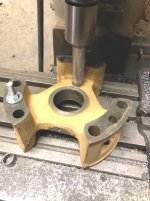
Today was used to attack the center compensator casting....specifically the thrust washers in the center of the unit where the axle stub gears are located...


I did some snooping and then frequented the local tranny shop.....

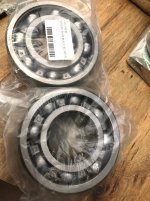
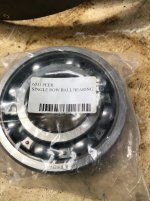
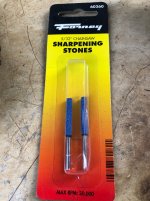
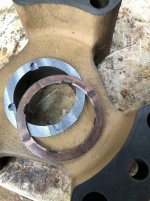
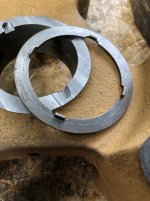
Picked up a pair of washers from a FORD....84GT7D428AA thrust washers

"Front drum to direct drum thrust washer" These are a 4 tang thrust washer that fits the inner gears sweeeeeeet....

I put the stack together and measured the clearance with feeler gauges.

The assembly is worn a bit off from side to side.....so the amount of metal to be cut off the center casting was not the same on both sides.

I WANTED .010" CLEARANCE....BUT WE ARE CLOSE

Milled the one side .022" and the other .037" to get things happy

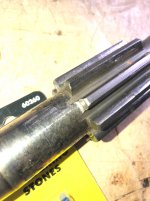
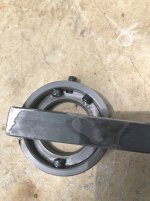
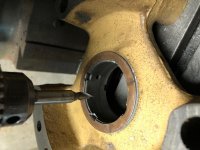
Set things up to cut 4 little notches for the thrust bearing tangs to fit.


Got this all done....feeling real smug....then it happened.

Stacked everything together and dropped the thin washer between the inner gears and things are off by 1/4" or so.

OMG.....WTF

Day started way too early....

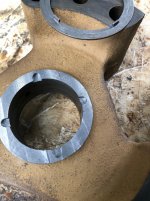
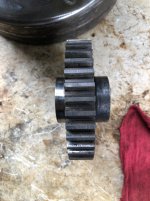
Not paying close enough attention and dropped the one center gear into the compensator outer case and put it in with the long hub to the center.....

THIS WILL NOT WORK :shitHitFan:


After looking at it and thinking OMG ...this is gonna hurt.

Then it dawned on me what I had done.

The total material removed was only ..059"....you can't make this into 1/4"

Swapped the gear position and life is good.


Arrrrrgh....time to put the toys away for the night.....


Looking good....I want to bolt the cases all together with 3 bolts to be sure the inner clearances are where I want them....


The little Ford washers really spiff up that area...
Plenty of bearing area, and these washers are meant to be rubbed on....

No mods needed to be done on these washers....right out of the box...good to go.

They are .062" thick....

Pics of the machining of the hub area as well as the tang notches.....

Almost looks factory...:thumbup:

I wonder why the factory used such crappy washers.


Tomorrow it's gear deburing time..... This old girl may not be the prettiest one at the ball....but it is gonna be just fine......


Bunches of pix

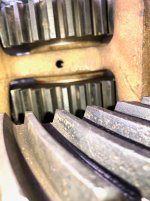
See the one gear on edge.....put it in backwards and you will wonder wassssssssup ....:th_lmao:
 

Attachments

  • Centercompthrust2.jpg
    Centercompthrust2.jpg
    340.2 KB · Views: 177
  • Centercompthrust3.jpg
    Centercompthrust3.jpg
    314.7 KB · Views: 161
  • Centercompthrust4.jpg
    Centercompthrust4.jpg
    241.6 KB · Views: 165
  • Centercompthrust5.jpg
    Centercompthrust5.jpg
    85.1 KB · Views: 157
  • Centercompthrust6.jpg
    Centercompthrust6.jpg
    227.6 KB · Views: 160
  • Centercompthrust7.jpg
    Centercompthrust7.jpg
    242.7 KB · Views: 169
  • Centercompthrust10.jpg
    Centercompthrust10.jpg
    311.1 KB · Views: 158
  • Centercompthrust9.jpg
    Centercompthrust9.jpg
    314.8 KB · Views: 170
  • Center comp thrust1.jpg
    Center comp thrust1.jpg
    319.4 KB · Views: 171

vintagebike

Well-known member
OC-12 question

Are the ring and pinion a matched set? I have a center section from what I think is an OC-12 but no case/pinion and has one drum with a big chunk missing. :hammer:
 

Snowy Rivers

Well-known member
My gears were what came out of the machine and had been in use.
The pix really show the ugly that water can do if left for a while.

I suspect this thing has sat with water in it for several years.

I had to put a wrench on the pinion nut and a 5 foot bar to get it to break loose when it first came home.

Yes..R&P are made as sets and need to be run as such.
 
Last edited:

Snowy Rivers

Well-known member
Sitting here thinking about all the broken stuff I found when tearing into this thing.

First the RH axle bearing was broken up.

Then heading on in, the upper bearing in the drop box on the outside had the cage broken....all the balls were still in the bearing.

The ring gear had a couple teeth with some small nicks....nothing bad...buttttttttttttt???

The Compensator gears appear typical of a well used unit, but the teeth are fine....no undo wear on the teeth.

The case was marked with witness marks before I got in there.

The comp case halves show the inner pinion gear wear into the case.

The outer compensator pinion gears fit the shaft well and the key had not chewed the washers....

Washers were rusty and generally SHOT
Took some snooping online...but found some nice heat treated washers...
Be here next week (July 6)

Overall....I am still at a loss as to what caused the damage in this gear box.

No washers missing anywhere....
All the other parts, although there is wear..... no smoking gun....

One scary thing through....one of the dowel pins that pilot the left had side of the compensator case had worked inward and was lodged in the little hollow in the center case..... I wiggled it with my fingers and it fell out..

Had that bad boy fell out we would likely not be having this discussion....


It was obvious that previous folks who had been in there had try to STAKE the dowel pin holes.....but cast iron does not peen well and crumbles more than anything.

On the case side next to the ring gear the dowels are TIGHT...

I'm going to leave them alone...

The side opposite ..Not so much....all slip in and out easily.

I am going to drill the bosses and the pins and locktite a 1/4" Allen screw in those....

Sort of like what ya see in a 10 bolt GM spider gear shaft retainer bolt.

Very easy to drill and tap the holes to keep the pins in place.

Will also make it easier to get the pins out later if need be.

Sort of a MISSION CRITICAL ITEM....If a pins gets loose GAME OVER

BANG.....:shitHitFan:
 

Snowy Rivers

Well-known member
Ahhhhh yessss

Cleaned up the bands outta the OC12 this morning.

Drilled out the rivets and ripped the old lining off...Yuck.

Got them done and ready to get new lining....

My neighbor stopped by to chat and asked if I had ever used "Grandpa's Tractor shop"

Old fella a couple miles away from us.

We tooled on over and had a chat with the old guy....

He knew exactly what the bands were from.

So we left them with him and he called up a couple hours later and said the bands were ready.


Sweeeeeeeet.

Bearings are starting to show up.

One of the carrier bearings showed up today....

The other one should be here soon.

I am pleased at how fast this diffy is coming along..

May be able to start stuffing the thing back together fairly soon.

I want to go through and smooth up the teeth on the inner pinions as well as the inner axle stub gears.

Crazy that these were left so sharp.

Once the final deburing is done I think this bad boy can go back togrther.


We shall see.....
 
A little AstroCat porn, a reward for all your efforts.:beer: 
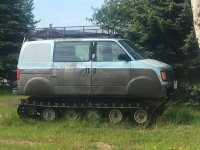
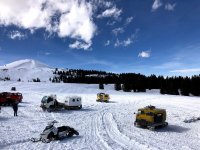
Kenai, Alaska Looked like Sprite undercarriage.
 

Attachments

  • IMG_1919.jpg
    IMG_1919.jpg
    126.4 KB · Views: 146

Snowy Rivers

Well-known member
YEAH.....THATS IT :clap::clap:


I had been in hopes of finding a Spryte to do the project with, but basically nothing showed itself until the 2100 came along to a want ad I posted on Craig's list.

Several cats did present, but were waaaaaaaaaaaay out of my price range.

All but one were turn key...and the one that was not was just a few bits of scrap and too far away to even consider.

The 2100 is certainly going to be a beast when it's done......

At present I am trying hard to keep focused on a very specific set of goals for this summer.

Basically get the drive train completed.

Engine to diffy all in and ready to go by summers end.

Then cover things for the long wet cold

I just don't want to have a lot of parts scattered all over...like the diffy....That sucker is in piles on the bench, floor and a few other places .....

Hope to have that bad boy ready to bolt back in the cat in a couple weeks.

The bands were probably the biggest worry as far as getting them into the $$$$ pipeline....

But good fortune and a curious neighbor got things moving fast....


Lets see ????????????/

Still need the 2 axle bearings and the 8 bearings for the drop boxes...

Gotta get the gaskets ordered from the folks in Idaho soon.....

There is a little work to get the new mounting hardware made for the diffy to chassis.

The outer axle to frame mounts are a bit tacky looking and they will need some TLC.....BUT EASY STUFF TO DO....


This digging up these big bearings by the bucket full for the diffy is a chore....
Thank gawd for ebay

Great fun....keeps my mind off the crap tossed at us on the news every night.

:thumbup::thumbup:
 

Snowy Rivers

Well-known member
Stopped off and saw "Grandpa" at the tractor shop and picked up the bands.

Fantastic job.... Best part...almost a neighbor....

The second carrier bearing showed up today....

Coming together.......

Gotta get some mowing done around the ranch here.

Probably get back on the cat tomorrow...

Ya'll have a safe 4th
 

Attachments

  • Newparts5.jpg
    Newparts5.jpg
    287.3 KB · Views: 138
  • Newparts4.jpg
    Newparts4.jpg
    301.4 KB · Views: 133
  • Newparts2.jpg
    Newparts2.jpg
    299.3 KB · Views: 131
  • Newparts1.jpg
    Newparts1.jpg
    411.1 KB · Views: 139
  • Newparts3.jpg
    Newparts3.jpg
    353.4 KB · Views: 134

Snowy Rivers

Well-known member
Got some time on the tractor mowing....more fun to work on the cat project....

Time to get after some tedious hand work.

The stuff that just sucks.

DEBURING THE SHARP GEAR TEETH.

A little die grinder is the ticket.

Some long stones designed for sharpening chainsaw chain work sweet.

Use the tip of the stone and when it breaks off...MOVE IN and go again.

One stone...one gear....

Really does a nice job of cleaning off the super sharp edges.

These teeth actually resemble a milling cutter and are hard...very hard.

The case is soft cast steel (Soft by comparison)


Tomorrow we get after the skinny pinion teeth.....the end closest to the threaded end...

Same treatment as on the big inner gear.....


Nice and smooth.....:clap:
 

Attachments

  • Deburingthe gears1.jpg
    Deburingthe gears1.jpg
    405.4 KB · Views: 143
  • Deburingthegears2.jpg
    Deburingthegears2.jpg
    249.8 KB · Views: 130
  • Deburingthegears3.jpg
    Deburingthegears3.jpg
    338.9 KB · Views: 149
  • Deburingthegears4.jpg
    Deburingthegears4.jpg
    170 KB · Views: 131
  • Deburingthegears5.jpg
    Deburingthegears5.jpg
    246.9 KB · Views: 132

Snowy Rivers

Well-known member
Went after the skinny pinions and got them all ready.

Son in law is poking at me to stick either a crew cab or extended cab pickup cab and front clip on the project.

We found a 94 chevy 1500 4x4 that is fairly clean inside.

Tranny is lunched....Cheap price too..

Likely be able to scarf the cab and such and then sell off the rest.

Thinking about this plan....

Will definitely be easier to get the cab up on the cat with this plan.


Just an idea.
 

Snowy Rivers

Well-known member
I agree on the space thing.

The Van was the most usable space...Big issue is all the extra wasted equipment that has to be carved off..

Getting an engine out is a royal pain, as these were designed to drop out the bottom.

I am fresh out of hoists......

Another thing (And I think the Son in law had the same idea....Sell the leftovers easily and recover the $$$$$)

Doing a Tilt front end would be easy and make service much easier....

The original 2100 design left a lot wanting as far as service access goes.

Mine was a tilt cab and that helped a lot.....


The idea of the cab forward would be cool.....but the crew compartment is not that roomy.


I would love a full crew cab, but the length is nearly too long.....

The Extra cab is 135" BBC (Bumper to back of cab) and this will put the rear of the cab just forward of the point where my exhaust turns up and heads out the back....

I have the fuel tank from the 2100 sitting in the barn....It is in great shape.

This tank can be mounted easily behind the cab.

Thinking about a small "Postage stamp" sized deck in the back to cover the big pipes, have the tank on the front end and room for a bit of stuff ?????/


The focus is still on getting the cat chassis finished up.

OC12 Back in
Drive shaft finished

But I want to consider all options.

The pickup cab will require FAR LESS steel to mount it to the cat chassis, and will add a lot less weight.....Plus it can be handled with the skid steer readily.

As with many projects the designs get changed as things move along.....


The cab forward would be cool though......


All things considered.....the cost of materials has to be looked at.

The current idea of getting the Ext cab PU should leave me with my cab and parts paid for and extra $$$$$ in my pocket.

As with the engine and Trans....It ended up being FREE....this is a very good price....


More bearings coming....

I currently have the following either here or coming

(2) 6311 carrier brgs (Here
(1) 1310 large pinion brg (Here)
(1) 6309 small pinion brg (In transit)

(8) 6014 drop box brgs (8 required 1 in transit) (Ordered one to look at the quality....over seas made.....I want "Touchy feely" befor I spring for all 8

(2) 5210 axle bearings (Will order these once the diffy is back in the cat..still need to finish machine the retainer rings)

Bands done and on the bench.

Compensator case all cleaned up, thrust washer issues dealt with, gears debured and parts final washed.....

Main case and drop boxes need to be finish washed.....Today likely.


Urethane diffy mounts need to be completed to be as close to original as possible (A guess as the stuff that came out had been thrashed)


All in all....I am pleased with the progress.....

Thanks so much for the support and the input troops.
 

Snowtrac Nome

member formerly known as dds
GOLD Site Supporter
can I make a cool suggestion, why not try a tilt cab like an Isuzu npr down in civilization where you live you can get a salvaged cab for a few hundred bucks.
 

PJL

Well-known member
Topwelder started on one of those tilt cabs. In the photos of the last Colorado event there is some sort of tilt cab converted rig.
 

Attachments

  • IMG_4908.jpg
    IMG_4908.jpg
    200.2 KB · Views: 94
can I make a cool suggestion, why not try a tilt cab like an Isuzu npr down in civilization where you live you can get a salvaged cab for a few hundred bucks.

Ha ha, great minds think alike! Scroll up a couple posts!

I had a Thiokol 3700 and purchased a Ford CF7000 to do exactly that. Never transpired sold everything and bought a Pisten Bully. Same basic idea.
 
Last edited:

Snowy Rivers

Well-known member
Well...I live about 25 miles south of Portland Oregon (Civilization)

I did some snooping on Craigs and did find a few Isuzu cab forward rigs..

No cab only deals..

A couple complete trucks for a couple grand.....


Yesterday I went looking for a wrench/socket for the N11 nuts that hold the carrier bearings on.

About all I got was the deer in the headlight looks... and whaaaaaaaaaaaaat ?????

Nobody had a clue.....

Found a kit with a bunch of the sockets $$$$$$$$$$$$$$$$$$$$$$$$$$$$


So....Made one today.

Piece of 3" Schedule 80 pipe and a chunk of bar stock....

Drilled and tapped some 1/4" holes...added 3 Allen heads to keep the tool straight....Welded on a heavy bar.....

Should do fine...Far better than a chisel and a hammer....


Thanks for the Isuzu Idea....

I will keep my ears open .

Maybe a GMC CAB FORWARD...
 

Attachments

  • Locknutwrench1.jpg
    Locknutwrench1.jpg
    271.4 KB · Views: 88
  • Locknutwrench2.jpg
    Locknutwrench2.jpg
    342.2 KB · Views: 101
  • Locknutwrench3.jpg
    Locknutwrench3.jpg
    404.2 KB · Views: 89

Snowtrac Nome

member formerly known as dds
GOLD Site Supporter
the Isuzu and gmc are the same trucks there are also mitsubisi fuzo trucks and Nissan ud. trucks I have a buddy in ca has one that he is parting out and there is a wrecking yard in Arizona that specializes in the Isuzu platforms so I cant imagine they can be that hard to come by
 

Snowtrac Nome

member formerly known as dds
GOLD Site Supporter
as I own a fc truck for a daily driver the down side of fc is ride quality especial on tracks the plus side is its a better use of space.
 

Snowy Rivers

Well-known member
With the Isuzu cab up front a shorty pickup box would fit on the rear...Add a canopy to the box and it could be a cool set up.

Where I am in Oregon (Newberg) there are a lot of wreckers close by....but the little cab forwards are not all that prevalent.....

One on Craig's list for $1200
Cab, frame, bits of the engine, rear axle....

Pretty filthy looking.

I did post an ad on Craig's to see what shakes out.

Maybe somebody has a dead one holding down the grass and wants it gone....
 

PJL

Well-known member
Check with Nikson, he's in Oregon and as I recall it was a tilt cab Isuzu he pulled the engine out of for his Tucker. Might have been wrecked though. I can't recall.


(Edit) Okay I found it on his Youtube, it is wrecked. But he got another transmission from somewhere. Worth a shot.
 

Snowy Rivers

Well-known member
A "G WAGON" OMG

Yes ...definitely spendy...

Gonna have to pass on that one...waaaaaaaaay beyond my pay grade...:th_lmao:

Would be cute though.

All fun's and games aside....I am getting into the Cab forward idea though.

Just gonna keep plowing along on the drive train and see what shakes out

Using an Isuzu cab would give things the look of a Pisten bully.

Paint it red and it would really look the part....:thumbup:
 

Snowy Rivers

Well-known member
Check with Nikson, he's in Oregon and as I recall it was a tilt cab Isuzu he pulled the engine out of for his Tucker. Might have been wrecked though. I can't recall.


(Edit) Okay I found it on his Youtube, it is wrecked. But he got another transmission from somewhere. Worth a shot.

I sent Bud a PM

We'll see what shakes

Thanks for the idea......

There has got to be a dead Suzzy out there that needs a home....
 

Snowy Rivers

Well-known member
More parts slowly drizzling in.

The outer pinion washers for the OC12 showed up and the steering band shaft seals.

With the washers here I can start getting the compensator case back together.

All the rest of the parts are cleaned up and ready to go.....
 

Attachments

  • Steering rodseal.jpg
    Steering rodseal.jpg
    542.2 KB · Views: 177
  • Outer pinion washers and steering shaft seal.jpg
    Outer pinion washers and steering shaft seal.jpg
    588.1 KB · Views: 178

loggah

Active member
SUPER Site Supporter
The original steering shaft seals were very thick with another steel piece in them to act as a rod guide,at the last of our running sprytes with the oc12 differential we double stacked the seals. The hole in the differential is deep enough to do it.
 

Jim_S

Gone But Not Forgotten
GOLD Site Supporter
I have no idea the cost of a body but GMC and Chevy had some neat looking snub nosed COE trucks in the 30’s and 40’s Would be a unique look.
 

Snowy Rivers

Well-known member
Loggah...
Mine was a mess (Entire thing was trashed by the previous crew)

The seals were mashed to hell....likely by an idiot with a hammer.

I can spin up some aluminum guides to fit behind the seal and help keep the seals alive??????

Jim

Those COE rigs will fetch big $$$$$

I am gonna keep my eye open for a Suzy cab forward.

Since they are made as a tilt cab already...will be easy to adapt it to the front of the 2100....

The old GMC COE are cool, but the restoration dudes will be all over anything decent.

OK

Today the diffy compensator went back together.....(HEAVY!@#$%)
I do not have an easy way to lift that beast up on the bench....so put down a piece of heavy particle board on the concrete floor.

Worked down there where it's safe...:thumbup:

That sucker went together quite well.

Greased up the new thrust washers I added to the setup....got them all in.

Timed the skinny pinions and got them in.

Just kept adding parts until the bench was bare (Except the old thrust washers and used cotter pins)

Cut some exhaust tube to be temporary fillers in place of the carrier bearings..

Wanted to keep the drums from falling off.

All nuts tight...just need to get a box of cotter pins and get 12 of those bad boys in place.

The unit turns very free all the way....

This is not my first Rodeo on one of these....just never did this big of one.

Last one I was in came from an Oliver HG (About the same as the C4 used in early Spryte)

Before that I did an OC6 crawler and an OC3.

But this was when I was in my early 20's.


Same game pretty much.....


I am going to be very happy when this bad boy is hanging back in the 2100.

Tomorrow the case gets washed out.

Still gotta order the gaskets from Snow cat Pat....

I can get the gear set back in and the drop boxes on....

Still need more of the 6014 bearings to finish the beast.........


WHAT A MESS THIS WAS.

Happy that it's usable is about the best thing....

A couple pix....

Gonna roll that sucker into a big plastic bag to keep it clean for now
 

Attachments

  • Diffy backtogether1.jpg
    Diffy backtogether1.jpg
    256.1 KB · Views: 155
  • Diffybacktogrther2.jpg
    Diffybacktogrther2.jpg
    266.2 KB · Views: 159

loggah

Active member
SUPER Site Supporter
We used to put the brake bands on the differential before we set it in the box,that way we didn't have to fight with rolling them in place, your doing good getting it done !!!:smile:
 

Snowy Rivers

Well-known member
Thank you.....

YESSSSSSSSSSSS

That's what I got planned

Put the bands on the drums....cinch up with a zip tie to keep them from being a PITA while stuffing the diffy carrier into the box.

As the thing is all the way down....this is he way to do it..

The new band material is a tad stiff...

Same stuff, just thicker due to being new..

The old stuff was nearly to the rivets....


GREAT FUN:clap::hammer::hammer::hammer:
 

Snowy Rivers

Well-known member
Cleaning up the drop box covers and the axle tubes this morning

The threads in the drop box cover are in bad shape on about half the holes
Some threads there, but not good enough

Going to countersink the holes from the inside and thread in flat head Allen bolts and locktite them

This will make a very sturdy repair of the area
The other option is to Helicoil them

The tool kit is one I do not have on the shelf

Gotta head to town and get the bolts in a bit

Will post pix later
 
Top