• Please be sure to read the rules and adhere to them. Some banned members have complained that they are not spammers. But they spammed us. Some even tried to redirect our members to other forums. Duh. Be smart. Read the rules and adhere to them and we will all get along just fine. Cheers. :beer: Link to the rules: https://www.forumsforums.com/threads/forum-rules-info.2974/

Astro van cat conversion

Snowy Rivers

Well-known member
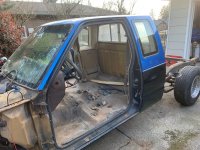
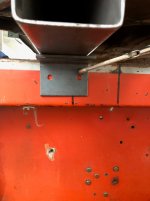
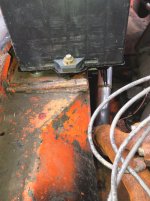
Cleaned up the weather strip and then tapped the metal closure down tight so it will grip the metal flange.

Oh yessssssssssssssssssss....gonna be sweeeeeet.

I am sitting there sucking up a cola and looking at things....then another can of worms jumped off the page at me.

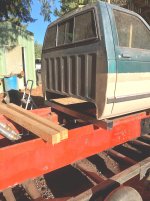
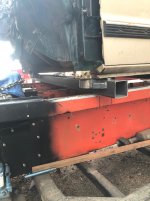
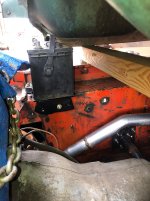
If ya look at the engine location and then look up at the heater core outlet/inlet tubes.....

Hmmmmmm

Gonna have to install a HIGH MOUNT burp tank above the heater core to keep the system from air locking.

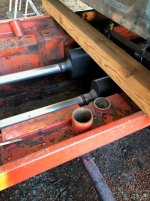
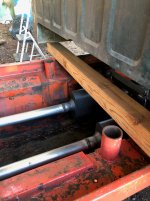
Also there is a very real possibility that a coolant booster pump may be needed to to get coolant moving through the heater core.....at least when the engine is not running at a good clip.

Slow engine RPM may yield a cold/cool heater air flow.

GM used some booster pumps on a few rigs and the aftermarket can handle it if the GM ones are tough to find.


These Franken rigs are never at a loss for another "What do we do now" type thing....


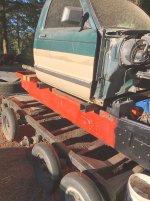
There is a handy spot on the outer edge of the cowl by the drivers door that seems to be of sufficient size to anchor a little burp tank....

Seems that this cooling system will need to be filled at the radiator until its full, and then capping the radiator and continuing to fill things at the top mounted burp tank.


I may try to get an aluminum radiator that does not have a fill neck/cap

So many ready made units available that having an extra cap will not be anything more than a DON'T OPEN HERE.....Put a higher pressure cap on the lower one and a 15 psi up top.......


Always a bag of worms to deal with.

But the plan is coming together.

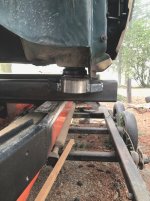
Been shopping for a floor mount shifter.

Decided after more measuring and figuring to go with the Winters Sidewinder cable shifter.

The Lokar looked simple and easy....Big issue is the height of the shifter from the tranny case. and at that distance the throw of the lever is A MILE LONG

The Sidewinder simply bolts to the floor and the 5 foot cable snakes down and around and sneaks up from the rear...

Lots of room...
 

Snowy Rivers

Well-known member
Weather is changing a bit, but it was a good day to work on the cat.....

Checking out the front area where the radiator is going to sit.....and a quick trip to look at the fan shroud off the S10 was in order.

The fan shroud fits between the sides of the 2100 body tub with a bit of room to spare.....

Can't seem to find a 16" or 16.5 fan with a clutch unit that will fit the Small block Chevy as yet....but the night is young :smile:

The 305 I have is a V belt drive....all the newer engines use the serp drive set ups....


With the fan shroud and the radiator thing sort of hashed out, the realization that there was no room out front for the battery as I had thought came full view.

Well now....with the cab elevation where it is the battery can sit right under the heater box on the passenger side of the rig.

We have had a brand new LH battery tray from a square body Suburban hanging on a nail in the shop for years.....not there any longer... :thumbup:

Grabbed that bad boy...did some measuring and then some cutting.

Trimmed off part of the support on the one side....made some spacers, cut out the bolt that was welded into the pan part and that tray sits on the shelf in the tub really sweet.

One spacer under the tray, use the original inner bolt flange and then a spacer to allow a bolt to come through the tub wall and anchor the inside edge.

Nice and secure....Factory battery wedge and bolt......

A nice full size battery fits in and snugs right down.....


Another issue outta the way....

I think some stainless bolts on the tray will be fine as well.....

The battery clears the RH cab mount by a bit....so no worries.

I am scouring the shelves for everything that can be used to fill the need.

Always things left from other projects.


After getting the battery tray fit and checked out I noticed that there is a nice area between the cab mount beams (Currently 4x4 wood but will be 3-1/2" box tube) this area is perfect for two air tanks to fasten down....

The tanks can mount such that the connections will be easy to access....and we can have a water drain on each one....


Will have to see just how much room we have in there......I want to have access to the tranny shift cable and such without the need to rip stuff all apart to get in there.......

Field service ya know.. :hammer::hammer:
 

Attachments

  • BATTERY TRAY2.jpg
    BATTERY TRAY2.jpg
    281.9 KB · Views: 314
  • BATTERY TRAY3.jpg
    BATTERY TRAY3.jpg
    352.9 KB · Views: 312
  • BATTERY TRAYT1.JPG
    BATTERY TRAYT1.JPG
    315.5 KB · Views: 312

Snowy Rivers

Well-known member
Pretty slack day today.

BUTTTTTTTTTTTTTTTTTTTTTTT....The last two bearings for the OC12 DROP BOXES showed up in the mail box today.

Boxes looked pretty dog eared and literally falling apart.

Date on the boxes said July 2 1988

Wow......
The bearings are in fine shape, still wrapped up in the factory plastic seal bag...

Now the diffy can get closer to being done......

Still need the axle bearings..."5210"

I want to try and get as much as possible done on the chassis before the fall rains get here......
 

Snowy Rivers

Well-known member
Getting some "ON paper engineering" done on the hood design today while we wait for a fella coming to pick up the left overs from the S10

Frame and such.


I think the design on the hood is pretty well worked out now.....The design allows the hood to slide forward about 10" and then tip up from the back.

The assembly will be located at the rear by two urethane cones that will center the hood up/down and Right/left

Two rubber stretchy hold downs slightly forward of center will retain the hood.

The pivot at the front will have a slot to allow the assembly to slide fore/aft and an open spot in the pivot bracket that will allow the hood to be removed easily without tools.

Being able to get the hood off and out of the way easily will be a real plus for changing a belt or other maintenance items....

Not going to win any awards for aesthetics as the pivot needs to be on the outside of the tub due to the radiator shroud, radiator and grille.....

But maybe things can be smoothed up to help a bit in the looks department.
 

Snowy Rivers

Well-known member
The day came to a close on a great note.

The S10 "WLT" went down the road about 20 minutes ago behind an 82 Chevy diesel pickup....heading home for a new adventure.....

More bone picking me thinks.

Fella wanted the 5 speed gear box.

Another chapter of history closes.....

So on we go..

Go cat go....:thumbup:
 

Snowy Rivers

Well-known member
With all the Drop box bearings here now I need to get the bearings on the drop gears and close that box up.

Got things cleaned up outside this morning and after breakfast the diffy gonna come out of it's hiding place and I am going to get that stuff done.

Still need new plugs for the drop boxes and some plugs for the forward lower ports on the main case (Cooler ports)

Not going to connect a cooler until after the maiden voyage is done and some other stuff is spiffed up a bit.

Seems that the 2100's without a blade and groomer did not come with coolers from Thiokol.

I think a cooler would be a great idea, but for now it's going to need to wait.

Getting a cooler pump on the diffy will take some thought as well as materials.
A belt driven hydraulic pump off the engine would likely be the easiest plan.
There are electric cooler pumps available, but I really want to limit the draw on the electrical system.
Still stewing on what to do for the air compressor/s
Engine driven pump would be sweet.....
The VIAIR 100% duty cycle electrics may be worth trying.....The engine mounted auxiliary pumps used for TIRE SERVICE rigs are pretty beefy....but $$$$$$$$$$$$$$$$$$$$

Many Jeepers use a York AC pump as they have their own oil sump and can be used as a stand alone air pump.

Plenty of room down front on the drivers side to mount a York.

Fasten the pump to the chassis and Vbelt drive it with a modified Serp belt tensioner to allow the engine to wiggle a bit....

Right now I want to get that gear box completed and filled up with oil before winter rains and such set in......

I had hoped to get the diffy back into the chassis this season.....We shall see...

With zero possibility of operating this year I really don't want the box just laying out in the weather......

Far better sitting in the corner of the shop.....

The biggest plan after the diffy is to get the cab mount beams finished before the cab comes back off for other work that's still needed down in the tub....

A bit here and a bit there......

Been since early July on the last two bearings for the drop boxes....but the price was so good I could not pass them up.

The shipped out of Macedonia ......Should have looked at ebay sale closer...

Oh well......


The 6014 bearings that just showed up were marked July 1988
The boxes look it too.

Falling apart and one nearly in shreds.....Plastic bag with the bearing is sealed....no worries.

The entire batch of bearings for this rebuild has been all NEW OLD STOCK....

Maybe should call it OLD...OLD STOCK.

Never used at any rate, and in new condition.....

I will snap a few pics of the drop box gears and such going back in.....
 

Attachments

  • DROPBOXBEARING].jpg
    DROPBOXBEARING].jpg
    66.3 KB · Views: 264

loggah

Active member
SUPER Site Supporter
Years ago i made up a differential cooler assemblys on 1200 sprytes buy putting a v belt pulley on the driveshaft, and mounting a coolent"oil pump" inside the tub directing the oil flow through a remote cooler. Needless to say it only worked when the machine was moving,but thats the only time it was needed. These machines had blades and hauled powder makers ,or mogul planers. I really doubt you will need any cooler not having any attachments hooked to the machine.
 

Snowy Rivers

Well-known member
I tend to agree on the cooler.

Thiokol did not put them on standard unless the machine had a blade and tools on the back....the Gasoline 300 6 cyl cats did not come with them either....

One of our members that lives close to me has a 2100 and it does not have a cooler.

We shall see how this thing works....then decide.....


Now....for today's progress.

Grabbed the box of bearings and went after getting the drop box gears in and the covers back on.


A NOTE.....THE TOP GEAR WITH ONLY THE INNER BEARING GOES IN FIRST....

Then the big bull gear with both bearings....and the long hub on the gears faces the case cover.

When this came apart some months back it was a mess and the bearings were in pieces.....


The new bearings (In piccy) many different brands with boxes that looked like a war zone......
Some of the bearings I got were either double shielded or double sealed.....just popped them out and into the trash.
All open bearings needed....

Bearings tapped onto the gears quite easily using a dead blow and a medium sized driver......


Stuck the gaskets to the case with some grease in spots around the periphery of the case.

Greased the cover bearing bores and GENTLY tapped the cover onto the bearings that were on the gears.

One of the service books I read some time ago mentioned jack bolt holes..?????

My gear box must be old as there is not any jack screw holes to remove the covers.....

Just a bit of wiggle and a putty knife got them off...


The covers went on extremely easy with zero issues.....

Installed the bolts and we are good to go.


Everything turns very smooth.....Far better than the first time I tried to move this beast. (When it came home) ....TOOK A BIG BAR ON THE AXLE AND A 4 FOOT PIPE WITH SERIOUS OOOOOOOMPH TO GET IT TO MOVE....

Amazing what clean gears and new bearings can do.....


I measured the register flange on the axle tubes and they fit into the lower bearing bore and just contact the bearing....With the gasket in place things will have a tiny bit of clearance (End play)


Looking good.

Got a call a bit ago...MAY have an S10 extended cab to bolt on the rear of the cat.

A stripped cab with doors and a few things...

This will certainly keep symmetry in this FrankenCat

Still not sure if the cabs need to go back to back....

Both have sliding back windows.....back to back with the rear suicide doors will look cool....

Guy is supposed to send me more pics of the cab tonight....

I hope it was a NON AC truck....I don't need another AC box to deal with..
 

Attachments

  • DROPBOXGEARS1.JPG
    DROPBOXGEARS1.JPG
    279.7 KB · Views: 245
  • DROPBOXGEARS2.jpg
    DROPBOXGEARS2.jpg
    334.5 KB · Views: 252
  • DROPBOXGEARS3.jpg
    DROPBOXGEARS3.jpg
    285.2 KB · Views: 240
  • DROPBOXGEARS4.jpg
    DROPBOXGEARS4.jpg
    391 KB · Views: 249
  • Possibleextrearcab.JPEG
    Possibleextrearcab.JPEG
    202.4 KB · Views: 274

Snowy Rivers

Well-known member
Well now

We went and took a peek at the Blue S10 EXT CAB this morning.

Not gonna drag it home.
Way too much stuff stripped off and gone to really entice me to fool with it.

Windshield hacked out, side EXT cab windows hacked out, rear slider hacked out..Door seals gone.....Way too much stuff to have to go buy.

The interior is stripped clean as well......

And the biggy.....waaaaaaaaaaay too long to fit without extending the frame out quite a bit.

Gonna snoop more to find a second cab for the back end....


Found a complete Isuzu Hombre cheap.... Bad engine but chassis decent.

We shall see..

No hurry.

Fiddling around with some snively stuff at the moment.

Nothing really exciting......

Cab mounts on order....


A lazy weekend.
 

Snowy Rivers

Well-known member
Bored to tears.....

GOOD DEAL.....
The last two seals for the band actuator rods were at my post box....:clap:

Installed the LH band actuator rod and wrapped that chapter up.

Stopped off at the hardware store and picked up a couple 1 inch pipe plugs and got those tightened into the lower front ports (Cooler ports)

Sort of nervous about having anything open that crap can get into...


Still need the pinion seal.....Prices vary a lot for that particular seal.

Still shopping.....Found a couple on ebay for $6 each.....probably should get them both and stick the extra in the spares box.....


Was not a real productive day.

Designed a solid plate wheel center for building new wheels for the machine.

Dropped the print off at the WATER BLAST CUTTER to get a quote.

If the cost comes in good I may order some 12" wheel blanks from Hey Wheel and try building some new wheels.

So far the other options are pretty slim.....

The tariff on the alloy wheels is just way out of my budget.

The two fronts are the spoke'd alloys with foam filling....all the rest are steel with tubes.

Seems that flat tires from the tire guides wiping off the valve stems must have been common....

Once the tire goes flat the guides beat the hell out of the rims.....several of mine are beat up badly.

Another day comes to a close
 

Attachments

  • Diffy complete3.jpg
    Diffy complete3.jpg
    118.4 KB · Views: 189
  • Diffy complete2.jpg
    Diffy complete2.jpg
    155.2 KB · Views: 194
  • Diify complete1.jpg
    Diify complete1.jpg
    134.9 KB · Views: 194

Snowy Rivers

Well-known member
The Cab mount urethane biscuits will be here in a few days.

Local auto parts stores wanted $120 for the set....Nooooooooooooooo $58 off ebay for the same parts (Brand and part number)

I can wait a few days for the savings.

The steel tube (3-1/2" square x 1/8" wall) will be in at the steel yard today.

Have them this afternoon. (Cab mount beams)

I machined up a pair of round tubes to act as receptacles for the urethane biscuits....

Need to fabricate the complete brackets for each mount.

Got the material all ready for the front mounts....no pix yet....

Really anxious to get the cab mounts finished and the top rail of the cat tub drilled for the bolts.

Then the cab can come back off........

After this work the cab will go back on easily and line up exactly....

Still need to yank the engine back out to complete welding the engine and trans mounts. (Tacked them really well earlier when I located the power pack)

Still need to get the diffy back in and finish the drive shaft.

The rear portion will remain stock....I need to shorten the front section a bit and weld the slip yoke back on.

Also need to finish the center support bearing X member.

Gawd.....so much work.....sure is fun though....

I wanted to do the dive shaft back earlier this summer, but the pinion flange had to be changed to the new piece I machined that mates to the CV shaft.

Then came the nasty mess in the diffy and the condition of the diffy was then an unknown quantity......
As it turned out it is OK

One step at a time.....

Maybe this thing will start coming together.....:hammer::hammer::thumbup:
 

Snowy Rivers

Well-known member
Slow day.

Got a call from the steel yard about an hour ago....the steel tube for the cab mount beams was there.

Tooled into town and picked them up.


Not much else happening...and its HOT OUTSIDE...

Ordered the pinion seal....be here about the 10th.

The urethane mounts be here about the same time.

Hurry up and wait......

The tube steel has been a hangup ....3-1/2 square is not a normal size for the local guys to stock.....the owner was in the other day and he ordered in a stick./

I got two 62" pieces.....I think somebody else wanted the rest....that works.

IF/WHEN another cab comes home I will worry about two more chunks.

The rear cab mountings will be a bit different though......
We shall see....
 

Attachments

  • Cabmount beams1.jpg
    Cabmount beams1.jpg
    435 KB · Views: 176

Snowy Rivers

Well-known member
Got some much needed work done today.

Fab'd up the two front cab mounts.......

I had some big azz heavy washers that were just the right size to support the urethane biscuits.

Welded the washers onto some schedule 80 pipe.
Added some angle pieces and some braces.

Good and stout..

I can't bore the hole for the biscuit pilot until I get the new parts.

I have a set of biscuits from a Square body Suburban....I can't be sure the pilot is the same size.

Take only a couple minutes per unit to bore them to size.

Assemble them and then get the square tube set correctly and then weld them in place.

Add a angle under the tube and bolt it to the Cat tub.....


The stand off for the biscuits in the rear of the cab will be different.

Same schedule 80 pipe.....Longer as the rear mounts are higher off the frame due to the floor of the cab raising up.

The plan is to use the schedule 80 pipe and mill a big slot in it to get the biscuits inside and to tighten the bolts....then weld the pipe to the square tube
 

Attachments

  • Cabmountbeam2.jpg
    Cabmountbeam2.jpg
    314.7 KB · Views: 155
  • Cabmountbeam3.jpg
    Cabmountbeam3.jpg
    318 KB · Views: 166
  • Cabmountbeam4.jpg
    Cabmountbeam4.jpg
    312.2 KB · Views: 165
  • Cabmountbeam,5.jpg
    Cabmountbeam,5.jpg
    94.7 KB · Views: 155
  • Cabmountbeam6.jpg
    Cabmountbeam6.jpg
    251.8 KB · Views: 169
  • Cabmountbeam7.jpg
    Cabmountbeam7.jpg
    313 KB · Views: 164
  • Cabmountbeam8.jpg
    Cabmountbeam8.jpg
    447.8 KB · Views: 157

Snowy Rivers

Well-known member
With this wretched weather (TOO HOT)

I got out and onto things at the BUTTCRACK A DAWN this morning.

The old stubs from the original roll bar were in the way.

Out with the SAWZALL :clap:

Very short job to hack those bad boys off at a very low level....Still need a bit of grinding to make them sort of even ....No big deal...just useless baggage now....


Cleaned up the new tubing, deburring the ends and washing off the pickling goop they spray on the stuff.

Jacked up the cab slightly to get the wood 4x4 out.

Slid the steel tubes in and added a 1/2" spacer to allow the front biscuit mounts to have a bit of clearance above the tube after the biscuits are all in.

Tubes adjusted for location (Final and exact position will be done just before welding the mounts to the tube.

The tube/beams extend far enough out from the cab to allow step/steps to be added as things progress..

At present....getting up into the cab is a bit of a stretch.....


The design seems to be working fine. The rear mounts will sit right on top of the tube/beam.... Slotted schedule 80 pipe with the big washer welded to the top will be the basis.

Facing the open slot of the tube rearward will allow easy access to the biscuits/bolts and such.

Gotta wait for the new biscuits to be able to stack things together and get the correct measurements to cut and machine the parts...
 

Attachments

  • Newbeamsin5.jpg
    Newbeamsin5.jpg
    325.2 KB · Views: 155
  • Newbeamsin6.jpg
    Newbeamsin6.jpg
    338.2 KB · Views: 145
  • Newbeamsin4.jpg
    Newbeamsin4.jpg
    335 KB · Views: 148
  • Newbeamsin2.jpg
    Newbeamsin2.jpg
    372 KB · Views: 158
  • Newbeamsin1.jpg
    Newbeamsin1.jpg
    313.5 KB · Views: 156
  • Newbeamsin3.jpg
    Newbeamsin3.jpg
    357.8 KB · Views: 158

Snowy Rivers

Well-known member
Lazy hot day today.

The pinion seal showed up today....

Sweet....
Now I can finish up getting the diffy box together.

Just the axles is all that's left now.

Get the bearing retainers machined and the new bearings on the axles.....be good to go.


Still waiting on the cab biscuit.....
 

vintagebike

Well-known member
Another thought

Now if the latest body configuration isn't just quite right... maybe this from 'The Three Stooges in Orbit' , 1962


0BB6E089-9BFF-4234-9A70-EE9A575E2FAA.jpeg
 

Snowy Rivers

Well-known member
Not much done today.

Yesterday we had a very very rare September "Arctic" front slip in to our East and we ended up with 60 mph winds steady with 80 mph gusts last night.

Raised hell.

Hot at 80 F at dark with all this wind and 15% humidity.

3 fires close by and all were stomped out before they did much damage.

Helluva mess out in the yard to clean up.....

The Cab biscuits and the air brake valve showed up today...


Weather is still sketchy with 20-30 mph winds for another day.

Power was out last night at 11 and back on about an hour ago...

Getting horses watered and chores done.

Spent nearly all night on fire watch and little sleep.

No more fires, but we are not outta the woods yet.

One spark and we could have an inferno on our hands......


Be safe my friends.
 

PJL

Well-known member
Major fire going on a few miles from my home. Last night I watched a UH-60 dumping water on it.
 

Snowy Rivers

Well-known member
We have a fire about 3-4 miles away....downwind thankfully.

The sky has been about like a 5 pm dusk in late December around here.

A dull redish brown cast to everything.

Wind is about neutral now......this will really help the fire guys.
 

Snowy Rivers

Well-known member
The cab mount biscuits showed up...

YESSSSSSSSSSSSSSSSSSSSSSSSSS

Bored out the pilot holes....Biscuits now fit.
As soon as the fire hazard abates things can be welded together.


And now....

The Air control valve to allow the brake pedal to run both bands came.

BUILDING PARTS THAT WERE NEVER MEANT TO FIT TOGETHER AND NEVER DESIGNED TO DO WHAT THEY ARE NOW GOING TO DO.

Took the old master cylinder from the S10 and cut the flange off the end.

Tossed it in the lathe and trued up the end.

Grabbed a chunk of 2-1/2" aluminum bar and whittled it down to form the adapter section to mate the air valve bracket to the master cylinder flange.

Had to machine off the foot pedal bosses to get a suitable flange so everything will mate up.

Some drilling and tapping yet to get the adapter to connect to the master cylinder flange and the foot pedal base.

The E3 valve bolts to the pedal base.

Pictures show the morphology.

Coming together.
 

Attachments

  • IMG_3485.jpg
    IMG_3485.jpg
    276.5 KB · Views: 190
  • IMG_3484.jpg
    IMG_3484.jpg
    231.1 KB · Views: 191
  • IMG_3479.jpg
    IMG_3479.jpg
    267.1 KB · Views: 191
  • IMG_3478.jpg
    IMG_3478.jpg
    265.2 KB · Views: 208
  • IMG_3477.jpg
    IMG_3477.jpg
    284.6 KB · Views: 205
  • Cabmountbeam19.jpg
    Cabmountbeam19.jpg
    234.2 KB · Views: 186
  • Cabmountbeam13.jpg
    Cabmountbeam13.jpg
    275.4 KB · Views: 202
  • Cabmountbeam12.jpg
    Cabmountbeam12.jpg
    238 KB · Views: 193
  • Cabmountbeam9.jpg
    Cabmountbeam9.jpg
    241.2 KB · Views: 192
  • IMG_3476.jpg
    IMG_3476.jpg
    270 KB · Views: 193

Bobcatbob

Active member
GOLD Site Supporter
“ Took the old master cylinder from the S10 and cut the flange off the end.

Tossed it in the lathe and trued up the end.”

Fabrication at its best!! Keep the pics coming! Stay safe out there.

Bob
 

Snowy Rivers

Well-known member
Yeah buddy.

Got busy this evening and finished the mount.

Only need to check to actuator rod length and possibly lengthen (New little rod) or shorten a touch so the pedal is at rest and the valve actuator has a bit of clearance.

Rod is the one that came in the S10 power booster.

Gawd I love it when a plan comes together :thumbup:

Just need to take it back apart and wash it all up.....Loctite the 4 screws ( Hidden under where the valve fits against the plate) and the 2 countersunk screws on the old mast cylinder flange as seen in the pics.
 

Attachments

  • IMG_3489.jpg
    IMG_3489.jpg
    318.2 KB · Views: 204
  • IMG_3490.jpg
    IMG_3490.jpg
    254.5 KB · Views: 184
  • IMG_3488.jpg
    IMG_3488.jpg
    305.7 KB · Views: 185
  • IMG_3487.jpg
    IMG_3487.jpg
    252.4 KB · Views: 199
  • IMG_3486.jpg
    IMG_3486.jpg
    209.3 KB · Views: 193

Snowy Rivers

Well-known member
Extremely smokey outside today....cut it with a knife.

I did get out and do a trial fit of the new valve assembly :thumbup:

I just need to make a new actuator rod.

The stock one is waaaaaaaaaaaaay too short...1-5/8" too short
 

Attachments

  • Air valve mounted1.jpg
    Air valve mounted1.jpg
    295.4 KB · Views: 174

Snowy Rivers

Well-known member
Hi all.

Way too smokey outside to do any recreational work.
I tried yesterday and it was just uncomfortable to breathe out there.

I gave the new air valve unit a quicky trial fit on the booster :thumbup:

I just need to cut and machine the longer actuator rod to go into the booster unit and that bad boy will be ready for prime time.....

The smoke is clearing some....but still pretty unhealthy to be out in it.

By Sunday I expect a big improvement.....

We are getting marine air filtering into the area now and the wind has switched to the s/sw and is thinning out the heavy smoke.....

Rain looking possible by Mon-Wed.....

Be safe troops.
 

Snowy Rivers

Well-known member
WEll ...it's Sunday morning at 7 am and the smoke is still nasty.

Buuuuuuuuuuuuuuuuuuut......we had a heavy dew last night.....this will help take the edge off the extreme fire danger...

Actually fired up the small pellet stove a bit ago.

House was 63 F this morning.../and the cat was complaining.

With the heavy dew it's safe enough to run a pellet stove.....

Almost zero chance of anything HOT getting out the pipe......

AS far as the cat goes.....not much happening....Still waaaaaaaaaay too dry to use the welder out there on the project....Rain coming though....

I am getting bored sitting around with so much work left to do before the fall weather closes in for the long dark wet season.....

Later troops
 

KickerM

Active member
Site Supporter
GOLD Site Supporter
Well head on over to MN, zero fire danger here and with your skill set we could have my cat ready to go in a week! Cattle working and Farming going full throttle here no time to even look at the skidozer...


Sent from my iPhone using Tapatalk
 

Snowy Rivers

Well-known member
Thanks for the offer.

Just too old and pretty well settled to want to go far any more.

I hate driving farther than town (5 miles):th_lmao:
 

Snowy Rivers

Well-known member
Sun was actually visible through the murk today....and the air was not as caustic as it has been.

Got after some work on the cat....

Got the cab mounts bolted on and the alignment within 1/16" for the cross beam.

Drilled the angle bracket that will end up bolting the beams to the cat tub.

Fooled around with the actuator rod on the foot brake valve......

Made the new rod.....got the length cut right and the inner sleeve in the boosted modified so the pedal travels far enough to activate the brake light switch and the air valve.

Still way too dry to weld anything outdoors......

But at least something got done.

Rain maybe by tomorrow night.

A bit of dampness and I want to get the mounts welded to the beams.

Then get them back out....finish weld and then get a coat of black paint on them before they rust up.......
 

Attachments

  • Cabmountbeam20.jpg
    Cabmountbeam20.jpg
    397.9 KB · Views: 141
  • Cabmountbeam21.jpg
    Cabmountbeam21.jpg
    403 KB · Views: 137
  • Cabmountbeam22.jpg
    Cabmountbeam22.jpg
    169.3 KB · Views: 143
  • Cabmountbeam23.jpg
    Cabmountbeam23.jpg
    264.1 KB · Views: 140
  • Cabmountbeam24.jpg
    Cabmountbeam24.jpg
    312.5 KB · Views: 138
  • Cabmountbeam25.jpg
    Cabmountbeam25.jpg
    269.8 KB · Views: 135

Snowy Rivers

Well-known member
Weather still sucks

Smokey as all get out.....but I decided to go downstairs to the machine shop and start machining on the rear cab mounts.

A lot different than the front ones due mostly to the height the mount needs to be off the cross beam. (Rear of cab floor has a step up)


Discovered I do not have enough large tube to make both rear mounts..

OFF THE THE STEEL YARD after breakfast :hammer:

I will get some pics in a while.....
 
Top