
-
Please be sure to read the rules and adhere to them. Some banned members have complained that they are not spammers. But they spammed us. Some even tried to redirect our members to other forums. Duh. Be smart. Read the rules and adhere to them and we will all get along just fine. Cheers. :beer: Link to the rules: https://www.forumsforums.com/threads/forum-rules-info.2974/
You are using an out of date browser. It may not display this or other websites correctly.
You should upgrade or use an alternative browser.
You should upgrade or use an alternative browser.
Jim's House Rebuilding
- Thread starter jwstewar
- Start date
jwstewar
Active member
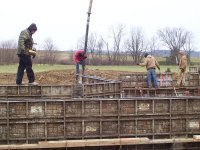
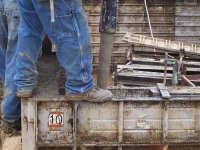
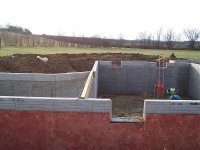
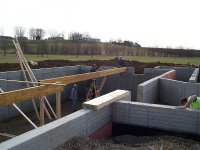
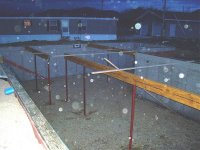
Here are some pics of the guys actually doing to the pouring. They had 2 or 3 guys down in the hole beating the forms all of the times to get the air out of it. I was actually a little surprised they didn't use a vibrator (it might have enjoyed it ) on it. They even had the owner of the company down in the hole beating on the wall. One of the young guys couldn't figure out why he "got promoted" and didn't have to be down in the hole and instead got to be on top placing the anchor bolts.
I'm having trouble adding the pics because of the air card. I'll have to try to add the rest of them later.
) on it. They even had the owner of the company down in the hole beating on the wall. One of the young guys couldn't figure out why he "got promoted" and didn't have to be down in the hole and instead got to be on top placing the anchor bolts.I'm having trouble adding the pics because of the air card. I'll have to try to add the rest of them later.
jwstewar
Active member
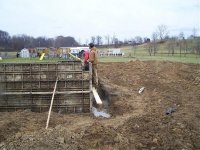
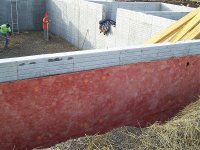
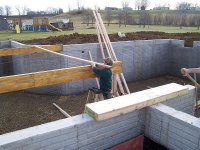
OK, sorry I missed my edit window. So I'm posting the pics now. Notice the guy in the 3rd pic. That is the owner of the sub-contractor company. That guy hit those forms for probably an hour and didn't stop. He was drenched in sweat when he came up out of that trench. The site foreman is the one that was controlling the concrete hose, he kept having the "accidents" with the hose and kept covering him in concrete if he was a little low in a spot and had to go back. The funny part was the owner got his payback. As they were pouring the porch (which is 4" inches higher than the basement walls) the owner kept telling them he was high, he response was "I don't smoke pot, I'm not high." Well, he was pretty quiet as he was shoveling the concrete back out of the wall like you can see in the last picture.
Attachments


jwstewar
Active member
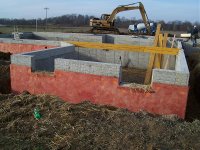
There I was snoozing pretty good this morning and all of a sudden I started hearing the pounding of hammers. They were taking the forms off. I knew I had to get out of bed and go move the vehicles out of their way. I told them they caught me by surprise , he said our builder got on to them and made them work. Works for me.
, he said our builder got on to them and made them work. Works for me.jwstewar
Active member
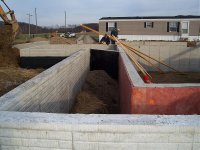
They worked and got most of the exterior forms down. They started crating them back up as well. Heard another truck running. Looked out and it was a load of lumber. It was the floor joists for the first and second floor. Because they don't have the back fill done the only place we could drop them was in the front yard. This had gotten torn up pretty good with the semi that brought the first excavator in. Once he backed that Freightliner in the tires just filled with mud and that is all she wrote. He couldn't go forward and he couldn't go farther back. We shoveled some gravel under the tires but it didn't help. He had a chain and I put a receiver on my Silverado. Took me a couple of tries, but my 1/2 ton Silverado with all 4 tires spinning in the gravel jerked that Freightliner out. One of the contractors was laughing at it and said he saw smoke rolling from all 4 tires, I knew I was spinning some, but really didn't want to spin that much as I didn't want to dig holes.
Ahh yeah, reminds me of the inevitable muddy mess associated with building a new home. At least you already have a tractor so you'll be able to fix the yard back when the building is done. I wasn't as lucky, I had to repair the mess by hand when we built.
jwstewar
Active member
I know that feeling all too well as well Doc. When we built the first time I had Dad's old Sears with a disc & plow. Didn't use those, but I did buy an old harrow for $25. I also had Dad's walk behind front-tine tiller that maybe only weighs 200 hundred pounds. This time around I still have that front tine tiller and the harrow. I also have a tiller for the Ryobi string trimmer, 20" Troy-Bilt Horse and of course the 60" Agric to go behind the New Holland. Along with the box blade, scraper blade I think I'll be in pretty good shape, but I am starting to throw some hints toward a landscape rake.
jwstewar
Active member
We are finally starting to see some progress. The framers are pretty upset the concrete guys took so long. They were supposed to have started December 26, but didn't get to start until January 8 so they sat around twiddling their thumbs for almost 2 weeks.
Anyway, here are a few shots from Tuesday. I stay home to fix a leak in our camper roof and got to be around for the action. It actually worked out well as the builder show up and I got to go over some things with him. We actually talked for about 3 hours.
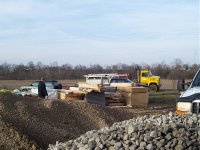
The first shot is of the stack of lumber and some of the vehicles in the parking lot Formerly Known as my front yard.
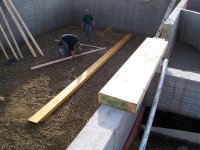
Next one is the first beam that was put in place and some of the waterproofing/insulation around the basement.
Last one is just of the cement mixer pouring the cap for the living room. I was impressed that truck went up that hill of dirt w/o any problems. The hoe operator had litteraly just spread that dirt out while the truck was out front waiting.
Anyway, here are a few shots from Tuesday. I stay home to fix a leak in our camper roof and got to be around for the action. It actually worked out well as the builder show up and I got to go over some things with him. We actually talked for about 3 hours.
The first shot is of the stack of lumber and some of the vehicles in the parking lot Formerly Known as my front yard.
Next one is the first beam that was put in place and some of the waterproofing/insulation around the basement.
Last one is just of the cement mixer pouring the cap for the living room. I was impressed that truck went up that hill of dirt w/o any problems. The hoe operator had litteraly just spread that dirt out while the truck was out front waiting.
Attachments

Last edited:
jwstewar
Active member
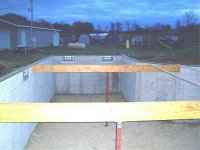
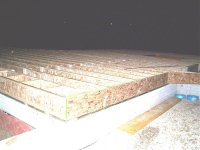
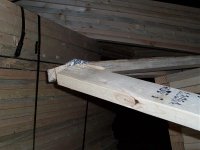
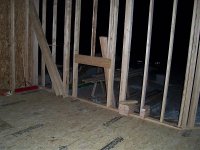
Here is a shot of one of the beams down in the basement. As well as a header for the opening to the crawl space under the living room. Finally there are some shots of the basement windows as well as the beams and sill plates in place.
Attachments
jwstewar
Active member
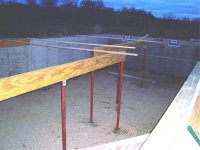
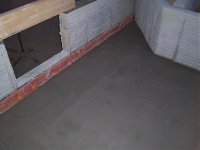
First shot is the concrete in the living room crawl space. Next is a better basement window shot. Next are a couple of shots of the beams and posts in place. Then yesterday they worked and got the floor joists in place. Looks like there might be a few more for the living room yet.
Attachments

jwstewar
Active member
Next are just some "extras."
First it is starting to look like a construction site.
We've had 3 issues/questions so far.
First when they brought the lumber the lumber company sent 2x4s for the sill plate instead of 2x8s. No biggie, the builder just went and picked up 2x8s and brought them to the jobsite.
Second when they dropped the trusses off yesterday they broke one. I'm a little upset w/ the builder at this point they are saying the framer should be able to fix it. I say every joint on it is messed up, several of the boards split, and they broke the bottom cord, the truss company should send a new one.
Last one is more of a logistical question. They said they wouldn't poured the basement floor until the framers had completed the decking on the first floor. I said OK, how will you get the concrete in. They said through a basement window. As you can see, these are already installed. I'm waiting to see how they pull this one off once the framer starts building the walls.
Attachments

jwstewar
Active member
I'm not sure why the one long beam couldn't go all the way through. I know the long one had to be offset because of the stairs, but not sure why it couldn't have continued. Maybe the way the upstairs walls are made they will put some weight down. Another thought, that is about where the sink and appliances end up, so maybe an offset to get away from the drains. I'll ask the builder the next time I see him.
I like the idea of waiting until the decking is complete before pouring the basement, just not crazy about the idea of going through the window as some damage is most likely going to happen to the window. They poured by basement right after the walls were done. It rained that night. All in all it isn't too bad, but I think its best if you can keep the elements (wind, sun and rain) away from the cement as it is drying.
It's looking good. I bet the wife is getting anxious and all ready placing the furniture in her mind.
It's looking good. I bet the wife is getting anxious and all ready placing the furniture in her mind.
I'm not sure why the one long beam couldn't go all the way through. I know the long one had to be offset because of the stairs, but not sure why it couldn't have continued. Maybe the way the upstairs walls are made they will put some weight down. Another thought, that is about where the sink and appliances end up, so maybe an offset to get away from the drains. I'll ask the builder the next time I see him.
Jim, Doc,
Probably to catch the weight of the load bearing walls upstairs. If the walls upstairs stopped short, there's no need to continue the beam with the post right there.
Jim a truss cannot be repaired unless the engineer that designed it approves the fix (in my jurisdiction). It's cheaper to just pick up another truss. I would not accept one damaged like that one is.
I like the idea of waiting until the decking is complete before pouring the basement, just not crazy about the idea of going through the window as some damage is most likely going to happen to the window. They poured by basement right after the walls were done. It rained that night. All in all it isn't too bad, but I think its best if you can keep the elements (wind, sun and rain) away from the cement as it is drying.
It's looking good. I bet the wife is getting anxious and all ready placing the furniture in her mind.
My basement was poured before it was coverd. What a muddy mess it was. It took numerous moppings of the concrete to get it clean.
Good info on the truss Jerry. I suspected the same but didn't have the knowledge to back it up.
Jim a truss cannot be repaired unless the engineer that designed it approves the fix (in my jurisdiction). It's cheaper to just pick up another truss. I would not accept one damaged like that one is.
Jim, Jerry's correct about getting the engineer at the truss company to provide a repair to the carpenters. Truss repairs are very common place and generally not an issue. The truss lay-out for your house is not complicated and the load on your roof is minimal in that it's not carrying additional stories or has excessive spans. The repair should be quite easy and more than adequite. Chances are the engineer will require either a plywood gusset with specific sized nails and spacing or the sistering of like material with the nailing pattern and nail size called out. The Truss company is accoustomed to providing repairs and it is a much quicker turn around than waiting for a new one to be built and delivered. The key is to make sure your carpenters get the repair information and perform it as stated. Your truss package should have come with a set of profiles and other technical information. They should get a sheet similar to one of the profiles identifying the details of the repair. If a framing inspection is required by your municipality the inspector should look at this for compliance. If not then by all means inspect it yourself to be sure they followed the repair instructions.
BTW....There shouldn't be any extra charge to you or the contractor (if there is one other than yourself) by the framers for the repair unless it is excessive or extensive and they should tell you that up front. Typically that's part of the deal. If there is going to be a charge then the truss company should pick it up as the breakage occured when they dropped the load.
jwstewar
Active member
Sorry, little late getting back. Just a few things going on.
It is a truss that will go out over the porch, since it won't be carrying a lot of weight,t he framer is just going to build a new truss and charge it back to the truss company.
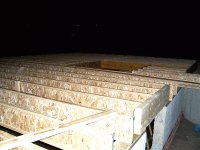
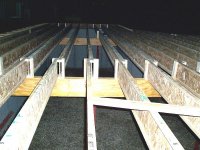
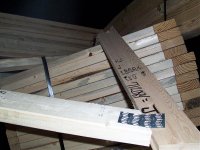
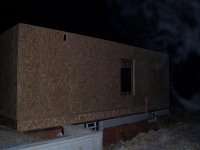
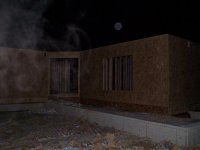
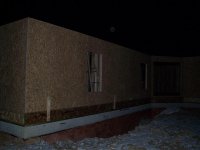
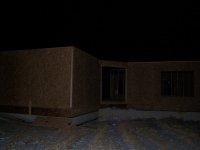
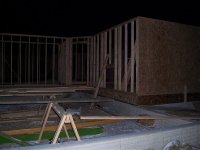
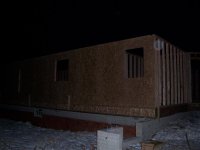
These guys aren't wasting much time. They've already framed almost the entire first floor. Sorry for the dark pics, but it was late and I haven't had a chance to lighten them.
It is a truss that will go out over the porch, since it won't be carrying a lot of weight,t he framer is just going to build a new truss and charge it back to the truss company.
These guys aren't wasting much time. They've already framed almost the entire first floor. Sorry for the dark pics, but it was late and I haven't had a chance to lighten them.
Attachments
jwstewar
Active member
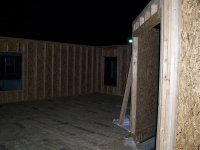
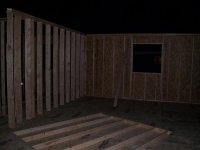
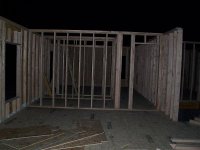
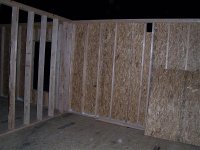
Here are some interior shots.
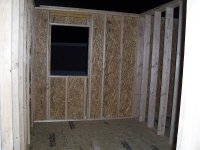
First is of the utility room that Monica claims isn't big enough. It is 7'6" x 12'
Next is looking from the dining room across the French door opening to the Great Room. Next is looking at the kitchen from the dining room.
4th is looking from the kitchen to the dining room with the guest bathroom and bedroom located in the back ground.
Next is a picture of the office which is 14 x 11 with 2 big windows facing the front.
Last is a picture of the living room including the framing for the Vent-free fireplace that we just decided to add last week. It will stick out in the garage a little bit, but not much and it will be in the "middle" of the cars so it shouldn't affect the parking area.
Attachments
Here are some interior shots.
First is of the utility room that Monica claims isn't big enough. It is 7'6" x 12'
I know it will work, but doesn't the header belong down by the top of the window?
I know it will work, but doesn't the header belong down by the top of the window?
The header can be at the top or bottom. It's all about load and so long as the support is there it's ok. Personally, I like the carrying member right under the top plate. It provides continuous bearing from one side to the other. Also, every now and again there is a change in the window opening. The header being at the top allows for an adjustment without ever having to involve the header. I notice that your guys appear to be using engineered lumber for your headers Jim. Is this something called out in the plans or did your framer elect to do this. I can see how this could be a cost savings for alot of reasons.
jwstewar
Active member
I know it will work, but doesn't the header belong down by the top of the window?
Jerry, I actually asked that same question. Got the same response from the builder that Cowboy gave us. Now the ironic part about this. There is a mistake in the location of the windows. They are too low. They are going to have to be moved up. The head at the top will make that a little easier. I'm not happy about the OSB going to have a joint below the window, but things happen and Monica isn't happy with the windows being low. She mentioned it to me last night even before I had told her. The builder just told me last night and wanted to know if we wanted them moved or left alone.
I notice that your guys appear to be using engineered lumber for your headers Jim. Is this something called out in the plans or did your framer elect to do this. I can see how this could be a cost savings for alot of reasons.
Not sure how that came about. I don't see where it was speced out in the plan - of course the plans we have don't include the engineered floor joists either. It called for so many doubled joists the builder decided to send it off to the joists company and had them redraw it for the engineered lumber. We were able to get rid of a couple of poles out of the basement and didn't have so many 2x12s doubled in the basement. So maybe when they drew it they recommended them. I know it is the first time the framers had used them. I know along the same lines, I know our builder had lunch with as he said "Our MicroLam Man" and the OMLM wanted to see our house
 I can't say so far one way or the other if I'm happy with them. I know the builder said these little 4x6 blocks are probably at least the equivalent of 3 2x10s.
Jim, I wouldn't worry about the joint in the OSB. Just ask the framers to put blocks in along the joint. That will be sufficiant. They may balk a little but it's no skin off thier nose so don't let them talk you out of it.
Typically, there is a savings in using the engineered floor system over standard lumber. There is also greater design flexability. Last and certainly not least is the qualitative aspect of an engineered floor system. From squeaking to movement and making openings for other systems like plumbing and electric. All around it's a better thing and I don't expect for you to be unhappy with them. I like to incorporate floor trusses with I-joists to accomodate HVAC and such. A floor truss is alot like your roof truss in that there are openings thru which you can pass things. This helps in placing things up in what is the ceiling of the basement and reducing the amount of "Living" space used for things like duct work and such. Gives a cleaner look if you will.
TJI is a brand name and has become the "Kleenex" of the engineered lumber world. Chances are the "Microlam Guy" is either a lumber company rep or a rep from the vendor that supplies the lumber company with thier engineered lumber. It is common for them to visit job sites. It's just a little politic-ing on the part of the lumber rep or vendor. The idea is to maintain those customer/ builder relations.
jwstewar
Active member
Oooopppps, just went back and reread my last reply and man even had myself confused. When we went looking I actually wanted the engineered floor joists. I was a little disappointed that the builder didn't do them standard, I was glad when they sent the plans off and had them redrawn for engineered lumber. The framer has used the engineered joists before.
I am neutral on the engineered headers as I didn't know they had them. These are what the framer hadn't used before.
I am neutral on the engineered headers as I didn't know they had them. These are what the framer hadn't used before.
jwstewar
Active member
Sorry, I hadn't posted in this thread in awhile. Been a little busy both at home and work. The air card doesn't help a whole lot. We are right on the fringe of service so sometimes it is good and sometimes...well it isn't.
I've kept the Pacasa site up to date that I listed earlier, but haven't posted here. Anyway, here are a few up-to-date pics.
I'm having trouble uploading attachments again. Visit Pacasa for now.
I've kept the Pacasa site up to date that I listed earlier, but haven't posted here. Anyway, here are a few up-to-date pics.
I'm having trouble uploading attachments again. Visit Pacasa for now.
Sorry, I hadn't posted in this thread in awhile. Been a little busy both at home and work. The air card doesn't help a whole lot. We are right on the fringe of service so sometimes it is good and sometimes...well it isn't.
I've kept the Pacasa site up to date that I listed earlier, but haven't posted here. Anyway, here are a few up-to-date pics.
I'm having trouble uploading attachments again. Visit Pacasa for now.
You might look into www.hughesnet.com they are highspeed internet from "space". I do installs up here in Alaska in my spare time for a friend. Have it here at the house and it requires no phone lines to operate, the dish is .78 of a meter accross so it isn't very big, and in most cases bolts to the side of the house or can be mounted on a pole. About $400.00 in the States and they run a hundred dollar rebate. I think they even finace the cost at about twenty bucks a month for two years now, at no interest.
Attachments
Last edited: