• Please be sure to read the rules and adhere to them. Some banned members have complained that they are not spammers. But they spammed us. Some even tried to redirect our members to other forums. Duh. Be smart. Read the rules and adhere to them and we will all get along just fine. Cheers. :beer: Link to the rules: https://www.forumsforums.com/threads/forum-rules-info.2974/

Tucker 442 front trunion issues

Track Addict

Bronze Member
GOLD Site Supporter
While looking at front drive issue I noticed two cracks front and back where trunion goes through.

Appears bushing is moving around now? Anyone taken one appart?

Other than crack parts appear to be in good shape. Will put up pics in a few
 

Track Addict

Bronze Member
GOLD Site Supporter
All my cats down in one weekend.

Looking at this design all the force tries to flatten out the v so it appears to be a weak spot.

Looks fixable but how does this trunion come apart?
 

Attachments

  • IMG_0977.jpg
    IMG_0977.jpg
    24.7 KB · Views: 430
  • IMG_0979.jpg
    IMG_0979.jpg
    60.1 KB · Views: 427
  • IMG_0980.jpg
    IMG_0980.jpg
    41.7 KB · Views: 431
  • IMG_0981.jpg
    IMG_0981.jpg
    43.8 KB · Views: 423
  • IMG_0982.jpg
    IMG_0982.jpg
    39.1 KB · Views: 431
  • IMG_0983.jpg
    IMG_0983.jpg
    38 KB · Views: 431
  • IMG_0984.jpg
    IMG_0984.jpg
    48.7 KB · Views: 430
  • IMG_0985.jpg
    IMG_0985.jpg
    34.1 KB · Views: 423
  • IMG_0975.jpg
    IMG_0975.jpg
    46.2 KB · Views: 430

Track Addict

Bronze Member
GOLD Site Supporter
Tough to see in pictures but two different cracks same spots on opposites sides. ONe front passenger one front driver.

Curious if those plates were added or factory ?
 

Snowtrac Nome

member formerly known as dds
GOLD Site Supporter
I'm no tucker expert, but I did stay at a holiday inn express once. the plates do look factory if that was just tube welded together if it had been me I'd have tried to put a plate on each side, one across the bottom
 

Track Addict

Bronze Member
GOLD Site Supporter
Am I correct that the axels need to come out to remove differential and the caps behind the hubs retain the axle?
 

Snowtrac Nome

member formerly known as dds
GOLD Site Supporter
if those older axles are built like amc axles or 9 inch fords yes you have 4 bolts holding on a retainer plate. remove bolts and pull the axle if it is like an amc 20 it will fall right out if it's like a ford with a unit bering you will have to use a slide hammer to pull bearings and races than unbolt the diff housing and pull it out the axle housing I would expect you re going to find a broken axle.
 

sno-drifter

Bronze Member
GOLD Site Supporter
Cracking in this area is very common for Tucker Sno-Cats. Here are some photos of work I just did on a 743. I discovered the repair job when I pulled the engine. You can see the additional strap welded across the rear tronion bearing frame. What I did not see is that that cross member was deformed up when the first repair was made. This causes the tronion to be not parallel with the frame which allows the fifth wheel to hit the frame when fully tilted and turning at the same time. To check this, tilt the fifth wheel fully and the gap between the fifth wheel and frame should should be the same front and back. This gap difference also can be the result of the pivot hole and tronion wear. I did the rear tronion repair after the engine was put back in the cat. Not easy, as the tronion can't re removed due to interference with the engine pan. REMOVE the engine to do this repair.
 

Attachments

  • DSCN1656.jpg
    DSCN1656.jpg
    62.1 KB · Views: 404
  • DSCN1658.jpg
    DSCN1658.jpg
    47.7 KB · Views: 400

sno-drifter

Bronze Member
GOLD Site Supporter
Here is the repair to the frame with the engine out and the additional strap goes from motor mount to motor mount. I put two stout pieces of angle across the mounts to ensure that the welding did not move them so the holes lined up when I put the engine back in.
 

Attachments

  • DSCN1623.jpg
    DSCN1623.jpg
    84.8 KB · Views: 395

sno-drifter

Bronze Member
GOLD Site Supporter
Yup. If it was my cat, the engine would come out. You want this repair to be 100%. check the bottom of the frame too. You may have to remove the sheet metal to see it. This also means you should drop the fifth wheel, or rather, lift the frame up from the fifth wheel.
 

Track Addict

Bronze Member
GOLD Site Supporter
So I have resided to the fact the engine has to come out which it should for a few things anyway. This has a chevy small block and new process 435.

Can I just unbolt the motor form the tranny and leave the transmission in place? If that works will I be able to rebuild clutch while I am in there?

Pulling motor and tranny out seems like a suck job and I think some cross members need to be cut on mine?
 

sno-drifter

Bronze Member
GOLD Site Supporter
Many of the later (late '60's on) Sno-Cats have a trunion cross member that bolts to the frame. I did not see this in your photos, but if you have it, it will make life very easy, as you will not have to pull the engine to get the whole cross member out where you can do a super job welding it up.
 

sno-drifter

Bronze Member
GOLD Site Supporter
I would pull the engine after removing the transmission. The trany is not supported by any frame mounting so it will be a challenge to leave it in the cat unless you figure a way to support it in the frame. To get at the areas to weld, you need the fifth wheel removed and you will probably lift the front of the frame to give better view and positioning to do the weld. You are to be congratulated for keeping every thing greased down there but it must be completely clean before welding.
 

DAVENET

Bronze Member
GOLD Site Supporter
Sno-drifter - did you find wear on your trunion pin and crossmember tube when you had yours apart? And if so, how did you repair?

I'm guessing all of the pin wear is on the top pressure point. Then again, the tube is probably the bigger problem with wear. Is there enough material on the pin that it could be turned down and that the tube could be bored to have sleeves inserted to tighten everything back up?? Has any Tucker owner done this before??
 

Track Addict

Bronze Member
GOLD Site Supporter
So with my setup the transmission is supported by the bell housing to the frame with brackets.

Maybe the small block chevy v8 model had this additional supports? So it looks like the way my v8 is mounted that I take the radiator out, six bell housing bots, the four engine mounts and there is enough room to slide the engine forward up and out. Will get some pics up.
 

sno-drifter

Bronze Member
GOLD Site Supporter
Hey Black and Blue,

Access:
I prefer removing the floor pan, and then pull the trany. Breaking at the bell housing to engine subjects you to misalignment when reattaching. You can do what ever clutch work with the bell housing on.
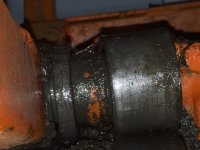
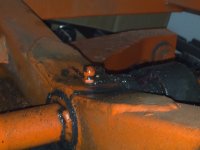
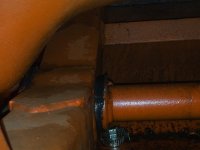
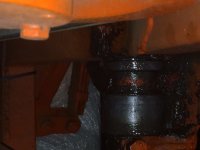
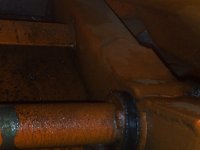
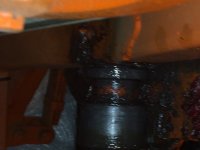
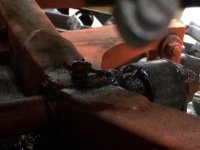
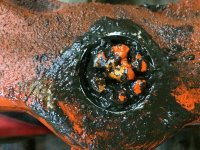
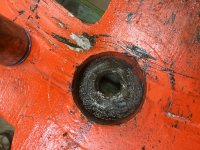
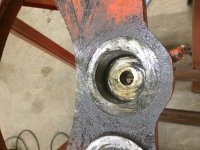
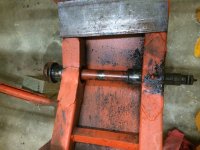
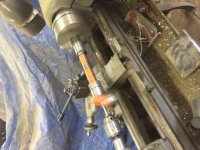
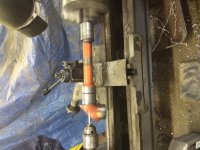
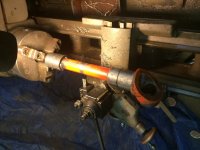
Trunon:
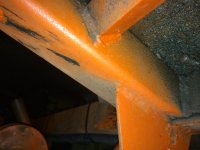
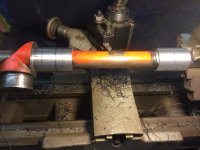
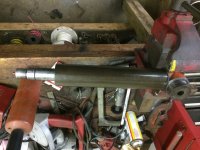
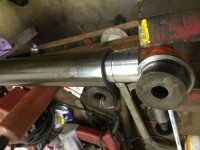
First of all it all needs to be SUPER CLEAN. V out for weld prep. I put a round piece of aluminum, machined to the OD of the trunion, during welding. You can clamp the cracked journal before welding. Make sure it all fits before welding. Front and rear frame bushings need to be in alignment. I have not seen one so bad that it needed a sleeve, and there is not enough thickness to do this. Easier to replace the whole journal, but everything needs to be in the right place. Check clearance at the bottom of your welds as the fifth wheel is right there when assembled.
 

Track Addict

Bronze Member
GOLD Site Supporter
got the front axel off. the trunion is a sloppy mess. Front is real worn. bushing or something bad is gone in there.
 

Track Addict

Bronze Member
GOLD Site Supporter
Tucker is on Crack!!! Looks like some repair time once this motor is out.
 

Attachments

  • IMG_1090.jpg
    IMG_1090.jpg
    57.3 KB · Views: 274
  • IMG_1092.jpg
    IMG_1092.jpg
    71.1 KB · Views: 275
  • IMG_1091.jpg
    IMG_1091.jpg
    60.6 KB · Views: 274
  • IMG_1088.jpg
    IMG_1088.jpg
    55.3 KB · Views: 272
  • IMG_1087.jpg
    IMG_1087.jpg
    57.3 KB · Views: 272
  • IMG_1086.jpg
    IMG_1086.jpg
    58.4 KB · Views: 283
  • IMG_1089.jpg
    IMG_1089.jpg
    51.3 KB · Views: 272

Track Addict

Bronze Member
GOLD Site Supporter
Definitely remove transmission then pull motor. Glad I made the floor s removable. Thre guys pulled tranny up through cab. 5 minutes 4 bolts engine out.

Thanks for the info. My way would have been tough!
 

Track Addict

Bronze Member
GOLD Site Supporter
Wtd welded nut below turn table in trunion?

What do I do here?
 

Attachments

  • image.jpg
    image.jpg
    106.8 KB · Views: 278

jask

Member
assuming this is the removable nut and bolt trunnion I would pilot drill it then get it up on the drill press and hog out the welded section of the bolt then replace them with a proper set with a pin... Or have at it with a die grinder and carbide burr.
 

Track Addict

Bronze Member
GOLD Site Supporter
Ground down the bolt and weld to the point I got the nut off. So there is some slop in here.

What does anyone know about adding bushings and tolerances?

The front trunion hole has about 1/32 each side. Back is less.

Tie rod bolt also needs bushing.

Where trunion goes in milled hole on turn table does not have too much slop. Thinking speedy sleeve will fix it.

Some one added a home made washer between trunion and table. Thinking this was due to slight wear on the table and clearance.

Input appreciated. Thanks in advance.
 

Attachments

  • IMG_1139.jpg
    IMG_1139.jpg
    107 KB · Views: 237
  • IMG_1140.jpg
    IMG_1140.jpg
    76.2 KB · Views: 240
  • IMG_1141.jpg
    IMG_1141.jpg
    73.4 KB · Views: 243

sno-drifter

Bronze Member
GOLD Site Supporter
Here are some photos of the repairs to the trunion and fifth wheel. I had more slop than that in the fifth wheel/ trunion hole. Set up the casting in a mill and bore it out, press in a steel bushing, and wha la you now have no slop. Before you take everything apart, know what the stack height needs to be. Refer to my comments and photos previously. The fifth wheel needs to end up horizontally parallel with the frame so that there is no contact between the two when the fifth wheel is bottomed out side ways ( see photo) and you are turning. See the previous comments and photo to see the equal gap at the front and back of the fifth wheel relative to the frame. You can control this by the height of the steel bushing in the fifth wheel when you bore it and the diameter of the roller on the front of the trunion. I made the bushing a press fit and heated the fifth wheel before installing.

Now would also be a good time to clean the fifth wheel and check and repair any cracks in the fifth wheel. I have had very good success with wire welding after prober prep and in some cases adding reinforcing matl.
 

Attachments

  • DSCN1657.jpg
    DSCN1657.jpg
    82.3 KB · Views: 224
  • DSCN1658.jpg
    DSCN1658.jpg
    47.7 KB · Views: 226

Track Addict

Bronze Member
GOLD Site Supporter
Here is where I am at:

1. The spare turn table I have is in excellent shape. Trunion cup fits tight so that solves that. Also minimal wear on the spare table. Mine has been rubbing and gouging for a while and the tapered tie rod is work out.
2. Trunion. It's oval/egg shaped from the years of wear. Measures 1.855 give or take on both ends. The frame bushings another story. they are also Egg/oval shaped measuring about 1.930 front and a bit less back.

What is the trick to tightening some of this up?
 

Track Addict

Bronze Member
GOLD Site Supporter
Things are looking up. Here is the plan:

1. Lose the metal shield/shit collector.
2. Turn Trunion down to 1.75 which should clean it up. Add grease groove.
3. Machine down pipe OD to fit through frame bushings.
4. Weld new tube in place which will be the bushing.
5. Dill out grease fittings
6. Add gussets.
7. Weld frame

https://www.metalsdepot.com/catalog_cart_view.php?msg=

I think that will fix it for my lifetime.
 

Track Addict

Bronze Member
GOLD Site Supporter
New plan is to cut out the two bushings and weld in the new steel 2/14 tub and re ti everything. If i make a bushing it will be thin and not as strong.

Plasma cut out the old in with the new.
 

sno-drifter

Bronze Member
GOLD Site Supporter
Hi B4B,

That is the correct way to do the repair. Make sure that the trunion center line ends up parallel with the bottom of the frame. See the photo #8 in this thread. If you look closely, you will see where the right rear ear of the 5th wheel was hitting the frame just below the red parts boxes. There isn't much wiggle room for miss alignment. The frame to 5th wheel gap can also be off if there is too much wear where the rear of the trunion rides in the 5th wheel hole or if the front trunion roller has worn.
 

Track Addict

Bronze Member
GOLD Site Supporter
Trunion turned. New full length bushing tube made. Very egged shaped. Had to take about 70 thousands off.

New grease groove. Much better setup.

Front one had the grease groove worn away on one side.
 

Attachments

  • IMG_1257.jpg
    IMG_1257.jpg
    66.6 KB · Views: 134
  • IMG_1258.jpg
    IMG_1258.jpg
    73.3 KB · Views: 134
  • IMG_1259.jpg
    IMG_1259.jpg
    57.9 KB · Views: 131
  • IMG_1260.jpg
    IMG_1260.jpg
    38.4 KB · Views: 132
  • IMG_1261.jpg
    IMG_1261.jpg
    64.4 KB · Views: 140
  • IMG_1262.jpg
    IMG_1262.jpg
    70.3 KB · Views: 135
  • IMG_1263.jpg
    IMG_1263.jpg
    55.3 KB · Views: 132
Top