Many people do not even know what a "culti-packer" is. I didn't until I saw this one at an auction nearly 20 years ago. An old farmer told me that if I was going to put in a yard at the house I was telling him I was going to build, he said that having a culti-packer would be a must. I took him at his word and ran the bidding for the very old and well worn implement all the way up to $40; where I won the bidding.
I put in about a 12 acre lawn where my house is back in 1992 and used this implement for hours and hours. It did a fantastic job with some additional weight added to it (it is made to have weight added on top). In the last 15 years I've pulled it out of the woods and used it here and there to put in a lawn for a relative or to re-do portions of my own lawn after I built my lake. Otherwise, this thing sat in the woods, uncovered, for the last 20 years; just like it had for the roughly 60 years it was in existence before I bought it.
A year or so ago I decided that I would do much of my lawn over again since I've added a pool, pool house, and installed various utilities and services underground. My lawn is not exactly smooth as it once was. Anyway, I almost couldn't find the culti-packer since honeysuckle had completely covered it. After dragging it out I noticed that the bearings on it were in really sad shape and I'd need to repair them if I were going to use this thing any further. I called around and found that about the only place that could get parts for it was Ken Sweet, over at "the other place". Unfortunately, when I spoke to Ken about purchasing parts for my culti-packer, he said that he wouldn't sell parts to anyone he didn't sell the implement to. Not sure he understood what I was asking, I again asked if I could buy replacement bearings from him for an implement , a very used implement, not a tractor. He refused, but offered to buy it from me for what I'd paid for it.
If he hadn't pissed me off so much, I may have sold it to him. I figured it was worthless. I then went to his site and found that he had several culti-packers like mine and he was asking between $1200 and $1500 for them! WTF!? Now I was even further ticked because it seemed to me that he knew exactly what I had and was really trying to take me on buying it from me after refusing to sell me parts. I'm sorry if you know Ken Sweet and do business with him, but I'll never do any sort of business with him. I've had dealings with his type in the past and hope to never deal with that type in the future. I figure word will eventually get around about someone who does business like that.
Sorry for the long intro, but that takes me to the point about 4 weeks ago when I decided that it indeed would be worth my trouble to fix my old implement. After doing considerable cleaning on it (hours and hours), I discovered that it was patented in 1922 and had a manufacturing date stamp on it from 1927. Cool. Since parts were basically not available for it, I begun the process of disassembly to get an idea of exactly what needed repair.
The 4 "barrel" ends cast into the side pieces had end caps on them and had castings on them that said "keep filled with grease". Hmm, never noticed that before; I'd never added grease. After taking all the pieces apart and then having them boiled clean at a local metal works place, I found all four of the barrel pieces cast into the ends were badly worn, and two of them had fatigue cracks in them. That is when I began my parts list and began drawing up what I would need to do to fix my culti-packer.
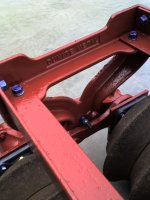
I used my plasma cutter and cut out four parts from 3/8" steel that would go over each barrel piece and also hold new flange bearings. The flange bearings would take the place of the wear parts that were once inside these barrel pieces that were not available. Besides, at this point, although I wanted to keep the implement as close to original as possible, I wanted it to be able to work. New high quality flange bearings with grease fittings would be a vast improvement on the original design. I drew out the pieces I would make and then cut out cardboard pieces. If done correctly they would not only hold the new bearings, but would prevent the cracked pieces from having any further stress on them after I welded up the cracks.
That takes me to the next stage. I had to determine the composition of the cast end pieces. Fortunately, they were cast steel, not cast iron. The metal shop that cleaned them for me told me that they were made of "dunite metal" (which after cleaning I found was stamped right on them), and I'd just need to use low hydrogen rods after pre-heating the parent cast pieces and my newly made pieces that would go on them. It sounded easier than it was. The cast steel was not exactly made free of any impurities. That made the welding a bit of a challenge, but I managed. I welded up the cracks, welded some strengthening criss crosses inside the barrels, and welded my new parts on from each side.
At that point I noticed that the original axles measured from 1.22" to 1.75", and everywhere between. In other words, they were badly worn and I'd never get a good seal with new bearings on the old axles. That is when I discovered how expensive 'stress proof' hardened 1.75" steel axles were. No turning back now, so they were ordered. Once in, I cut them to size and turned the ends on a lathe to match the original ends.
Once everything was welded, checked, and test assembled I was finally able to see that all fit perfectly. I then disassembled everything again; media blasted each part and painted them their original red color with hardened enamel implement paint. After it all dried I reassembled everything. At that point I decided that the original bolts and square nuts were just too far gone to put back on, so I replaced all with new grade 8 bolts, nuts, and washers.
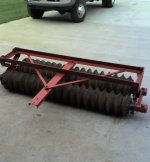
Today I rolled out the nearly completed implement and took a few pictures. I know, I should have taken pictures of the process, but I didn't think of it. All I need to do is to make a new hitch to go on it and I'll be finished. I'm pleased to see that it rolls extremely easy and everything works perfectly; most likely better than new with the high quality roller bearings. Sorry for the long post, but this simple repair became almost what you'd call a labor of love. Here are some pics I took with my phone today.
I put in about a 12 acre lawn where my house is back in 1992 and used this implement for hours and hours. It did a fantastic job with some additional weight added to it (it is made to have weight added on top). In the last 15 years I've pulled it out of the woods and used it here and there to put in a lawn for a relative or to re-do portions of my own lawn after I built my lake. Otherwise, this thing sat in the woods, uncovered, for the last 20 years; just like it had for the roughly 60 years it was in existence before I bought it.
A year or so ago I decided that I would do much of my lawn over again since I've added a pool, pool house, and installed various utilities and services underground. My lawn is not exactly smooth as it once was. Anyway, I almost couldn't find the culti-packer since honeysuckle had completely covered it. After dragging it out I noticed that the bearings on it were in really sad shape and I'd need to repair them if I were going to use this thing any further. I called around and found that about the only place that could get parts for it was Ken Sweet, over at "the other place". Unfortunately, when I spoke to Ken about purchasing parts for my culti-packer, he said that he wouldn't sell parts to anyone he didn't sell the implement to. Not sure he understood what I was asking, I again asked if I could buy replacement bearings from him for an implement , a very used implement, not a tractor. He refused, but offered to buy it from me for what I'd paid for it.
If he hadn't pissed me off so much, I may have sold it to him. I figured it was worthless. I then went to his site and found that he had several culti-packers like mine and he was asking between $1200 and $1500 for them! WTF!? Now I was even further ticked because it seemed to me that he knew exactly what I had and was really trying to take me on buying it from me after refusing to sell me parts. I'm sorry if you know Ken Sweet and do business with him, but I'll never do any sort of business with him. I've had dealings with his type in the past and hope to never deal with that type in the future. I figure word will eventually get around about someone who does business like that.
Sorry for the long intro, but that takes me to the point about 4 weeks ago when I decided that it indeed would be worth my trouble to fix my old implement. After doing considerable cleaning on it (hours and hours), I discovered that it was patented in 1922 and had a manufacturing date stamp on it from 1927. Cool. Since parts were basically not available for it, I begun the process of disassembly to get an idea of exactly what needed repair.
The 4 "barrel" ends cast into the side pieces had end caps on them and had castings on them that said "keep filled with grease". Hmm, never noticed that before; I'd never added grease.
After taking all the pieces apart and then having them boiled clean at a local metal works place, I found all four of the barrel pieces cast into the ends were badly worn, and two of them had fatigue cracks in them. That is when I began my parts list and began drawing up what I would need to do to fix my culti-packer. I used my plasma cutter and cut out four parts from 3/8" steel that would go over each barrel piece and also hold new flange bearings. The flange bearings would take the place of the wear parts that were once inside these barrel pieces that were not available. Besides, at this point, although I wanted to keep the implement as close to original as possible, I wanted it to be able to work. New high quality flange bearings with grease fittings would be a vast improvement on the original design. I drew out the pieces I would make and then cut out cardboard pieces. If done correctly they would not only hold the new bearings, but would prevent the cracked pieces from having any further stress on them after I welded up the cracks.
That takes me to the next stage. I had to determine the composition of the cast end pieces. Fortunately, they were cast steel, not cast iron. The metal shop that cleaned them for me told me that they were made of "dunite metal" (which after cleaning I found was stamped right on them), and I'd just need to use low hydrogen rods after pre-heating the parent cast pieces and my newly made pieces that would go on them. It sounded easier than it was. The cast steel was not exactly made free of any impurities. That made the welding a bit of a challenge, but I managed. I welded up the cracks, welded some strengthening criss crosses inside the barrels, and welded my new parts on from each side.
At that point I noticed that the original axles measured from 1.22" to 1.75", and everywhere between. In other words, they were badly worn and I'd never get a good seal with new bearings on the old axles. That is when I discovered how expensive 'stress proof' hardened 1.75" steel axles were.
No turning back now, so they were ordered. Once in, I cut them to size and turned the ends on a lathe to match the original ends.Once everything was welded, checked, and test assembled I was finally able to see that all fit perfectly. I then disassembled everything again; media blasted each part and painted them their original red color with hardened enamel implement paint. After it all dried I reassembled everything. At that point I decided that the original bolts and square nuts were just too far gone to put back on, so I replaced all with new grade 8 bolts, nuts, and washers.
Today I rolled out the nearly completed implement and took a few pictures. I know, I should have taken pictures of the process, but I didn't think of it. All I need to do is to make a new hitch to go on it and I'll be finished. I'm pleased to see that it rolls extremely easy and everything works perfectly; most likely better than new with the high quality roller bearings. Sorry for the long post, but this simple repair became almost what you'd call a labor of love.
Here are some pics I took with my phone today.