olympicorange
Active member
Doug is a good guy. very knowledgeable. he originally bought out the Ludlow tucker dealership. sounds like he has pretty well sold off the old stock. 

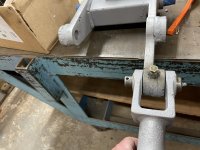
Took the pivot out for inspection and paint. We will see if it has cracks like
1BG after cleaning and blasting. That pin on the pivot the piston is frozen good. Got it to move a little then bailed because what's the point? Pivots fine.How much slop did you have in the pivot bearings / pin? Too much grease on mine currently to determine if it's the bearings or a worn pin, but I'm betting both. I can grab the bottom of my pivot and rock it side to side.
 But I always preferred the petrol or gunpowder sports. And we're hard to sneak up on by sea, so I just keep a little powder and the bulk tank full.
Are you going to rebuild your orbital? Mine is leaking bad so has to be rebuilt, but curious if it's as easy as removing the four 12-pt studs on top or if the shaft needs to travel with it. Never seen one out on here.