• Please be sure to read the rules and adhere to them. Some banned members have complained that they are not spammers. But they spammed us. Some even tried to redirect our members to other forums. Duh. Be smart. Read the rules and adhere to them and we will all get along just fine. Cheers. :beer: Link to the rules: https://www.forumsforums.com/threads/forum-rules-info.2974/

Tucker 1544 IRAN Project

Pontoon Princess

Cattitute
GOLD Site Supporter
I enjoy the detailed posts and explanations as well.

I had no idea this one was going to be this involved!

and there is no end to the corrections that can be made

BFT does an excellent job explaining in detail (most valuable/priceless) the issues and repairs, you are most fortunate to have him rebuilding a machine for you...I would love to have him rehab a tucker for me, say a 543

WBJr, you know Christmas is just around the corner, and with absolutely no disrespect to the BFT 'the bear' and just maybe giving him a little help with stress relief, you should consider using a certain Snow Trac over the Christmas holiday, it is available and can be drop off at the Bear's den, headed east again soon...

no takers so far on the steep and deep challenge.
 

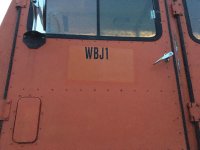
The Sweet Wbj1

Active member
GOLD Site Supporter
WBJr, you know Christmas is just around the corner, and with absolutely no disrespect to the BFT 'the bear' and just maybe giving him a little help with stress relief, you should consider using a certain Snow Trac over the Christmas holiday, it is available and can be drop off at the Bear's den, headed east again soon...

PP,

I literally :th_lmao: at this!!!!!
 

Pontoon Princess

Cattitute
GOLD Site Supporter
PP,

I literally :th_lmao: at this!!!!!


hope you don't hurt yourself, like busting a gut...:laughing your ass offffffffffff

pretty sure when the 'Bear' reads this he will have a few words for the 2 of us...no, a epic novels worth of words, very detailed
 
Last edited:

Blackfoot Tucker

Well-known member
GOLD Site Supporter
I had no idea this one was going to be this involved!


We didn't either! But when we find stuff that's not right, we can't pretend we didn't see it and not fix it.... so we make the required repairs. If it takes longer, and costs a few bucks...oh well. Believe me, we don't do this to put food on the table...or we'd starve.

I could not sell something I knew wasn't right, and sleep well. I'm certain Scott feels the same way.
 

DAVENET

Bronze Member
GOLD Site Supporter
I suspect some forum members are put off by my long-winded explanations and detail-oriented descriptions. Some also may not appreciate my unvarnished opinion of the Tucker factory’s product. (I have no sympathy for Tucker in this regard.) Believe me, it would be a lot easier and faster to post a few photos, add a few words and call it good. I go to the time and effort to provide the information for people who either may be considering a used Tucker that might have these issues, or already own one and aren’t sure of what’s involved to repair it properly.

Whew. I need a nap. :smile:

In all honesty it's cool seeing your posts from the point of someone that sees either poor craftsmanship, shoddy repairs or frame damage and knows how to fix the issue. And it has certainly opened my eyes as to why my frame is the way it is (doubled up on the bottom rail), although the way it was done still leaves me scratching my head.
 

Blackfoot Tucker

Well-known member
GOLD Site Supporter
WBJr, you know Christmas is just around the corner, and with absolutely no disrespect to the BFT 'the bear' and just maybe giving him a little help with stress relief, you should consider using a certain Snow Trac over the Christmas holiday, it is available and can be drop off at the Bear's den, headed east again soon...

no takers so far on the steep and deep challenge.

PP,

That's a very kind and generous offer. Scott and I have quite a bit of work to do to get the 1544 ready for WBJ1, but we should be okay time-wise (unless we find a bunch more Tucker "Easter eggs").

If WBJ1 were to take you up on that, and they have a lot of snow by Christmas, I suspect it might turn into a "Tucker appreciation event".... I can't speak to Colorado weather, but here in Northern Utah the cold temperatures have been setting records. We've had three snow storms so far, and thankfully most of it has melted at my house (still have fall chores to get done).

I know WBJ1 has a neighbor with a Tucker, so when (not if) the Snow Trac gets stuck the neighbor can pull him out. :clap:
Perhaps the lack of "steep and deep" challengers is a function of the respect forum members have for you and sno-drifter. He has probably forgotten more about "snowcatting" than most of us will ever know.
 

Blackfoot Tucker

Well-known member
GOLD Site Supporter
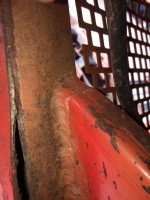
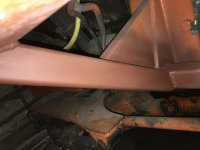
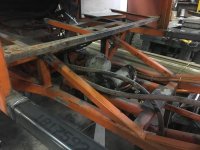
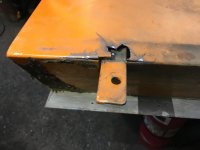
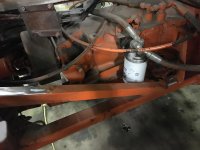
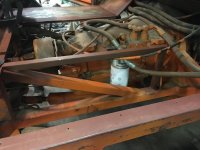
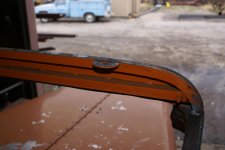
We had one more frame component to replace, the left front diagonal brace between the lower, inner frame and the upper, outer frame. Here are some before pics.

You can see the distorted “square” tube.

attachment.jpg

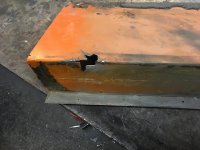
And where it was split by water that froze inside.

attachment-1.jpg

And here’s the new one installed.

IMG_2721.jpg

All previous Tuckers I’ve owned have had poorly designed, and poorly constructed floors. The same poor design and execution held true in 1986. On the Vail Cat we literally threw away the Tucker floor and started from scratch, which is pretty much exactly what we did with Thundercat, too.

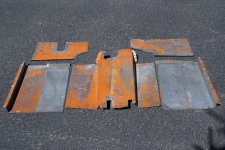
Here are the original Tucker floor components from the Vail cat laid out on a driveway.

DSC01543.jpg

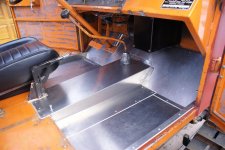
And the new one we made.

DSC01406.jpg

Here’s Thundercat; new rear and center floor sections.

IMG_0198.jpg

And the front floor, complete with an enclosure for the blade system control valve. (We also added the trapezoidal bracket for the transmission shifter. It’s welded to the dash and bolts to the valve enclosure. Everything is tied together and is very solid.)

IMG_0199.jpg

The floor in the ’86 had some serious shortcomings, as did the seat support structure for the front seats. Honestly, if this design were submitted as a college freshman engineering assignment I think the professor would give it an F, with a note to the student that his basic concepts of design and materials strength are so poor, perhaps he should consider a change in major to one of the humanities. You might think I’m exaggerating and/or trying to be funny, but I’m not. It really is that pathetic.

Tucker welded a piece of J-shaped steel between the rear door posts of the front doors. To that, they welded four roughly 15” lengths of 1" angle at 90º protruding forward. They drilled holes in the pieces of angle to attach the seat adjusting brackets, which in turn were bolted to the front seats. There were no supporting frame members under those lengths of 1" angle. None. Tucker then took some .062 aluminum sheet and bent it to attach to the support between the door posts and cut holes in the front of the sheet for the four pieces of 1” angle to penetrate. They bent the front of the aluminum sheet in a Z shape. The angle of the diagonal leg of the Z is so acute that you can’t get close to the diagonal leg to install a fastener through. And the bottom horizontal leg is so far forward it barely rests on the frame crossmember that, in theory anyway, should provide support. (The front floor panels overlap and sit on top of the horizontal Z leg.) Tucker then secured the aluminum sheet to the 1” angle pieces as "support” for the front of the seats with some small machine screws. All four locations where the aluminum sheet was attached to the pieces of angle were broken. Think about that for a second. That’s a 100% failure rate. And due to the shape of the Z, and minimal contact with the crossmember, there are no fasteners to secure it to the crossmember. This had to be obvious to the Tucker employee(s) who assembled this machine, but apparently they deemed it "good enough”. Pictures tell the tale.

Here’s a photo of the front seat support structure. You can see the J-shaped piece between the door posts, and the four front seat mounting pieces of angle protruding forward. (The E-brake handle is zip-tied to keep it out of the way, as we move the machine in and out of Scott’s shop to work on it.)

IMG_2690.jpg

Here’s a shot from the right front door looking left. Note the total lack of support underneath the protruding lengths of angle. The small diameter holes behind the larger holes in the front are where the aluminum sheet was attached with machine screws. Note also how little of the front floor panel is resting on the crossmember. As you look along that crossmember you’ll see that contact area remains minimal, and that there are no holes for any fasteners from the floor to that crossmember. The floor just sat on top and could rattle away. Because it wasn’t securely attached, over time one piece of aluminum on top of the other caused pretty significant wear to the aluminum sheet at the contact points. Brilliant Tucker, brilliant...


attachment-2.jpg

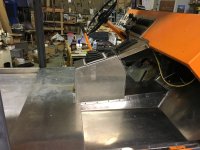
Despite my best efforts, my powers of description fail in comparison to photos. This is the right side of the sheet metal floor section and seat bracket support. The holes on the unpainted horizontal leg of the Z are where the Z attached to the front floor sections. But this was forward of the frame crossmember.

IMG_2711.jpg

This shows the piece of angle protruding through the sheetmetal, and you can see where the attachment point is broken out.

IMG_2719.jpg

What made this mess extra frustrating was on the one hand we wanted to start from scratch and create something to be proud of, but we have a hard deadline to meet, and we have to draw the line somewhere, or we’ll blow through yet another deadline. (We’re good at that!)

After some discussion, and considering the changes we had made to the frame under the rear floor, we decided we could re use the rear floor piece with a few inches cut off in front. The center floor would be thrown in the scrap heap and a new center floor design would be installed. We would make a new seat bracket that actually supported the seats properly. In front we would weld a piece of 3/4” flat bar to the front of the frame crossmember. That would add significant support underneath the rear edges of the front floor panels, and the panels could be attached to the flat bar. We could therefore re use the front floor pieces, though the transmission tunnel would need some modification at the rear, and the upper center floor section would get trimmed so it wouldn’t contact part of the transmission-which was evidently perfectly okay with Tucker (ARRRGGGH). We also decided to add some front underfloor supports. Tucker installed these in all my earlier Tuckers, but their “new and improved” design eliminated them. A strong, well-supported floor seems worthwhile, so we added sections of 1” square tube under the front floor on both sides. (Before the change, Tucker used 3/4” angle.)


Cidertom

Chionophile
GOLD Site Supporter
RE Square tube going round.
Since the vast majority of square tube started its life as round, and got violently abused to adopt the square profile, maybe they are just finally feeling free to self identify as round again.


or not
 

olympicorange

Active member
……… professionally done again, sweet,.... you know , if you & t/g/s were in charge of q/c & engineering (at Tucker) , we all wouldn't have anything to refurbish, on these old jewels,....lol.... (and tuckers profit margin),... nicely done....:thumbup::thumbup:
 

Blackfoot Tucker

Well-known member
GOLD Site Supporter
OO,

Thanks for the nice laugh. Reading that pegged the needle in my BS meter.

I sincerely hope Tucker has cleaned up their act in terms of design, engineering, and manufacturing quality. There was lots of room in all three areas for improvement....
 

olympicorange

Active member
OO,

Thanks for the nice laugh. Reading that pegged the needle in my BS meter.

I sincerely hope Tucker has cleaned up their act in terms of design, engineering, and manufacturing quality. There was lots of room in all three areas for improvement....

… I thought someone would chuckle about that post, just happened across it,... brought back the convo we had alittle while back,... free comedy I guess,...:smile:
 

Blackfoot Tucker

Well-known member
GOLD Site Supporter
I haven’t provided an update in a while but work has been continuing, and “real time” we took the 1544 out for operational test and evaluation this past Saturday. Snow conditions were pretty darn good in that we had a fair amount of snow for this early in the season and it was light and dry, so you sink in quite a bit. The 1544 performed pretty well, though we uncovered some relatively minor issues we want to correct before WBJ1 comes to grab the machine. It seems every time we take a machine out for testing, we find things we didn't uncover at the shop, and that seems to validate the concept of testing in real world conditions. Scott's shop is in SLC at an elevation of about 4,500' and the area we tested at was roughly between 7,000' and 8,500'.

After we got about a mile in from the trailhead we were making “first tracks” everywhere we went. I took a bunch of photos but I’ll only provide a couple.

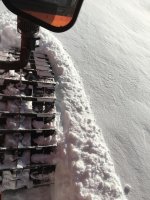
This gives you an idea of the snow depth and track penetration. For reference, with the machine on a flat surface the top of the grouser in the center is about 30” higher than the flat surface.

IMG_2835.jpg

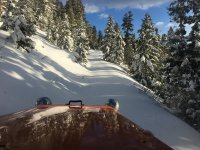
Perhaps this should be called “Where Snow Tracs Fear to Tread” (just kidding…maybe). Yes, the bent hood grab handle bugs me - Hugely. (A new one is on order).

IMG_2843.jpg

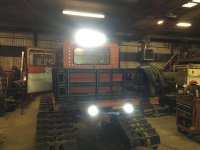
Incidentally, with WBJ1’s fetish for LED lights we thought it prudent to add some additional lighting to the 1544 before he uses it. We added a 42” curved LED light bar in front, a smaller 22” curved LED light bar on the rear cab roof, and two 18 watt LED back-up lights under the bed.

Here’s the front LED light bar.

IMG_2776.jpg

And the rear lights.

IMG_2772.jpg


Picking up the thread where I left off…

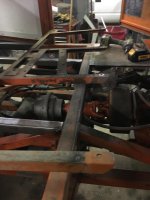
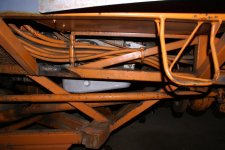
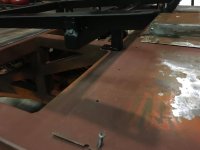
Here’s a photo of the frame area under the front floor. The shiny areas on the frame are where the new floor supports will be welded to the frame.

IMG_2724.jpg

With the supports installed. Note the use of red oxide primer. It serves two functions; one being the prevention of rust, and the other is that it acts as a barrier between the steel frame and the aluminum floor components. This prevents the galvanic corrosion that Tucker is so infamous for. This step is not expensive and it’s not time consuming, but the benefits far outweigh the time and money involved….unfortunately, the factory doesn’t see it this way.

IMG_2728.jpg

This is how Tucker did the floor support back in 1980. You can see the under floor support made from 3/4” angle. Note the hydraulic line setup that connects with the six way valve. If you look closely on the vertical floor support, you’ll see a short length of heater hose slit and secured to the vertical leg with zip ties. Then the multiple hydraulic lines are similarly secured to the frame with larger zip ties. Believe it or not, this was not a prototype effort made for testing. It was a production machine delivered to the customer in this configuration.

DSC01821.jpg

That was something that we changed on Thundercat. Yes, it was time consuming, but once you get it figured out one could make duplicate tubes for subsequent machines fairly easily. Look Ma: No zip ties! And this from a couple of knuckleheads... not a “professional” company. (Sorry for the tangent, but this is a pet peeve.)

IMG_1470.jpg

We talked about seat bracket configuration a fair bit. I’m quite tall at 6’4” and I liked the idea of lowering the seats slightly for those that aren’t “vertically challenged”. Scott, being 5’9”, was against a significant improvement, so the compromise was a 1/2” reduction in seat height. We don’t know who will eventually purchase the machine, so it didn’t make sense to lower the seats too much. We used 1”, .125” wall, square tubing for the frame and salvaged the pieces of 1” angle Tucker had used for mounting the seats. At the bottom of the legs Scott welded short lengths of flat material to provide tabs for installing mounting bolts. Similar tabs were welded to the frame crossmembers.

I’ve taken plenty of shots at Tucker for design and manufacturing issues, but the front seats installed in this machine are very definitely a step up from previous Tucker seats. When the machine comes back from its Christmas hiatus in Colorado with WBJ1, we’ll remove the seats and get them reupholstered.

Here’s a photo of the seat bracket in position with the left front seat attached. Tucker drilled holes in the aluminum floor and through bolted the seat belts to it. We chose to weld vertical tabs to the rear of the seat frame, and secure the seat belts to those. We arranged the support legs in a tripod configuration to leave the area under the seat frame as open as possible. That way items could be stored under the seats, if desired.

IMG_2725.jpg

Front mounting detail. Note how the legs of the bracket are positioned over the frame cross members for best support.

IMG_2726.jpg
 

Blackfoot Tucker

Well-known member
GOLD Site Supporter
Well, the 1544 is off to Colorado for Christmas with WBJ1 and his family...

But here's the chapter on the bed, actually done a few weeks ago:

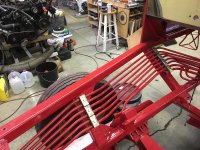
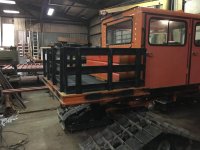
After getting the cab floors installed and the seats bolted back in place, it was time to move on to the bed. I suppose we could have cleaned up the areas where Scott had used an acetylene torch to cut the bed off, and re-welded the bed to the frame as Tucker did, but that would be kicking the can down the road in terms of not fixing the deficiencies of Tucker’s design and installation. Scott and I talked about different strategies for the bed, and weighed the various pros and cons. We decided to use the same type of expanded metal decking, and with the diamonds oriented the same way Tucker did! However, we would use both a different structural support member than the purlins Tucker used, and a different layout of those members, which is correct for the orientation of the expanded metal.

First though, we had to remove the existing expanded metal and the purlins. Then all the residual welds had to be removed in preparation for installing the new supports and decking. The rear bed frame rail was tweaked a fair bit. It looked like a previous owner had backed into something, and they had also badly bent the rear frame rail’s bottom flange in one spot. All of this needed to be sorted out before welding in any new pieces. We also decided to move the gas tank forward about four inches, which would would provide a little more useable bed space. Four inches doesn’t sound like much but the useable bed space is only about 42” front-to-back, so four inches is almost 10%. A 10% gain for not much work is an easy trade-off. Moving the bed that far forward also meant that the fuel tank would be used in place of stake body side boards. Note: a previous owner, for an unknown reason had cut the filler neck and it was held in place with some rubber hose and worm drive clamps. We removed the hose and Scott welded the filler neck back together.

Gas tank- bed interface.

attachment.jpg

When it came to straightening the bed I think it would have been amusing to watch the back and forth discussion. Scott is all about function and strength, and I want it to look good, in addition to being functional. (You can think of me as the little white angel on his shoulder.) After the first attempt at straightening the rear frame rail we had taken out the bulk of the bend and now it was only about 1/4” out. Scott proclaimed that acceptable, but I thought there was room for improvement, and after all, we’d only tried once. “It’s not a piano” Scott protested. “Yeah, but we can do better” was my reply. And so it continued... as I badgered him to get the bed rail as straight as possible. It’s not perfect, but it turned out pretty well.

For the new support members we decided on 4" x 2” rectangular steel tubing in 14 gauge thickness. We installed four, full length pieces parallel with the Tucker's side frame rails (which makes them perpendicular to the long side of the diamonds on the expanded metal decking). All four members cantilever over the rear Tucker frame adding a lot of support to the rear of the bed. We also installed some additional sections perpendicular to these new frame members to support the side frame rail sides, the gas tank, and the expanded metal decking. When you look at the data plate and compare the machine's empty weight to the max GVW the difference is 1,900 lbs. Subtract fuel and people, and there’s still quite a payload. But our impression of the stock bed was that it was under-engineered for the potential load. The purlins Tucker used are basically a U-shape, and the legs of the U have inward flanges at 90º. But there’s an open section, and if you weld something perpendicular to the sides there is no strength at all; the side of the U just bends inward. By using rectangular (or square) tube, one can weld the perpendicular support members and they will have plenty of strength. We think our design is superior in terms of supporting the bed rails, as well as supporting the expanded metal decking. The newly re-configured bed is bolted to the Tucker frame with four Grade 8, 1/2-20 bolts and Nylon nuts. What a (obvious) concept!

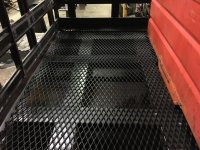
Here’s a pic of the bed floor after the bed was reinstalled on the Tucker frame.

IMG_2751.jpg

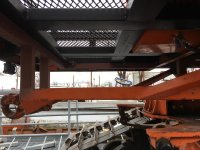
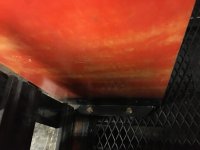
And an underside shot. If you look closely, you can see one of the bed to Tucker attachments.

IMG_2777.jpg

We also decided to change the way the gas tank is secured to the bed. Tucker uses two straps of flat bar over the top of the gas tank that are welded to sections of threaded rod. That system works okay, but we’ve run into a problem when trying to remove them. On a couple of occasions the nut on the threaded rod has rusted in place. Gentle persuasion didn’t work, and the idea of using a torch to heat the nuts right next to a vented gas tank could qualify one for a Darwin Award. And, depending on the configuration of the bed’s frame, those nuts can be a bit of a challenge to access as well. We had run into this issue before (on Thundercat) and we decided to weld some lengths of angle (with holes for mounting bolts) to the gas tank's end plates fairly close to the bottom. Using the end plates makes for a very secure mounting. Welding gas tanks is very dangerous if you don’t know what you’re doing. Scott does it fairly often, and so he takes the appropriate precautions. (I think I discussed this in the Snowzilla thread, and therefore won’t repeat the details.) I’ll confess the first time I saw him do this (nonchalantly, I might add) I wanted to be far away. But that seemed to be hugely lame, and I “trusted" him. Now, it’s a non-issue, except he liked it better when I was “concerned” and squirmed a bunch.

IMG_2749.jpg

When I bought this machine there were no side boards installed but there was a somewhat goofy rack system that bolted to the bed and the cab’s center roll bar. That was removed in pretty short order, but while working on the bed we had to weld the rack’s mounting bolt holes closed. Thundercat’s bed was originally similar in size to this one; 6’ wide and 4’ long. That seemed somewhat small and we made a new, larger bed for Thundercat that's 6 1/2’ wide and 5 1/2’ long. (The extra 18” length required stretching the Tucker frame 12”.) We still have the old bed and decided to use the sideboards from that on the 1544. Naturally, in true Tucker form, the layout of the pockets for the vertical posts was different, and the pockets for the vertical posts were slightly smaller. That meant a fair amount of extra work to get the vertical posts to fit in the pockets and modify the various parts for proper fit.

IMG_2752.jpg

Another view.

IMG_2754.jpg
 

Track Addict

Bronze Member
GOLD Site Supporter
Please give some feedback on the front roof LED bar. Have been contemplating the same setup. Interested in any reflecting or lighting of the hood which might be annoying.

Impressive work in your shop!
 

Pontoon Princess

Cattitute
GOLD Site Supporter
so what did you guys do for rear seats?

in the CF 544 and 1974 super cab forward, the gas tanks, of about 40 gallons are located under the rear seat, this was a factory design, and yes we all know about the lack of ?????

given your desire to have as much rear deck space, hey you did a quite a bit of work for 10% more room. gas tank under the rear seats seems like a good choice.

great that you and Scott, got-r-dun, just in time, for WBJR (chad) and hope all goes well, sure looks good and hats off to you two

thank you so much for great detailed photos and info about what was done...

wish I could afford you guys.

merry christmas
 
Last edited:

Blackfoot Tucker

Well-known member
GOLD Site Supporter
Please give some feedback on the front roof LED bar. Have been contemplating the same setup. Interested in any reflecting or lighting of the hood which might be annoying.

Impressive work in your shop!

Let's wait for light performance feedback from WBJ1. We installed the lights and tested them, but have never operated the machine with them, other than parking the Tucker outside Scott's shop, which isn't really a test. I can say the headlights, which are KC "Daylighters" installed by a previous owner, are not nearly as bright or as white, as the LED light bar.

I chose the 42" curved size due to more, as-in wider, light coverage than a straight bar. It's a "combo light" as there are some flood bulbs and some spot bulbs. Another factor was the factory light tabs under the roof skin. I think many Tucker owners are not aware Tucker welds what are basically large washers to the front and rear can roof supports for mounting lights. They're covered up with upholstery so you cant see them.

Here's a photo of one with the roof removed.

DSC01652.jpg

The holes in the tabs are 42 3/4" apart from center to center (no guarantee other machines are the same) and I was hoping the light bars mounting brackets would be pretty close. They were! We had to drill some small holes slightly outside the holes in the tabs but the mounting is quite solid. (The light bar in the rear was nowhere close to the tabs.)

I am amazed by how cheap LED light bars have become. I think the front and rear curved LED light bars and the two rear LED backup lights were less than a hundred bucks in total.
 

Blackfoot Tucker

Well-known member
GOLD Site Supporter
so what did you guys do for rear seats?

in the CF 544 and 1974 super cab forward, the gas tanks, of about 40 gallons are located under the rear seat, this was a factory design, and yes we all know about the lack of ?????

given your desire to have as much rear deck space, hey you did a quite a bit of work for 10% more room. gas tank under the rear seats seems like a good choice.

great that you and Scott, got-r-dun, just in time, for WBJR (chad) and hope all goes well, sure looks good and hats off to you two

thank you so much for great detailed photos and info about what was done...

wish I could afford you guys.

merry christmas

PP,

Thanks for the kind words.

Thundercat, a 1980 four-door Tucker, came with two rear "bucket" seats identical to the front seats. This 1544 had a rear bench seat that incorporates a large drawer underneath for "stuff". The downside to the drawer's height is that it steals headroom for rear passengers. I'm almost positive that was the factory setup in 1986.

We discussed the idea of custom making a gas tank that fits under the rear floor and bed area. That's a fair amount of work, and we had a hard deadline to meet, so we decided to just move the tank forward. It really didn't take much extra time. We had to cut out part of the front bed rail and weld in the areas that had been cut out for the two inside vertical post pockets. We had already removed the entirety of the expanded metal decking and the original bed support purlins, so when we were installing the new 4" x 2" rectangular tubes it was just a matter of locating them accordingly for the tanks new position.

We did get it done in the nick of time! After finishing the 1544 we had some minor stuff to do to the trailer, and Scott suggested moving the low-hanging license plate and it's light to a spot where it won't get bent every time the trailer gets used. Much better!

Couldn't resist having some fun with self adhesive letters...

IMG_2864.jpg


IMG_2866.jpg

Incidentally, after meeting WBJ1 in person (exceptionally nice guy, BTW) I've decided his new nickname is "The Steamroller". He looks like an NFL fullback!

Merry Christmas to you!
 

olympicorange

Active member
………. Hello BFT/TGS,...…. you guyz must be some kinda crazy busy out there, been awful quiet on the project. must be getting ready for Sun Valley,... :thumbup:...… hope all is well ,.... I think you did mention something about an operation, perhaps,....my crs ….. :smile:
 

Pontoon Princess

Cattitute
GOLD Site Supporter
'steamroller', I like it......

and if the tank does not fit well under the rear seat, I, myself would put it under the rear deck in the frame, it is space that is not being used and gives you more deck space, your work is a standard that all should aspire too, I am trying......

see you and your Scott in sun valley
 

The Sweet Wbj1

Active member
GOLD Site Supporter
I have recently been poking the bear for an update post. Hopefully with y'all poking as well he will give in!

I sure wish we could have made Sun Valley this year. It just was not in the cards.
 

Blackfoot Tucker

Well-known member
GOLD Site Supporter
To provide a thread update, Scott and I took the ignition timing information kindly provided by 1BG and OO and adjusted the timing accordingly. We also removed the butterfly plates from the velocity governor under the carburetor (essentially rendering it worthless), re-jetted the carburetor and replaced the transmission modulator. I had hoped to get some work done on the exhaust system, but my go-to exhaust guy no longer works at the shop he did for years, and of course they said they didn’t know where he was now employed. That’s disappointing as Fritz did awesome work. Finding someone with both the skill set and the desire to do the job to the best of their ability is not easy.

So the 1544 went to The Serenade as-is... and the engine continued to disappoint. I exchanged some texts with WBJ1 and I told him I was going to name the 1544 “Gutless”. Scott and I would figure out what was wrong with the engine, or it was history. Then the name would change yet again to “Gutless No More”. We decided to start the process by running a compression check on the engine. And…problems right from the get-go. Cylinders 1-6 were all between 120 and 125 PSI. That’s great, but number eight was only 105, and seven was much worse at 60. Uh-oh, that’s not good!


We are both big-time fans of fuel injection. Yes, a properly adjusted carburetor works well, but fuel injection offers a lot of advantages. Ultimately this machine will be sold, and we had planned on installing aftermarket fuel injection on the 360 engine; most probably the Holley Sniper setup. It’s a throttle body system, not cheap, and if you want to incorporate the ability to control ignition timing it’s even more expensive. I’ve read various articles on the swap with before and after results. It really doesn’t give you any more power; it improves engine starting and drivability. While the Sniper system is a big step up, we’d be spending a chunk of money and not gaining any additional power. And now, with a major engine issue to resolve, the cost of going that route is even higher.

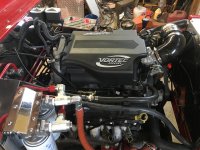
Plan B was replacing the Chrysler 360 Industrial with a GM LS series engine in a manner very similar to Snowzilla. After a fair amount of discussion over the last few days we've decided to go with Plan B. It’s not cheap, it’s not fast, and it’s not easy; but the result will be a significant step up in power, easier starting and a smoother running engine. The swapped system will have an OBDII port to attach an engine scanner for trouble codes - just like on a modern car or truck.

If you think about it, a carburetor's function is to meter fuel to the engine in a manner that makes the engine run well, which means the air-fuel mixture needs to be very close to the 14.7:1 stoichiometric ratio. That sounds relatively simple, and if your vehicle stayed at the same elevation and temperature, it would work pretty well. However, snowcat usage very frequently involves significant elevation changes and wide temperature swings. The LS engine fuel injection systems are way, way more sophisticated. They have multiple sensors; all feeding information to the engine’s computer on a continuous basis for the computer to adjust fuel delivery and ignition timing to make the engine run optimally under any conditions. A partial list of sensors includes a crankshaft position sensor, a camshaft position sensor, a mass air flow sensor, a manifold absolute pressure sensor and oxygen sensors (plural). The mass air flow sensor measures the “mass”, or density, of the air entering the engine. Air density is affected by elevation, temperature, barometric pressure and humidity. The manifold absolute pressure sensor can be thought of as a vacuum sensor measuring the vacuum inside the intake manifold; which basically tells the computer how hard the engine is working. The oxygen sensors measure the oxygen in the exhaust stream to determine if the fuel mixture is too rich, or too lean. Better information leads to better decision making, and that’s what a modern sequential multi-port fuel injection system is all about.

But the LS engine’s advantages continue on. For decades hot rodders have installed roller rocker arms and roller cams and lifters on their engines to increase performance. Those are expensive items, but the roller lifters allow camshaft lobe profiles that one simply can’t use with a camshaft designed for flat tappet lifters. The roller bearing design is also more efficient in terms of less valve train friction. The LS engines come from GM with all of those components…stock. For eons American auto manufacturers equipped their engines with stamped steel valve covers, oil pans and timing covers. And over time - they had a tendency to leak. LS engines use machined aluminum castings, which are much more costly from a manufacturing standpoint, but their increased rigidity and close tolerance machining result in virtually no leakage, and the gaskets can often be reused. (I guess for once the bean counters lost!)

There have been advances in metallurgy, improvements in casting technology, as well as in manufacturing processes. Back in the seventies and eighties, numerically controlled machine tools were starting to take off, but the machines themselves were, relatively speaking, in their infancy. The new machine tools today quite literally have capabilities that we wouldn’t have believed possible back then. The phrase “beyond our wildest dreams” is not inappropriate.

So with that (again) long-winded explanation, what’s not to like about the LS engine?

But we have two other Tuckers higher on the priority list to finish before we can get serious about yet another engine swap. At the end of the day it will make for a better machine, and that’s our overarching objective for all our projects.
 

Snowy Rivers

Well-known member
We have a 2007 Avalanche with the 5.3 Aluminum LS engine.
For a small cube little mill it screams.

So quiet too.

The 5.3 uses twin electric fans and when they are off you can hardly hear it run.

The 5.3 we have has the Active Fuel management (Shuts off 4 cylinders) I am not a fan of that system...

Do not put dual exhaust on an AFM engine...the sound is awful when it drops the 4 cylinders...

As mentioned...WHATS NOT TO LIKE ABOUT AN LS.

The distributorless ignition is just sweet......

Complete stand alone electronic controls are available.

Plug and play....just like LEGOS:thumbup:
 

Snowy Rivers

Well-known member
Could Opt for one of the 8.1 Moose motors....only down side would be that it would break things and eat fuel like a pig
 

Blackfoot Tucker

Well-known member
GOLD Site Supporter
Could Opt for one of the 8.1 Moose motors....only down side would be that it would break things and eat fuel like a pig


Our Thundercat project has an 8.1 engine. It's big and heavy, and it does have a healthy appetite for gasoline, but all that power sure puts a big smile on your face! I should perhaps point out that the 8.1 is really a torq-a-saurus. To quote Hot Rod magazine "They make more torque at 800 RPM than a factory LS1 produced at any point in its RPM range".

IMG_2153.jpg
 
Top