• Please be sure to read the rules and adhere to them. Some banned members have complained that they are not spammers. But they spammed us. Some even tried to redirect our members to other forums. Duh. Be smart. Read the rules and adhere to them and we will all get along just fine. Cheers. :beer: Link to the rules: https://www.forumsforums.com/threads/forum-rules-info.2974/

Bombardier Bombi Restoration

Bobcatbob

Active member
GOLD Site Supporter
Did you get the tracks mated up? Question. What air filter did you replace yours with?
I went with the stock filter (canister).....the filter is a

Donaldson P101222​


Bought on Amazon.....was about $47

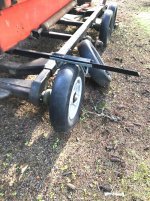
Tracks will be next weekend (machine is at our farm, weekend getaway from city life)
 

Snowy Rivers

Well-known member
BOB....Just an idea.... YANK OUT THE NEXT TO THE REAR BOGIES
This may give you enough extra room to allow the rear tires to move forward a bit more and then buckle the tracks up.

Stuff the other tires and wheels back in once the track is tight....

Just a thought...
 

Bobcatbob

Active member
GOLD Site Supporter
BOB....Just an idea.... YANK OUT THE NEXT TO THE REAR BOGIES
This may give you enough extra room to allow the rear tires to move forward a bit more and then buckle the tracks up.

Stuff the other tires and wheels back in once the track is tight....

Just a thought...
That is a GREAT idea. If I can’t get the splices to mate up, I’ll go with your plan (I’ve jacked the machine up to help initially, but would definitely do again to remove the rear(s) non tensioning Boggie). I’m hoping plan A will work, but if not, operation “Snowy River“ will be enacted.

Bob
 

Snowy Rivers

Well-known member
Hi Snowy

I ordered the belts from http://mn-outdoors.com/

I’m not sure on the exact length for your machine, but if you reach out to Boggie, he’ll likely have what you need.

Bob
I have my track issues handled.
3 ply belting ....Two 12" belts with the tire guides between @12"
This give me 36" tracks......Should be pretty good.....
1-1/2" x 36" angle grousers with a 12" box tube in the center where the tire guide bolts on.
The road wheels are 92" on Center on the 2100 Machine is still gonna be 10 foot 6 inches wide.
It had 57" tracks originally......
 

Attachments

  • Grouser1B.jpg
    Grouser1B.jpg
    298.1 KB · Views: 173
  • Grouser1D.jpg
    Grouser1D.jpg
    369 KB · Views: 161
  • Grouser1G.jpg
    Grouser1G.jpg
    410.5 KB · Views: 165
  • Grouser1H.jpg
    Grouser1H.jpg
    585 KB · Views: 168

Bobcatbob

Active member
GOLD Site Supporter
Finished the tracks over the weekend, took her out today .....ran like a top! (minus the snow) I was able to get both tracks connected using 5/8“ diameter 3 foot long bars, ratchet straps....and bolting together one row of holes, then installed the tire guides on the remaining row. Thank you all for your help!
 

Attachments

  • 25FE9183-0795-4B37-B74A-03D4ED995BCF.jpeg
    25FE9183-0795-4B37-B74A-03D4ED995BCF.jpeg
    690.3 KB · Views: 177

Bobcatbob

Active member
GOLD Site Supporter
And those who followed the Bombardier SW48 rebuild I completed two years ago, know I like to add a “precision badge” to my projects.

PwPTXpe.jpg


6mzKSdF.jpg


I created a program to machine the “Bombi Badge”.....if anyone would like one, private message me (no cost other than sending me the aluminum stock : 12” x 5” x 3/4”, a UPS label or USPS label to send the finished “Bombi Badge” back to you. I left the setup/tooling in the CNC.....I’ll keep it ready for 2-3 weeks for anyone that wants one.

sLgC9PC.jpg


Having fun!

Bob
 
Last edited:

HillBilt

Active member
That badge turned out sick! nice work Bob. Cat looks great, Im pretty jealous on how good of shape your tracks are in compared to mine
 

Bobcatbob

Active member
GOLD Site Supporter
That badge turned out sick! nice work Bob. Cat looks great, Im pretty jealous on how good of shape your tracks are in compared to mine
Thank you. The tracks were a good deal of effort.....but it made sense to bring them back to new. I can’t imagine trying to fix/replace a track in the middle of nowhere. Boggie provided the track material....worked out perfectly. The rest was sweat, cuts and bruises...lol.

Bob
 

Bobcatbob

Active member
GOLD Site Supporter
I’ve considered adding a winch to the front of the Bombi, but passed on it due to likelihood of needing it. Has anyone ever done a self recovery with their Bombi winch? Used it to help someone else?

Bombi is complete! Added a fire extinguisher as it’s finishing touch (the cherry on the cake)......will add a storage trunk and a spare tire later on. Now the hard part begins.....what to rebuild next?

dMydXDL.jpg


ueID4YS.jpg


Having fun!

Bob
 

HillBilt

Active member
I’ve considered adding a winch to the front of the Bombi, but passed on it due to likelihood of needing it. Has anyone ever done a self recovery with their Bombi winch? Used it to help someone else?

Bombi is complete! Added a fire extinguisher as it’s finishing touch (the cherry on the cake)......will add a storage trunk and a spare tire later on. Now the hard part begins.....what to rebuild next?

dMydXDL.jpg


ueID4YS.jpg


Having fun!

Bob

Man that thing is looking good!
 

ezroller

Active member
GOLD Site Supporter
Hey Bob, what did use for the gas tank bung in the front? I was thinking of making the hole a bit bigger since you can’t get the prints anymore.
 

ezroller

Active member
GOLD Site Supporter
I’ve considered adding a winch to the front of the Bombi, but passed on it due to likelihood of needing it. Has anyone ever done a self recovery with their Bombi winch? Used it to help someone else?

Bombi is complete! Added a fire extinguisher as it’s finishing touch (the cherry on the cake)......will add a storage trunk and a spare tire later on. Now the hard part begins.....what to rebuild next?

dMydXDL.jpg


ueID4YS.jpg


Having fun!

Bob
Come on Bob, don’t be bashful. Let the pictures fly. Let’s see the inside and some up close shots. ?
 

Bobcatbob

Active member
GOLD Site Supporter
Hey Bob, what did use for the gas tank bung in the front? I was thinking of making the hole a bit bigger since you can’t get the prints anymore.
I used a leftover “Bombardier“ badge I machined for the SW48.....it had a few minor errors in it....and it was the perfect size to cover the fuel access hole in the nose (the part is 6” in diameter). Painted it black, good to go. Here’s a few pics of a finished one (the most difficult part was painting the cavity...about 1/8” depth.....had to make a precision mask).

Trpf0c7.jpg


IT2VJ7M.jpg


V3RiX6e.jpg


Bob
 

ezroller

Active member
GOLD Site Supporter
you leave these snowcats with a better than factory touch... Top shelf man!!!!:respect:Wish I had a mill and some skills to run it... I've acquired cad skills which at least allows me to pay someone to do it.:ROFLMAO:
 

Bobcatbob

Active member
GOLD Site Supporter
you leave these snowcats with a better than factory touch... Top shelf man!!!!:respect:Wish I had a mill and some skills to run it... I've acquired cad skills which at least allows me to pay someone to do it.:ROFLMAO:
Thank you.

CAD is such a great tool (vs drafting). My chicken scratch handwriting /drafting skills no longer posed an issue once I learned CAD (I actually learned on Auto Cad, version 1 .....1986).....it was a quantum leap.
 

Cidertom

Chionophile
GOLD Site Supporter
On the extinguisher, consider a cover. vinyl? Pleather? I've seen ice buildup to the point the extinguisher wouldn't let go of the mount, much less operate.
 

Bobcatbob

Active member
GOLD Site Supporter
On the extinguisher, consider a cover. vinyl? Pleather? I've seen ice buildup to the point the extinguisher wouldn't let go of the mount, much less operate.
I was considering a rubber cap over the valve, but a pleather cover for the unit....much better idea. Thanks Tom.
 

Bobcatbob

Active member
GOLD Site Supporter
It’s seems like fire seems to be a common theme with snow cats? Am I wrong??
I’ve seen a couple rebuilds in here that started with “so I bought this after a fire”.....but I think it’s forest fire’s or the like. I add fire extinguishers to every vehicle.....cheap insurance.
 

Backyardski

BackyardskiLima
GOLD Site Supporter
I’ve seen a couple rebuilds in here that started with “so I bought this after a fire”.....but I think it’s forest fire’s or the like. I add fire extinguishers to every vehicle.....cheap insurance.
Not all are forest fires, some are even on purpose
 

Attachments

  • 16712356-D279-4A28-8AF8-491D674FE43D.jpeg
    16712356-D279-4A28-8AF8-491D674FE43D.jpeg
    375.7 KB · Views: 158
  • BA7B7399-B654-468C-A07E-1957E829DF30.jpeg
    BA7B7399-B654-468C-A07E-1957E829DF30.jpeg
    494.3 KB · Views: 164

Cidertom

Chionophile
GOLD Site Supporter
One fun fact for those that have extinguishers on mobile equipment: Monthly turn it upside down and shake it. Or at time of use, remember to turn upside down, tap againgst something then shake before using it. The powder will pack and may not work well.
 
Top